
22: Chapter 21. Edit lighting and create a video
- Page ID
- 13205

 Session Objectives
Upon completing this session, students will be able to:
(CO 1) Save and load presets
(CO 2) Set and adjust artificial lightings
(CO 3) Create a walk-through video
 Session Highlights
At the end of the session, students can create the graphics below.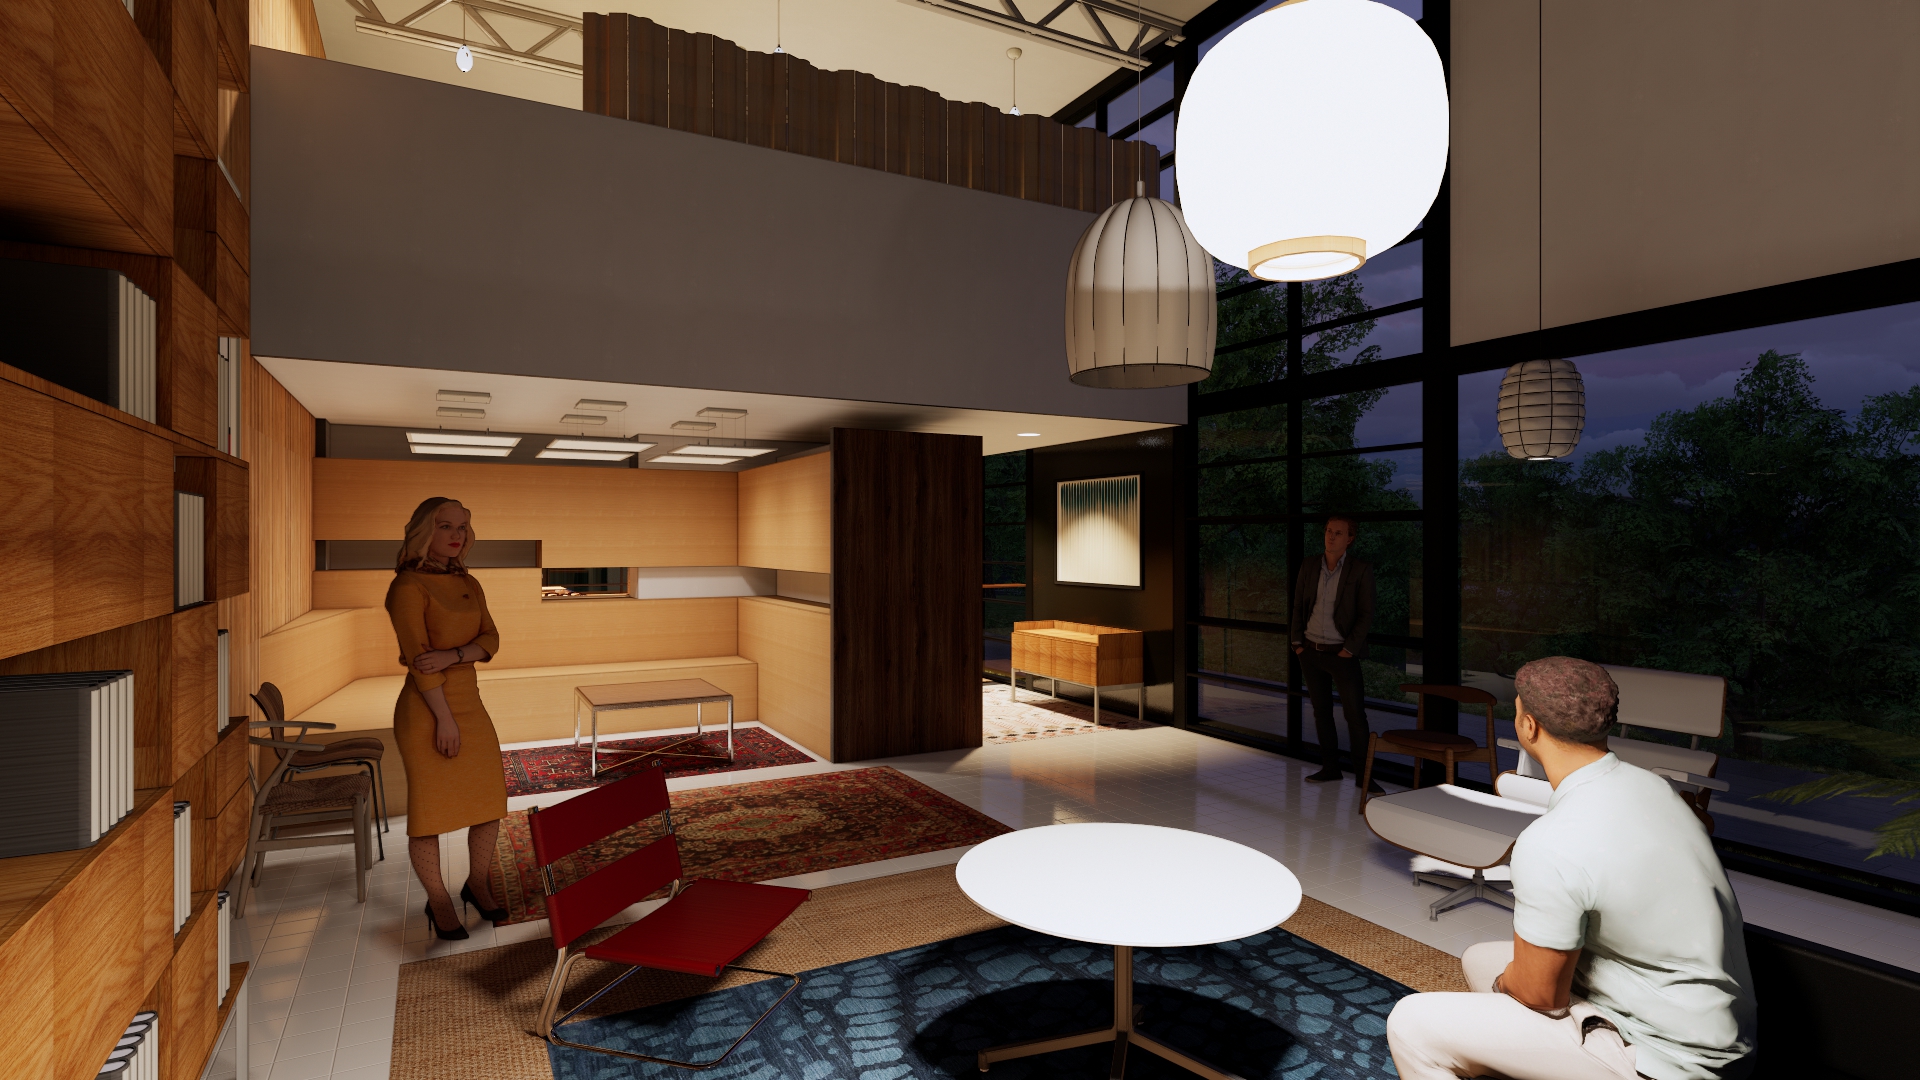
 Lecture Contents
(CO 1) Save and load presets

A YouTube element has been excluded from this version of the text. You can view it online here: https://iastate.pressbooks.pub/visualgraphiccomm/?p=114
The saving and loading presets are very helpful if you need to render multiple images. You will save a lot of time and produce consistent image qualities.
You can save the visual setting that you modified
- [STEP 1] Click Presets
- [STEP 2] Click Save Preset > Save to Project or Save to File
- [STEP 3] Name the preset
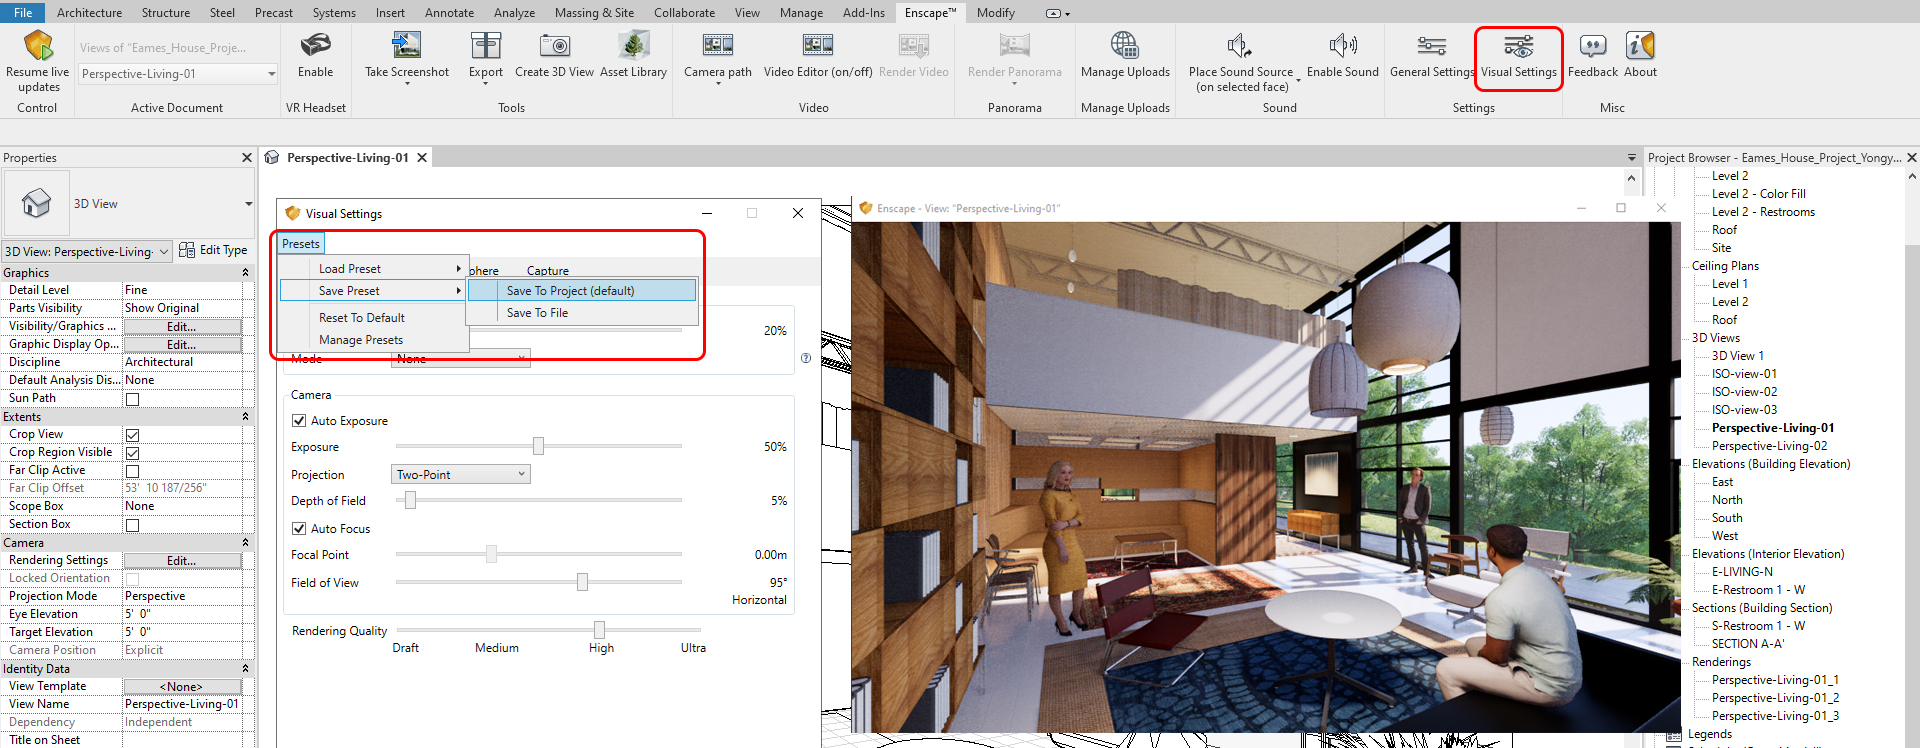
- It is recommended to save three types of preset [Perspective-Day, Perspective-Night, and Isometric]
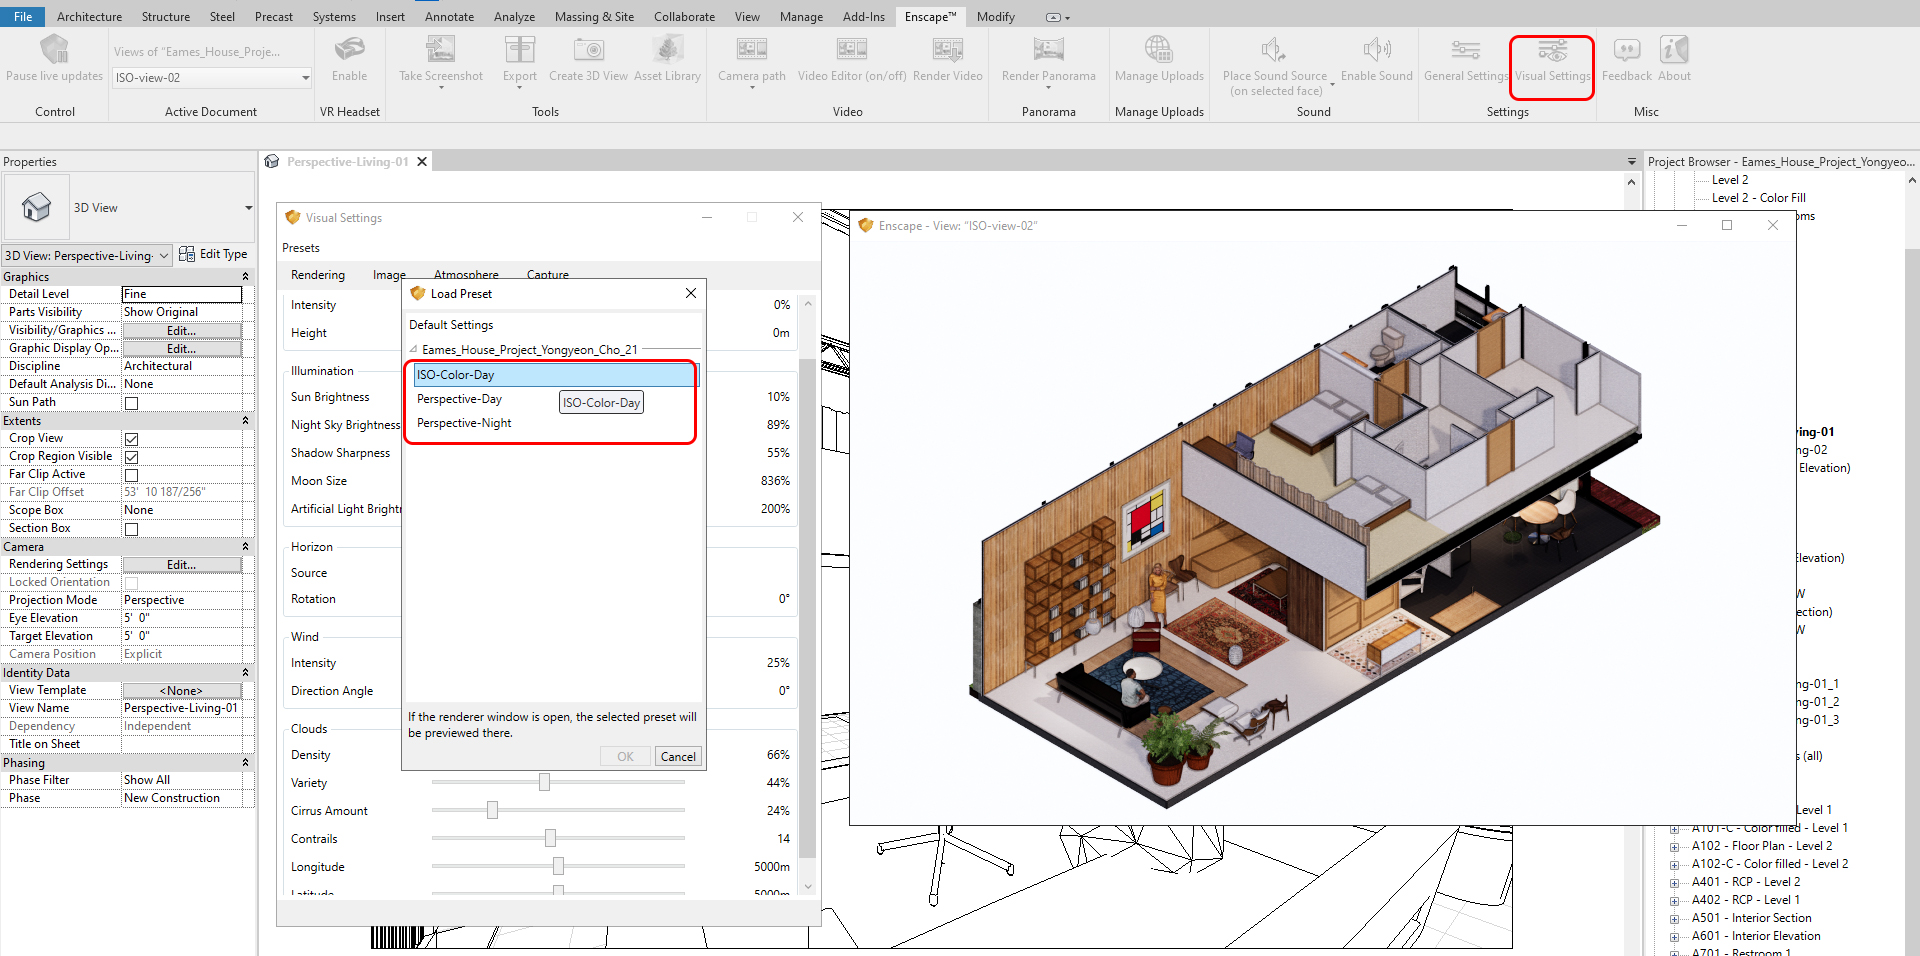
To load a preset that you already saved
- [STEP 1] Click Presets
- [STEP 2] Click load Preset > Load from Project, or you may load from the file
- [STEP 3] Select a preset that you would like to load > Click OK
(CO 2) Set and adjust artificial lightings

A YouTube element has been excluded from this version of the text. You can view it online here: https://iastate.pressbooks.pub/visualgraphiccomm/?p=114
For better artificial lighting simulation
- [STEP 1] Use a night-time scene time (sunset or sunrise would work as well)
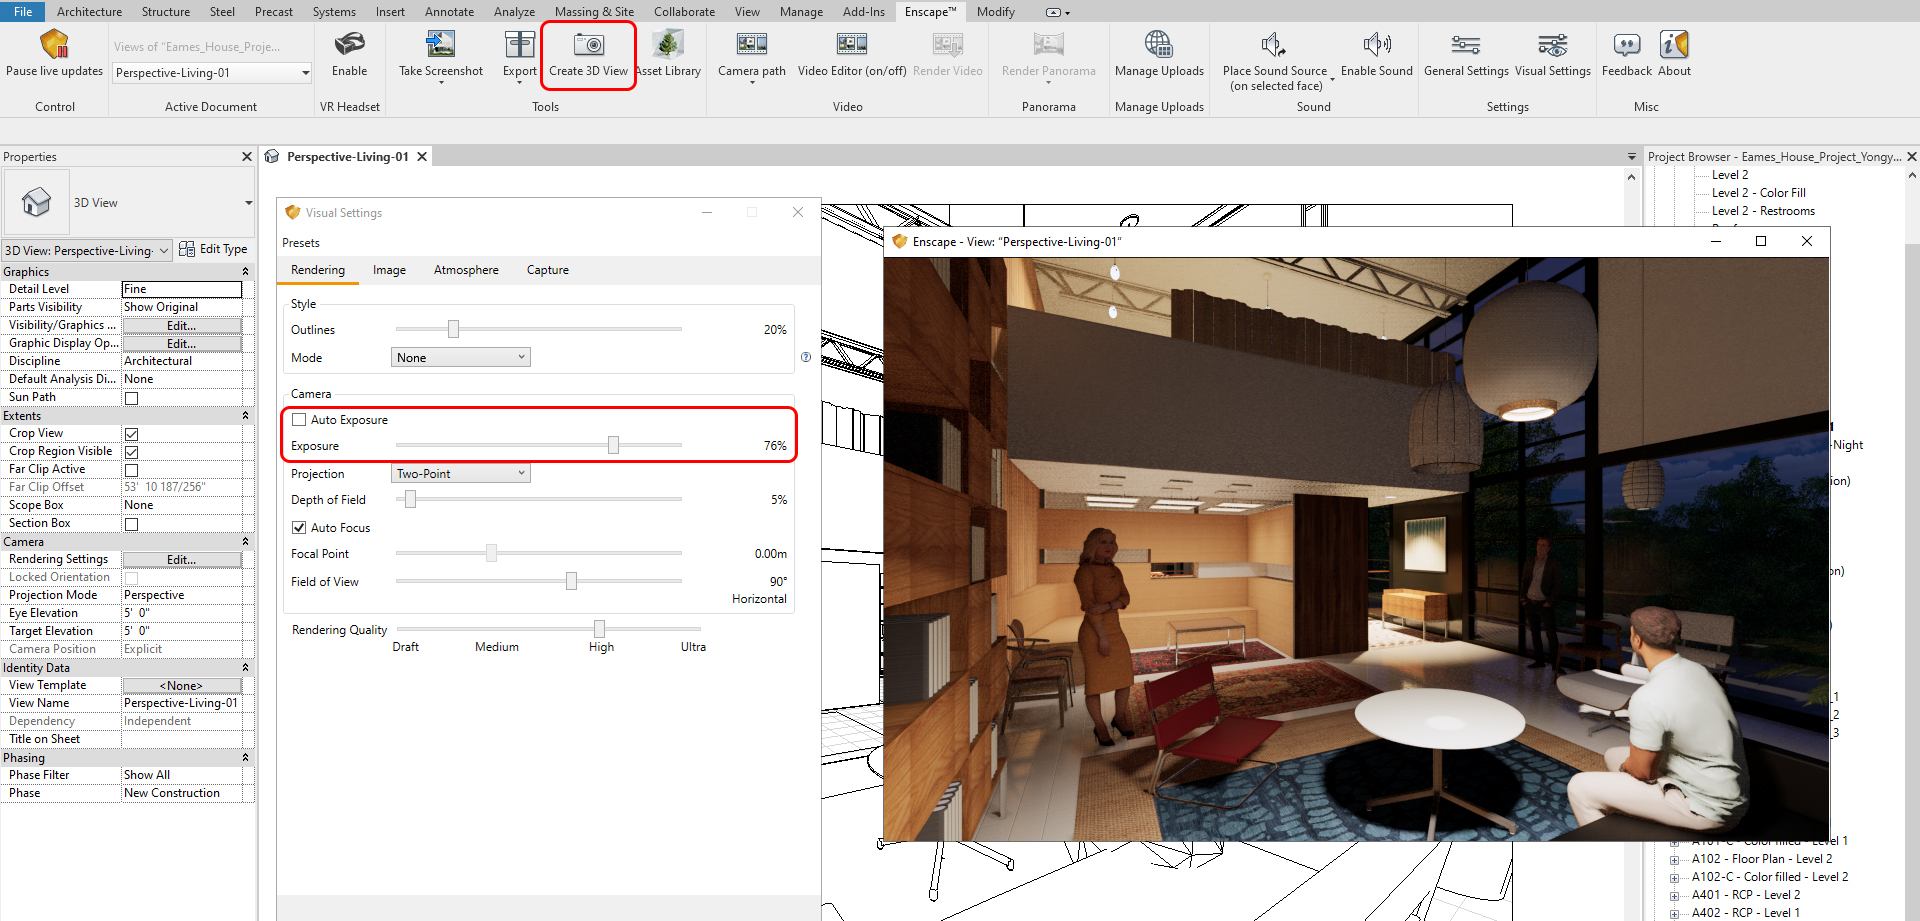
- [STEP 2] Turn off “Auto Exposure” in Enscape visual settings
- Exposure Brightness = 60% ~ 80% (Nighttime scene)
- Exposure Brightness = 51%~53% (Day time scene)
- [STEP 3] The render quality should be High or Ultra
- [STEP 4] Vignette effect = 0%
- [STEP 5] Artificial Light Brightness = 100% ~ 150%
Once you change the time of day, you must click “create 3D view” to save that time of day.
- [STEP 1] Click [Create 3D view] from the [Enscape] tab
- [STEP 2] Name the view
You may need to adjust the value of Illuminance on the “Initial Intensity” of lighting properties.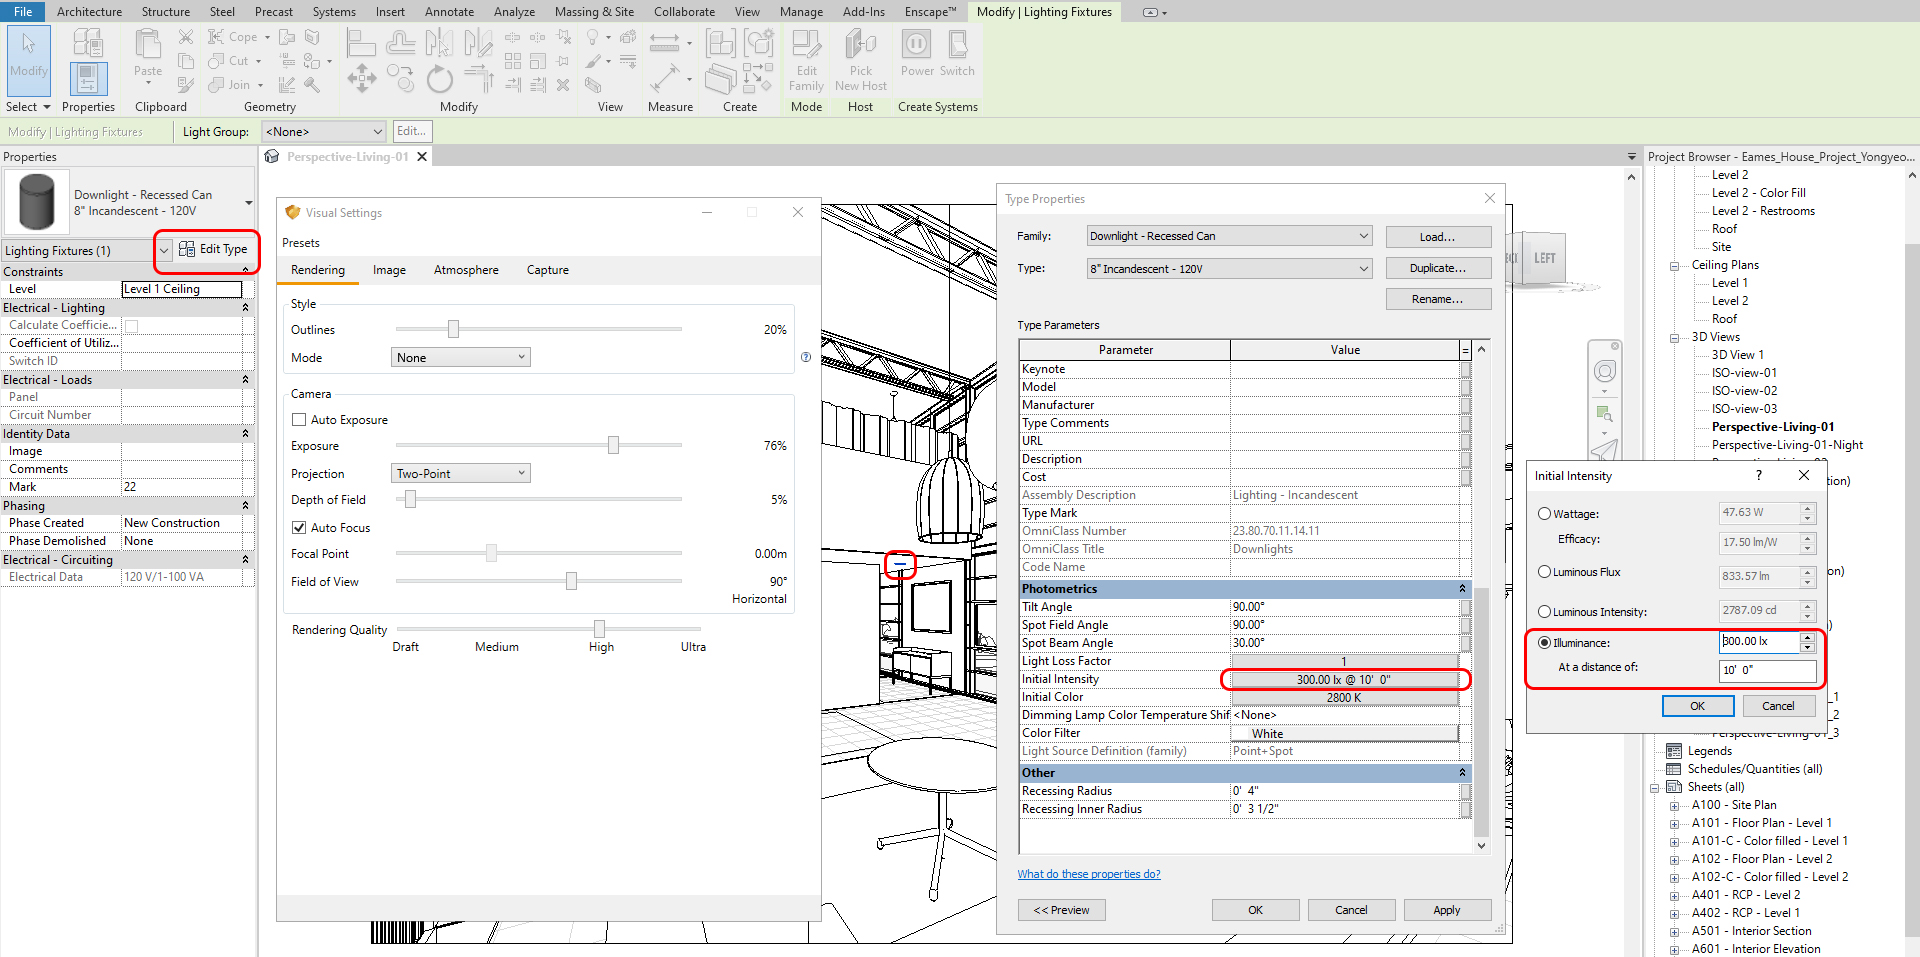
Find/use IES lighting from this link
Use/adjust self-illumination materials for lighting sources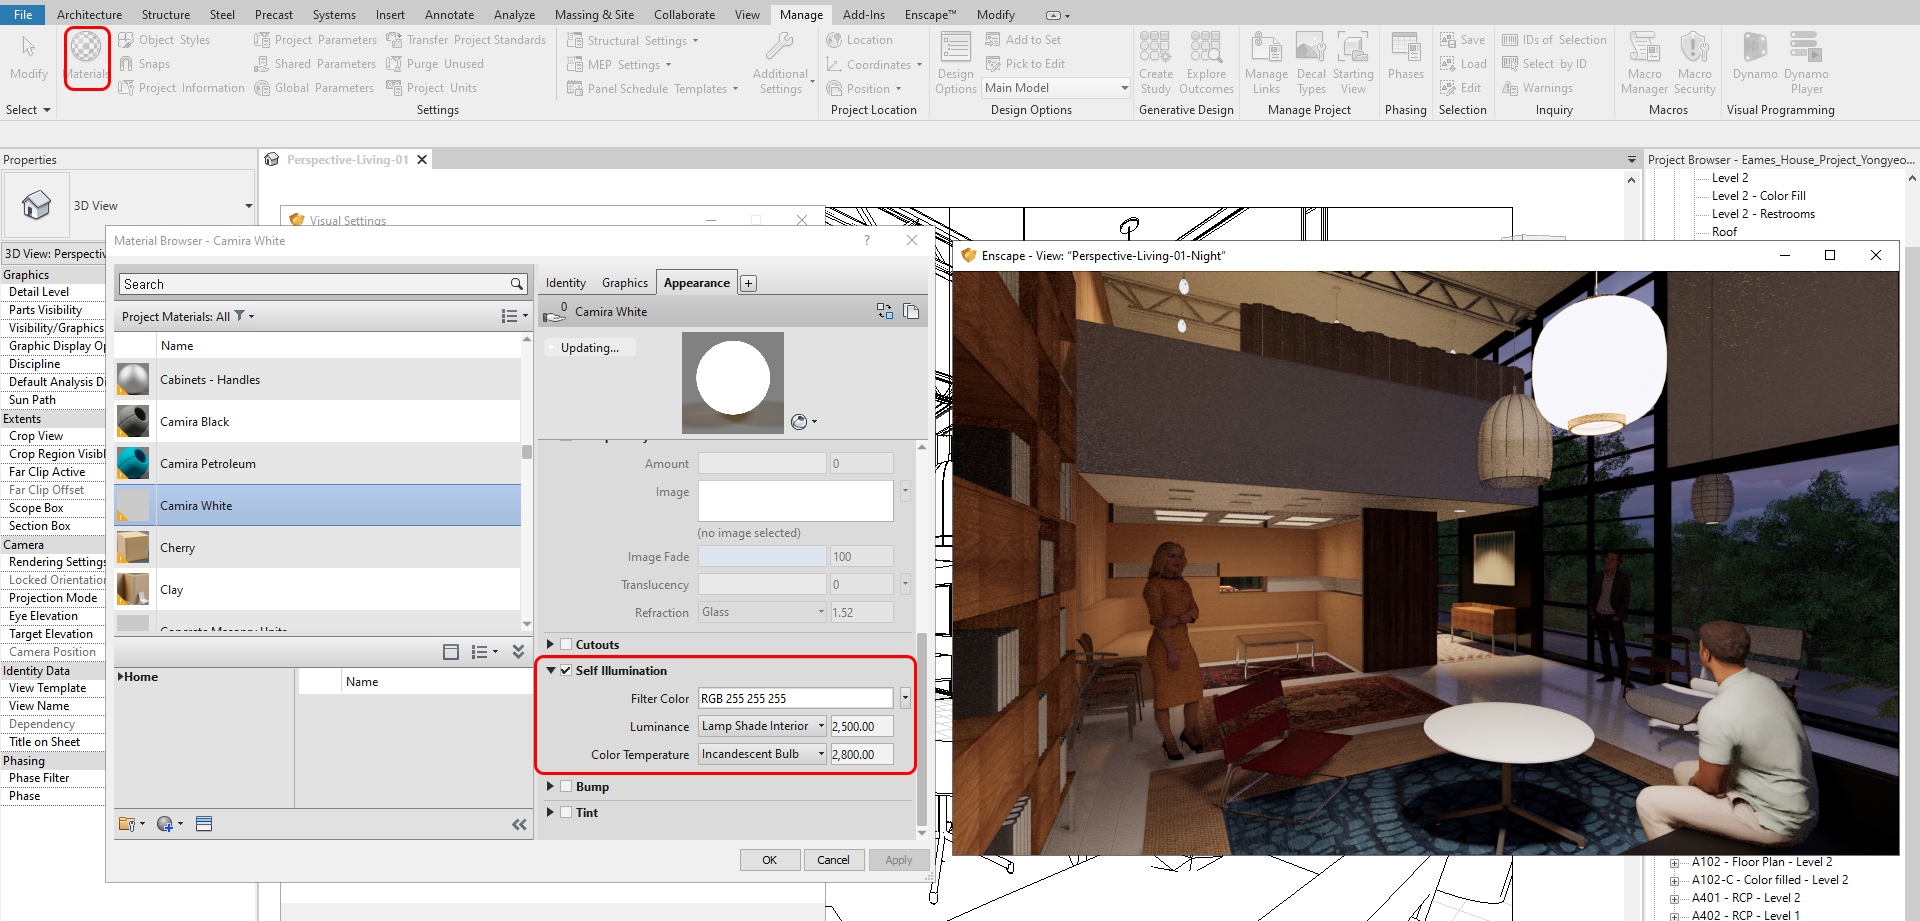
(CO 3) Create a walk-through video

A YouTube element has been excluded from this version of the text. You can view it online here: https://iastate.pressbooks.pub/visualgraphiccomm/?p=114
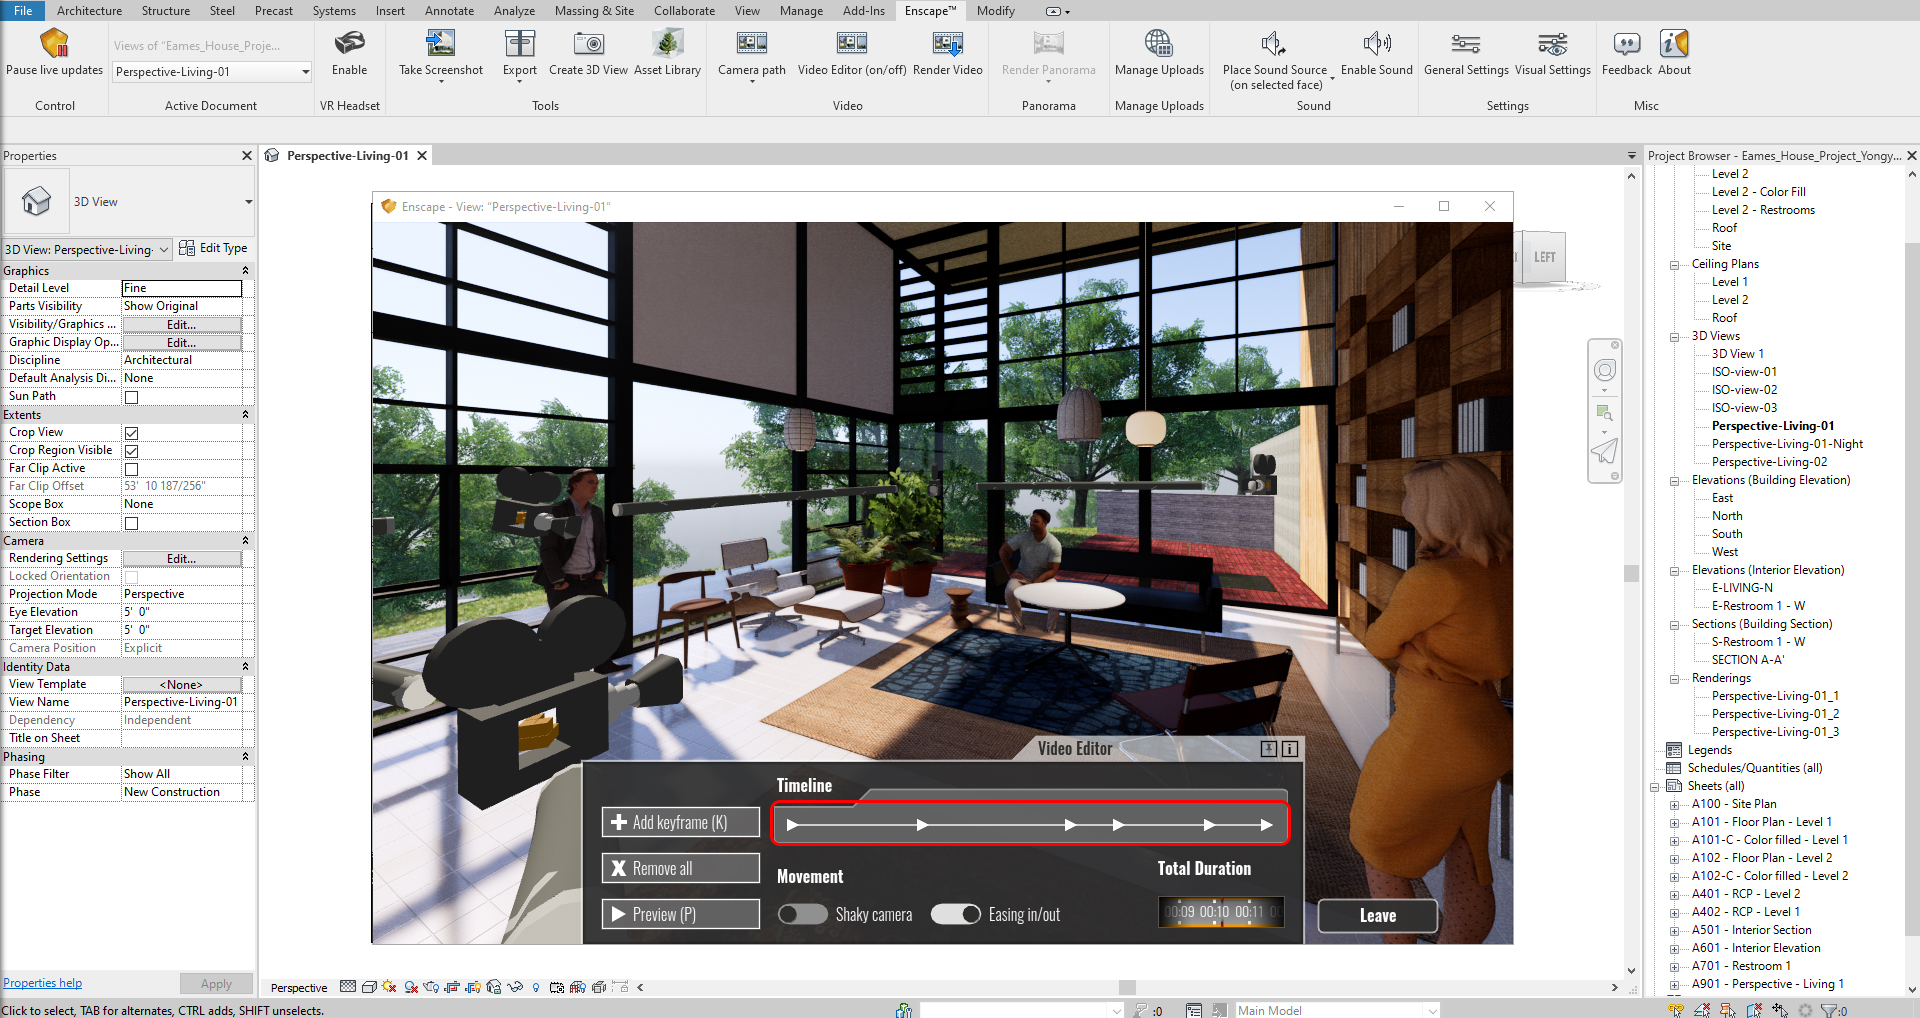
To create a video path with scenes
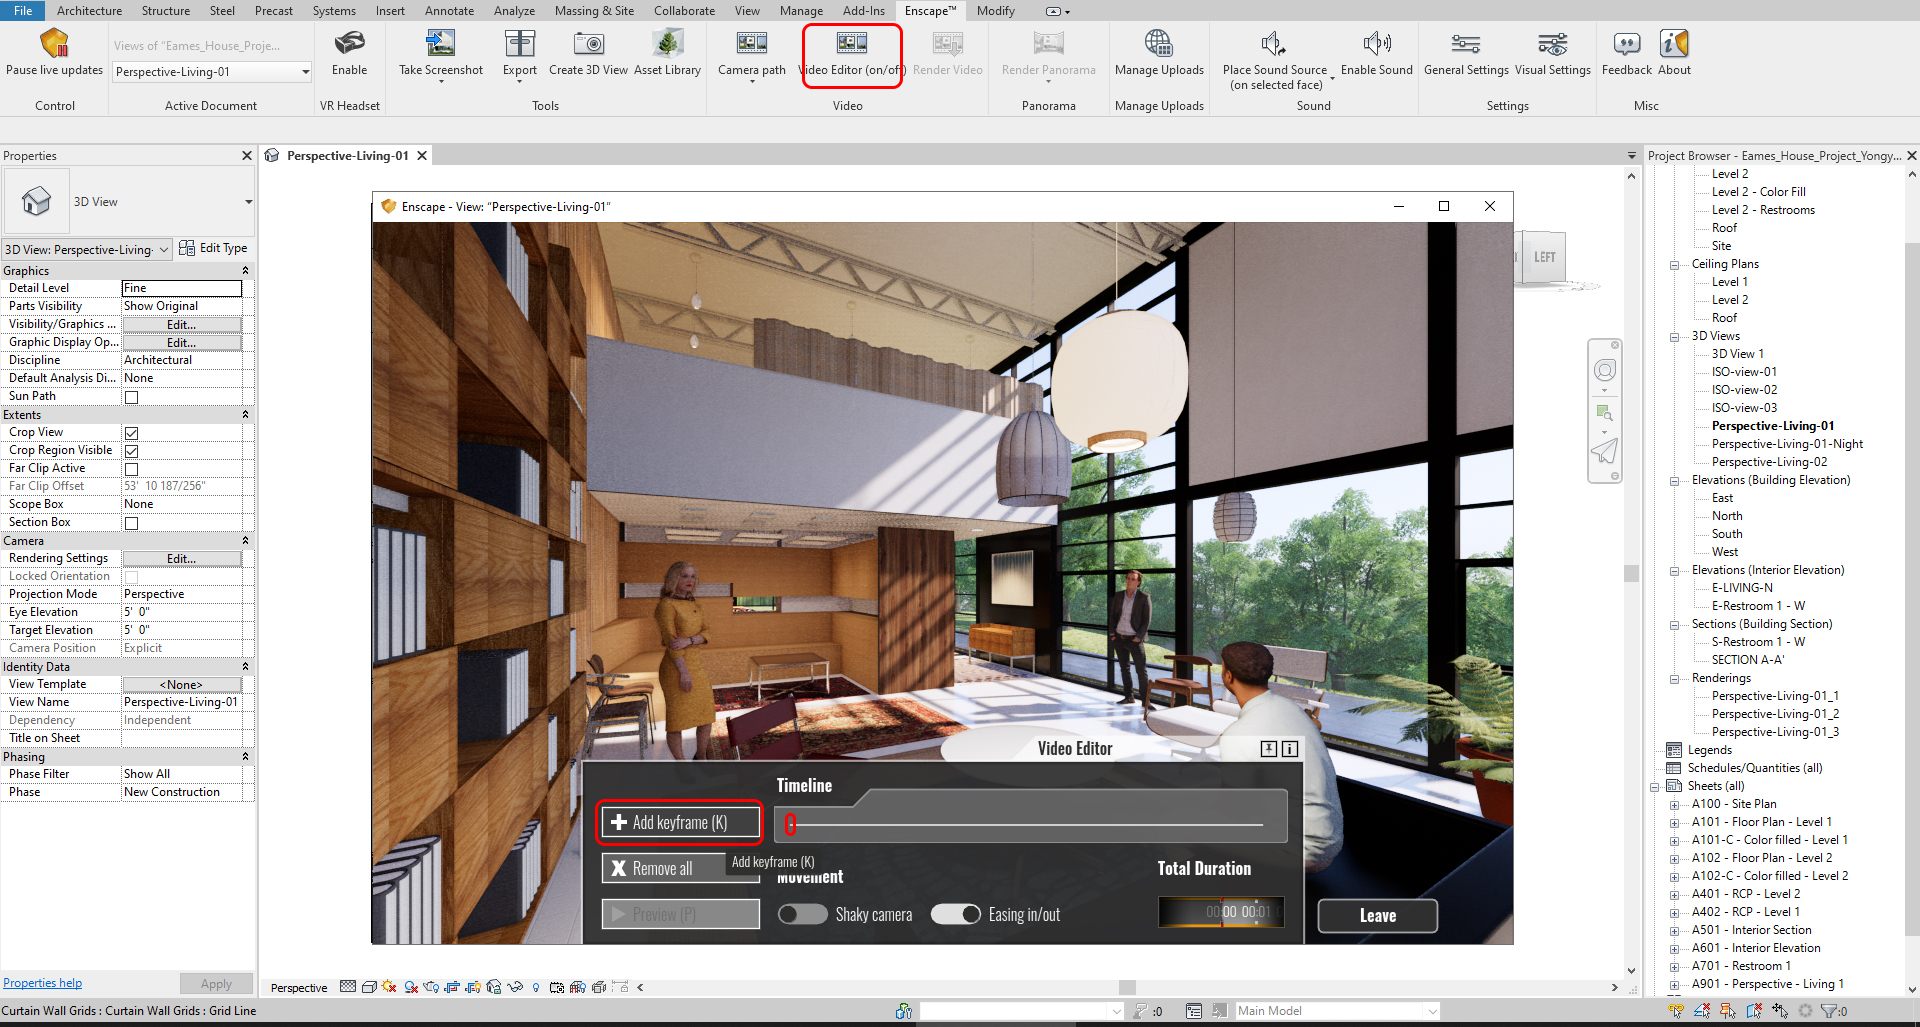
- [STEP 1] Click “Video Editor” from the Enscape tab
- [STEP 2] Click “Add keyframe” – Once you click “Add keyframe,” the setting will be saved
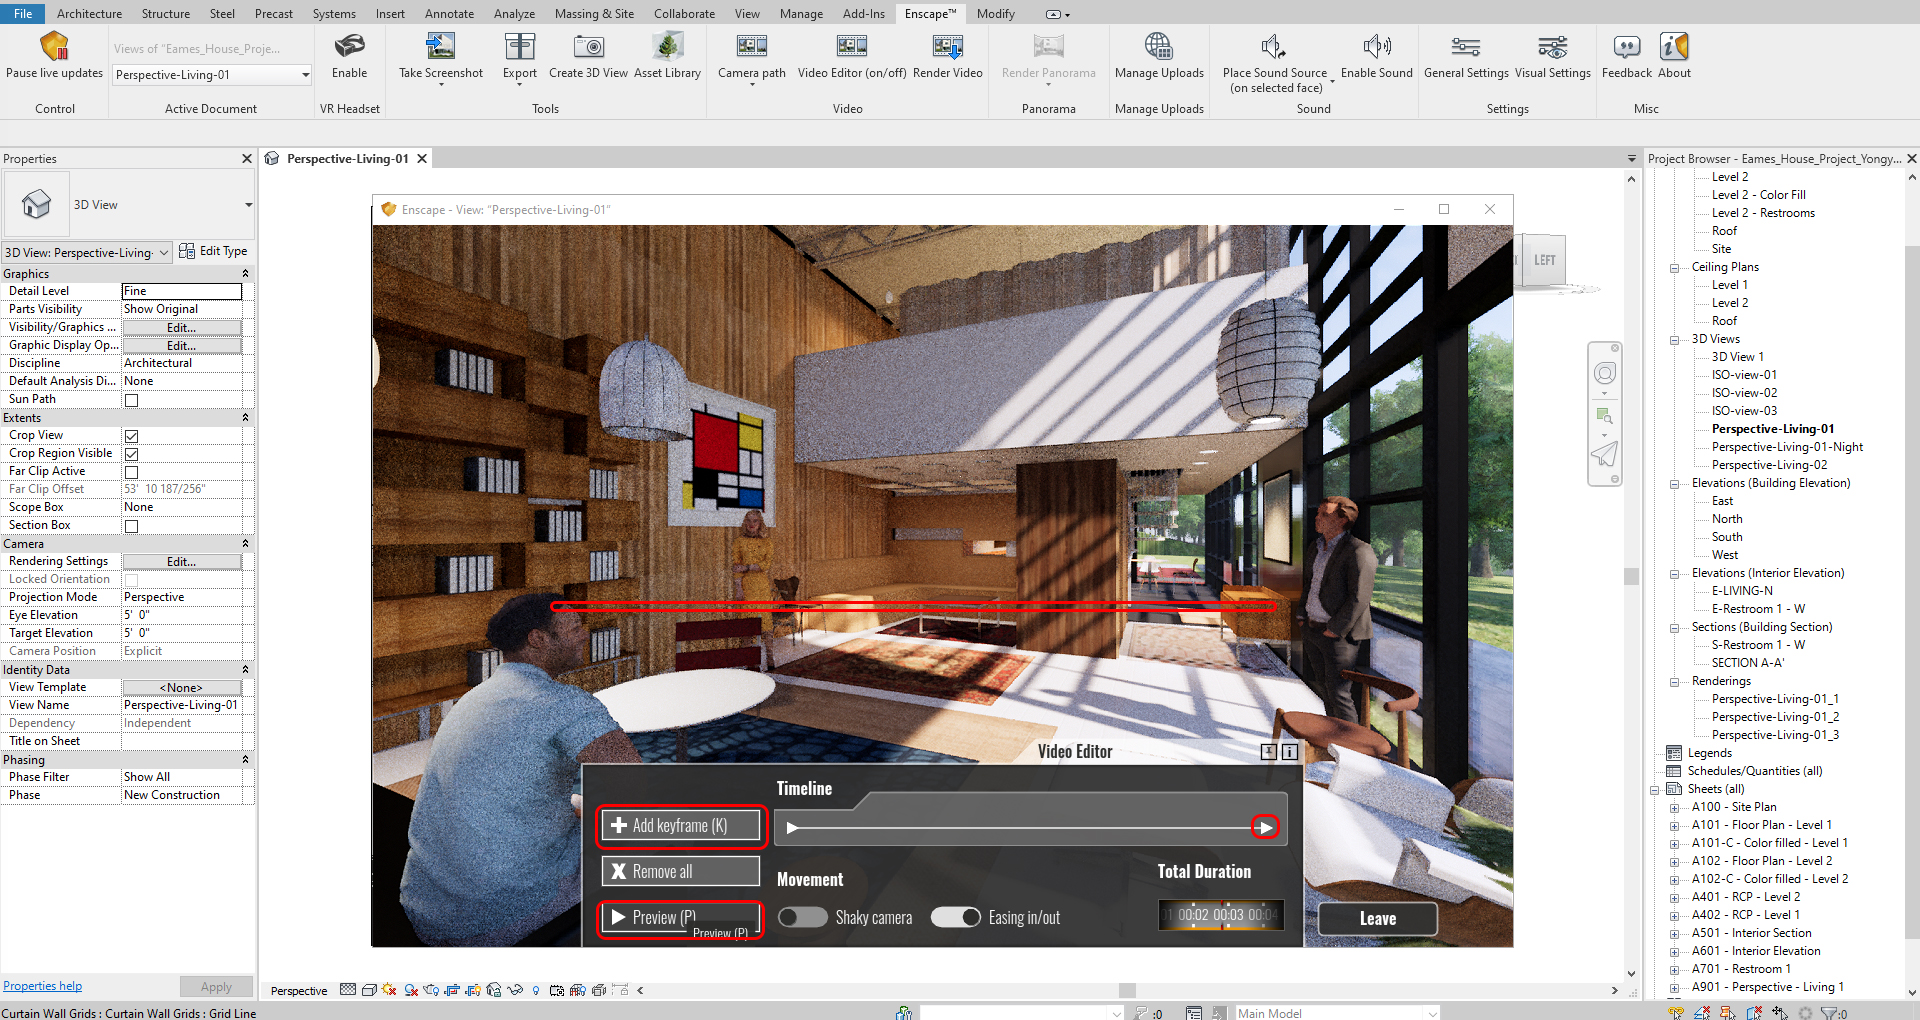
- [STEP 3] Change the scene by moving the scene
- [STEP 4] Once you think the next scene is the right position (recommend foot walk to see the scene from the same height), click “Add keyframe,” then you can see the second frame is added.
- [STEP 5] You may check the preview to see how this works.
- [STEP 6] Repeat step 3 to 5 to create a complete path for a video
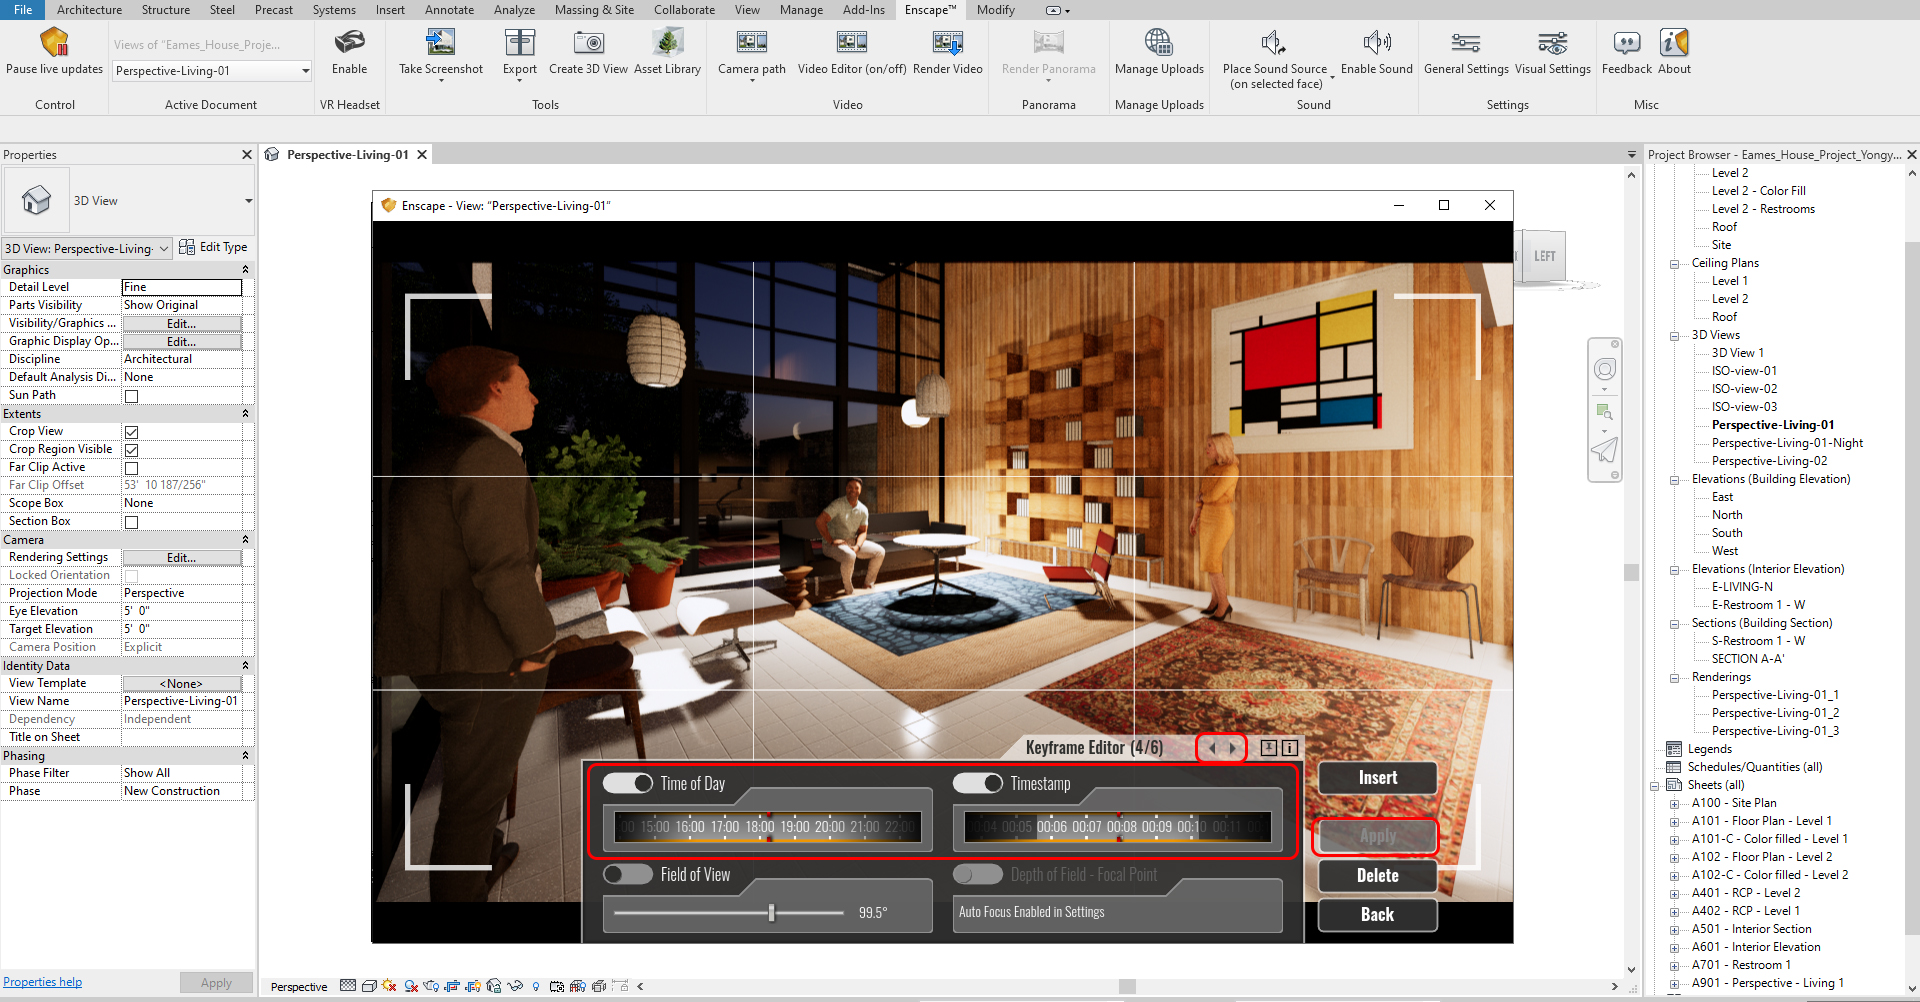
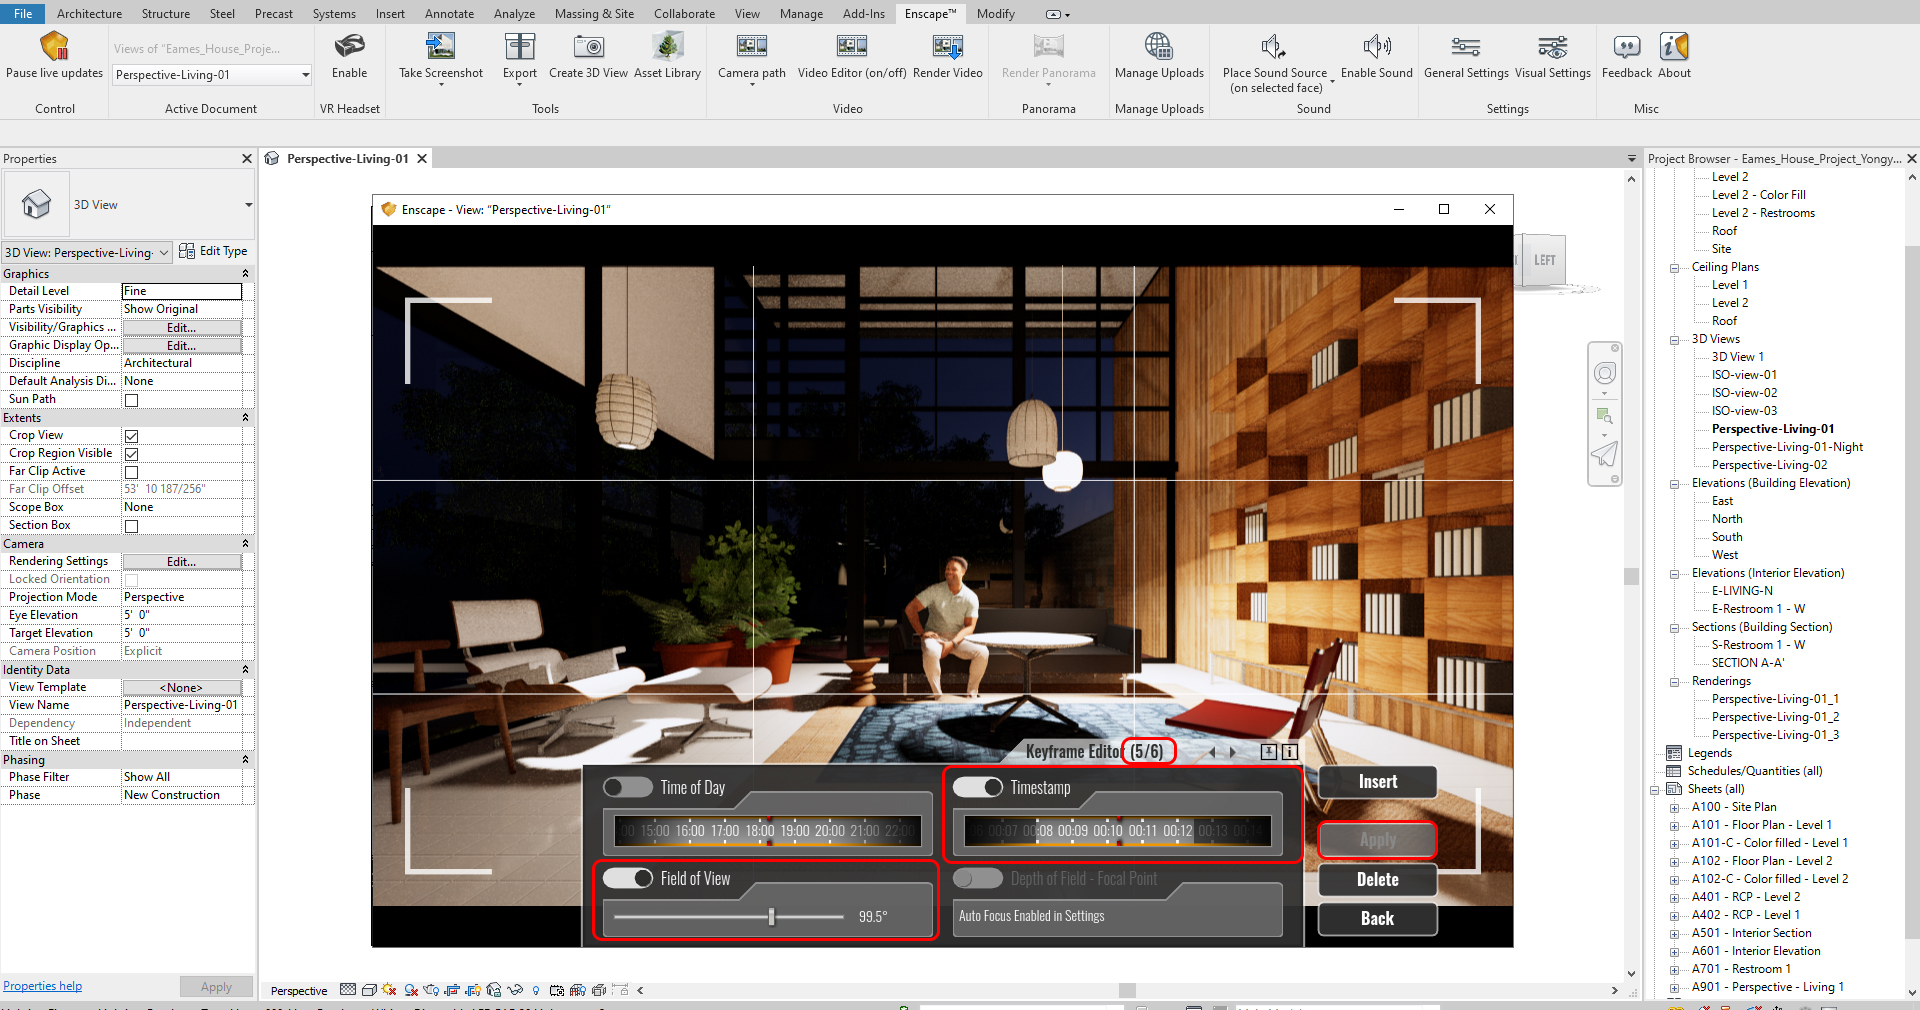
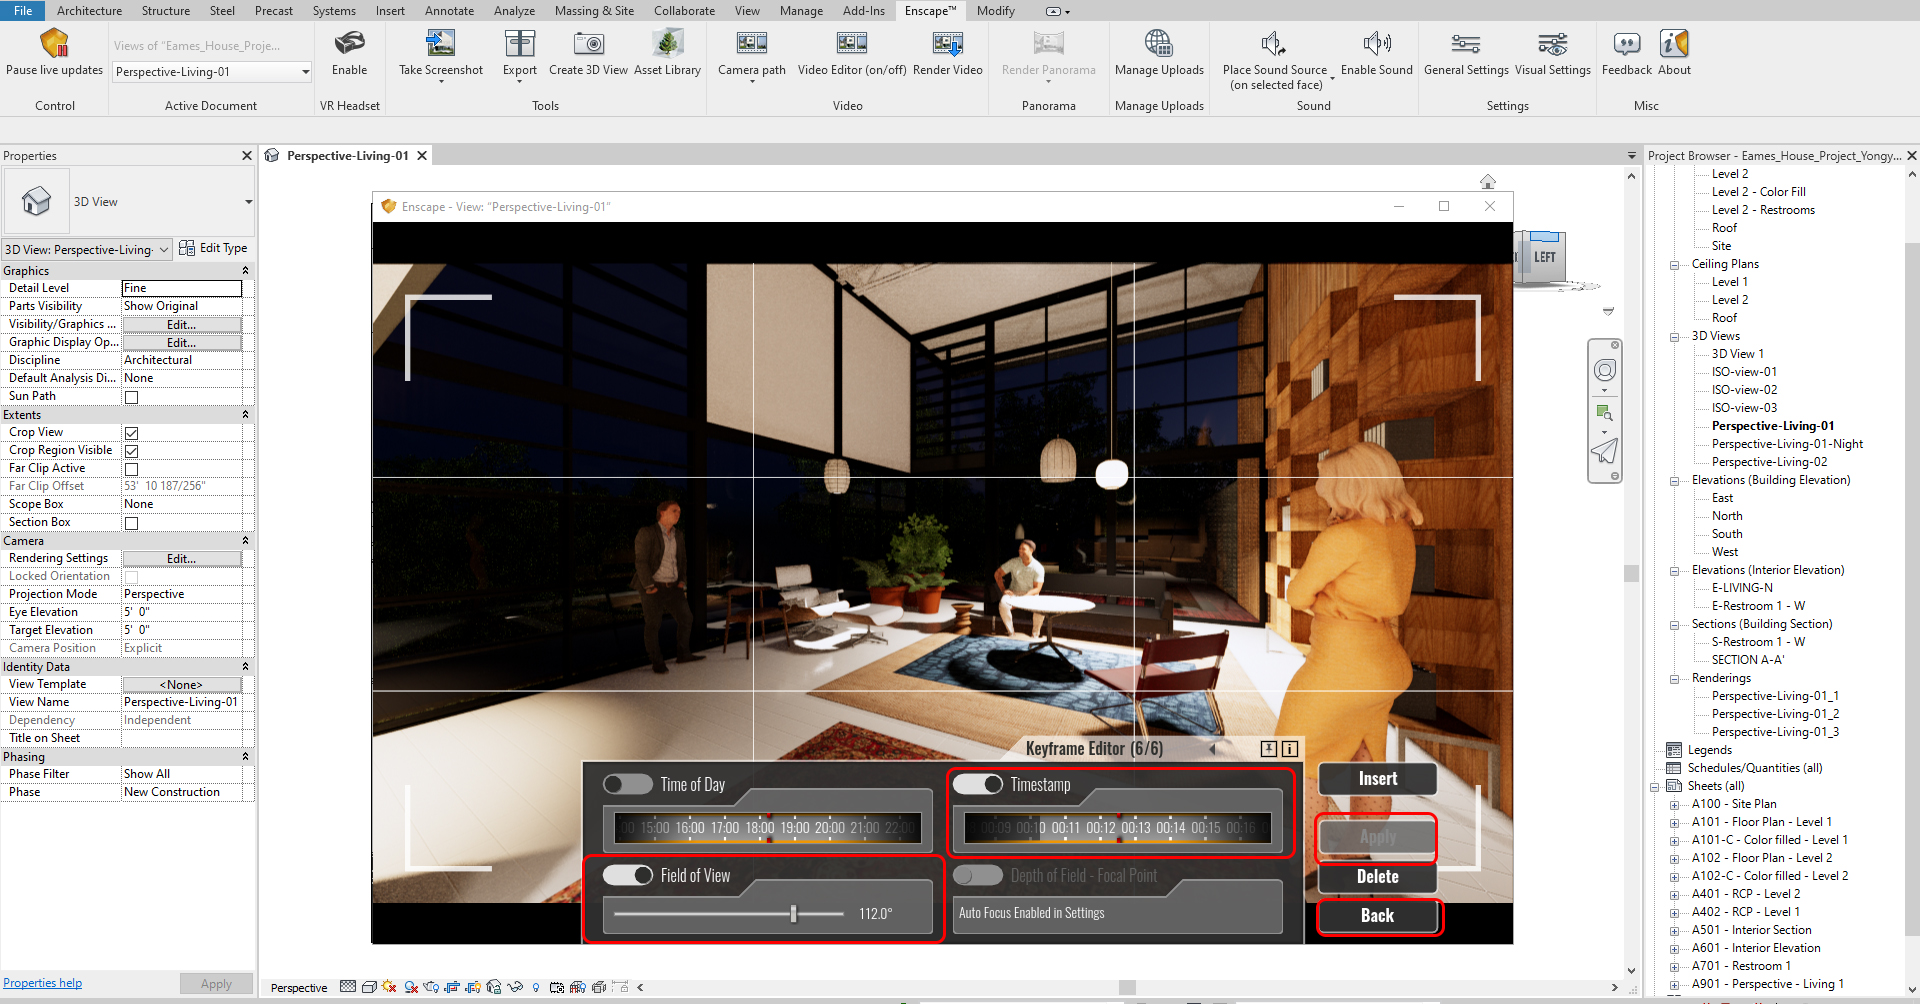
- [STEP 7] Click a [frame] and change the settings (time of the day, duration of the movement, camera field of view, and camera position) and click “Apply” to apply the changes
- [STEP 8] You can repeat other frames to change the settings
- [STEP 9] You can get out of the keyframe editor by clicking Back, Click Preview to see the results
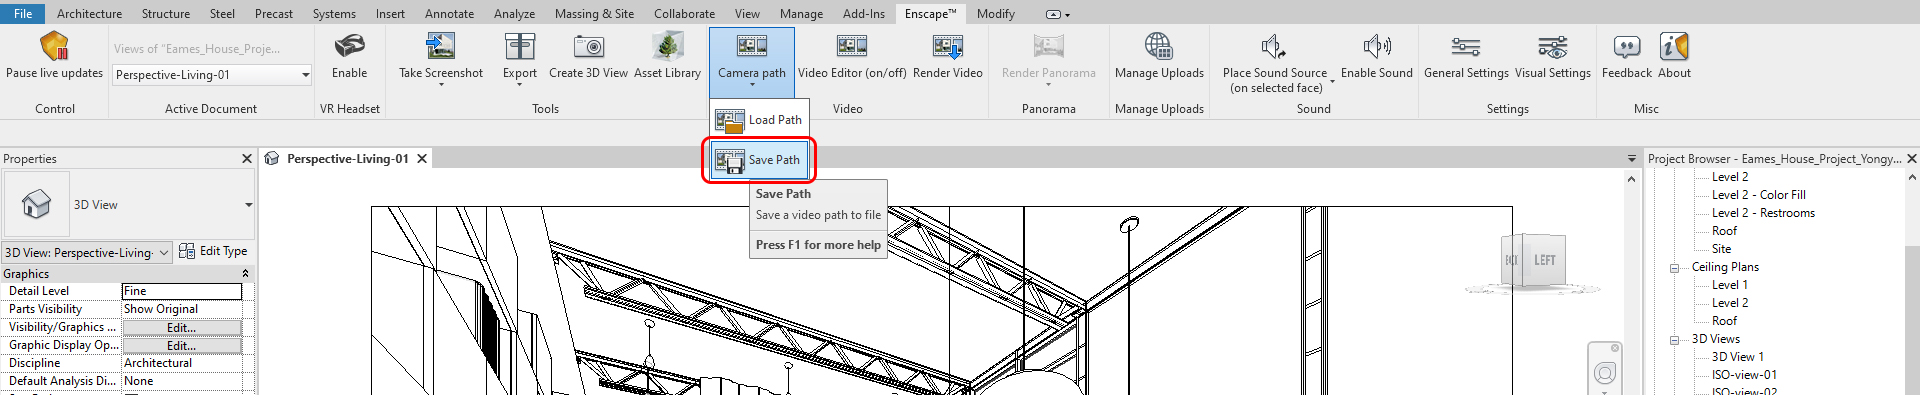
To save a video path
- [STEP 1] Click “Save Path” from the Enscape tab
- [STEP 2] Make a unique name for the path
To render the video
- [STEP 1] Load camera path by clicking “Camera Path” > “Load path” from the Enscape tab
- [STEP 2] Change video size from Visual Setting – Resolution (HD is recommended), the quality can be [Web], FPS must be [30]
- [STEP 3] Click “Render Video” to render the path
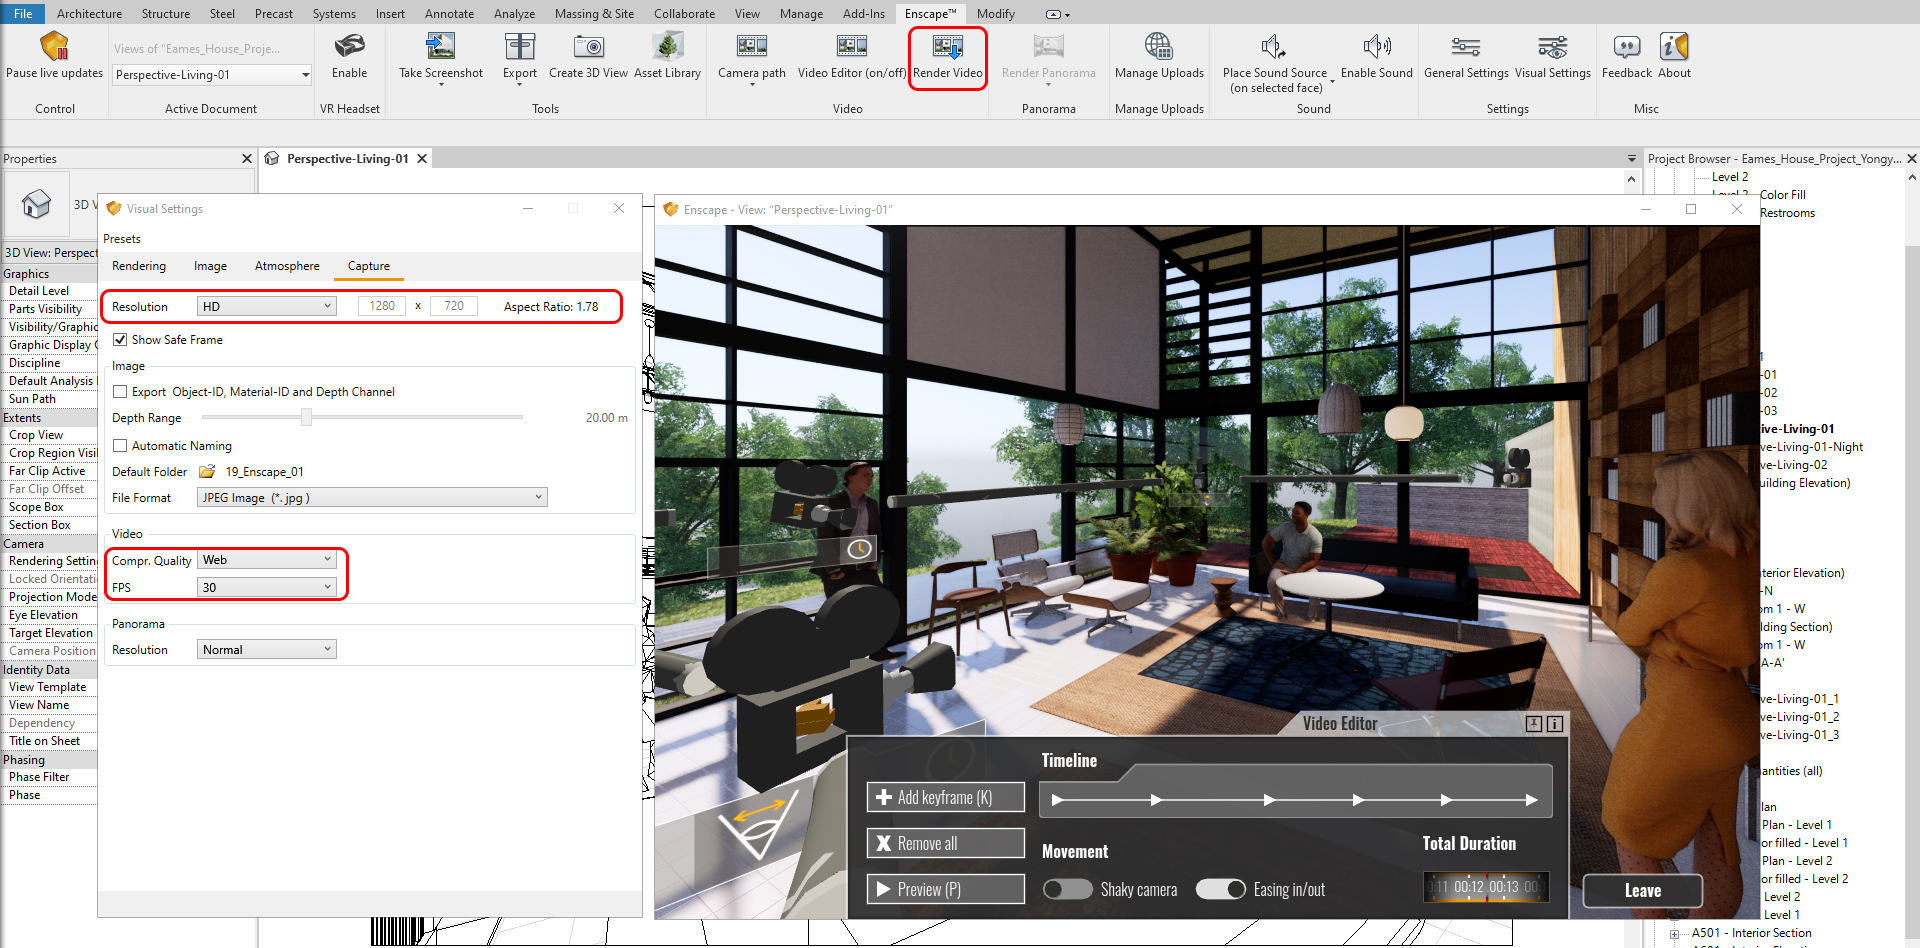
Note. To render the video, it will take a while because of the pictures that the video renders. Typically, if you render a 1-second video, Enscape renders 30 frames. If one frame takes 10 seconds to render, a total 1-second Video takes 300 seconds to render. Enscape does a great job because Revit rendering takes 5 minutes to render one frame.
References
Free Enscape Student & Educational Licenses – Enscape™. (2020, June 05). Retrieved October 23, 2020, from https://enscape3d.com/educational-license/