

1.03: Exercise 3: Creating a dynamic composition
- Page ID
- 23694
\( \newcommand{\vecs}[1]{\overset { \scriptstyle \rightharpoonup} {\mathbf{#1}} } \)
\( \newcommand{\vecd}[1]{\overset{-\!-\!\rightharpoonup}{\vphantom{a}\smash {#1}}} \)
\( \newcommand{\dsum}{\displaystyle\sum\limits} \)
\( \newcommand{\dint}{\displaystyle\int\limits} \)
\( \newcommand{\dlim}{\displaystyle\lim\limits} \)
\( \newcommand{\id}{\mathrm{id}}\) \( \newcommand{\Span}{\mathrm{span}}\)
( \newcommand{\kernel}{\mathrm{null}\,}\) \( \newcommand{\range}{\mathrm{range}\,}\)
\( \newcommand{\RealPart}{\mathrm{Re}}\) \( \newcommand{\ImaginaryPart}{\mathrm{Im}}\)
\( \newcommand{\Argument}{\mathrm{Arg}}\) \( \newcommand{\norm}[1]{\| #1 \|}\)
\( \newcommand{\inner}[2]{\langle #1, #2 \rangle}\)
\( \newcommand{\Span}{\mathrm{span}}\)
\( \newcommand{\id}{\mathrm{id}}\)
\( \newcommand{\Span}{\mathrm{span}}\)
\( \newcommand{\kernel}{\mathrm{null}\,}\)
\( \newcommand{\range}{\mathrm{range}\,}\)
\( \newcommand{\RealPart}{\mathrm{Re}}\)
\( \newcommand{\ImaginaryPart}{\mathrm{Im}}\)
\( \newcommand{\Argument}{\mathrm{Arg}}\)
\( \newcommand{\norm}[1]{\| #1 \|}\)
\( \newcommand{\inner}[2]{\langle #1, #2 \rangle}\)
\( \newcommand{\Span}{\mathrm{span}}\) \( \newcommand{\AA}{\unicode[.8,0]{x212B}}\)
\( \newcommand{\vectorA}[1]{\vec{#1}} % arrow\)
\( \newcommand{\vectorAt}[1]{\vec{\text{#1}}} % arrow\)
\( \newcommand{\vectorB}[1]{\overset { \scriptstyle \rightharpoonup} {\mathbf{#1}} } \)
\( \newcommand{\vectorC}[1]{\textbf{#1}} \)
\( \newcommand{\vectorD}[1]{\overrightarrow{#1}} \)
\( \newcommand{\vectorDt}[1]{\overrightarrow{\text{#1}}} \)
\( \newcommand{\vectE}[1]{\overset{-\!-\!\rightharpoonup}{\vphantom{a}\smash{\mathbf {#1}}}} \)
\( \newcommand{\vecs}[1]{\overset { \scriptstyle \rightharpoonup} {\mathbf{#1}} } \)
\(\newcommand{\longvect}{\overrightarrow}\)
\( \newcommand{\vecd}[1]{\overset{-\!-\!\rightharpoonup}{\vphantom{a}\smash {#1}}} \)
\(\newcommand{\ket}[1]{\left| #1 \right>}\)
\(\newcommand{\bra}[1]{\left< #1 \right|}\)
\(\newcommand{\braket}[2]{\left< #1 \vphantom{#2} \right| \left. #2 \vphantom{#1} \right>}\)
\(\newcommand{\braopket}[3]{\left< #1 \vphantom{#2}\vphantom{#3} \right| #2 \vphantom{#1}\vphantom{#3} \left| #3 \vphantom{#1}\vphantom{#2} \right>}\)
\(\newcommand{\qmvec}[1]{\mathbf{\vec{#1}}}\)
\(\newcommand{\op}[1]{\hat{\mathbf{#1}}}\)
\(\newcommand{\expect}[1]{\langle #1 \rangle}\)
\(\newcommand{\dfn}[1]{\emph{\textbf{#1}}}\)
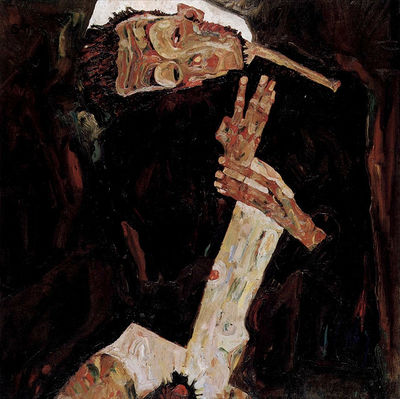
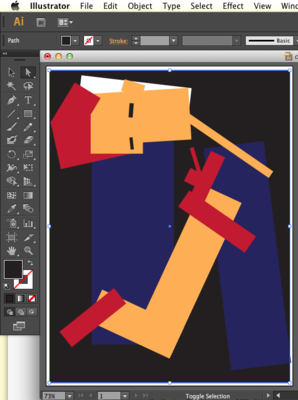
Compositions can be static or dynamic. In this exercise, we will recreate the dynamic movement found within a painting. Dynamic compositions are full of energy or movement. Angles are used to create motion. While a flat horizon line is at rest, a triangle is in motion. The repetition of even spacing is easy on the eye, as our minds predict the simple rhythm of an evenly spaced grid. Angles and uneven spacing between objects causes our eyes to move back and forth. This physical movement translates into the perception of movement within a composition. Use the Schiele painting as the guideline for your dynamic composition with rectangles. The final composition could be like this image, if yours is based on the Schiele painting:

- In Illustrator®, click on the Rectangle tool from the Tools panel. Click and drag to draw a rectangle on the page.
- Once the rectangle is created, release the mouse and click on the Selection tool. Objects can only be modified when they are selected. The Selection tool is used to select an object in order to move, scale, or copy it. Click on the rectangle with the Selection tool. Notice that the selected rectangle has square anchor points on each corner and at the midpoint of each line. These anchor points are essential components of the vector art. They determine the contours of the shape by their position in relationship to each other. A rectangle is described by a path that turns at right angles through four anchor points to create four sides and meet itself to close the shape. To deselect the object, click on the Artboard in any area outside of the rectangle. Notice that a tool tip shows up when the mouse hovers over a tool. The tool tip displays the name of the tool and the keyboard shortcut. This is true in most graphics applications.


To rotate the rectangle, position the Selection tool just outside one of the four anchor points at the corners. Don’t click yet. Notice that the cursor changes from the usual Selection tool icon (straight, black arrow) to a curved arrow. The curved arrow indicates that you can rotate the selection. When you see the curved arrow, click and drag outside of the rectangle to the right or left in order to rotate the rectangle.


Be sure to save your files!