1.7: Cake and Buttercreams
- Page ID
- 21177

To make a great cake the baker must take great care in creating the batter. The cake itself is a base for which the rest of the ingredients are built upon. The process starts with high quality ingredients. The rest is an art from that follows specific formulas and mixing methods to produce a light and delicious finished product.
There are three main goals you to making a good batter:
1. Combining the ingredients into a smooth homogeneous batter.
2. Incorporating air into the batter.
3. Having the proper texture in a finished product.
The Batter
All cake batters are a basic emulsion of fat and water. As the two ingredients are mixed, the fat molecules encase the water droplets. Then, as the other ingredients are added, this emulsion can break. If so the batter will looked curdled. This happens when the fat separates from the water and they are then just mixed together with the other ingredients in the batter.
Issues that can lead to curdled batters:
- Using the wrong type of fat – each recipe is formulated for a specific fat. Do not substitute fats. High ratio shortening cannot hold the same amounts as butter. Also butter has water in is so formulas that contain butter limit the water to what that product can hold and remain emulsified.
- Temperature of the ingredients – the best emulsification happens at room temperature, which is about 70 F.
- Mixing process – do not rush the process. The formation of the emulsification must be done correctly for it to hold. Higher speeds do not speed up the process. Air cell formation is accomplished at a lower speed.
- Adding ingredients – if liquids are added to quickly, the other ingredients cannot adequately absorb them. They are usually added in stages and alternate with dry. This helps to keep a smooth homogeneous mix.
Air Cells
Proper procedure needs to be followed to obtain proper air cell formation. This is done by slowly incorporating the butter and sugar in the creaming method. Too high a speed will cause the mix to become warm and not allow for proper formation. In addition, the temperature of the ingredients play a part in this as well. Butter and granulated sugar combinations at low speed create the best air cells for a good cake texture.
Texture of the Batter
The finished texture of the baked cake depends on the ingredients, and how well they were put together. If the air cells were formed small and uniformed, the crumb will be smooth and fine. A coarse crumb will be because of large or irregular formation of the air cells. Unlike breads, you do not want a lot of gluten formed in the cake. Gluten will give a tough product. Cake flour, which is low in protein, is used to insure gluten formation is at a minimal. Also the way the ingredients are mixed together.
Mixing Methods for Cakes
I. Creaming Method
- All of the ingredients are scaled out accurately and at room temperature.
- The fat is placed into the mixing bowl fitted with the paddle attachment. On low begin to mix until it is smooth and creamy. There should be no lumps.
- Scrape down the sides of the bowl and add the sugar. On a low/medium speed, you will begin the process of creaming the fat and sugar together. You will cream them until they are white, light and fluffy. This will take anywhere from 5 to 10 minutes. Notice the color change of the butter.
- Stop and scrape down the bowl. The eggs will be added a little at time depending on how many you have. Before you add the next egg, make sure that each addition is completely absorbed into the mix. The mix will return to a light and fluffy texture.
- The addition of the dry and liquid ingredients will begin once all the eggs have been added. Scrap down the bowl continuously to ensure proper mixing.
- You will start with the dry and end with the dry. The patter for adding dry in liquid is:
- ¼ of the dry is added. The mixer is turned on, and you will mix until JUST incorporated. Turn off and scrape the down the bowl.
- 1/3 of the liquid is added. This is mixed until just blend. Again, scrape down the bowl.
- These steps are repeated until all the ingredients have been added. Scraping and alternating the ingredients ensure an even mixing of the batter.
NOTE: Vanilla and other spices can be added once the fat and sugar is creamed or to the liquid ingredients. Some bakers prefer to sift the spices into the dry ingredients. If adding melted chocolate to a batter it can be added to the creaming method paying attention to the temperature of the chocolate.
II. Chiffon Method
- Scale out all ingredients accurately. All should be room temperature.
- Sift all dry ingredients into the bowl of the stand mixer fitted with the paddle attachment. Add part of the sugar at this time as well.
- With the mixer on low slowly steam in the oil. Next you will add the eggs yolks, followed by water and any flavorings. As this is being added you should stop the mixer and scrape down the bowl to ensure proper mixing of the batter.
- In another bowl, you will begin to whip the egg whites to soft peak. Then add the cream of tartar and remaining sugar. Whip to stiff peak.
- Fold the whipped egg whites into the batter.
- Cake pans should only be greased, and lined on the bottom. If the sides are greased the cake will not rise. It needs to cling to the side of the pan to rise.
Types of Cakes
- Butter Cakes – these are high fat cakes. The fat used for these cakes is butter. This gives the cake a better mouth feel. Butter melts at body temperature whereas shortening does not. Some bakers will prefer to use shortening because it is cheaper and easier to emulsify.
- Chiffon or Angle food – these are egg foam cakes. For Chiffon cakes a leavener is added but for Angel food the air whipped into the egg whites is the primary leavener. These cakes also have little to no fat added.
Baking and Handling of Cake
The method of baking will ensure that your cake is at its best. To ensure this following the right guidelines are essential.
- Always preheat your oven.
- The oven and its shelves should be level. If they are not the batter will bake unevenly.
- Make sure the pans are spaced evenly apart. Proper air circulation will ensure even baking of each cake.
- Bake at the right temperature. Each cake requires different baking temperatures. This will affect the way the cake sets.
- Too high a temperature will cause the top to set before it is risen enough.
- Too low a temperature can lead to it not rising enough and falling
- Some ovens have steam. This can help delay the crusting of the layer and allow for a more even rise in some cakes: creamed, two-stage and one-stage cakes.
- Do not open the oven until the cake has fully risen and the structure has set. This can cause the cake to fall.
Signs of Doneness
- If the cake appears to be pulling away from the sides of the pan.
- When the top is lightly touched, it springs back.
- If you stick a cake tester in the center, it comes out clean.
Cooling and Removing from Pans
- Cakes should be cooled in their pans for 15 to 20 minutes or until warm to the touch. Removing the cake before can cause it to crack. Remember that they are fragile and soft.
- Remove cakes from the pan and place on a cooling rack to finish cooling.
- Sheet cakes can be turned out onto cake boards or another sheet pan. Top the cake with parchment, then the cake board. Flip the pan leaving the cake on the cake board. Another cake board is now put on the bottom and both are inverted leaving the bottom of the cake on the board. Remove the parchment and let cool.
NOTE: Angel Food and Chiffon cakes need to be cooled completely in their pans. The pan should be inverted but not touching the tabletop. There needs to be room for air circulation. This prevents the cake from falling in on itself. The cake will not fall out of the pan because it is clinging to the sides. Once they are cooled you can turn them over and with a knife remove them from the pan.
Buttercreams
Once the cake is baked and cooled it’s time to finish it. From the simple to the extravagant cakes can be finished in a variety of ways. Simple buttercreams, fondant, marzipan or poured ganache can be used to turn something simple into works of art.
Buttercreams
Light and fluffy frosting that can be used in decorating a cake. They range in simple to complex formulas that differ in texture and taste depending on the type you make.
3 Classical Butter Creams
These buttercreams all have a base that begins with a meringue. Each is done in a different style. These buttercreams are soft and smooth in texture.
- Swiss Buttercream – the base for this is Swiss meringue. The egg whites and sugar are heated over a warm bain marie until the sugar melts. Once this happens whip on high speed until the meringue cools and doubles in size. Slowly the cold butter/shortening combination is incorporated. As this happens the mixture will get to a stage that it looks broken. Keep adding the butter. It will come together. Any flavorings can be added at this time.
- Italian Buttercream – the base for this is Italian meringue. The sugar and water are cooked to 240oF. While this is happening whip the eggs whites to soft peaks. Pour the sugar into the whipping egg whites and whip until cool. Cut the butter into the mixture until it is all added. It will look curdled but continue to add the butter and mix until it is smooth and creamy.
- French Buttercream - this buttercream has an egg yolk base. The sugar and water are cooked to 240oF. Egg yolks are whipped to ribbon stage (thick and light in color). Pour the cooked sugar into the whipping yolks. Continue whipping until the mixture has cooled off and is thick. The butter is added slowly allowing the mixture to absorb the butter before the next addition is added. Flavorings can be added at this time.
American Buttercream
This is a popular buttercream frosting that is primarily used in North American and “frosting” of choice for most people in the South. This buttercream is simple to make and requires no cooking. It has a sweet taste with a fluffy and creamy texture. It is easily flavored and when set has a dry sugar “crust” exterior. The recipes for it vary depending on the baker/user but main ingredients are the same.
- Plain American Buttercream – butter (shortening) is added to the bowl of a stand mixer fitted with the paddle attachment. It is creamed until smooth and fluffy. Powdered sugar is added and mixed in. Flavorings are added at this time. The mixture is thick and will be thinned out with cream or water to the desired consistency. This buttercream has a very low melting temperature. It is not a good use for outdoor cakes in the summer months.
Royal Icing
This type of frosting is used in decorative decorating of cakes, cookies and other edible pastries. It can be used as a thick frosting for drop string, outlines of shapes and for making edible flowers. When thinned out it can be used to fill in outlined shapes for a beautiful finishing touch. This frosting dries hard to the touch.
- Royal Icing – egg whites are added to the bowl of a stand mixer fitted with the paddle attachment. The whites are mixed to just break them up. Next cream of tart is added along with powdered sugar. The mixture is mixed until it is stiff and fluffy with soft peaks. To keep this useable while working it needs to be covered with a damp cloth.
Glazes
Some cakes are finished with a glaze a thin almost see through coating. This is a mixture of ingredients that is poured over a finished product to leave it with a beautiful shiny surface. The purpose is twofold in that it serves as a finish and protection to avoid the drying out of the product.
There are primarily two types of glazes:
- Chocolate glazes – these consist of chocolate melted by pouring heated cream over mixed with either butter, glucose or corn syrup. Once cool to the touch it is poured over a cake. If cooled correctly, it can be whipped into a frosting to finish a cake as well.
- Gelatin glazes - these are done with a combination of ingredients but the primary setting of the glaze is done with gelatin. Bloomed gelatin is melted, then added to other ingredients, mixed, and immediately used. If it is allowed to sit and cool, it will set.
Other Cake Coatings
- Rolled fondant – can be made, or purchased commercially. A thick edible sugar paste that can be used to cover and decorate cakes. It can be molded into shapes, flowers, animals etc. It can be used as is, or colored for added garnish. This gives the outer layer protection and keeps it from drying out.
- Marzipan – a decorative coating made from almond paste, sugar and corn syrup. It has a very sweet taste and can be used to make accent garnishes as well. It is also used to make marzipan candy, and used as a filling for truffles.
- Modeling Chocolate – a paste that is made from melted chocolate and corn syrup. When done it is thick and easily molded. Texture is similar to thick playdough.
Cake Syrup
From scratch cakes, differ from box mix cakes. They lack the preservatives that are added to keep those moist as they sit. To add some moisture to your cake a cake syrup is used. It is brushed onto layers and allowed to soak it. It is a basic 1:1 ratio of water to sugar. Flavoring can be added as well as liquors or spirits.
Cake Decorating
One of the most important things you need to begin the decorating of a cake is the design of the cake. Nothing can really be done without this. The planning of how it is assembled, frosting, fillings and garnishes are all done based on the initial plan. Proper planning of the cake lends to easy assembly and beautifully finished product.
The Cake Layers
Once your layers are baked, de-panned, and cooled they need to be prepped for assembly.
- All excess crumbs are removed with a dry pastry brush.
- If tops are slightly mounded, they can be made even with the addition of buttercream. If there is a high rounded top, it needs to be leveled by cutting the top even.
- Proper cake board is added under the layer.
- Cake layers and be cut in half. This increases the amount of filling and frosting adding additional height to your finished cake as well as increasing the cake to filling/frosting ratio.
- Cake layers are brushed with cake syrup excluding the top layer.
- If there is a filling other than buttercream, a dam is created to lock the filling it. This is a circle of frosting piped around the perimeter of the layer.
- The bottom of the cake is the straightest piece. It should always be used as the last layer added to the cake. This gives a straight and level surface to the finished cake.
- Once the layers are assembled, the crumb coat is added. This is a very thin layer of frosting. Its purpose to lock in any extra crumbs that are on the cake. Once this is done, it is place in the refrigerator to set.
- Once the crumb coat is set, the finishing frosting is added. This addition is the final buttercream coating unless a rolled coating will be used. Once finished this should not contain any crumbs. The cake is now ready for decorating.
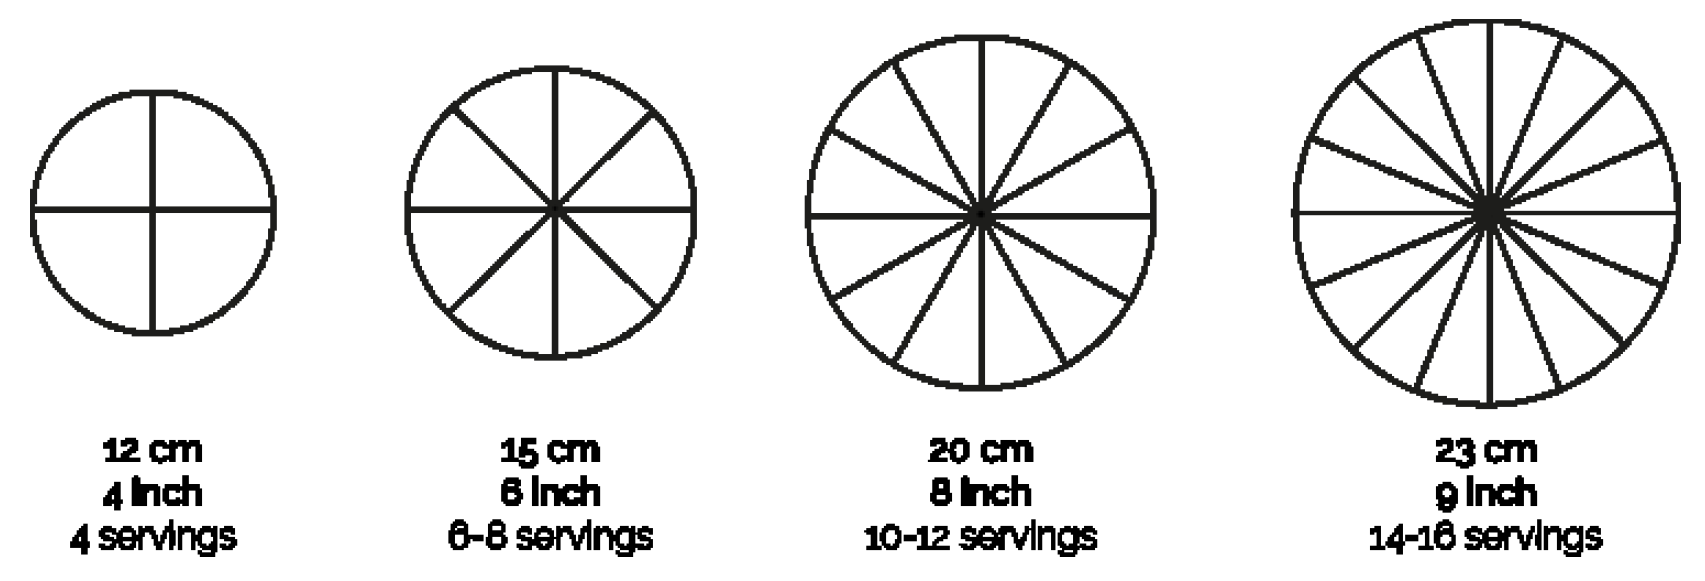
Cake Cuts
There are three main cake cuts that see the most use for round cakes or pies are the ‘8’ cut, the ‘12’ cut and the ‘16’ cut.
- The ‘8’ cut: The cake is cut in half. Each half is then cut in half. From there each quarter is then cut in half. Each slice should be the same size.
- The ‘12’ cut: is a little more difficult. The cake is cut in half. Each quarter piece is then cut evenly into 3 pieces. Each piece should be the same size.
- The ‘16’ cut: is the most difficult. Each cake is cut in half. Each quarter is then cut in half. Each eight is then cut in half. Each slice should be the size.