
6.4: Creating a Table
- Page ID
- 14255

As previously stated, a database cannot exist without at least one table. Therefore, when a new database is created in Access, the first object that opens is a table in datasheet view.

Switching the view to Design View allows the user to make many design decisions in a much more intuitive view. Many users like to use Datasheet View to paste data copied from Excel. However, setting up the fields in Design View makes it easier to define each field’s properties and data type.

Design View doesn’t display any data. Therefore, there’s more space available to display other settings. In Design View, you can see the data type listed next to each field. When a user clicks on a field (in the top frame), the bottom frame displays the properties for that field. The user can then change these properties as desired.
Creating a table in Design View allows the user to define advanced settings, like data types and properties, for each field in the table. However, the first step is defining the field names. Here are a few guidelines when creating field names:
- Names can include numbers, UPPER and lowercase letters, and any combination. Avoid special characters (exclamation points, periods, brackets, quotes, etc.)
- No leading spaces. Spaces between words is acceptable, but not common practice, because:
- Make the names as short as possible without excessive abbreviation. Formatting column widths for displaying in printouts can be challenging with excessively long field names. For example, Order # or Order Number are better than Customer Order Number.
- Ensure the names are unique per table. If a table has fields for Customer ID and Product ID, neither field should be named simply ID. Likewise with the word Name. It is too generic and needs an prefix identifier.
- Break data into multiple fields. For example, instead of one field for Customer Name, create fields for First Name and Last Name. This will allow sorting and filtering on single fields. Another example would be separating an address into multiple fields for Street Address, City, State/Province and Zip/Postal Code.
Every field has a data type. A field’s data type indicates the kind of data that the field stores, such as large amounts of text or attached files. A field’s data type determines what other properties the field has including its size and formatting options. Field data types are defined in the table design grid, where as field properties are defined in the Field Properties pane in the bottom of the Table Design View window. Data types include:
| Data type | Description | Size |
|---|---|---|
| Short Text | Use for text or combinations of text and numbers (i.e. Phone Numbers). | Up to 255 characters |
| Long Text | Use for larger amounts of alphanumeric data, including sentences and paragraphs. Note: You cannot sort a memo field. However, they are searchable. | Up to 1 GB |
| Number | Numeric values. | 4 bytes |
| Large Number | Numeric values. Stores a non-monetary, numeric value and is compatible with the SQL_BIGINT data type in ODBC. Use this data type to efficiently calculate large numbers. | 8 bytes |
| Currency | Use for monetary data. Holds up to 15 digits of whole dollars, plus 4 decimal places. Tip: You can choose which country’s currency to use. | 8 bytes |
| AutoNumber | Unique value generated by Access for each new record, usually starting at 1. | 4 bytes |
| Date/Time | Use for dates and times. | 8 bytes |
| Yes/No | A logical field can be displayed as Yes/No, True/False, or On/Off. In code, use the constants True and False (equivalent to -1 and 0). Note: Null values are not allowed in Yes/No fields. | 1 byte |
| Ole Object | Can store pictures, audio, video, or other BLOBs (Binary Large OBjects). | Up to 2 GB |
| Hyperlink | Contain links to documents or other files, e-mail addresses, or web pages. | Up to 8 bytes |
| Attachment | Attach pictures, documents, etc. Can contain an unlimited number of characters per record. Access will compress the file. | Up to 2 GB |
| Calculated | Use to create an expression that uses data from one or more fields. You can designate different result data types from the expression. | Dependent on the data type of the result type property |
| Lookup Wizard | When selecting this entry, a wizard starts to help define either a simple or complex lookup field. A simple lookup field uses the contents of another table or a value list to validate the contents of a single value per row. A complex lookup field allows you to store multiple values of the same data type in each row. | Dependent on the data type of the lookup field |
After creating a field and setting its data type, users can set additional field properties. The field’s data type determines which other properties that can be set. The field size is the number of characters or the type of number it can store. For Number and Currency fields, the Field Size property is especially important, because it determines the range of field values. For example, a one-bit Number field can store only integers ranging from 0 to 255. In the Field Properties pane, on the General tab, enter the new field size in the Field Size property. Users can choose from the following values:
- Byte — For integers that range from 0 to 255. Storage requirement is a single byte.
- Integer — For integers that range from -32,768 to +32,767. Storage requirement is two bytes.
- Long Integer — For integers that range from -2,147,483,648 to +2,147,483,647. Storage requirement is four bytes.
- Single — For numeric floating point values that range from -3.4 x 1038 to +3.4 x 1038 and up to seven significant digits. Storage requirement is four bytes.
- Double — For numeric floating point values that range from -1.797 x 10308 to +1.797 x 10308 and up to 15 significant digits. Storage requirement is eight bytes.
- Replication ID — For storing a GUID that is required for replication. Storage requirement is 16 bytes.
- Decimal — For numeric values that range from -9.999… x 1027 to +9.999… x 1027. Storage requirement is 12 bytes.
Numeric and date/time fields can have a specified format to define how the data is displayed. Short text, long text, and hyperlink fields usually have no format. Predefined numeric field formats include:
- General Number – (Default) Display the number as entered.
- Currency – Use the thousand separator; follow the settings specified in the regional settings of Windows for negative amounts, decimal and currency symbols, and decimal places.
- Euro – Use the euro symbol (
 ), regardless of the currency symbol specified in the regional settings of Windows.
 - Fixed – Display at least one digit; follow the settings specified in the regional settings of Windows for negative amounts, decimal and currency symbols, and decimal places.
- Standard – Use the thousand separator; follow the settings specified in the regional settings of Windows for negative amounts, decimal symbols, and decimal places.
- Percent – Multiply the value by 100 and append a percent sign (%); follow the settings specified in the regional settings of Windows for negative amounts, decimal symbols, and decimal places.
- Scientific – Use standard scientific notation.
When it comes to date/time fields, Access automatically displays the date and time in the General Date and Long Time formats. The dates appear as, mm/dd/yyyy in the U.S. and as, dd/mm/yyyy outside the U.S. where mm is the month, dd is the day, and yyyy is the year. The time is displayed as, hh:mm:ss AM/PM, where hh is the hour, mm is minutes, and ss is seconds. Here are some other predefined formats for date/time fields:
- Long Date – Displays only date values, as specified by the Long Date format in your Windows regional settings. i.e. Monday, May 13, 2018.
- Medium Date – Displays the date as dd/mmm/yy, but uses the date separator specified in your Windows regional settings. i.e. 13-May-2018.
- Short Date – Displays date values, as specified by the Short Date format in your Windows regional settings. i.e. 5/13/2018.
- Medium Time – Displays hours and minutes followed by AM or PM. Access uses the separator specified in the Time setting in your Windows regional settings. i.e. 9:23 AM.
- Short Time – Displays only hours and minutes. Access uses the separator specified in the Time setting in your Windows regional settings. i.e. 9:23.
Other popular (not all inclusive) field properties that appear based on certain data types include:
- Decimal Places – Specifies the number of decimal places to use when displaying numbers.
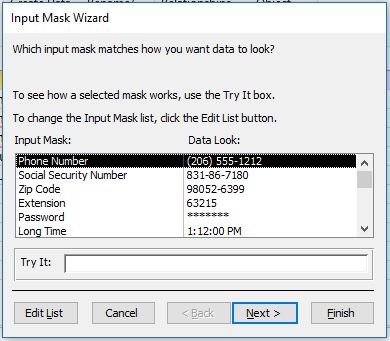
- Input Mask – Controls how data is entered and is useful when text or date entries should follow a certain format. Access has several predefined masks. To open the Input Mask Wizard, click the ellipses (…) at the end of the Input Mask field. Popular existing input masks include the Phone Number and Zip Code masks. Typically, clicking Next to accept the default options throughout the wizard will create the most common input masks. Custom masks can be created by clicking the Edit List button. Mask characters include the digits 0 and 9. A 0 placeholder means that a digit is required, whereas a 9 means that a digit is optional. For example, the last four characters of a Zip Code are often optional, so the mask would display as 00000-9999.
- Caption – The label text that is displayed for this field by default in forms, reports, and queries. If this property is empty, the name of the field is used. Any text string is allowed.
- Default Value – Automatically assigns the specified value to this field when a new record is added. Popular with State or Country fields for data entry in regional uses.
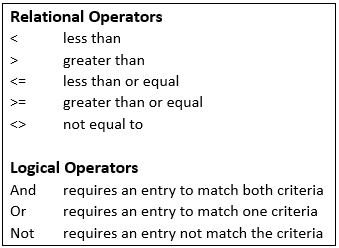
- Validation Rule – Helps ensure accurate data through creation of an expression criterion that must be true whenever the value is added or changed in the field. Validation rules are popular for numeric and date entries, and are formed with one or more relational operators and/or logical operators. A typical rule in an Order Entry table/form might require the Quantity be at least one. The rule in the Quantity field could be >=1.
- Validation Text – If an entry breaks the rule, it is cleared from the entry box and the Validation Text is displayed in a dialog box. Highly recommended to be used in conjunction with the Validation Rule so the data entry person knows why their entry is not acceptable.
- Required – Specifies if data must be entered or not. Choice is Yes or No. Default is No.
- Indexed – Specifies whether the field has an index. There are three available values: Yes (No duplicates) – Creates a unique index; Yes (Duplicates OK) – Creates a non-unique index; No – Removes any index on the field. If users often search a table in Access or sort its records by a particular field, users can speed up these operations by creating an index for the field. Access uses indexes in a table as people use an index in a book: to find data, Access looks up the location of the data in the index. In some instances, such as for a primary key, Access automatically creates an index. At other times, it may be necessary to create an index manually.