11.3: Paragraph Group
- Page ID
- 13640

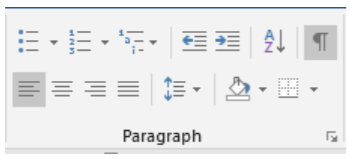
The Paragraph Group focuses on arranging text in a paragraph. Users may create lists, adjust the indentation, sort items, show paragraph formatting, correctly, align text in a paragraph, adjust line spacing, add fill color in shapes, and create borders.
Bullet Lists
Starting in the upper left corner are bullet lists  . Bullet lists should be used when creating a list of similar items that do not require any order. Clicking on the drop-down arrow allows for customization of the appearance of bullet lists. Pressing “Tab” on the keyboard will indent a list item and create a sub bulleted item.
Numbered Lists
To the right of Bullet, Lists are numbered lists  . Numbered lists are like bullet lists, but they should be used when listing out a sequence of events that must be followed in order. Clicking on the drop-down arrow will allow for customization of the numbered list. Pressing “Tab” on the keyboard will indent a list item and create a sub numeral.
Multi-Level Lists
To the left of Numbered Lists are Multi-Level Lists  . Multi-Level Lists provide more customization of lists and sub-lists to the user.
Increase/Decrease
Indent Next on the right, the increase/decrease indent icons  allow the user to move the selected text to the right or left five spaces, or to the next tab setting. Increase/Decrease indent also changes the hierarchy of the list. Increasing an indent to the right will make an item a sub-bullet or sub-number of the item above it and decreasing indent to the left will do the opposite.
Sort
After an increase/decrease indent is the Sort icon  allows the user to arrange a current selection of text in alphabetical or numerical order. It is usually used when working with tables in Microsoft Word.
Show/Hide Paragraph Formatting
Finally, in the top right corner of the paragraph group is the Show/Hide Paragraph Formatting icon  allows the user to view all the hidden formatting options that are currently attributed to the document. This is useful if the formatting seems incorrect in a document and the user is trying to investigate it. Any formatting displayed is not printed.
Paragraph Alignment
The bottom row of the paragraph group begins with Paragraph Alignment settings  . The settings align the selected text to the left side of the screen (which is standard formatting), centered (which is common for titles), right-aligned, and justified, which distributes text evenly between the margins. Most word documents are written with left alignment, so that is the default settings.
Line & Paragraph Spacing
To the right of the paragraph alignment icons is Line & Paragraph Spacing  . These settings allow the user to choose how much space exists between lines and between paragraphs. This is helpful to enhance the readability of paragraphs by creating enough space between sentences and paragraphs. For more customization, users can click on “Line Spacing Options” in the drop-down menu for even greater controls.
Shading
The Shading function  to the right of Line & Paragraph Spacing allows the user to change the color behind a paragraph, table, or selected text. It can be used in flyers and more creative word documents.
Borders
The Page Borders icon  allows the user to create borders around selected text and/or paragraphs and define the type of borders from the drop-down menu. There is every type of border imaginable for the user. Borders are usually created to create distance or space between separate ideas or paragraphs.
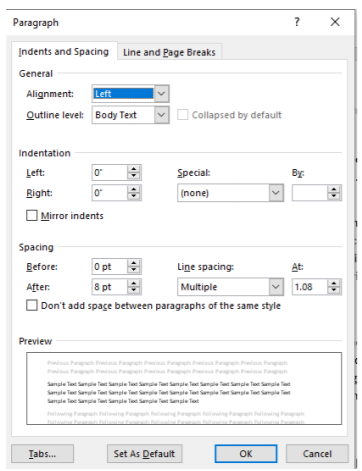
More settings
Users who desire more control in paragraph formatting can click on the arrow icon facing down and to the right.  . This will launch a more settings menu that will provide customization of the line & paragraph spacing and page breaks.