
1.4: Building a Spreadsheet
- Page ID
- 13016
Student outcomes:
Students will be able to create spreadsheets, enter data in rows and columns, copy and move data in rows and columns, use the AutoSum Key and apply a simple formula using cell referencing.
Steps referenced in this assignment:
- Opening a new blank document (“How to Open,” #1) (Page 1)
- Saving a document (procedures and file names (“How to Open,” #2) (Page 1)
- Definition of a Label and attributes, fonts and alignment (“Label,” #2,) (Page 1)
- How to widen a column (“Labels,” #3) (Page 2) Moving from cell to cell (“Labels,” #4) (Page 2)
- Definition of a value (“Values,”) (Page 2)
- Definition and instructions for the AutoSum key (“Cell Referencing,”) (Page2)
- Definition of cell referencing (“Cell Referencing”) (Page 2)
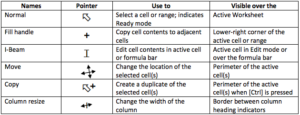
- Common Mouse pointers (“Table: Common Mouse Pointers”) (Page 2)
How to open and save a blank spreadsheet
1. Opening a new blank document: When an assignments requires a blank spreadsheet, click on FILE tab then click NEW in the navigation panel on the left. Click on the spreadsheet icon in your spreadsheet software.
2. Saving a document (procedures and file names):
- Once the blank spreadsheet displays on the screen, save the document with the title that will be provided to you by going to Step 3.
- Students should have some knowledge as to how to SAVE a document.)To Save a file, click on FILE tab (at the top of the screen) and from the Backstage navigation bar along the left side, click SAVE AS. The spreadsheet can be saved to the DESKTOP or to a STORAGE DEVICE.
- If a file name is not given to you, save the file with any name you wish as long as you name it in such a way for easy retrieval. A file name can be in capital or lower case letters and can include spaces as well as periods.
- There are only a select few symbols that can be used in a filename. Some symbols to avoid are diagonals, parentheses, commas. If you try to save a file with an unacceptable symbol, a dialog box will display indicating the file cannot be saved with that name. Simple delete the symbol from the file name.
- The file extension for spreadsheets (the information after the period) is usually.xlsx. The extension automatically attaches. You do not need to type it.
Basic Definition: Labels
- Labels are entries that contain text and numerical information not used in calculations. They help to make the worksheet easier to read.
- Labels can be typed in any cell.
- Basic attributes (bold, underline, or italicize) as well as font type and size can be applied to any label. Labels can be aligned by using the same alignment keys used for word processing (left, center and right alignments). These formatting choices are found on the HOME TAB in the Font Group.
- To widen a column: If the label is too big for the cell size the column needs to be widened. To do this either double click in the cell that needs more room. The cell will automatically widen. This is called adjusting columns.
- To move from one cell to the next, you can
- Click in the cell you want, or
- Use the TAB key on the keyboard to move into the next adjacent cell, or
- Use the arrow keys on the keyboard to move to various positions.
Basic Definition: Values
Values are numbers, formulas, and functions that can be used in calculations
Basic Definition: AutoSum Button
- The AutoSum button is found on the HOME TAB in the Editing Group which is the last group to the right on this ribbon. The symbol before it looks a version of the capital letter “E”.
- AutoSum is used to quickly add columns or rows of data.
Basic Definition: Cell Referencing
Cell Referencing is identifying values by first identifying the column the value is in and then identifying the coordinating row
Columns are vertical and use letters (in the example, letters in red). Column references are given first.
Rows are horizontal and use numbers (in the example, numbers in blue) Row references are indicated after the column reference. (Example B1).
In the example below the Cell Reference would be B2, not 1000. Actual values are hardly ever used.

Common Mouse Pointers for Spreadsheets
- Building a Spreadsheet. Authored by: Fran Wells. License: CC BY: Attribution