Workforce LibreTexts

6.3: Sketching Figures with Non-isometric Lines

  • Page ID
    3251
  • \( \newcommand{\vecs}[1]{\overset { \scriptstyle \rightharpoonup} {\mathbf{#1}} } \) \( \newcommand{\vecd}[1]{\overset{-\!-\!\rightharpoonup}{\vphantom{a}\smash {#1}}} \)\(\newcommand{\id}{\mathrm{id}}\) \( \newcommand{\Span}{\mathrm{span}}\) \( \newcommand{\kernel}{\mathrm{null}\,}\) \( \newcommand{\range}{\mathrm{range}\,}\) \( \newcommand{\RealPart}{\mathrm{Re}}\) \( \newcommand{\ImaginaryPart}{\mathrm{Im}}\) \( \newcommand{\Argument}{\mathrm{Arg}}\) \( \newcommand{\norm}[1]{\| #1 \|}\) \( \newcommand{\inner}[2]{\langle #1, #2 \rangle}\) \( \newcommand{\Span}{\mathrm{span}}\) \(\newcommand{\id}{\mathrm{id}}\) \( \newcommand{\Span}{\mathrm{span}}\) \( \newcommand{\kernel}{\mathrm{null}\,}\) \( \newcommand{\range}{\mathrm{range}\,}\) \( \newcommand{\RealPart}{\mathrm{Re}}\) \( \newcommand{\ImaginaryPart}{\mathrm{Im}}\) \( \newcommand{\Argument}{\mathrm{Arg}}\) \( \newcommand{\norm}[1]{\| #1 \|}\) \( \newcommand{\inner}[2]{\langle #1, #2 \rangle}\) \( \newcommand{\Span}{\mathrm{span}}\)\(\newcommand{\AA}{\unicode[.8,0]{x212B}}\)

    Figure \(\PageIndex{1}\) shows an object that is basically rectangular but has one face machined at an angle. You can easily construct an isometric sketch of the basic rectangular block. To show the machined face, it is necessary to plot the appropriate points of intersection and join those points to produce the correct angle.

    rectangleMachineFace.png

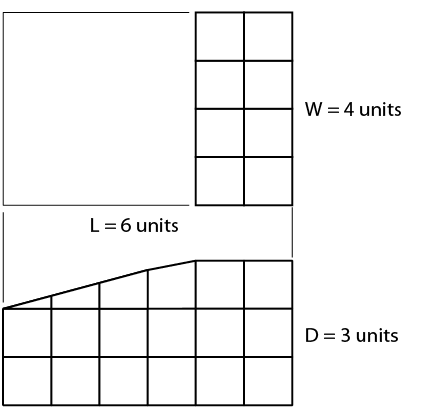
    Figure \(\PageIndex{1}\): Rectangle with face machined at an angle

    Sketch a light outline of the basic rectangular block using the size measurements given in Figure \(\PageIndex{1}\). Mark the number of units indicated along the length (L) and the depth (D), as shown in Figure \(\PageIndex{2}\).

    Lightly sketch lines parallel to the original block outlines from the marked points on the front and side surfaces, as shown in Figure \(\PageIndex{3}\).

    rectangleWithUnits.png

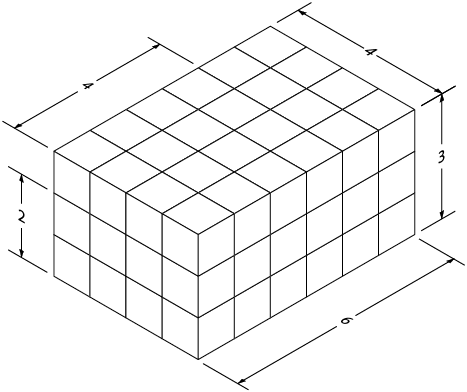
    Figure \(\PageIndex{2}\): Rectangle with units marked along L and D

    linesSketchedParallel.png

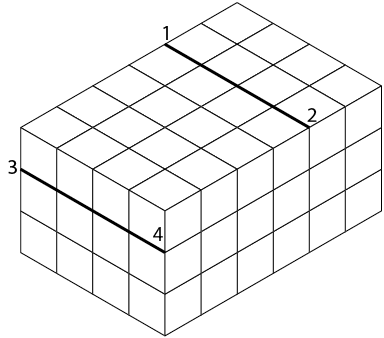
    Figure \(\PageIndex{3}\): Lines sketched parallel to original block outline

    Join the two points on the front face and the two ends of the lines you have just sketched across the object (Figure \(\PageIndex{4}\)). Once you are sure your sketch is correct, erase the light lines that originally outlined the block and darken the outline of the completed block as shown in Figure \(\PageIndex{5}\). 

    frontFace.png

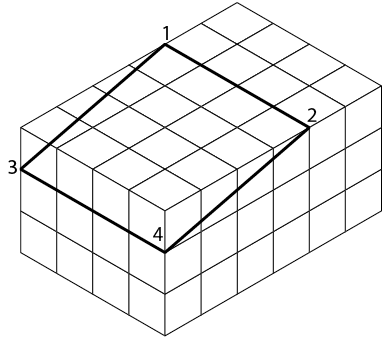
    Figure \(\PageIndex{4}\): Front face

    completedBlock.png

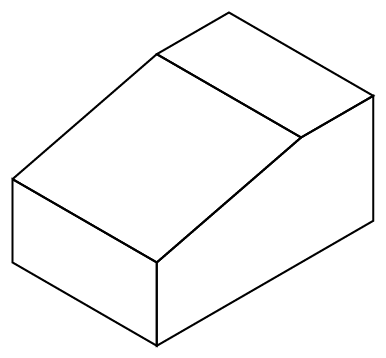
    Figure \(\PageIndex{5}\): Completed block


    6.3: Sketching Figures with Non-isometric Lines is shared under a CC BY license and was authored, remixed, and/or curated by LibreTexts.

    • Was this article helpful?