
2.5: Unit 5: Tapping
- Page ID
- 2277
OBJECTIVE
After completing this unit, you should be able to:
• Describe the tapping procedure.
• Determine the RPM for tapping.
• Describe the filling and polishing.
• Describe the advanced workholding.
Tapping
Tapping is the process of cutting a thread inside a hole so that a cap screw or bolt can be threaded into the hole. Also, it is used to make thread on nuts.
Tapping can be done on the lathe by power feed or by hand. Regardless of the method, the hole must be drilled with the proper size tap drill and chamferred at the end.
Tapping Procedures
Good Practices
Using Tap Guides
Tap guides are an integral part in making a usable and straight tap. When using the lathe or the mill, the tap is already straight and centered. When manually aligning a tap, be careful, as a 90° tap guide is much more accurate than the human eye.
Using Oil
When drilling and tapping, it is crucial to use oil. It keeps the bits from squealing, makes the cut smoother, cleans out the chips, and keeps the drill and stock from overheating.
Pecking
Pecking helps ensure that bits don’t overheat and break when using them to drill or tap. Peck drilling involves drilling partway through a part, then retracting it to remove chips, simultaneously allowing the piece to cool. Rotating the handle a full turn then back a half turn is common practice. Whenever the bit or tap is backed out, remove as many chips as possible and add oil to the surface between the drill or tap and the workpiece. Hand Tapping Procedure 1. Select drill size from chart. When choosing a tap size, this chart is the first place to look
Hand Tapping Procedure
1. Select drill size from chart.
When choosing a tap size, this chart is the first place to look.
Tap & Clearance Drill Sizes


2. If necessary, add chamfer to the hole before tapping. Chamfers and countersinks are additional features that are sometimes desired for screws. For best results, the speed of the spindle should be between 150 and 250 rpm.
3. Get a tap guide. The hole is now ready to tap. To do this, use the taps and guide blocks near the manual mills. The guide blocks will have several holes for different sized taps. Select the one closest to the size of the tap being used and place it over the drilled hole.
4. Tap the block. Peck tap using the tap wrenches. Apply gentle pressure while turning the wrench a complete turn in, then a half-turn out. Peck tap to the desired depth.
5. Complete the tap. If the tap does not go any further or the desired depth has been reached, release pressure on the tap; it has likely bottomed out. Remove the tap from the hole.
Applying any more pressure is likely to break the tap. The smaller the tap, the more likely it is to break.
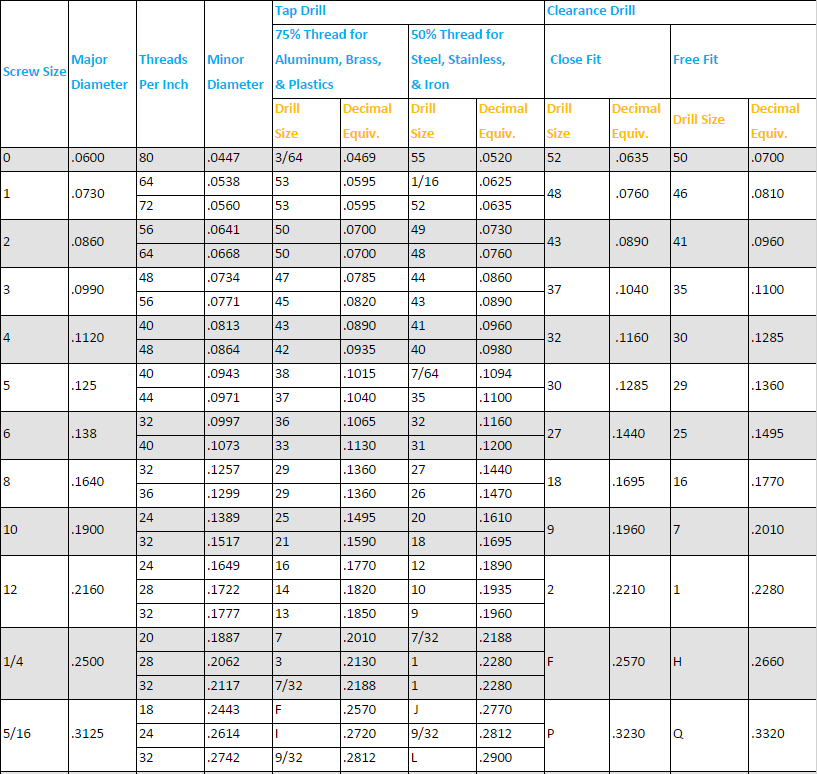
Figure 1. Tap
Tapping Procedure for Lathe
Procedure:
1. Mount the workpiece in the chuck.
2. Face and center drill.
3. Select the proper tap drill for the tap to be used.
4. Example: ¼ – 20 unc used # 7 drill.
5. Set the lathe to the proper speed and drill with the tap to the required depth. Use plenty cutting fluid.
6. Note: the workpiece will rotate when tapping using the lathe power. Use a very slow spindle speed. (40 to 60 rpm) and plenty of cutting fluid.
7. Chamfer the edge of the hole.
Filing in a Lathe
A workpiece should be filled in a lathe only to remove a small amount of stock, to remove burns or round off sharp corners. Workpiece should always be turned to about .002 to .003 inch of size, if the surface is to be filed. Hold the file handle in the left hand to avoid injury when filing on the lathe, so that the arms and hands can be kept clear of the revolving chuck.
Procedure:
1. Set the spindle speed to about twice that used for turning.
2. Mount the workpiece in the chuck, lubricate, and adjust the dead center in the workpiece.
3. Move the carriage as far to the right side as possible and remove the tool post (if needed)
4. Disengage the lead screw and feed rod.
5. Select right file to be used.
6. Start the lathe.
7. Grasp the file handle in the left hand and support the file point with the right hand finger.
8. Apply light pressure and push the file forward to its full length. Release pressure on the return stake.
9. Move the file about half the width of the file for each stroke and continue filing, using 30 to 40 strokes per minute until the surface is finished.
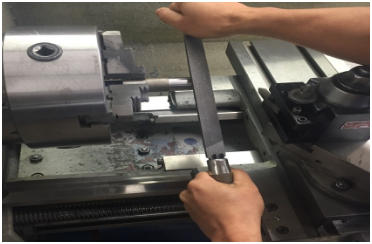
Figure 2. Filing
When filing in a lathe, the following safety should be observed.
• Roll up sleeves.
• Do not use a file without a properly fitted handle.
• Remove watches and rings.
• Do not apply too much pressure to the file.
• Clean the file frequently with a file brush. Rub a little chalk into the file teeth to prevent clogging and facilitate cleaning.
Polishing in a Lathe
After the workpiece has been filed, the finish may be improved by polishing with abrasive cloth.
Procedure:
1. Select the collect type and grade of abrasive cloth, for the finish desired, use a piece about 6 to 8 inch long and 1 inch wide.
2. Set the lathe to run on high speed (about 800-1000 rpm).
3. Disengage feed rod and lead screw.
4. Lubricate and adjust the dead center.
5. Start the lathe.
6. Hold the abrasive cloth on the workpiece.
7. With the right hand, press the cloth firmly on the work while tightly holding the other end of the abrasive cloth with the left hand.
8. Move the cloth slowly back and forth along the workpiece.
Figure 3. Polishing
When polishing in a Lathe, the following safety should be observed:
1. Roll up sleeves.
2. Tuck in any loose clothing
For normal finishes, use 80 to 100 grit abrasive cloth. For better finishes, use a finnier grit abrasive cloth.
Advanced Workholding
Some parts may be irregular, calling for specialized tools to hold them properly before being machined.
1. The part cannot be placed into a collet or chuck when cutting on the entire outside diameter of the stock.
2. Parts with holes through it should be pressed onto a lathe arbor (a tapered shaft) and then clamped onto the arbor rather than the part itself.
3. If the hole is too large, using a lathe arbor will not sufficiently support the piece. Instead, use the outside jaws to grasp the inside diameter of the part.
4. Parts with complex geometries may need to be attached onto a faceplate that will be further installed onto the spindle.
LATHE WORKHOLDING:
The following table provides a quick comparison of the strengths and weaknesses of the different means of holding the workpiece on a lathe:
Method | Precision | Repeatability | Convenience | Notes |
Collets | High | High | High | Fast, high precision, high repeatability, grips well, unlikely to mar workpiece, grip spread over a wide area. Expensive chucks and collets. Handles limited lengths. Workpiece must be round andmust fit nearly exactly to the collet size. |
3-Jaw Chuck With Soft Jaws | High | High | High | For larger workpieces, 3 jaw chucks withsoftjawsare the norm in the CNC world. |
3-Jaw Self-Centering Chuck with Hard Jaws | Low | Low | High | Common, cheap, simple. Low precision, low repeatability if you remove the workpiece and have to put it back. |
4-Jaw Chuck | High | High | Medium | Can be time consuming to individually adjust the jaws, but will result in high precision. Can hold pieces offset for turning cams or eccentrics. Can hold irregular shapes and square or rectangular stock. |
6-Jaw Self-Centering Chuck | Medium | Medium | High | Best for thin wall work or to grip finished edges of workpiece. Obviously good for hex stock. |
Faceplate Turning | Varies w/ Setup | Medium | Low | Great for irregular shapes. Involves clamps like a milling setup. May need counterweights to keep things balanced. |
Turning Between Centers | High | High | Low | Great precision, allows part to be put back between centers with very high repeatability. |
Constant Face Turning | High | High | High | The modern alternative to turning between centers. Instead of using lathe dogs, which are kind of a nuisance to set up, the constant face system uses hydraulic or other force to grip and drive the spindle end. |
Expanding Arbors | High | High | High | These work from the inside out rather than the outside in but are otherwise much like collets. |
Method describes the particular technique or tooling to be used.
Precision describes how precisely the workpiece will be held, or how close to concentrically it will run with the spindle before taking any cuts.
Repeatability describes how easy it is to take the workpiece out and then get it back in precisely again.
UNIT TEST
1. What drill size to be used for ½ -20 tap?
2. What is the purpose of chamfer?
3. What is the best RPM for tapping?
4. What spindle speed do we set for filing?
5. What is the purpose of polishing?
6. What is the best grit abrasive cloth for normal finishes?
7. What type of work is best suited to three-jaw chucks?
8. What are the special characteristics of the three-jaw chuck?
9. Explain the different between three-jaw chuck and 4-jaw chuck.
10. What are the advantages and disadvantages of a collect chuck?