
5.6: Imposition
- Page ID
- 9539
\( \newcommand{\vecs}[1]{\overset { \scriptstyle \rightharpoonup} {\mathbf{#1}} } \)
\( \newcommand{\vecd}[1]{\overset{-\!-\!\rightharpoonup}{\vphantom{a}\smash {#1}}} \)
\( \newcommand{\dsum}{\displaystyle\sum\limits} \)
\( \newcommand{\dint}{\displaystyle\int\limits} \)
\( \newcommand{\dlim}{\displaystyle\lim\limits} \)
\( \newcommand{\id}{\mathrm{id}}\) \( \newcommand{\Span}{\mathrm{span}}\)
( \newcommand{\kernel}{\mathrm{null}\,}\) \( \newcommand{\range}{\mathrm{range}\,}\)
\( \newcommand{\RealPart}{\mathrm{Re}}\) \( \newcommand{\ImaginaryPart}{\mathrm{Im}}\)
\( \newcommand{\Argument}{\mathrm{Arg}}\) \( \newcommand{\norm}[1]{\| #1 \|}\)
\( \newcommand{\inner}[2]{\langle #1, #2 \rangle}\)
\( \newcommand{\Span}{\mathrm{span}}\)
\( \newcommand{\id}{\mathrm{id}}\)
\( \newcommand{\Span}{\mathrm{span}}\)
\( \newcommand{\kernel}{\mathrm{null}\,}\)
\( \newcommand{\range}{\mathrm{range}\,}\)
\( \newcommand{\RealPart}{\mathrm{Re}}\)
\( \newcommand{\ImaginaryPart}{\mathrm{Im}}\)
\( \newcommand{\Argument}{\mathrm{Arg}}\)
\( \newcommand{\norm}[1]{\| #1 \|}\)
\( \newcommand{\inner}[2]{\langle #1, #2 \rangle}\)
\( \newcommand{\Span}{\mathrm{span}}\) \( \newcommand{\AA}{\unicode[.8,0]{x212B}}\)
\( \newcommand{\vectorA}[1]{\vec{#1}} % arrow\)
\( \newcommand{\vectorAt}[1]{\vec{\text{#1}}} % arrow\)
\( \newcommand{\vectorB}[1]{\overset { \scriptstyle \rightharpoonup} {\mathbf{#1}} } \)
\( \newcommand{\vectorC}[1]{\textbf{#1}} \)
\( \newcommand{\vectorD}[1]{\overrightarrow{#1}} \)
\( \newcommand{\vectorDt}[1]{\overrightarrow{\text{#1}}} \)
\( \newcommand{\vectE}[1]{\overset{-\!-\!\rightharpoonup}{\vphantom{a}\smash{\mathbf {#1}}}} \)
\( \newcommand{\vecs}[1]{\overset { \scriptstyle \rightharpoonup} {\mathbf{#1}} } \)
\(\newcommand{\longvect}{\overrightarrow}\)
\( \newcommand{\vecd}[1]{\overset{-\!-\!\rightharpoonup}{\vphantom{a}\smash {#1}}} \)
\(\newcommand{\avec}{\mathbf a}\) \(\newcommand{\bvec}{\mathbf b}\) \(\newcommand{\cvec}{\mathbf c}\) \(\newcommand{\dvec}{\mathbf d}\) \(\newcommand{\dtil}{\widetilde{\mathbf d}}\) \(\newcommand{\evec}{\mathbf e}\) \(\newcommand{\fvec}{\mathbf f}\) \(\newcommand{\nvec}{\mathbf n}\) \(\newcommand{\pvec}{\mathbf p}\) \(\newcommand{\qvec}{\mathbf q}\) \(\newcommand{\svec}{\mathbf s}\) \(\newcommand{\tvec}{\mathbf t}\) \(\newcommand{\uvec}{\mathbf u}\) \(\newcommand{\vvec}{\mathbf v}\) \(\newcommand{\wvec}{\mathbf w}\) \(\newcommand{\xvec}{\mathbf x}\) \(\newcommand{\yvec}{\mathbf y}\) \(\newcommand{\zvec}{\mathbf z}\) \(\newcommand{\rvec}{\mathbf r}\) \(\newcommand{\mvec}{\mathbf m}\) \(\newcommand{\zerovec}{\mathbf 0}\) \(\newcommand{\onevec}{\mathbf 1}\) \(\newcommand{\real}{\mathbb R}\) \(\newcommand{\twovec}[2]{\left[\begin{array}{r}#1 \\ #2 \end{array}\right]}\) \(\newcommand{\ctwovec}[2]{\left[\begin{array}{c}#1 \\ #2 \end{array}\right]}\) \(\newcommand{\threevec}[3]{\left[\begin{array}{r}#1 \\ #2 \\ #3 \end{array}\right]}\) \(\newcommand{\cthreevec}[3]{\left[\begin{array}{c}#1 \\ #2 \\ #3 \end{array}\right]}\) \(\newcommand{\fourvec}[4]{\left[\begin{array}{r}#1 \\ #2 \\ #3 \\ #4 \end{array}\right]}\) \(\newcommand{\cfourvec}[4]{\left[\begin{array}{c}#1 \\ #2 \\ #3 \\ #4 \end{array}\right]}\) \(\newcommand{\fivevec}[5]{\left[\begin{array}{r}#1 \\ #2 \\ #3 \\ #4 \\ #5 \\ \end{array}\right]}\) \(\newcommand{\cfivevec}[5]{\left[\begin{array}{c}#1 \\ #2 \\ #3 \\ #4 \\ #5 \\ \end{array}\right]}\) \(\newcommand{\mattwo}[4]{\left[\begin{array}{rr}#1 \amp #2 \\ #3 \amp #4 \\ \end{array}\right]}\) \(\newcommand{\laspan}[1]{\text{Span}\{#1\}}\) \(\newcommand{\bcal}{\cal B}\) \(\newcommand{\ccal}{\cal C}\) \(\newcommand{\scal}{\cal S}\) \(\newcommand{\wcal}{\cal W}\) \(\newcommand{\ecal}{\cal E}\) \(\newcommand{\coords}[2]{\left\{#1\right\}_{#2}}\) \(\newcommand{\gray}[1]{\color{gray}{#1}}\) \(\newcommand{\lgray}[1]{\color{lightgray}{#1}}\) \(\newcommand{\rank}{\operatorname{rank}}\) \(\newcommand{\row}{\text{Row}}\) \(\newcommand{\col}{\text{Col}}\) \(\renewcommand{\row}{\text{Row}}\) \(\newcommand{\nul}{\text{Nul}}\) \(\newcommand{\var}{\text{Var}}\) \(\newcommand{\corr}{\text{corr}}\) \(\newcommand{\len}[1]{\left|#1\right|}\) \(\newcommand{\bbar}{\overline{\bvec}}\) \(\newcommand{\bhat}{\widehat{\bvec}}\) \(\newcommand{\bperp}{\bvec^\perp}\) \(\newcommand{\xhat}{\widehat{\xvec}}\) \(\newcommand{\vhat}{\widehat{\vvec}}\) \(\newcommand{\uhat}{\widehat{\uvec}}\) \(\newcommand{\what}{\widehat{\wvec}}\) \(\newcommand{\Sighat}{\widehat{\Sigma}}\) \(\newcommand{\lt}{<}\) \(\newcommand{\gt}{>}\) \(\newcommand{\amp}{&}\) \(\definecolor{fillinmathshade}{gray}{0.9}\)Imposition of individual graphics page files serves two primary purposes. The first, and perhaps most important purpose, is to utilize media and manufacturing equipment with the most economic efficiencies. The second is to add what has historically been referred to as ‘furniture’ to the manufactured sheet to control processes. We will discuss both priorities for each primary imaging technology we are examining in this book. There is also a range of equipment capabilities for each technology that affects how documents are imposed. There are a few ways to impose the files either pre-RIP or post-RIP. We will also look at ways of imposing in graphic creation software and in specialized imposition software.
The first technology we will look at is electrophotography, where imposition is perhaps the most underutilized. Electrophotographic, or Xerox-type copiers are usually used for short-run lengths with demands for instant turnaround. Duplexing is the simplest type of imposition, but there are four choices for how to orient the back of a single page on the front. The duplexing style can be specified in the print driver, in the PDF file, or in the RIP. Most small printers will turn on duplexing, rather than image the fronts, turn the printed paper over the right way, and image the back of the sheet. Fewer will take the time to utilize the machine and media capabilities to step and repeat an image two up on a larger sheet to half the run time. Yet, as a manufacturing process, electrophotography is the slowest technology for image reproduction, and the most in need of saving time. There are simple rules of automation that can be programmed in a RIP to automatically impose if a run length is over 100 copies. For example, letter-size documents are the most often imaged on this type of equipment. If run lengths of more than 100 copies were imposed two up on a tabloid sheet, it would halve the run time and open up more imaging time on the machine. This introduces another process — cutting the sheets in half before final delivery. Management can determine how well the imaging engine run time is utilized and when it is efficient to have the same operator cut printed sheets in half. Making that management decision requires a knowledge of workflow options for efficiency. Those efficiencies are the primary purpose of implementing imposition software.
Using a ‘step and repeat’ or ‘duplexing’ imposition of single-page file is the simplest example of imposing files for electrophotographic workflows. More and more copiers have capabilities to fold and bind the finished product ‘inline’ in one continuous process. This process is driven by imposing the single-page files in the correct order as they are processed in the RIP, so they image in the proper spot on the media to fold, and bind together in the correct order.
Imposing page files for binding styles usually follows two types of machine capabilities: saddle stitching and perfect binding. Saddle stitching is a binding process that folds the media after it is imaged on both sides, stacks the printed folded sheets one inside the other, and applies staples to the spine of the book. The other dominant style of book binding built into copiers is perfect binding. Media is imaged on both sides and folded, but the folded sheets are stacked on top of each other, glue is applied, and a cover sheet is wrapped around the glued book to encase the spine. The pages have to be imposed in a completely different order on the printed sheets. The first and last sheets of a saddle-stitched book are imaged on the same sheet, whereas a perfect-bound book has the first pages imaged on the same sheet, and last pages on separate sheets of media.
There are many options for folding a sheet of substrate before binding it together. The options increase the larger a sheet is. An imposition must account for the preferences that are best practices for the specific machines involved. If we look at sheet-fed lithography first, we can identify some common best practices that can also apply to toner-based electrophotography and inkjet. We shall leave an examination of imposition for flexography to discuss nested dieline shapes for packaging applications.
Imposition standards are based on workflows for standard-sized pages, primarily letter-sized pages measuring 8½” x 11″. We speak of two up devices that can generally image substrates up to a maximum size of 12″ x 18″ or 13″ x 19.” Two up devices can accommodate two letter-sized pages plus bleeds, grip, marks, and colour bars — sometimes referred to as furniture on an imposed sheet. These four elements all serve a purpose in page reproduction manufacturing that we shall define later. Four up devices generally accommodate imaging substrates up to 20″ x 29″ to image four letter-sized pages. Forty-inch devices are referred to as eight up and image on a maximum sheet size of 30″ x 40″, which can image eight letter-sized pages and the furniture mentioned above.
There are four common styles of imposition for eight up devices: sheet-wise, work and turn, work and tumble, and cut and stack.
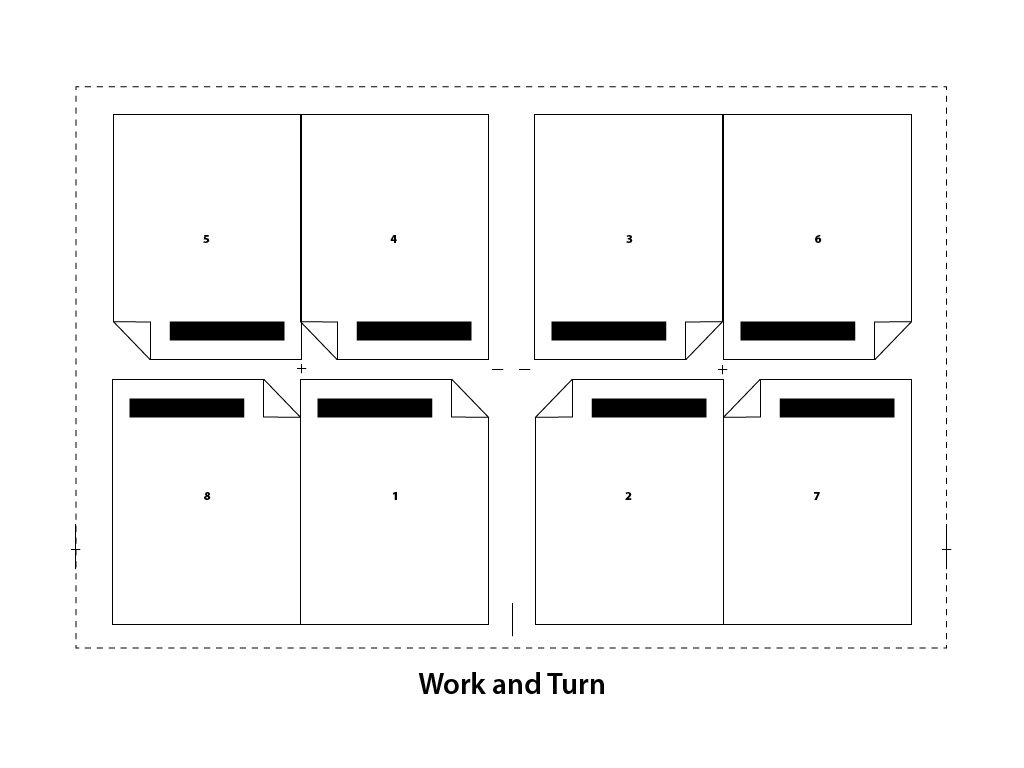
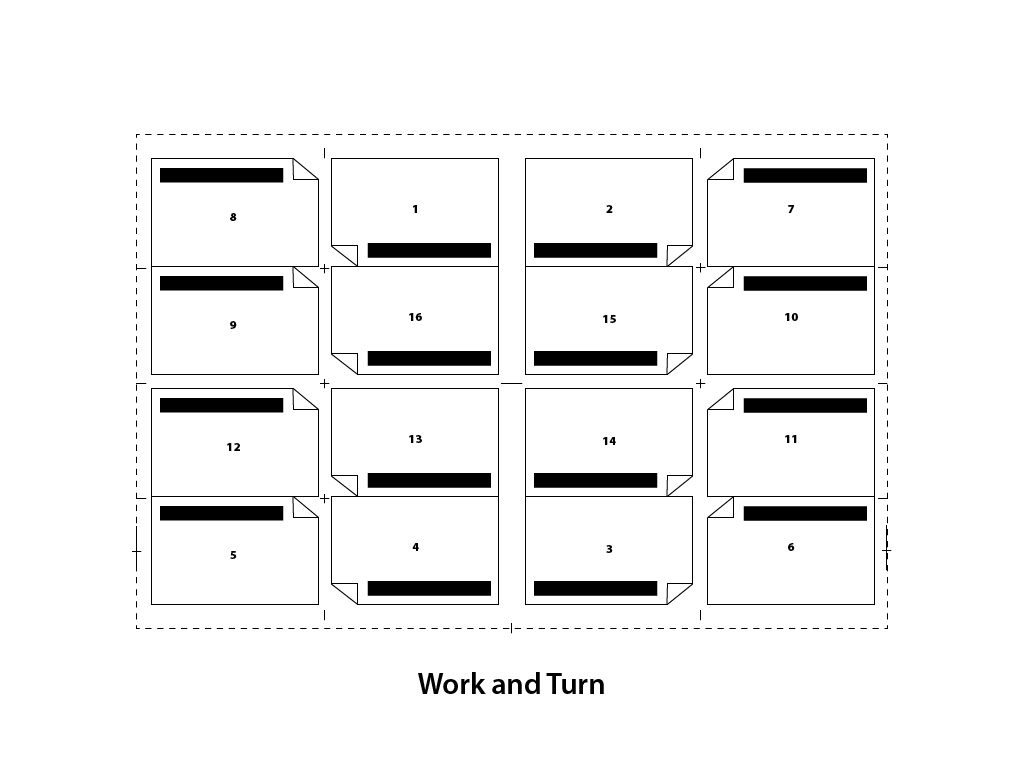
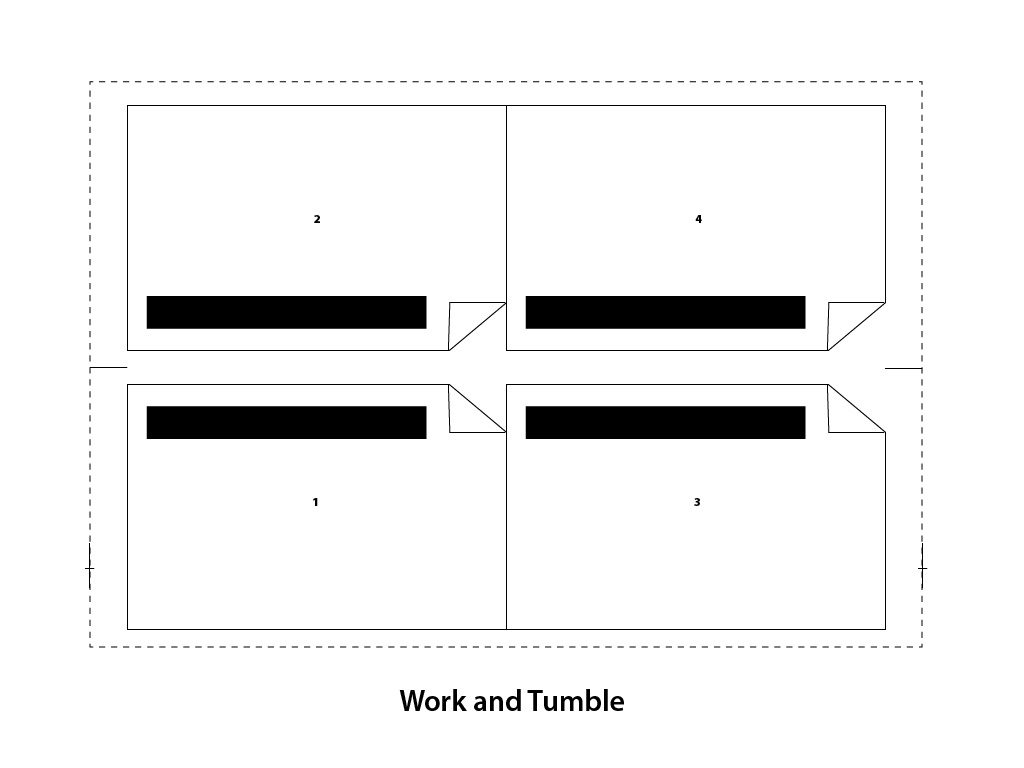
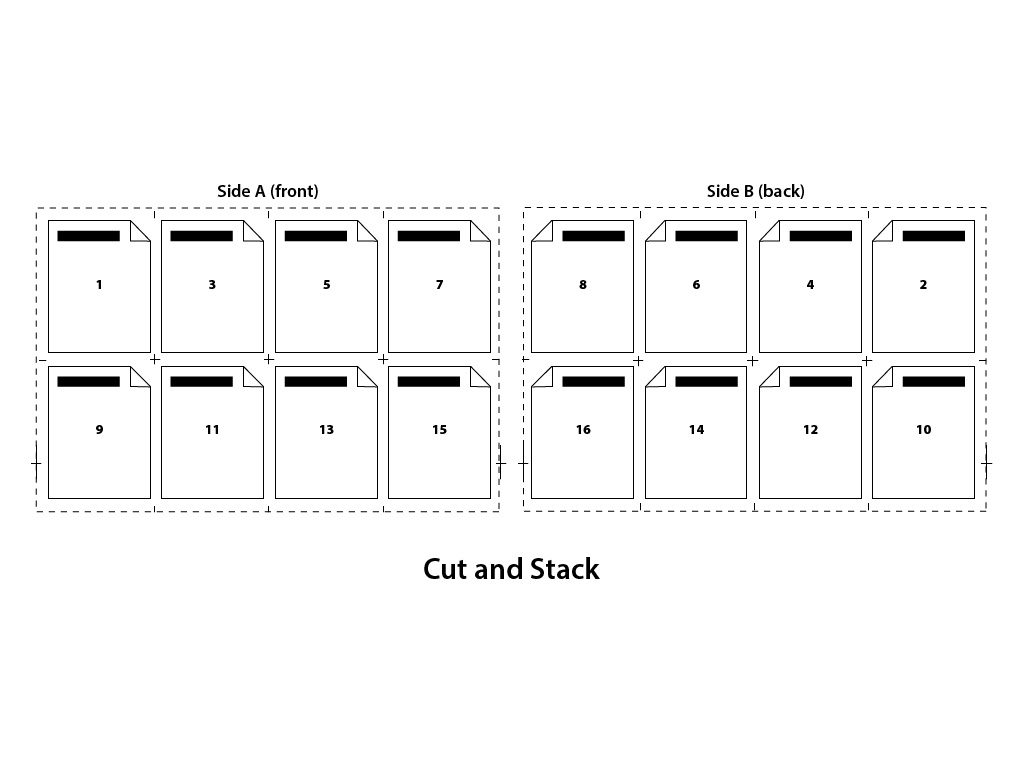
Sheet-wise impositions image the fronts of all pages on one side of the sheet and impose all the backs on a separate set of plates for a press run that will back up all the sheets. Work and turn imposes the fronts on one half of the sheet and the backs on the other half, with the axis running perpendicular to the grip of the sheet (see Figures 5.1 and 5.2). Work and tumble imposes all fronts on the bottom half of a sheet and backup images on the top half of the sheet (see Figure 5.3). The sheets are flipped halfway through the press run, with the axis parallel to the grip edge of the sheet. Cut and stack imposes the pages so full press sheets can be collated, and the collated sheets cut and stacked in order on top of each other to make a final book (see Figure 5.4).
Lithographic web offset presses have imposition orders that depend on how wide the web of paper is, and how many web rolls and half rolls will be brought together before folding on a first former, and cutting on a second former. There are many options for configuring a web-fed litho press, depending on the number of pages in a publication. Usually, the entire publication is printed and folded by running the stack of web paper together and folding it in half over a former.
Imposition has to account for creep and bottling when imposing for thicker publications. Creep pushes the image on a page closer in to the spine the further the page is toward the spine, by the width of the thickness of the publication at the stapled, spine edge. Bottling skews the image on a page to account for the skewing of web rolls of paper that are folded in very thick signatures. The thicker the folded signature of a bound book, the more skewing takes place, which should be accounted for in the ‘Bottling’ value in an imposition.
Imposition for inkjet mediums is usually done when the image is rasterized. The RIP will store the raster image and nest several raster images together to fill the dimensions of the media being imaged. This is usually set as an automated function in the RIP, and is tied to the size and cost of the media being used. When imaging very low resolution images on very low cost media, the manufacturer is usually more concerned with the speed of the machine than the utilization of the media. If an expensive media is being used, the automatic imposition will be utilized in the RIP to save media. Often inkjet images are not square, and the media will be die cut or cut with a router after imaging. The RIP can be set to impose the images so the shapes nest inside each other. This is usually outside of the automatic features for imposition in a RIP, and requires operator intervention. In that case, the imposition operator must know the die cutting or router processes very well to make sure the imaged media can be cut out even though it is nested with another image.
This nesting of images to be die cut after imaging is most prevalent in flexographic printing for packaging. Most package or label shapes are not square and the media is expensive. The imposition function becomes very important for preparing flexographic plates. Nesting the die cut shapes for several packages together on a continuous roll of media takes very specialized software and a highly skilled operator. There are many variables to consider, including media thickness, ink coverage, die shapes, glue releases, and image floor on the flexo plate. Flexo imaging for packaging generally takes more understanding of CAD software and the construction of the final three-dimensional product. Imposition operators must know the structural requirements as well as the press limitations to nest together several package images on the same press run.
The final consideration for all impositions in all imaging technologies is the computer resource requirements for the RIP. We usually require an imaging engine to raster a single document, and proof it one page at a time through a proofing device. When we impose the same document with many other pages in completely different orientations, sometimes RIP processing errors can occur. Fonts drop out, and more commonly, transparent elements do not process properly. This is another checkpoint to make sure the imposed image matches the proof of the single page. It is essential to discuss preflighting for print at this point to establish where the routine checkpoints in document processing should be.
Media Attributions
- work and turn 01 by Ken Jeffrey
- work and turn 02 by Ken Jeffrey
- work and tumble by Ken Jeffrey
- cut and stack-03 by Ken Jeffrey