7.6: The TRIAC
- Page ID
- 775
\( \newcommand{\vecs}[1]{\overset { \scriptstyle \rightharpoonup} {\mathbf{#1}} } \)
\( \newcommand{\vecd}[1]{\overset{-\!-\!\rightharpoonup}{\vphantom{a}\smash {#1}}} \)
\( \newcommand{\id}{\mathrm{id}}\) \( \newcommand{\Span}{\mathrm{span}}\)
( \newcommand{\kernel}{\mathrm{null}\,}\) \( \newcommand{\range}{\mathrm{range}\,}\)
\( \newcommand{\RealPart}{\mathrm{Re}}\) \( \newcommand{\ImaginaryPart}{\mathrm{Im}}\)
\( \newcommand{\Argument}{\mathrm{Arg}}\) \( \newcommand{\norm}[1]{\| #1 \|}\)
\( \newcommand{\inner}[2]{\langle #1, #2 \rangle}\)
\( \newcommand{\Span}{\mathrm{span}}\)
\( \newcommand{\id}{\mathrm{id}}\)
\( \newcommand{\Span}{\mathrm{span}}\)
\( \newcommand{\kernel}{\mathrm{null}\,}\)
\( \newcommand{\range}{\mathrm{range}\,}\)
\( \newcommand{\RealPart}{\mathrm{Re}}\)
\( \newcommand{\ImaginaryPart}{\mathrm{Im}}\)
\( \newcommand{\Argument}{\mathrm{Arg}}\)
\( \newcommand{\norm}[1]{\| #1 \|}\)
\( \newcommand{\inner}[2]{\langle #1, #2 \rangle}\)
\( \newcommand{\Span}{\mathrm{span}}\) \( \newcommand{\AA}{\unicode[.8,0]{x212B}}\)
\( \newcommand{\vectorA}[1]{\vec{#1}} % arrow\)
\( \newcommand{\vectorAt}[1]{\vec{\text{#1}}} % arrow\)
\( \newcommand{\vectorB}[1]{\overset { \scriptstyle \rightharpoonup} {\mathbf{#1}} } \)
\( \newcommand{\vectorC}[1]{\textbf{#1}} \)
\( \newcommand{\vectorD}[1]{\overrightarrow{#1}} \)
\( \newcommand{\vectorDt}[1]{\overrightarrow{\text{#1}}} \)
\( \newcommand{\vectE}[1]{\overset{-\!-\!\rightharpoonup}{\vphantom{a}\smash{\mathbf {#1}}}} \)
\( \newcommand{\vecs}[1]{\overset { \scriptstyle \rightharpoonup} {\mathbf{#1}} } \)
\( \newcommand{\vecd}[1]{\overset{-\!-\!\rightharpoonup}{\vphantom{a}\smash {#1}}} \)
\(\newcommand{\avec}{\mathbf a}\) \(\newcommand{\bvec}{\mathbf b}\) \(\newcommand{\cvec}{\mathbf c}\) \(\newcommand{\dvec}{\mathbf d}\) \(\newcommand{\dtil}{\widetilde{\mathbf d}}\) \(\newcommand{\evec}{\mathbf e}\) \(\newcommand{\fvec}{\mathbf f}\) \(\newcommand{\nvec}{\mathbf n}\) \(\newcommand{\pvec}{\mathbf p}\) \(\newcommand{\qvec}{\mathbf q}\) \(\newcommand{\svec}{\mathbf s}\) \(\newcommand{\tvec}{\mathbf t}\) \(\newcommand{\uvec}{\mathbf u}\) \(\newcommand{\vvec}{\mathbf v}\) \(\newcommand{\wvec}{\mathbf w}\) \(\newcommand{\xvec}{\mathbf x}\) \(\newcommand{\yvec}{\mathbf y}\) \(\newcommand{\zvec}{\mathbf z}\) \(\newcommand{\rvec}{\mathbf r}\) \(\newcommand{\mvec}{\mathbf m}\) \(\newcommand{\zerovec}{\mathbf 0}\) \(\newcommand{\onevec}{\mathbf 1}\) \(\newcommand{\real}{\mathbb R}\) \(\newcommand{\twovec}[2]{\left[\begin{array}{r}#1 \\ #2 \end{array}\right]}\) \(\newcommand{\ctwovec}[2]{\left[\begin{array}{c}#1 \\ #2 \end{array}\right]}\) \(\newcommand{\threevec}[3]{\left[\begin{array}{r}#1 \\ #2 \\ #3 \end{array}\right]}\) \(\newcommand{\cthreevec}[3]{\left[\begin{array}{c}#1 \\ #2 \\ #3 \end{array}\right]}\) \(\newcommand{\fourvec}[4]{\left[\begin{array}{r}#1 \\ #2 \\ #3 \\ #4 \end{array}\right]}\) \(\newcommand{\cfourvec}[4]{\left[\begin{array}{c}#1 \\ #2 \\ #3 \\ #4 \end{array}\right]}\) \(\newcommand{\fivevec}[5]{\left[\begin{array}{r}#1 \\ #2 \\ #3 \\ #4 \\ #5 \\ \end{array}\right]}\) \(\newcommand{\cfivevec}[5]{\left[\begin{array}{c}#1 \\ #2 \\ #3 \\ #4 \\ #5 \\ \end{array}\right]}\) \(\newcommand{\mattwo}[4]{\left[\begin{array}{rr}#1 \amp #2 \\ #3 \amp #4 \\ \end{array}\right]}\) \(\newcommand{\laspan}[1]{\text{Span}\{#1\}}\) \(\newcommand{\bcal}{\cal B}\) \(\newcommand{\ccal}{\cal C}\) \(\newcommand{\scal}{\cal S}\) \(\newcommand{\wcal}{\cal W}\) \(\newcommand{\ecal}{\cal E}\) \(\newcommand{\coords}[2]{\left\{#1\right\}_{#2}}\) \(\newcommand{\gray}[1]{\color{gray}{#1}}\) \(\newcommand{\lgray}[1]{\color{lightgray}{#1}}\) \(\newcommand{\rank}{\operatorname{rank}}\) \(\newcommand{\row}{\text{Row}}\) \(\newcommand{\col}{\text{Col}}\) \(\renewcommand{\row}{\text{Row}}\) \(\newcommand{\nul}{\text{Nul}}\) \(\newcommand{\var}{\text{Var}}\) \(\newcommand{\corr}{\text{corr}}\) \(\newcommand{\len}[1]{\left|#1\right|}\) \(\newcommand{\bbar}{\overline{\bvec}}\) \(\newcommand{\bhat}{\widehat{\bvec}}\) \(\newcommand{\bperp}{\bvec^\perp}\) \(\newcommand{\xhat}{\widehat{\xvec}}\) \(\newcommand{\vhat}{\widehat{\vvec}}\) \(\newcommand{\uhat}{\widehat{\uvec}}\) \(\newcommand{\what}{\widehat{\wvec}}\) \(\newcommand{\Sighat}{\widehat{\Sigma}}\) \(\newcommand{\lt}{<}\) \(\newcommand{\gt}{>}\) \(\newcommand{\amp}{&}\) \(\definecolor{fillinmathshade}{gray}{0.9}\)SCRs are unidirectional (one-way) current devices, making them useful for controlling DC only. If two SCRs are joined in back-to-back parallel fashion just like two Shockley diodes were joined together to form a DIAC, we have a new device known as the TRIAC: (Figure below)
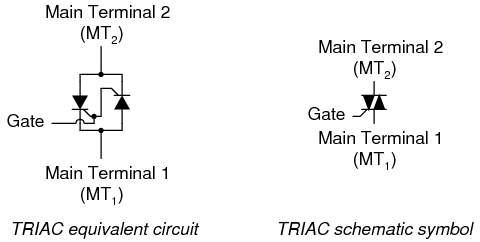
The TRIAC SCR equivalent and, TRIAC schematic symbol
Because individual SCRs are more flexible to use in advanced control systems, these are more commonly seen in circuits like motor drives; TRIACs are usually seen in simple, low-power applications like household dimmer switches. A simple lamp dimmer circuit is shown in Figure below, complete with the phase-shifting resistor-capacitor network necessary for after-peak firing.
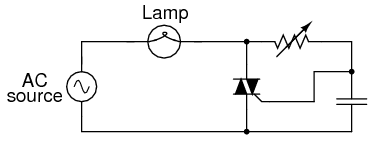
TRIAC phase-control of power
TRIACs are notorious for not firing symmetrically. This means these usually won’t trigger at the exact same gate voltage level for one polarity as for the other. Generally speaking, this is undesirable, because unsymmetrical firing results in a current waveform with a greater variety of harmonic frequencies. Waveforms that are symmetrical above and below their average centerlines are comprised of only odd-numbered harmonics. Unsymmetrical waveforms, on the other hand, contain even-numbered harmonics (which may or may not be accompanied by odd-numbered harmonics as well).
In the interest of reducing total harmonic content in power systems, the fewer and less diverse the harmonics, the better—one more reason individual SCRs are favored over TRIACs for complex, high-power control circuits. One way to make the TRIAC’s current waveform more symmetrical is to use a device external to the TRIAC to time the triggering pulse. A DIAC placed in series with the gate does a fair job of this: (Figure below)
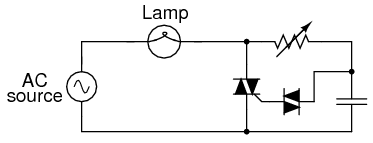
DIAC improves symmetry of control
DIAC breakover voltages tend to be much more symmetrical (the same in one polarity as the other) than TRIAC triggering voltage thresholds. Since the DIAC prevents any gate current until the triggering voltage has reached a certain, repeatable level in either direction, the firing point of the TRIAC from one half-cycle to the next tends to be more consistent, and the waveform more symmetrical above and below its centerline.
Practically all the characteristics and ratings of SCRs apply equally to TRIACs, except that TRIACs of course are bidirectional (can handle current in both directions). Not much more needs to be said about this device except for an important caveat concerning its terminal designations.
From the equivalent circuit diagram shown earlier, one might think that main terminals 1 and 2 were interchangeable. These are not! Although it is helpful to imagine the TRIAC as being composed of two SCRs joined together, it in fact is constructed from a single piece of semiconducting material, appropriately doped and layered. The actual operating characteristics may differ slightly from that of the equivalent model.
This is made most evident by contrasting two simple circuit designs, one that works and one that doesn’t. The following two circuits are a variation of the lamp dimmer circuit shown earlier, the phase-shiftingcapacitor and DIAC removed for simplicity’s sake. Although the resulting circuit lacks the fine control ability of the more complex version (with capacitor and DIAC), it does function: (Figure below)
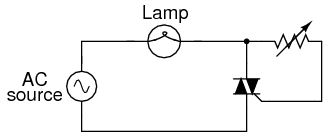
This circuit with the gate to MT2 does function.
Suppose we were to swap the two main terminals of the TRIAC around. According to the equivalent circuit diagram shown earlier in this section, the swap should make no difference. The circuit ought to work: (Figure below)
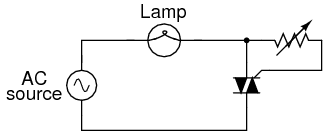
With the gate swapped to MT1, this circuit does not function.
However, if this circuit is built, it will be found that it does not work! The load will receive no power, the TRIAC refusing to fire at all, no matter how low or high a resistance value the control resistor is set to. The key to successfully triggering a TRIAC is to make sure the gate receives its triggering current from the main terminal 2 side of the circuit (the main terminal on the opposite side of the TRIAC symbol from the gate terminal). Identification of the MT1 and MT2 terminals must be done via the TRIAC’s part number with reference to a data sheet or book.
Review
- A TRIAC acts much like two SCRs connected back-to-back for bidirectional (AC) operation.
- TRIAC controls are more often seen in simple, low-power circuits than complex, high-power circuits. In large power control circuits, multiple SCRs tend to be favored.
- When used to control AC power to a load, TRIACs are often accompanied by DIACs connected in series with their gate terminals. The DIAC helps the TRIAC fire more symmetrically (more consistently from one polarity to another).
- Main terminals 1 and 2 on a TRIAC are not interchangeable.
- To successfully trigger a TRIAC, gate current must come from the main terminal 2 (MT2) side of the circuit!


