9.1: ElectroStatic Discharge
- Page ID
- 784
\( \newcommand{\vecs}[1]{\overset { \scriptstyle \rightharpoonup} {\mathbf{#1}} } \)
\( \newcommand{\vecd}[1]{\overset{-\!-\!\rightharpoonup}{\vphantom{a}\smash {#1}}} \)
\( \newcommand{\id}{\mathrm{id}}\) \( \newcommand{\Span}{\mathrm{span}}\)
( \newcommand{\kernel}{\mathrm{null}\,}\) \( \newcommand{\range}{\mathrm{range}\,}\)
\( \newcommand{\RealPart}{\mathrm{Re}}\) \( \newcommand{\ImaginaryPart}{\mathrm{Im}}\)
\( \newcommand{\Argument}{\mathrm{Arg}}\) \( \newcommand{\norm}[1]{\| #1 \|}\)
\( \newcommand{\inner}[2]{\langle #1, #2 \rangle}\)
\( \newcommand{\Span}{\mathrm{span}}\)
\( \newcommand{\id}{\mathrm{id}}\)
\( \newcommand{\Span}{\mathrm{span}}\)
\( \newcommand{\kernel}{\mathrm{null}\,}\)
\( \newcommand{\range}{\mathrm{range}\,}\)
\( \newcommand{\RealPart}{\mathrm{Re}}\)
\( \newcommand{\ImaginaryPart}{\mathrm{Im}}\)
\( \newcommand{\Argument}{\mathrm{Arg}}\)
\( \newcommand{\norm}[1]{\| #1 \|}\)
\( \newcommand{\inner}[2]{\langle #1, #2 \rangle}\)
\( \newcommand{\Span}{\mathrm{span}}\) \( \newcommand{\AA}{\unicode[.8,0]{x212B}}\)
\( \newcommand{\vectorA}[1]{\vec{#1}} % arrow\)
\( \newcommand{\vectorAt}[1]{\vec{\text{#1}}} % arrow\)
\( \newcommand{\vectorB}[1]{\overset { \scriptstyle \rightharpoonup} {\mathbf{#1}} } \)
\( \newcommand{\vectorC}[1]{\textbf{#1}} \)
\( \newcommand{\vectorD}[1]{\overrightarrow{#1}} \)
\( \newcommand{\vectorDt}[1]{\overrightarrow{\text{#1}}} \)
\( \newcommand{\vectE}[1]{\overset{-\!-\!\rightharpoonup}{\vphantom{a}\smash{\mathbf {#1}}}} \)
\( \newcommand{\vecs}[1]{\overset { \scriptstyle \rightharpoonup} {\mathbf{#1}} } \)
\( \newcommand{\vecd}[1]{\overset{-\!-\!\rightharpoonup}{\vphantom{a}\smash {#1}}} \)
\(\newcommand{\avec}{\mathbf a}\) \(\newcommand{\bvec}{\mathbf b}\) \(\newcommand{\cvec}{\mathbf c}\) \(\newcommand{\dvec}{\mathbf d}\) \(\newcommand{\dtil}{\widetilde{\mathbf d}}\) \(\newcommand{\evec}{\mathbf e}\) \(\newcommand{\fvec}{\mathbf f}\) \(\newcommand{\nvec}{\mathbf n}\) \(\newcommand{\pvec}{\mathbf p}\) \(\newcommand{\qvec}{\mathbf q}\) \(\newcommand{\svec}{\mathbf s}\) \(\newcommand{\tvec}{\mathbf t}\) \(\newcommand{\uvec}{\mathbf u}\) \(\newcommand{\vvec}{\mathbf v}\) \(\newcommand{\wvec}{\mathbf w}\) \(\newcommand{\xvec}{\mathbf x}\) \(\newcommand{\yvec}{\mathbf y}\) \(\newcommand{\zvec}{\mathbf z}\) \(\newcommand{\rvec}{\mathbf r}\) \(\newcommand{\mvec}{\mathbf m}\) \(\newcommand{\zerovec}{\mathbf 0}\) \(\newcommand{\onevec}{\mathbf 1}\) \(\newcommand{\real}{\mathbb R}\) \(\newcommand{\twovec}[2]{\left[\begin{array}{r}#1 \\ #2 \end{array}\right]}\) \(\newcommand{\ctwovec}[2]{\left[\begin{array}{c}#1 \\ #2 \end{array}\right]}\) \(\newcommand{\threevec}[3]{\left[\begin{array}{r}#1 \\ #2 \\ #3 \end{array}\right]}\) \(\newcommand{\cthreevec}[3]{\left[\begin{array}{c}#1 \\ #2 \\ #3 \end{array}\right]}\) \(\newcommand{\fourvec}[4]{\left[\begin{array}{r}#1 \\ #2 \\ #3 \\ #4 \end{array}\right]}\) \(\newcommand{\cfourvec}[4]{\left[\begin{array}{c}#1 \\ #2 \\ #3 \\ #4 \end{array}\right]}\) \(\newcommand{\fivevec}[5]{\left[\begin{array}{r}#1 \\ #2 \\ #3 \\ #4 \\ #5 \\ \end{array}\right]}\) \(\newcommand{\cfivevec}[5]{\left[\begin{array}{c}#1 \\ #2 \\ #3 \\ #4 \\ #5 \\ \end{array}\right]}\) \(\newcommand{\mattwo}[4]{\left[\begin{array}{rr}#1 \amp #2 \\ #3 \amp #4 \\ \end{array}\right]}\) \(\newcommand{\laspan}[1]{\text{Span}\{#1\}}\) \(\newcommand{\bcal}{\cal B}\) \(\newcommand{\ccal}{\cal C}\) \(\newcommand{\scal}{\cal S}\) \(\newcommand{\wcal}{\cal W}\) \(\newcommand{\ecal}{\cal E}\) \(\newcommand{\coords}[2]{\left\{#1\right\}_{#2}}\) \(\newcommand{\gray}[1]{\color{gray}{#1}}\) \(\newcommand{\lgray}[1]{\color{lightgray}{#1}}\) \(\newcommand{\rank}{\operatorname{rank}}\) \(\newcommand{\row}{\text{Row}}\) \(\newcommand{\col}{\text{Col}}\) \(\renewcommand{\row}{\text{Row}}\) \(\newcommand{\nul}{\text{Nul}}\) \(\newcommand{\var}{\text{Var}}\) \(\newcommand{\corr}{\text{corr}}\) \(\newcommand{\len}[1]{\left|#1\right|}\) \(\newcommand{\bbar}{\overline{\bvec}}\) \(\newcommand{\bhat}{\widehat{\bvec}}\) \(\newcommand{\bperp}{\bvec^\perp}\) \(\newcommand{\xhat}{\widehat{\xvec}}\) \(\newcommand{\vhat}{\widehat{\vvec}}\) \(\newcommand{\uhat}{\widehat{\uvec}}\) \(\newcommand{\what}{\widehat{\wvec}}\) \(\newcommand{\Sighat}{\widehat{\Sigma}}\) \(\newcommand{\lt}{<}\) \(\newcommand{\gt}{>}\) \(\newcommand{\amp}{&}\) \(\definecolor{fillinmathshade}{gray}{0.9}\)Volume I chapter 1.1 discusses static electricity, and how it is created. This has a lot more significance than might be first assumed, as control of static electricity plays a large part in modern electronics and other professions. An ElectroStatic Discharge event is when a static charge is bled off in an uncontrolled fashion and will be referred to as ESD hereafter.
ESD comes in many forms, it can be as small as 50 volts of electricity being equalized up to tens of thousands of volts. The actual power is extremely small, so small that no danger is generally offered to someone who is in the discharge path of ESD. It usually takes several thousand volts for a person to even notice ESD in the form of a spark and the familiar zap that accompanies it. The problem with ESD is even a small discharge that can go completely unnoticed can ruin semiconductors. A static charge of thousands of volts is common, however, the reason it is not a threat is there is no current of any substantial duration behind it. These extreme voltages do allow ionization of the air and allow other materials to break down, which is the root of where the damage comes from.
ESD is not a new problem. Black powder manufacturing and other pyrotechnic industries have always been dangerous if an ESD event occurs in the wrong circumstance. During the era of tubes (AKA valves) ESD was a nonexistent issue for electronics, but with the advent of semiconductors, and the increase in miniaturization, it has become much more serious.
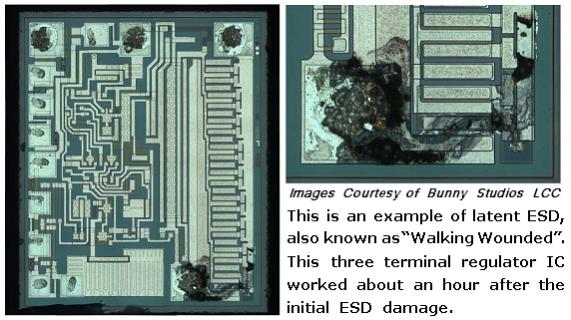
Damage to components can, and usually do, occur when the part is in the ESD path. Many parts, such as power diodes, are very robust and can handle the discharge, but if a part has a small or thin geometry as part of their physical structure then the voltage can break down that part of the semiconductor. Currents during these events become quite high but are in the nanosecond to microsecond time frame. Part of the component is left permanently damaged by this, which can cause two types of failure modes. Catastrophic is the easy one, leaving the part completely nonfunctional. The other can be much more serious. Latent damage may allow the problem component to work for hours, days or even months after the initial damage before catastrophic failure. Many times these parts are referred to as “walking wounded” since they are working but bad. Figure below is shown an example of latent (“walking wounded”) ESD damage. If these components end up in a life support role, such as medical or military use, then the consequences can be grim. For most hobbyists, it is an inconvenience, but it can be an expensive one.
Even components that are considered fairly rugged can be damaged by ESD. Bipolar transistors, the earliest of the solid state amplifiers, are not immune, though less susceptible. Some of the newer high-speed components can be ruined with as little as 3 volts. There are components that might not be considered at risk, such as some specialized resistors and capacitors manufactured using MOS (Metal Oxide Semiconductor) technology, that can be damaged via ESD.

ESD Damage Prevention
Before ESD can be prevented it is important to understand what causes it. Generally, materials around the workbench can be broken up into 3 categories. These are ESD Generative, ESD Neutral, and ESD Dissipative (or ESD Conductive). ESD Generative materials are active static generators, such as most plastics, cat hair, and polyester clothing. ESD Neutral materials are generally insulative but don’t tend to generate or hold static charges very well. Examples of this include wood, paper, and cotton. This is not to say they can not be static generators or an ESD hazard, but the risk is somewhat minimized by other factors. Wood and wood products, for example, tend to hold moisture, which can make them slightly conductive. This is true of a lot of organic materials. A highly polished table would not fall under this category because the gloss is usually plastic, or varnish, which are highly efficient insulators. ESD Conductive materials are pretty obvious, they are the metal tools laying around. Plastic handles can be a problem, but the metal will bleed a static charge away as fast as it is generated if it is on a grounded surface. There are a lot of other materials, such as some plastics, that are designed to be conductive. They would fall under the heading of ESD Dissipative. Dirt and concrete are also conductive, and fall under the ESD Dissipative heading.
There are a lot of activities that generate static, which you need to be aware of as part of an ESD control regimen. The simple act of pulling the tape off a dispenser can generate an extreme voltage. Rolling around in a chair is another static generator, as is scratching. In fact, any activity that allows 2 or more surfaces to rub against each other is pretty certain to generate some static charge. This was mentioned in the beginning of this book, but real world examples can be subtle. This is why a method for continuously bleeding off this voltage is needed. Things that generate huge amounts of static should be avoided while working on components.
Plastic is usually associated with the generation of static. This has been gotten around in the form of conductive plastics. The usual way to make conductive plastic is an additive that changes the electrical characteristics of the plastic from an insulator to a conductor, although it will likely still have a resistance of millions of ohms per square inch. Plastics have been developed that can be used as conductors is in low weight applications, such as those in the airline industries. These are specialist applications and are not generally associated with ESD control.
It is not all bad news for ESD protection. The human body is a pretty decent conductor. High humidity in the air will also allow a static charge to dissipate harmlessly away, as well as making ESD Neutral materials more conductive. This is why cold winter days, where the humidity inside a house can be quite low, can increase the number of sparks on a doorknob. Summer, or rainy days, you would have to work quite hard to generate a substantial amount of static. Industry clean rooms and factory floors go the effort to regulate both temperature and humidity for this reason. Concrete floors are also conductive, so there may be some existing components in the home that can aid in setting up protections.
To establish ESD protection there has to be a standard voltage level that everything is referenced to. Such a level exists in the form of ground. There are very good safety reasons that ground is used around the house in outlets. In some ways, this relates to static, but not directly. It does give us a place to dump our excess electrons or acquire some if we are short, to neutralize any charges our bodies and tools might acquire. If everything on a workbench is connected directly or indirectly to ground via a conductor then static will dissipate long before an ESD event has a chance to occur.
A good grounding point can be made several different ways. In houses with modern wiring that is up to code the ground pin on the AC plug in can be used, or the screw that holds the outlets cover plate on. This is because house wiring actually has a wire or spike going into the earth somewhere where the power is tapped from the main power lines. For people whose house wiring isn’t quite right a spike driven into the earth at least 3 feet or a simple electrical connection to metal plumbing (worst option) can be used. The main thing is to establish an electrical path to the earth outside the house.
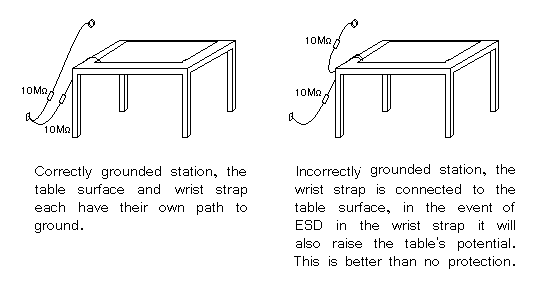
Ten megohms are considered a conductor in the world of ESD control. Static electricity is voltage with no real current, and if a charge is bled off seconds after being generated it is nullified. Generally, a 1 to 10 megohm resistor is used to connect any ESD protection for this reason. It has the benefit of slowing the discharge rate during an ESD event, which increases the likelihood of a component surviving undamaged. The faster the discharge, the higher the current spike going through the component. Another reason such a resistance is considered desirable is if the user is accidentally shorted to high voltage, such as household current, it won’t be the ESD protections that kill them.
A large industry has grown up around controlling ESD in the electronics industry. The staple of any electronics construction is the workbench with a static conductive or dissipative surface. This surface can be bought commercially, or home made in the form of a sheet of metal or foil. In the case of a metal surface, it might be a good idea to lay the thin paper on top, although it is not necessary if you are not doing any powered tests on the surface. The commercial version is usually some form of conductive plastic whose resistance is high enough not to be a problem, which is a better solution. If you are making your own surface for the workbench be sure to add the 10 megohm resistor to ground, otherwise you have no protection at all.
The other big item that needs ESD grounded is you. People are walking static generators. Your body being conductive it is relatively easy to ground it though, this is usually done with a wrist strap. Commercial versions already have the resistor built in and have a wide strap to offer a good contact surface with your skin. Disposable versions can be bought for a few dollars. A metal watch band is also a good ESD protection connection point. Just add a wire (with the resistor) to your grounding point. Most industries take the issue seriously enough to use real time monitors that will sound an alarm if the operator is not properly grounded.

Another way of grounding yourself is a heel strap. A conductive plastic part is wrapped around the heel of your shoe, with a conductive plastic strap going up and under your sock for good contact with the skin. It only works on floors with conductive wax or concrete. The method will keep a person from generating large charges that can overwhelm other ESD protections and is not considered adequate in and of itself. You can get the same effect by walking barefoot on a concrete floor.
Yet another ESD protection is to wear ESD conductive smocks. Like the heel strap, this is a secondary protection, not meant to replace the wrist strap. They are meant to short circuit any charges that your clothes may generate.
Moving air can also generate substantial static charges. When you blow the dust off your electronics there will be static generated. An industrial solution to the problem to this issue is two fold: Firstly, air guns have a small, well shielded radioactive material implanted within the air gun to ionize the air. Ionized air is a conductor, and will bleed off static charges quite well. Secondly, use high voltage electricity to ionize the air coming out of a fan, which has the same effect as the air gun. This will effectively help a workstation reduce the potential for ESD generation by a large amount.
Another ESD protection is the simplest of all, distance. Many industries have rules stating all Neutral and Generative materials will be at least 12 inches or more from any work in progress.
The user can also reduce the possibility of ESD damage by simply not removing the part out of its protective packaging until it is time to insert it into the circuit. This will reduce the likelihood of ESD exposure, and while the circuit will still be vulnerable, the component will have some minor protection from the rest of the components, as the other components will offer different discharge paths for ESD.
Storage and Transportation of ESD sensitive component and boards
It does no good to follow ESD protections on the workbench if the parts are being damaged while storing or carrying them. The most common method is to use a variation of a Faraday cage, an ESD bag. An ESD bag surrounds the component with a conductive shield and usually has a nonstatic generating insulative layer inside. In permanent Faraday cages this shield is grounded, as in the case of RFI rooms, but with portable containers, this isn’t practical. By putting an ESD bag on a grounded surface the same thing is accomplished. Faraday cages work by routing the electric charge around the contents and grounding them immediately. A car struck by lightning is an extreme example of a Faraday cage.
Static bags are by far the most common method of storing components and boards. They are made using extremely thin layers of metal, so thin as to be almost transparent. A bag with a hole, even small ones, or one that is not folded on top to seal the content from outside charges is ineffective.
Another method of protecting parts in storage is totes or tubes. In these cases, the parts are put into conductive boxes, with a lid of the same material. This effectively forms a Faraday cage. A tube is meant for ICs and other devices with a lot of pins, and stores the parts in a molded conductive plastic tube that keeps the parts safe both mechanically and electrically.

Conclusion
ESD can be a minor unfelt event measuring a few volts, or a massive event presenting real dangers to operators. All ESD protections can be overwhelmed by circumstance, but this can be circumvented by awareness of what it is and how to prevent it. Many projects have been built with no ESD protections at all and worked well. Given that protecting these projects is a minor inconvenience it is better to make the effort.
Industry takes the problem very seriously, as both a potential life threatening issue and a quality issue. Someone who buys an expensive piece of electronics or high tech hardware is not going to be happy if they have to return it in 6 months. When a reputation is on the line it is easier to do the right thing.


