1.2: Unit 1: Tramming the Head
- Page ID
- 2269
\( \newcommand{\vecs}[1]{\overset { \scriptstyle \rightharpoonup} {\mathbf{#1}} } \)
\( \newcommand{\vecd}[1]{\overset{-\!-\!\rightharpoonup}{\vphantom{a}\smash {#1}}} \)
\( \newcommand{\id}{\mathrm{id}}\) \( \newcommand{\Span}{\mathrm{span}}\)
( \newcommand{\kernel}{\mathrm{null}\,}\) \( \newcommand{\range}{\mathrm{range}\,}\)
\( \newcommand{\RealPart}{\mathrm{Re}}\) \( \newcommand{\ImaginaryPart}{\mathrm{Im}}\)
\( \newcommand{\Argument}{\mathrm{Arg}}\) \( \newcommand{\norm}[1]{\| #1 \|}\)
\( \newcommand{\inner}[2]{\langle #1, #2 \rangle}\)
\( \newcommand{\Span}{\mathrm{span}}\)
\( \newcommand{\id}{\mathrm{id}}\)
\( \newcommand{\Span}{\mathrm{span}}\)
\( \newcommand{\kernel}{\mathrm{null}\,}\)
\( \newcommand{\range}{\mathrm{range}\,}\)
\( \newcommand{\RealPart}{\mathrm{Re}}\)
\( \newcommand{\ImaginaryPart}{\mathrm{Im}}\)
\( \newcommand{\Argument}{\mathrm{Arg}}\)
\( \newcommand{\norm}[1]{\| #1 \|}\)
\( \newcommand{\inner}[2]{\langle #1, #2 \rangle}\)
\( \newcommand{\Span}{\mathrm{span}}\) \( \newcommand{\AA}{\unicode[.8,0]{x212B}}\)
\( \newcommand{\vectorA}[1]{\vec{#1}} % arrow\)
\( \newcommand{\vectorAt}[1]{\vec{\text{#1}}} % arrow\)
\( \newcommand{\vectorB}[1]{\overset { \scriptstyle \rightharpoonup} {\mathbf{#1}} } \)
\( \newcommand{\vectorC}[1]{\textbf{#1}} \)
\( \newcommand{\vectorD}[1]{\overrightarrow{#1}} \)
\( \newcommand{\vectorDt}[1]{\overrightarrow{\text{#1}}} \)
\( \newcommand{\vectE}[1]{\overset{-\!-\!\rightharpoonup}{\vphantom{a}\smash{\mathbf {#1}}}} \)
\( \newcommand{\vecs}[1]{\overset { \scriptstyle \rightharpoonup} {\mathbf{#1}} } \)
\( \newcommand{\vecd}[1]{\overset{-\!-\!\rightharpoonup}{\vphantom{a}\smash {#1}}} \)
\(\newcommand{\avec}{\mathbf a}\) \(\newcommand{\bvec}{\mathbf b}\) \(\newcommand{\cvec}{\mathbf c}\) \(\newcommand{\dvec}{\mathbf d}\) \(\newcommand{\dtil}{\widetilde{\mathbf d}}\) \(\newcommand{\evec}{\mathbf e}\) \(\newcommand{\fvec}{\mathbf f}\) \(\newcommand{\nvec}{\mathbf n}\) \(\newcommand{\pvec}{\mathbf p}\) \(\newcommand{\qvec}{\mathbf q}\) \(\newcommand{\svec}{\mathbf s}\) \(\newcommand{\tvec}{\mathbf t}\) \(\newcommand{\uvec}{\mathbf u}\) \(\newcommand{\vvec}{\mathbf v}\) \(\newcommand{\wvec}{\mathbf w}\) \(\newcommand{\xvec}{\mathbf x}\) \(\newcommand{\yvec}{\mathbf y}\) \(\newcommand{\zvec}{\mathbf z}\) \(\newcommand{\rvec}{\mathbf r}\) \(\newcommand{\mvec}{\mathbf m}\) \(\newcommand{\zerovec}{\mathbf 0}\) \(\newcommand{\onevec}{\mathbf 1}\) \(\newcommand{\real}{\mathbb R}\) \(\newcommand{\twovec}[2]{\left[\begin{array}{r}#1 \\ #2 \end{array}\right]}\) \(\newcommand{\ctwovec}[2]{\left[\begin{array}{c}#1 \\ #2 \end{array}\right]}\) \(\newcommand{\threevec}[3]{\left[\begin{array}{r}#1 \\ #2 \\ #3 \end{array}\right]}\) \(\newcommand{\cthreevec}[3]{\left[\begin{array}{c}#1 \\ #2 \\ #3 \end{array}\right]}\) \(\newcommand{\fourvec}[4]{\left[\begin{array}{r}#1 \\ #2 \\ #3 \\ #4 \end{array}\right]}\) \(\newcommand{\cfourvec}[4]{\left[\begin{array}{c}#1 \\ #2 \\ #3 \\ #4 \end{array}\right]}\) \(\newcommand{\fivevec}[5]{\left[\begin{array}{r}#1 \\ #2 \\ #3 \\ #4 \\ #5 \\ \end{array}\right]}\) \(\newcommand{\cfivevec}[5]{\left[\begin{array}{c}#1 \\ #2 \\ #3 \\ #4 \\ #5 \\ \end{array}\right]}\) \(\newcommand{\mattwo}[4]{\left[\begin{array}{rr}#1 \amp #2 \\ #3 \amp #4 \\ \end{array}\right]}\) \(\newcommand{\laspan}[1]{\text{Span}\{#1\}}\) \(\newcommand{\bcal}{\cal B}\) \(\newcommand{\ccal}{\cal C}\) \(\newcommand{\scal}{\cal S}\) \(\newcommand{\wcal}{\cal W}\) \(\newcommand{\ecal}{\cal E}\) \(\newcommand{\coords}[2]{\left\{#1\right\}_{#2}}\) \(\newcommand{\gray}[1]{\color{gray}{#1}}\) \(\newcommand{\lgray}[1]{\color{lightgray}{#1}}\) \(\newcommand{\rank}{\operatorname{rank}}\) \(\newcommand{\row}{\text{Row}}\) \(\newcommand{\col}{\text{Col}}\) \(\renewcommand{\row}{\text{Row}}\) \(\newcommand{\nul}{\text{Nul}}\) \(\newcommand{\var}{\text{Var}}\) \(\newcommand{\corr}{\text{corr}}\) \(\newcommand{\len}[1]{\left|#1\right|}\) \(\newcommand{\bbar}{\overline{\bvec}}\) \(\newcommand{\bhat}{\widehat{\bvec}}\) \(\newcommand{\bperp}{\bvec^\perp}\) \(\newcommand{\xhat}{\widehat{\xvec}}\) \(\newcommand{\vhat}{\widehat{\vvec}}\) \(\newcommand{\uhat}{\widehat{\uvec}}\) \(\newcommand{\what}{\widehat{\wvec}}\) \(\newcommand{\Sighat}{\widehat{\Sigma}}\) \(\newcommand{\lt}{<}\) \(\newcommand{\gt}{>}\) \(\newcommand{\amp}{&}\) \(\definecolor{fillinmathshade}{gray}{0.9}\)Objective
After completing this unit, you should be able to:
- Describe how to tram the mill head.
- Explain how to indicate the vise.
- Explain the use of spring collets.
- Describe the difference between climb vs. conventional milling.
- Explain how to use an edge finder.
- Describe how to set the quick change gearbox correctly.
- Describe how to square the stock.
- Describe face milling.
- Describe advanced workholding.
Tools For Tramming
A dial indicator is a precision tool used to measure minute amounts of deflection between two surfaces.
When tramming, a dial indicator attached to the chuck is used to determine the orientation of the mill head to the mill table. The same wrench used to tighten and loosen the quill can be used to adjust the various bolts on the mill head.
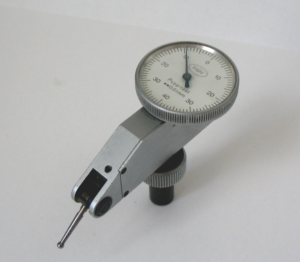
Dial indicator used for tramming the head.
Tramming the Mill Head
Tramming ensures that the mill head is perpendicular to the mill table’s X and Y axis. This process ensures that cutting tools and the milling surfaces are perpendicular to the table. Proper tramming also prevents irregular patterns from forming when milling.
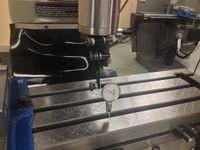
A dial indicator attached to the spindle for precise mill head alignment.
A vertical mill’s head is able to tilt from front to back and side to side. Occasionally these adjustments can drift. The mill head should be checked and adjusted periodically, ensuring that the spindle is perpendicular to the table.
- Remove the vice from the milling table.
- Attach a dial indicator to the spindle and offset the dial six inches from the spindle’s axis. Make sure the indicator probe is facing down.
- Raise the mill table so that when it contacts the indicator, the indicator reads between 0.005 inches to 0.010 inches. This reading is called the preload.
- Position the dial indicator so that it is visible, then set the bezel to zero.
- Hand-turn the spindle while watching the indicator.
- If the reading on the dial indicator stays at zero, the spindle is aligned.
- If the reading is not zero, continue tramming the head as shown below.
Tramming Process for the X-Axis
- To tram around the x-axis (the left-to-right direction of the mill bench when facing the front of the mill), loosen the six bolts (three on each side of the mill) using the mill wrench.
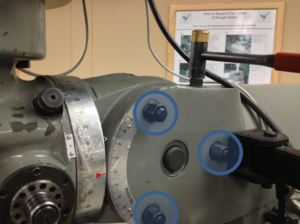
Location of the bolts to be loosened to allow the head to rotate about the X-axis.
- After loosening the bolts, re-tighten them by hand plus a ¼ of a turn using the mill wrench.
- The adjustment bolt that moves the mill head up and down around the x-axis is located at the back of the mill.
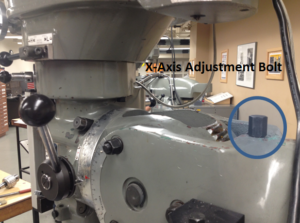
Adjustment bolt used to position the mill head vertically around the X-axis.
- Two protractors are used to indicate general alignment. The larger protractor on the mill head has a red indicating arrow that should align with the zero marker on the curved protractor on the body of the mill. This only provides a general guide, the dial indicator reading is required for precise alignment.
- Position the dial indicator to the rear of the table. Zero the dial indicator (preloaded at 0.005″ to 0.010″). Be sure to measure on a pristine surface of the mill table. It may be necessary to shift the table to avoid the gaps that are in the table.

Dial indicating around the mill head X-axis.
- With the dial zeroed and the spindle in neutral, rotate the spindle so that the dial indicator is now on the front of the table, ideally a 180 degree turn. Be sure to grab the clamp that is attached to the spindle (to avoid altering the dial’s vertical configuration).
- Note the direction that the dial rotates to determine the direction that the mill head needs to travel. A clockwise movement requires that the mill head will need to be adjusted up, while a counter-clockwise reading requires that the mill head will need to be adjusted downward.
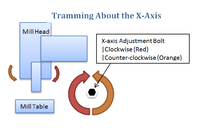
Mill head adjustment about the X-axis.
- The diagram above shows how movement of the adjustment bolt correlates to movement in the mill head. Once confident in the correct direction the adjustment bolt needs to be turned, adjust the mill head so that ½ the difference between the back and front measurements is reached. For example, if the rear reading is zero and the front reading is 0.010″, adjust the mill head so that the dial reads 0.005″ closer to zero.
- After the first adjustment is complete, again zero the dial indicator. It is recommended to zero off the same position to avoid confusion, however, it is not necessary. Continue the adjustment process until the difference between the front and the rear is no greater than 0.002 inches.
- Once satisfied with the readings, begin re-tightening the bolts that were loosened, tightening them evenly in rotation to prevent change in the alignment. Recheck the measurement between the front and the rear to ensure that the mill head did not move significantly from tightening.
Tramming Process for the Y-Axis
- To begin tramming about the y-axis, there are four bolts on the front of the mill that need to be loosened to allow movement of the mill head. The bolts should be loosened, then re-tightened to just beyond hand-tight (about ¼ turn past hand-tight with the appropriate wrench).
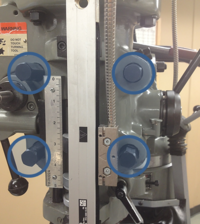
Location of the bolts to be loosened to allow the head to rotate about the Y-axis.
- The adjustment bolt to move the mill head left and right about the y-axis is shown in the figure below. By twisting this bolt clockwise and counter-clockwise the mill head will move accordingly.
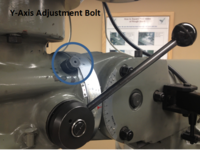
Adjustment bolt used to position the mill head around the Y-axis.
- The indicating arrow on the protractors for tramming around the y-axis is located on a standalone plate that is in contact with the vertical protractor. This indicating arrow and the zero on the vertical protractor can be used to estimate a starting point for tramming.
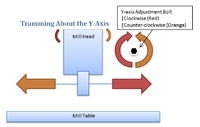
Mill head adjustment about the Y-axis.
- The figure above shows how the adjustment bolt for tramming about the y-axis affects the mill head. Use the same process as described for tramming about the x-axis, however, use locations left and right of the mill head as your reference points in contrast to the front and the rear as done previously.
- Once the adjustments are complete, tighten the bolts on the head of the mill and re-check the measurements about the x-axis and the y-axis. It is possible that the tram in either direction may have been altered by the re-tightening of the bolts. Ensure that all measurements are within 0.002 inches. If the measurements are not within tolerance, the tramming process will have to be redone.
Indicating the Vise
- Most workpieces are held in a vice that is clamped to the table.
- It is important to line the vice up with the feed axes on the machine in order to machine features that are aligned with the stock’s edges.
- Fix the vice on the bed by using T-bolts and secure it snugly, while still allowing adjustment to the vice.
- Install a dial indicator in the machine’s spindle with the probe facing away from the operator.
- Bring the spindle down then position the table’s bed until the fixed jaw on the vice is touching the indicator. Continue until the indicator has registered half of a revolution.
- Set the dial indicator’s bezel to zero.
- Run the indicator across the vice’s face with the cross feed.
- The indicator will stay at zero if the vice is squared.
- If the indicator does not stay at zero, realign the vice by lightly tapping with a soft hammer until the indicator reads half of its previous value.
- Repeat the process until the dial indicator shows zero through a complete travel from one side of the vice to the other.
- Fasten the T-bolts securely, while not changing the orientation of the vice. Recheck the alignment of the vice.
Types of Milling Cutters
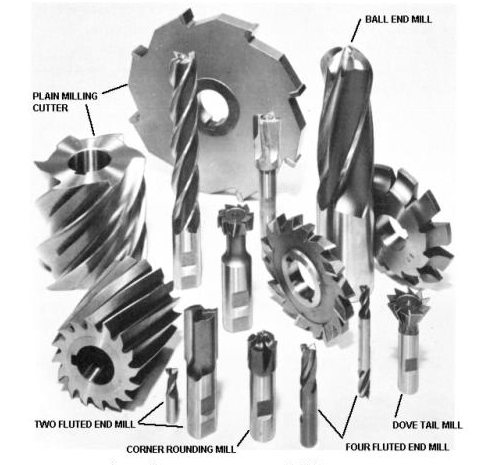
An assortment of milling cutters.
- Milling cutters that have solid shafts are usually used in vertical mills.
- Milling cutters that have keyed holes are usually used in horizontal mills.
- End mills are used to cut pockets, keyways, and slots.
- Two fluted end mills can be used to plunge into a workpiece like a drill.
- 2 and 3 flutes are generally for aluminum, 4 flutes is better for stainless steel. More flutes are better cutting, but come at a higher price.
- End mills with more than two flutes should not be plunged into the work.
- Fillets can be produced with ball end mills.
- Multiple features like round edges can be made by formed milling cutters.
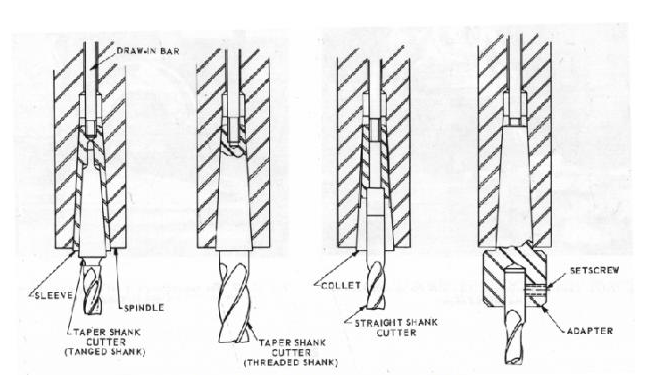
Methods of retaining an end mill.
Spring Collets
- If a tool needs to be removed, lock the quill at the highest position.
- Next, loosen the drawbar with a wrench while using the brake.
- Make sure that the threads of the draw bar remain engaged in the collet. If they are not engaged, the cutter will fall and potentially be damaged when the collet is released from the spindle.
- To release the collet from the spindle, tap on the end of the draw bar.
- Finally, unscrew the drawbar off of the collet.
- To install a different cutter, place the cutter in a collet that fits the shank.
- Insert the collet into the spindle while making sure that the keyway aligns properly with the key in the spindle.
- Begin threading the draw bar into the collet while holding the cutter with one hand. Afterwards, use a wrench to tighten the drawbar while engaging the brake.
Climb vs. Conventional Milling
It is important to know the difference between conventional and climb milling. Using the wrong procedure may result in broken cutters and scrapped workpieces.
Conventional Milling
- The workpiece is fed against the rotation of the cutter.
- Conventional milling is usually preferred for roughing cuts.
- Conventional milling requires less force than climb milling.
- Does not require a backlash eliminator and tight table gibs.
- Recommended when machining castings and hot-rolled steel.
- Also recommended when there is a hard surface that has resulted from scale or sand.
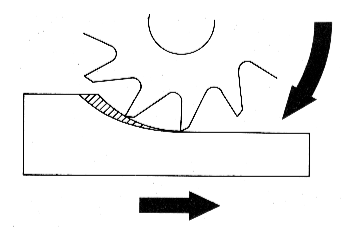
Shown above: Conventional Milling
Climb Milling
- The workpiece is fed with the rotation of the cutter.
- This method results in a better finish. Chips are not carried into the workpiece, thus not damaging the finish.
- Fixtures cost less. Climb milling forces the workpiece down, so simple holding devices can be utilized.
- The chip thickness tends to get smaller the closer it is to an edge, so there is a less chance of an edge breaking, especially with brittle materials.
- Increases tool life. The tool life can be increased by up to 50% due to chips piling up behind the tool.
- Chips can be removed easier since the chips fall behind the cutter.
- Reduces the power needed by 20%. This is due to the use a of a higher rake angle cutter.
- Not recommended if the workpiece cannot be held securely or if the machine cannot support high forces.
- Cannot be used to machine castings and hot-rolled steel.
- This method may pull the workpiece into the cutter and away from the holding device, resulting in broken cutters and scrapped workpieces.
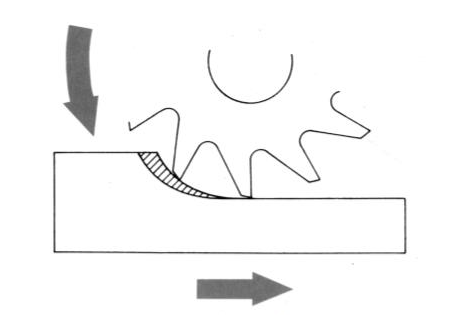
Shown above: Climb Milling
Setting Spindle Speed
- Spindle speed changes depending on the geometry of the drive train.
- A hand crank can be used to adjust the spindle speed on newer machines.
- To change the speed, the spindle has to be rotating.
- The speed (in RPM) is shown on the dial indicator.
- There are two scales on the dial indicator for the low and high ranges.
- A lever is used to change the machine’s range.
- Occasionally, slight rotation of the spindle is necessary for the gears to mate correctly.
Using an Edge Finder
- The edges of a workpiece must be located before doing mill work that requires great accuracy. An edge finder helps in finding the edges.
- 800-1200 spindle rpm is recommended.
- To use an edge finder, slightly offset the two halves so they wobble as they spin.
- Slowly move the workpiece towards the edge finder.
- The edge finder will center itself, then suddenly lose concentricity.
- The digital readout tells you the position of the spindle.
- The diameter of the edge finder is 0.200″. So adding or subtracting half of that (0.100″) will be the tool center.
- If centering on the top left, add 0.100″ to the X-axis and subtract 0.100″ from the Y-axis. If centering on the top right, subtract 0.100″ from the X-axis and subtract 0.100″ from the Y-axis.
- Part Reference Zero is when the bit is zeroed on the X and X axes.
- A pointed edge finder is a lot easier, but not as precise. Only use a pointed edge finder if precision is not necessary.
Using the Micrometer Dials
- Most manual feeds on a milling machine have micrometer dial indicators.
- If the length of the feed is known, the dial indicator should be set to that number (thousandths of an inch).
- To free the dial indicator, rotate the locking ring counterclockwise. Set the dial and re-tighten.
- Before setting the dial indicator, ensure that the table-driving mechanism backlash is taken up.
- It is common for newer machines to have digital readouts, which are preferable because they directly measure table position. When using a digital readout, backlash concerns are negated.
Squaring Stock
- When making a square corner, vertically orient a completed edge in the vice and clamp it lightly to the part.
- Place machinist’s square against the completed edge and the base of the vice.
- Align the workpiece with the square by tapping it lightly with a rubber mallet.
- Firmly clamp the vice.
- The top edge of the part is ready to be milled.
Face Milling
- It is frequently necessary to mill a flat surface on a large workpiece. This is done best using a facing cutter.
- A cutter that is about an inch wider than the workpiece should be selected in order to finish the facing in one pass.

Shown above: Face milling
Milling Slots
- Square slots can be cut using end mills.
- In one pass, slots can be created to within two one-thousandths of an inch.
- Use an end mill that is smaller than the desired slot for more accuracy.
- Measure the slot and make a second pass to open the slot to the desired dimension.
- The depth of cut should not exceed the cutter diameter.
Advanced Workholding
- Use a v-block to secure round stock in a vice. It can be used both horizontally and vertically.
- Clamping round stock in a v-block usually damages the stock.
- Collet blocks are made to hold round workpieces.
- To mill features at 90 degree increments, use a square collet block.
- To mill features at 60 degree increments, use a hexagonal block.
- It is easiest to set up stock when the features are perpendicular or parallel to the edges of the workpiece. It is more difficult to set up a workpiece when features are not parallel or perpendicular to the edges. Sometimes, an angle plate can be used to mill stock at any desired angle.
- Parts that don’t fit well in a vise can be directly secured to the table with hold-down clamps.
- Use parallels to create a gap between the work and bed.
- Slightly tilt the clamps down into the work.
- Rotary tables can be put on the bed to make circular features.
- Rotary tables allow rotation of the workpiece.
- Use a dial indicator to precisely control the angle of rotation.
- Use a ball for irregularly shaped workpieces. Make sure to only take a small cuts to avoid throwing the workpiece out of the vice.
UNIT TEST
- What tool is used for tramming the head?
- Explain the process for the X-axis tramming.
- Explain the process for the Y-axis tramming.
- What is the purpose of indicating the vise?
- Name three types of milling cutters.
- Explain how a spring collet works.
- What is the difference between conventional and climb milling?
- Describe briefly how a rotary table may be centered with the vertical mill spindle.
- Describe briefly how to set spindle speed on the milling machine.
- What tool is used for milling large workpiece surfaces?

