
6: Chapter 6. Set sheets
- Page ID
- 13182

\( \newcommand{\vecs}[1]{\overset { \scriptstyle \rightharpoonup} {\mathbf{#1}} } \)
\( \newcommand{\vecd}[1]{\overset{-\!-\!\rightharpoonup}{\vphantom{a}\smash {#1}}} \)
\( \newcommand{\id}{\mathrm{id}}\) \( \newcommand{\Span}{\mathrm{span}}\)
( \newcommand{\kernel}{\mathrm{null}\,}\) \( \newcommand{\range}{\mathrm{range}\,}\)
\( \newcommand{\RealPart}{\mathrm{Re}}\) \( \newcommand{\ImaginaryPart}{\mathrm{Im}}\)
\( \newcommand{\Argument}{\mathrm{Arg}}\) \( \newcommand{\norm}[1]{\| #1 \|}\)
\( \newcommand{\inner}[2]{\langle #1, #2 \rangle}\)
\( \newcommand{\Span}{\mathrm{span}}\)
\( \newcommand{\id}{\mathrm{id}}\)
\( \newcommand{\Span}{\mathrm{span}}\)
\( \newcommand{\kernel}{\mathrm{null}\,}\)
\( \newcommand{\range}{\mathrm{range}\,}\)
\( \newcommand{\RealPart}{\mathrm{Re}}\)
\( \newcommand{\ImaginaryPart}{\mathrm{Im}}\)
\( \newcommand{\Argument}{\mathrm{Arg}}\)
\( \newcommand{\norm}[1]{\| #1 \|}\)
\( \newcommand{\inner}[2]{\langle #1, #2 \rangle}\)
\( \newcommand{\Span}{\mathrm{span}}\) \( \newcommand{\AA}{\unicode[.8,0]{x212B}}\)
\( \newcommand{\vectorA}[1]{\vec{#1}} % arrow\)
\( \newcommand{\vectorAt}[1]{\vec{\text{#1}}} % arrow\)
\( \newcommand{\vectorB}[1]{\overset { \scriptstyle \rightharpoonup} {\mathbf{#1}} } \)
\( \newcommand{\vectorC}[1]{\textbf{#1}} \)
\( \newcommand{\vectorD}[1]{\overrightarrow{#1}} \)
\( \newcommand{\vectorDt}[1]{\overrightarrow{\text{#1}}} \)
\( \newcommand{\vectE}[1]{\overset{-\!-\!\rightharpoonup}{\vphantom{a}\smash{\mathbf {#1}}}} \)
\( \newcommand{\vecs}[1]{\overset { \scriptstyle \rightharpoonup} {\mathbf{#1}} } \)
\( \newcommand{\vecd}[1]{\overset{-\!-\!\rightharpoonup}{\vphantom{a}\smash {#1}}} \)
\(\newcommand{\avec}{\mathbf a}\) \(\newcommand{\bvec}{\mathbf b}\) \(\newcommand{\cvec}{\mathbf c}\) \(\newcommand{\dvec}{\mathbf d}\) \(\newcommand{\dtil}{\widetilde{\mathbf d}}\) \(\newcommand{\evec}{\mathbf e}\) \(\newcommand{\fvec}{\mathbf f}\) \(\newcommand{\nvec}{\mathbf n}\) \(\newcommand{\pvec}{\mathbf p}\) \(\newcommand{\qvec}{\mathbf q}\) \(\newcommand{\svec}{\mathbf s}\) \(\newcommand{\tvec}{\mathbf t}\) \(\newcommand{\uvec}{\mathbf u}\) \(\newcommand{\vvec}{\mathbf v}\) \(\newcommand{\wvec}{\mathbf w}\) \(\newcommand{\xvec}{\mathbf x}\) \(\newcommand{\yvec}{\mathbf y}\) \(\newcommand{\zvec}{\mathbf z}\) \(\newcommand{\rvec}{\mathbf r}\) \(\newcommand{\mvec}{\mathbf m}\) \(\newcommand{\zerovec}{\mathbf 0}\) \(\newcommand{\onevec}{\mathbf 1}\) \(\newcommand{\real}{\mathbb R}\) \(\newcommand{\twovec}[2]{\left[\begin{array}{r}#1 \\ #2 \end{array}\right]}\) \(\newcommand{\ctwovec}[2]{\left[\begin{array}{c}#1 \\ #2 \end{array}\right]}\) \(\newcommand{\threevec}[3]{\left[\begin{array}{r}#1 \\ #2 \\ #3 \end{array}\right]}\) \(\newcommand{\cthreevec}[3]{\left[\begin{array}{c}#1 \\ #2 \\ #3 \end{array}\right]}\) \(\newcommand{\fourvec}[4]{\left[\begin{array}{r}#1 \\ #2 \\ #3 \\ #4 \end{array}\right]}\) \(\newcommand{\cfourvec}[4]{\left[\begin{array}{c}#1 \\ #2 \\ #3 \\ #4 \end{array}\right]}\) \(\newcommand{\fivevec}[5]{\left[\begin{array}{r}#1 \\ #2 \\ #3 \\ #4 \\ #5 \\ \end{array}\right]}\) \(\newcommand{\cfivevec}[5]{\left[\begin{array}{c}#1 \\ #2 \\ #3 \\ #4 \\ #5 \\ \end{array}\right]}\) \(\newcommand{\mattwo}[4]{\left[\begin{array}{rr}#1 \amp #2 \\ #3 \amp #4 \\ \end{array}\right]}\) \(\newcommand{\laspan}[1]{\text{Span}\{#1\}}\) \(\newcommand{\bcal}{\cal B}\) \(\newcommand{\ccal}{\cal C}\) \(\newcommand{\scal}{\cal S}\) \(\newcommand{\wcal}{\cal W}\) \(\newcommand{\ecal}{\cal E}\) \(\newcommand{\coords}[2]{\left\{#1\right\}_{#2}}\) \(\newcommand{\gray}[1]{\color{gray}{#1}}\) \(\newcommand{\lgray}[1]{\color{lightgray}{#1}}\) \(\newcommand{\rank}{\operatorname{rank}}\) \(\newcommand{\row}{\text{Row}}\) \(\newcommand{\col}{\text{Col}}\) \(\renewcommand{\row}{\text{Row}}\) \(\newcommand{\nul}{\text{Nul}}\) \(\newcommand{\var}{\text{Var}}\) \(\newcommand{\corr}{\text{corr}}\) \(\newcommand{\len}[1]{\left|#1\right|}\) \(\newcommand{\bbar}{\overline{\bvec}}\) \(\newcommand{\bhat}{\widehat{\bvec}}\) \(\newcommand{\bperp}{\bvec^\perp}\) \(\newcommand{\xhat}{\widehat{\xvec}}\) \(\newcommand{\vhat}{\widehat{\vvec}}\) \(\newcommand{\uhat}{\widehat{\uvec}}\) \(\newcommand{\what}{\widehat{\wvec}}\) \(\newcommand{\Sighat}{\widehat{\Sigma}}\) \(\newcommand{\lt}{<}\) \(\newcommand{\gt}{>}\) \(\newcommand{\amp}{&}\) \(\definecolor{fillinmathshade}{gray}{0.9}\) Session Objectives
Upon completing this session, students will be able to:
(CO 1) Understand Model space and Paper space
(CO 2) Set a new layout – Page layout and plot styles
(CO 3) Set views in Paper space – Defpoints, scaling
(CO 4) Add/Edit/Draw a titleblock
 Session Highlights
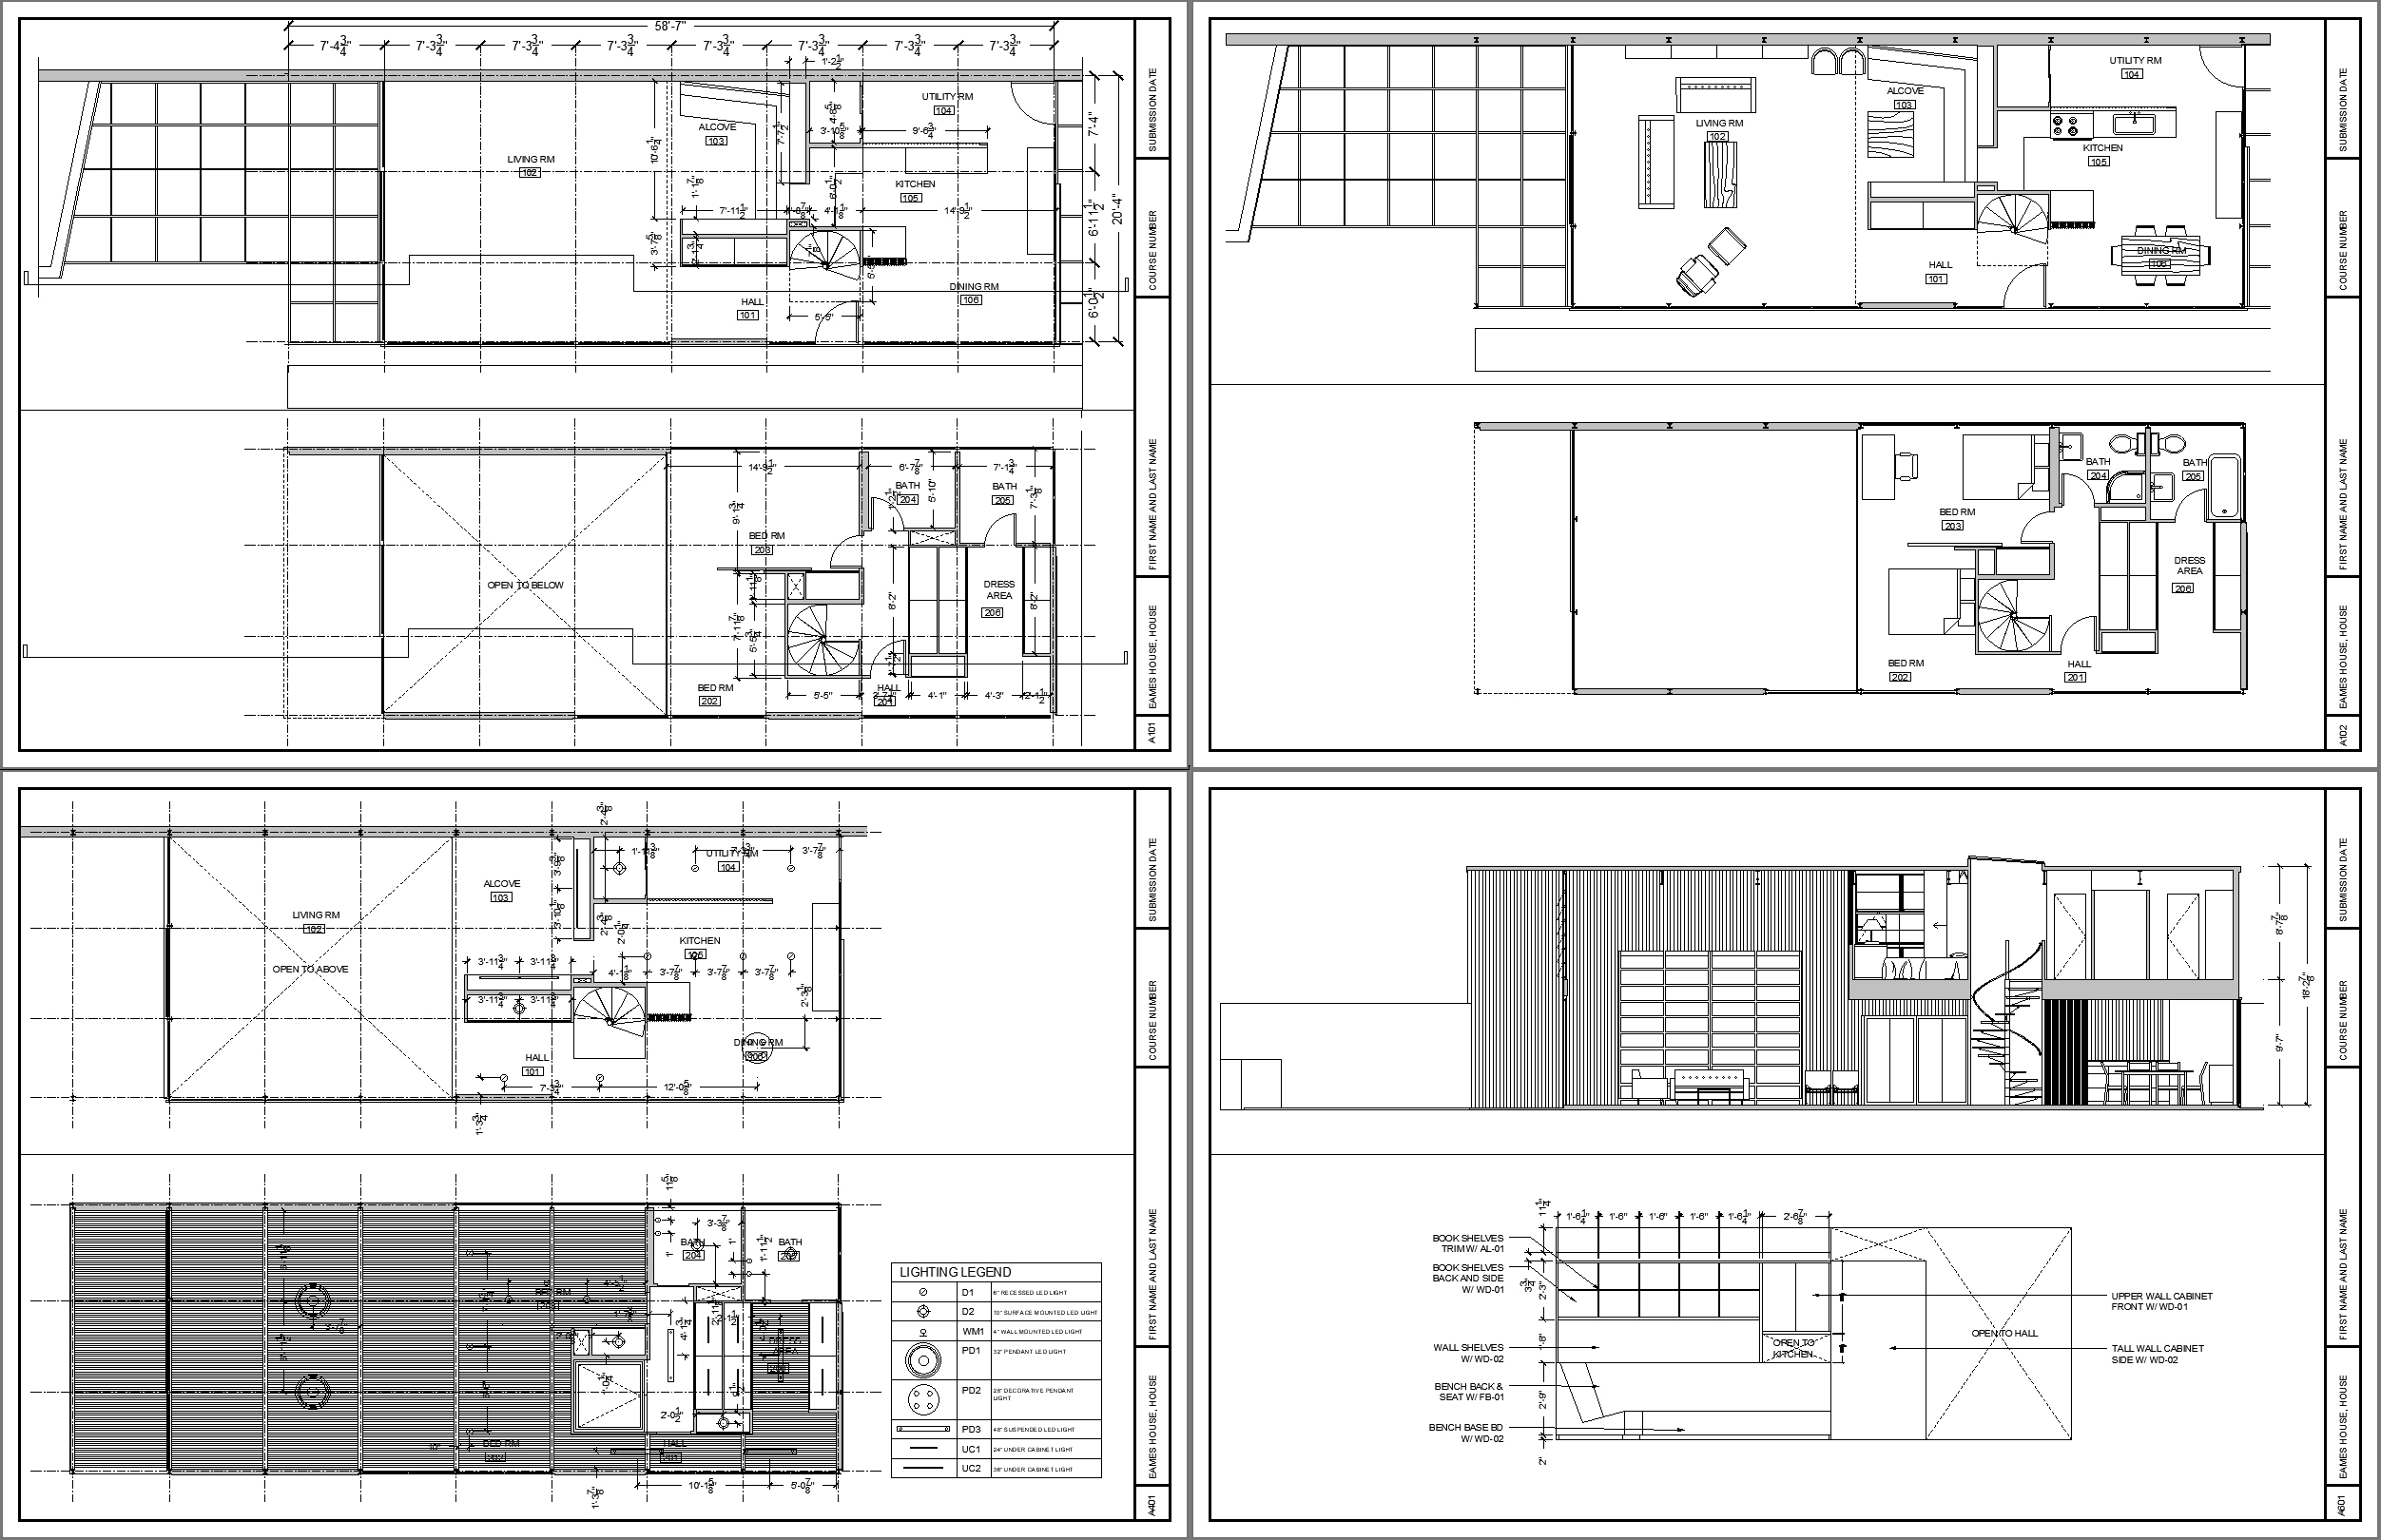
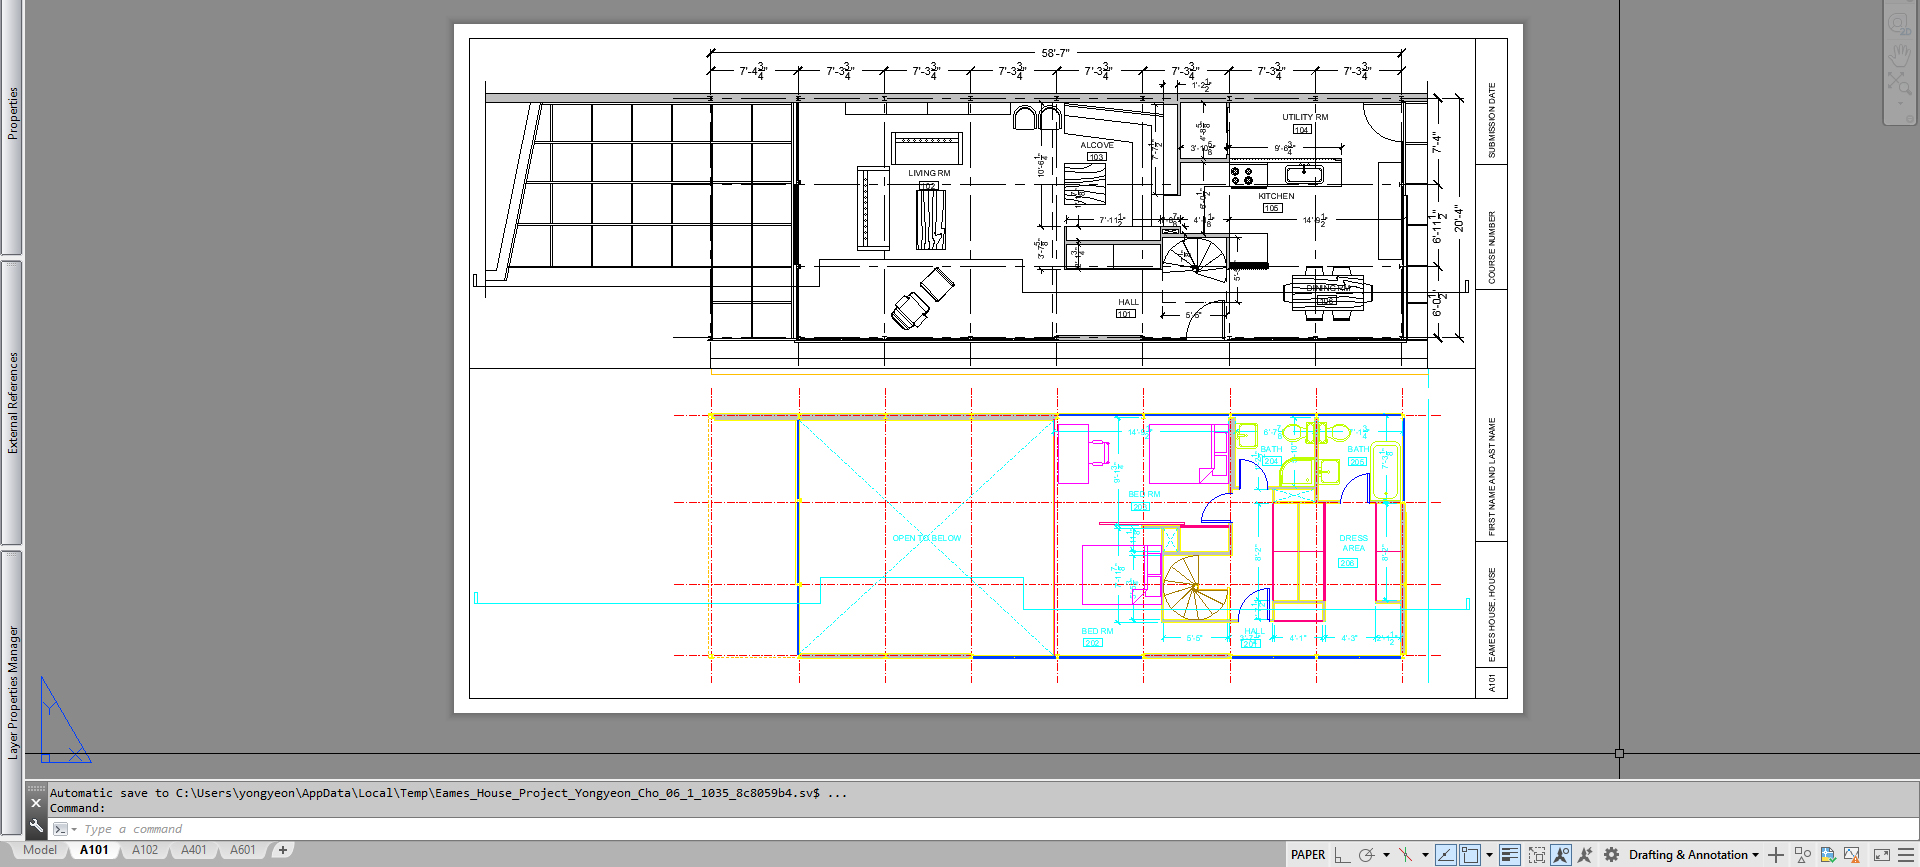
At the end of the session, students can create the graphics below.
 Lecture Contents
(CO 1) Understand Model space and Paper space

A YouTube element has been excluded from this version of the text. You can view it online here: https://iastate.pressbooks.pub/visualgraphiccomm/?p=84
In this tutorial, you will understand the differences between the concept of model space and the concept of paper space. AutoCAD provides two different types of drawing areas.
- Model space – A limitless drawing area. You draw at a 1:1 scale.
- Paper space – To prepare your drawing for printing, use paper space. Paper space is a pre-defined and set area. Please refer to the information from this link.
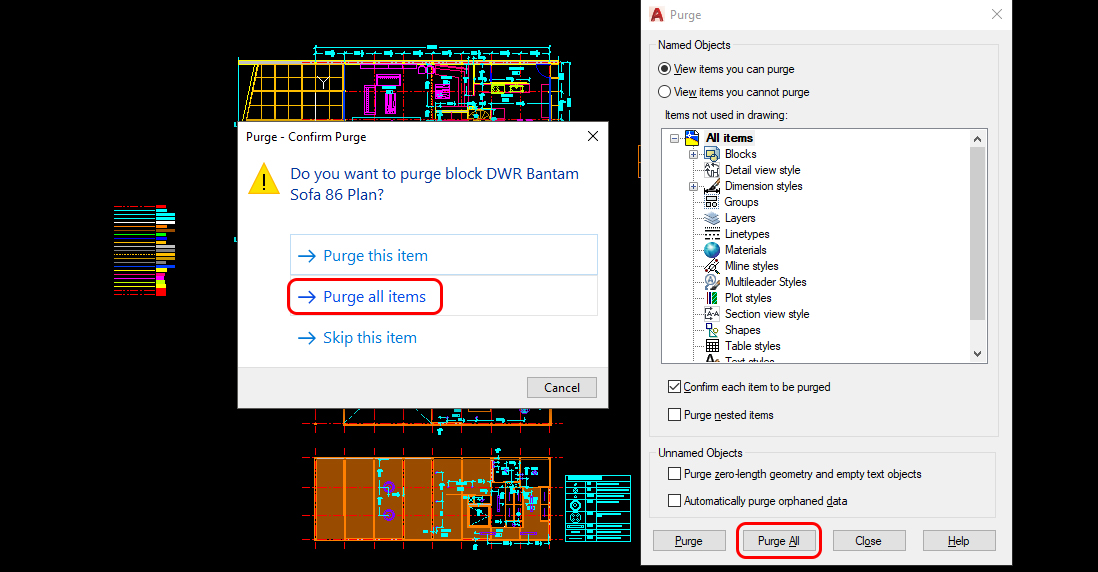
Clean up the CAD file
- Purge is a command to automatically removed all layers, block, dimension styles, and more items that are not currently used in your document. This command is a useful command to reduce the file size.
- Type [PURGE], and press [ENTER] key, select [PURGE ALL], and purge all again until the [PURGE ALL] is grayed out.
(CO 2) Set a new layout – Page setup

A YouTube element has been excluded from this version of the text. You can view it online here: https://iastate.pressbooks.pub/visualgraphiccomm/?p=84
In this tutorial, you will understand how to set a new layout in the paper space using page setup.
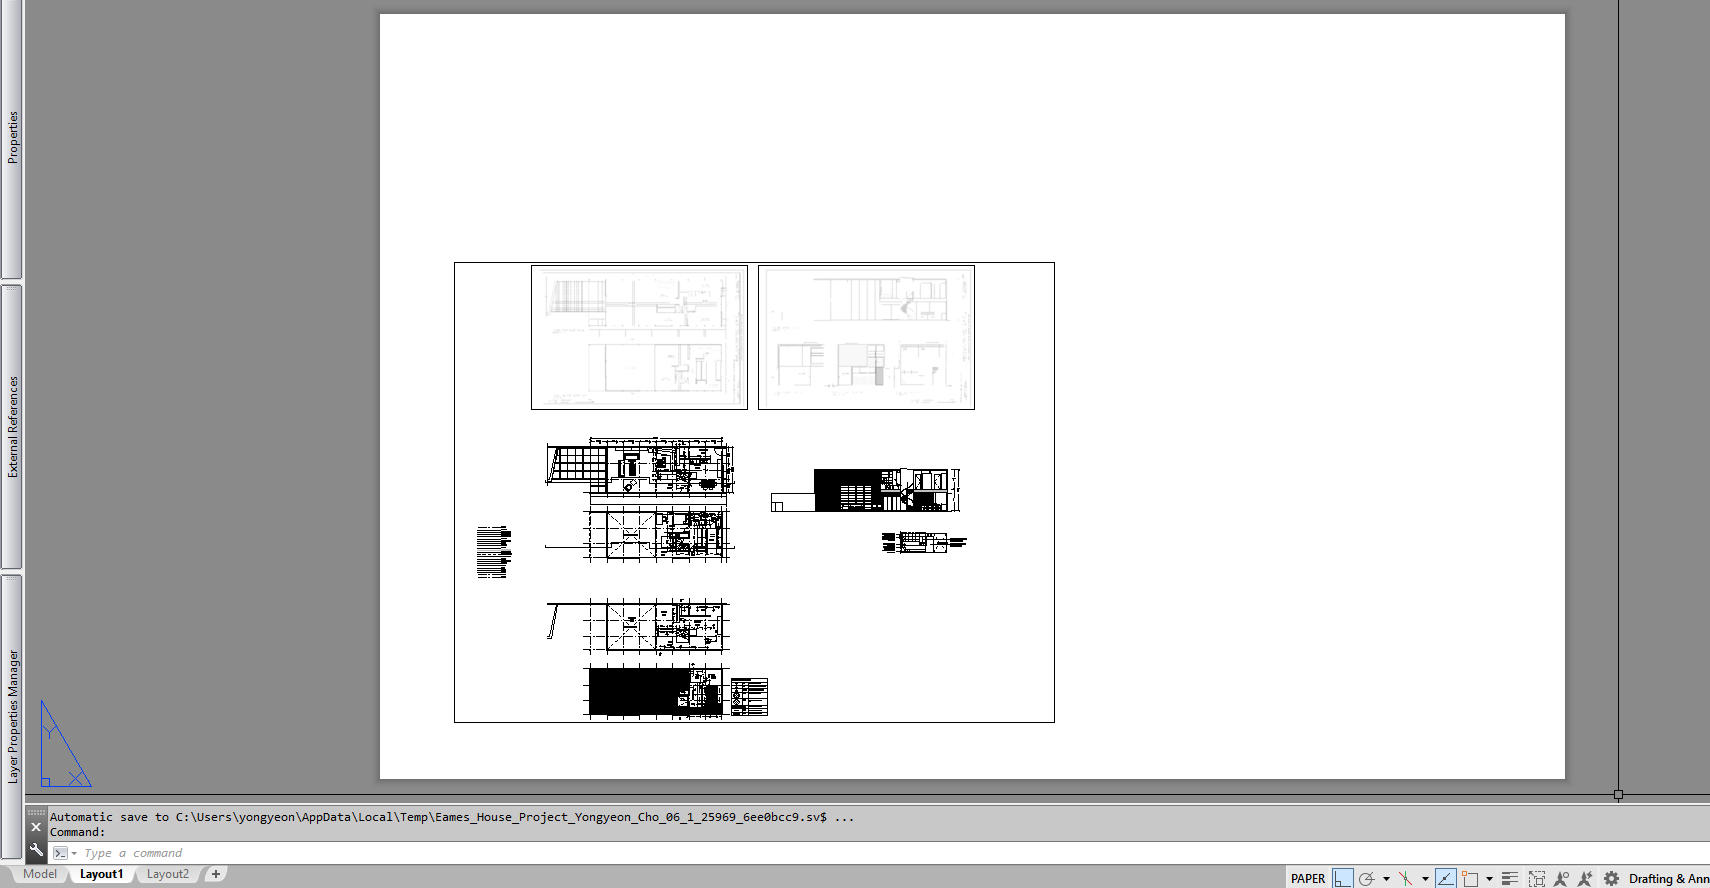
Once you click [LAYOUT 1], you will see the models you made in the model space in a rectangular box. It is called a viewport.
There is a dashed line that is inside of the white space; it is called a printable area.
And the white space called a layout. Once you change the paper size to print, the layout and the printable area will change accordingly.
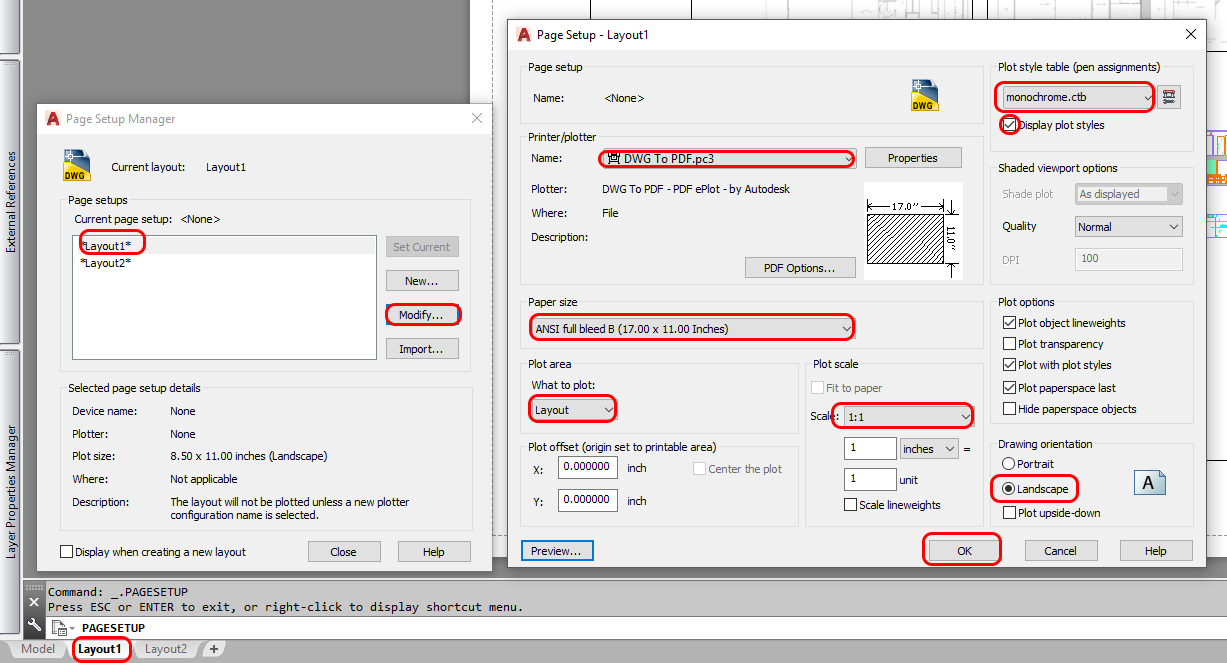
Update Page setup for 11in x 17 in PDF
- [STEP 1] Open Page setup manager
- Mouse right-click on [LAYOUT 1]
- Click [PAGE SETUP MANAGER]
- Click [*Layout1*] and select [MODIFY] to open the Page setup
- [STEP 2] Edit Page Setup
- Click the name of printer/plotter and switch to [DWG To PDF.pc3]
- Update paper size to [ANSI full-bleed B (17.00 x 11.00 Inches)
- Confirm What to plot: [LAYOUT]
- Confirm Plot scale to [1:1]
- Change Plot style table to [monochrome.ctb]
- Check [Display plot styles]
- Check [Landscape] for the drawing orientation
- Click [OK] – Page Setup – Layout 1
- Click [Close] – Page Setup Manager
- [STEP 3] Confirm the layout with an updated sheet size
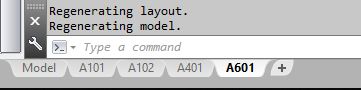
- [STEP 4] Update the name of the sheets and add sheets
- To update the name of sheet > mouse-right click on the tab > Click [RENAME] > Rename on the tab
- To add a sheet > click [+] tab
- Update the name of the Layout1 to A101. A101 is for the floor plans
- Update the name of the Layout2 to A102. A102 is for the furniture plans
- Add a new layout and change the name to A401. A401 is for RCPs
- Add a new layout and change the name to A601. A601 is for the section view and the elevation
- [STEP 5] Update other sheets to 11×17 PDF
- Mouse right-click on A102
- Open Page Setup Manger
- Select *A101*
- Click [Set Current]
- Click [Close]
- Repeat this process for A401 and A601
(CO 3) Add/Edit/Draw a titleblock
A YouTube element has been excluded from this version of the text. You can view it online here: https://iastate.pressbooks.pub/visualgraphiccomm/?p=84
- [STEP 1] Draw a titleblock
- Select [A101] sheet to open the sheet
- Confirm your current layer is [0]
- Draw a rectangle for a paper size box – Type [REC], press [Enter] key > Type [0,0], press [Enter] key > Type [17”,11”]. Press [Enter] key
- Draw a titleblock outline using the paper size box – Type [O], press [Enter] key > Type [1/4”], press [Enter] key > Click the inside of the sheet
- Draw lines for the titleblock. Please refer to the image below
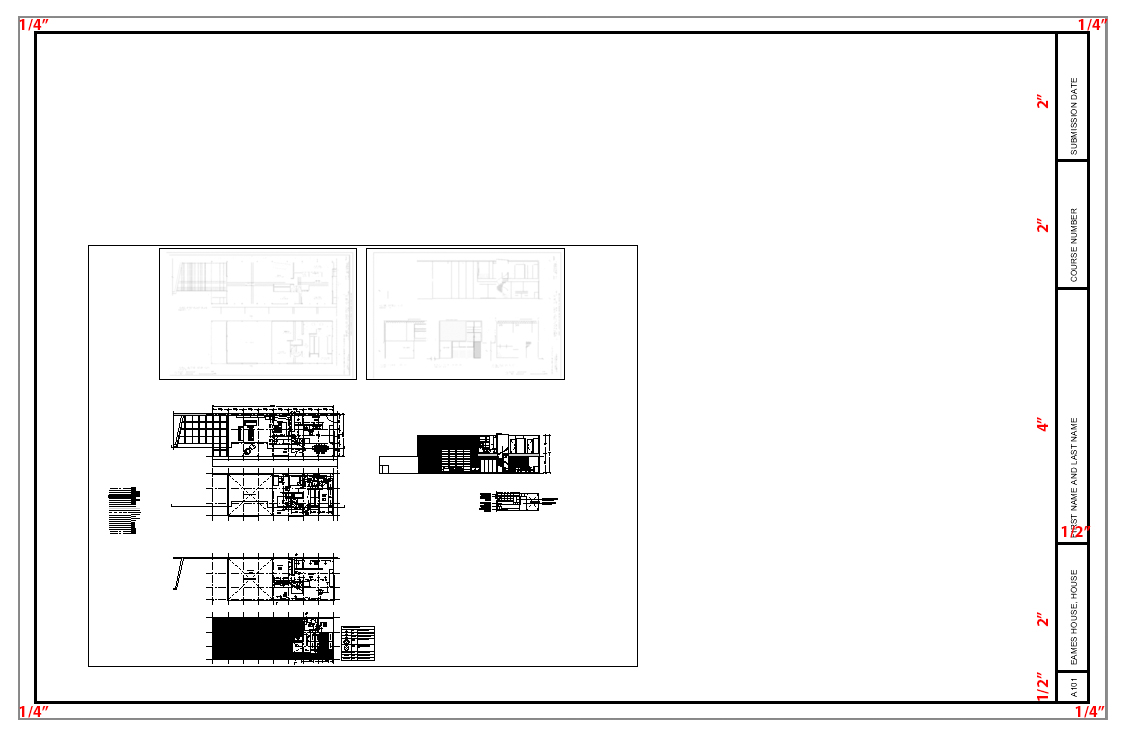
- [STEP 2] Add titleblock information
- Sheet number – A101
- Project name – Eames House, House
- Your name – First name and last name
- Course number
- Submission date
- Add text using [MT] for titleblock information. Verify the text size is 3/32”. You may rotate the text 90 degrees.
- [STEP 3] Add the titleblock to other sheets
- Click [Inset] from [Insert] tab, on [Block] panel
- Select [000_Titleblock_11x17]
- Type [0,0], press [Enter] key
- Select the titleblock and the information except for the Sheet number.
- Create a block for the selected elements – Name the block – [000_Titleblock_11x17]
- Insert the titleblock to A102, A401, and A601
- Switch the Titleblocks to [A-ANNO-TTLB]
- Copy and modify the sheet number to A102, A401, and A601
- Now you are ready to add a titleblock on the paper space.
(CO 4) Set views in Paper space – Defpoints, scaling

A YouTube element has been excluded from this version of the text. You can view it online here: https://iastate.pressbooks.pub/visualgraphiccomm/?p=84
Now you are ready to set the views in the sheets
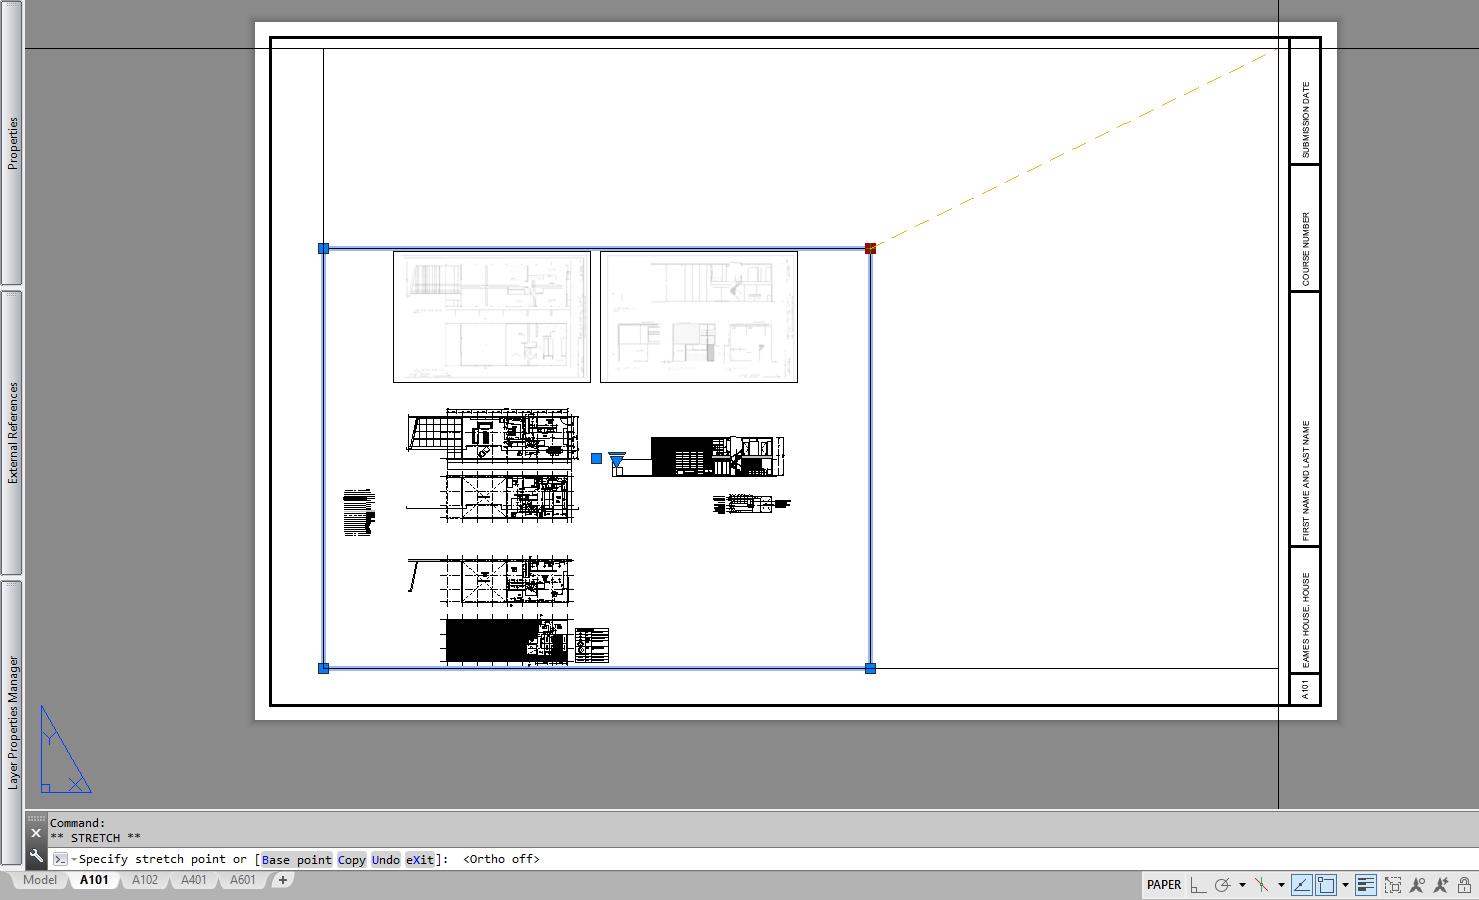
- [STEP 1] Change a viewport size and the viewport layer
- Once you click, a viewport can be changed by stretching the corner of the viewport line.
- Once you click, a viewport can be changed by stretching the corner of the viewport line.
-
- Select the viewport > switch to [Defpoints] layer. The [Defpoints] layer is set up by default as a non-plot layer.

- Select the viewport > switch to [Defpoints] layer. The [Defpoints] layer is set up by default as a non-plot layer.
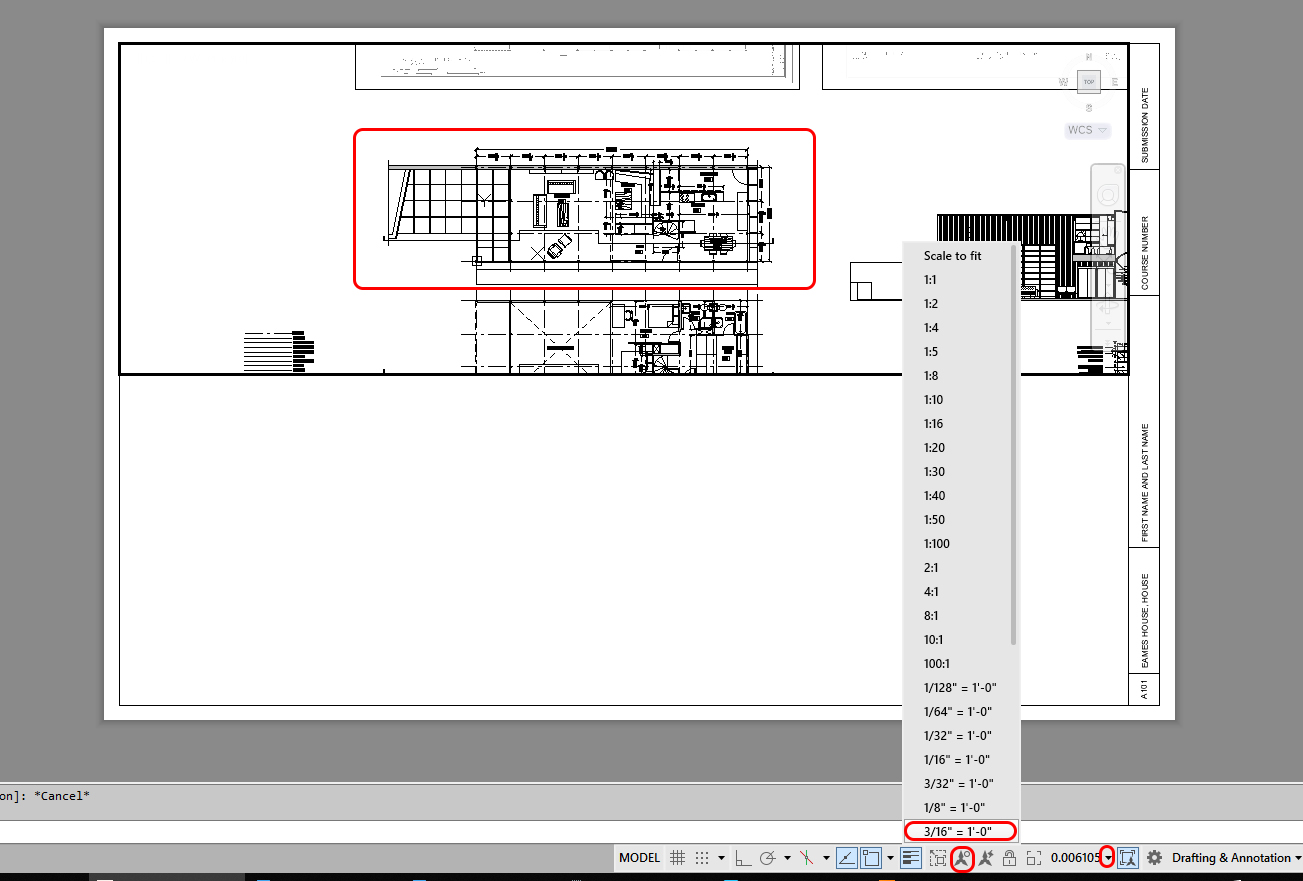
- [STEP 2] Update the scale of the viewport
- After changing the viewport size > double-click the viewport > Zoom in and out > Pan the view to make the view centered
- After changing the viewport size > double-click the viewport > Zoom in and out > Pan the view to make the view centered
-
- Click a scale on the application status bar, and select a desired scale for the floor plan
- If the dimensions have disappeared, click on the Show Annotation icon on the application status bar
- [STEP 3] If you want to add a new viewport, use [MVIEW] command.
- Type [MV], and press [Enter] > Click the first point to draw a rectangle > Click a second point to finish the rectangle. It will automatically show the drawings
- If you have a viewport to copy, you can copy the viewport and pan the view
- Sometimes a copied viewport will show in color. To change it to black and white, double-click the inside of the viewport > type [RE] and press [ENTER] key > double-click the outside of the viewport
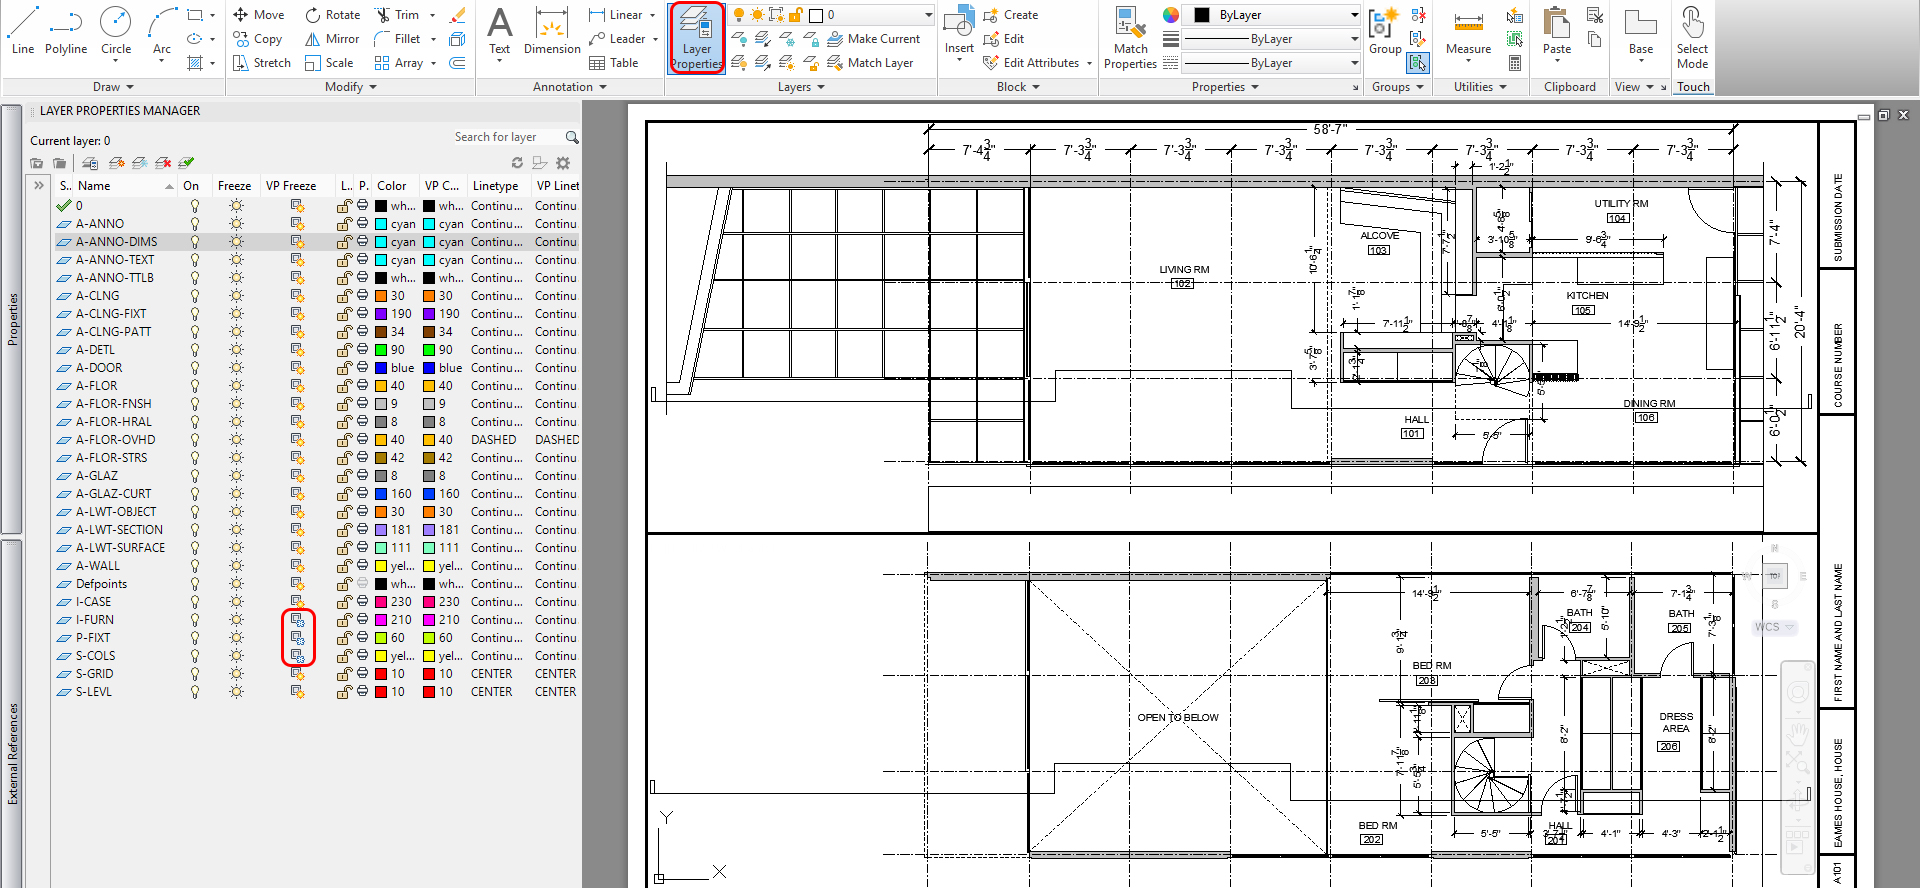
- [STEP 4] Update layer visibility for the viewports
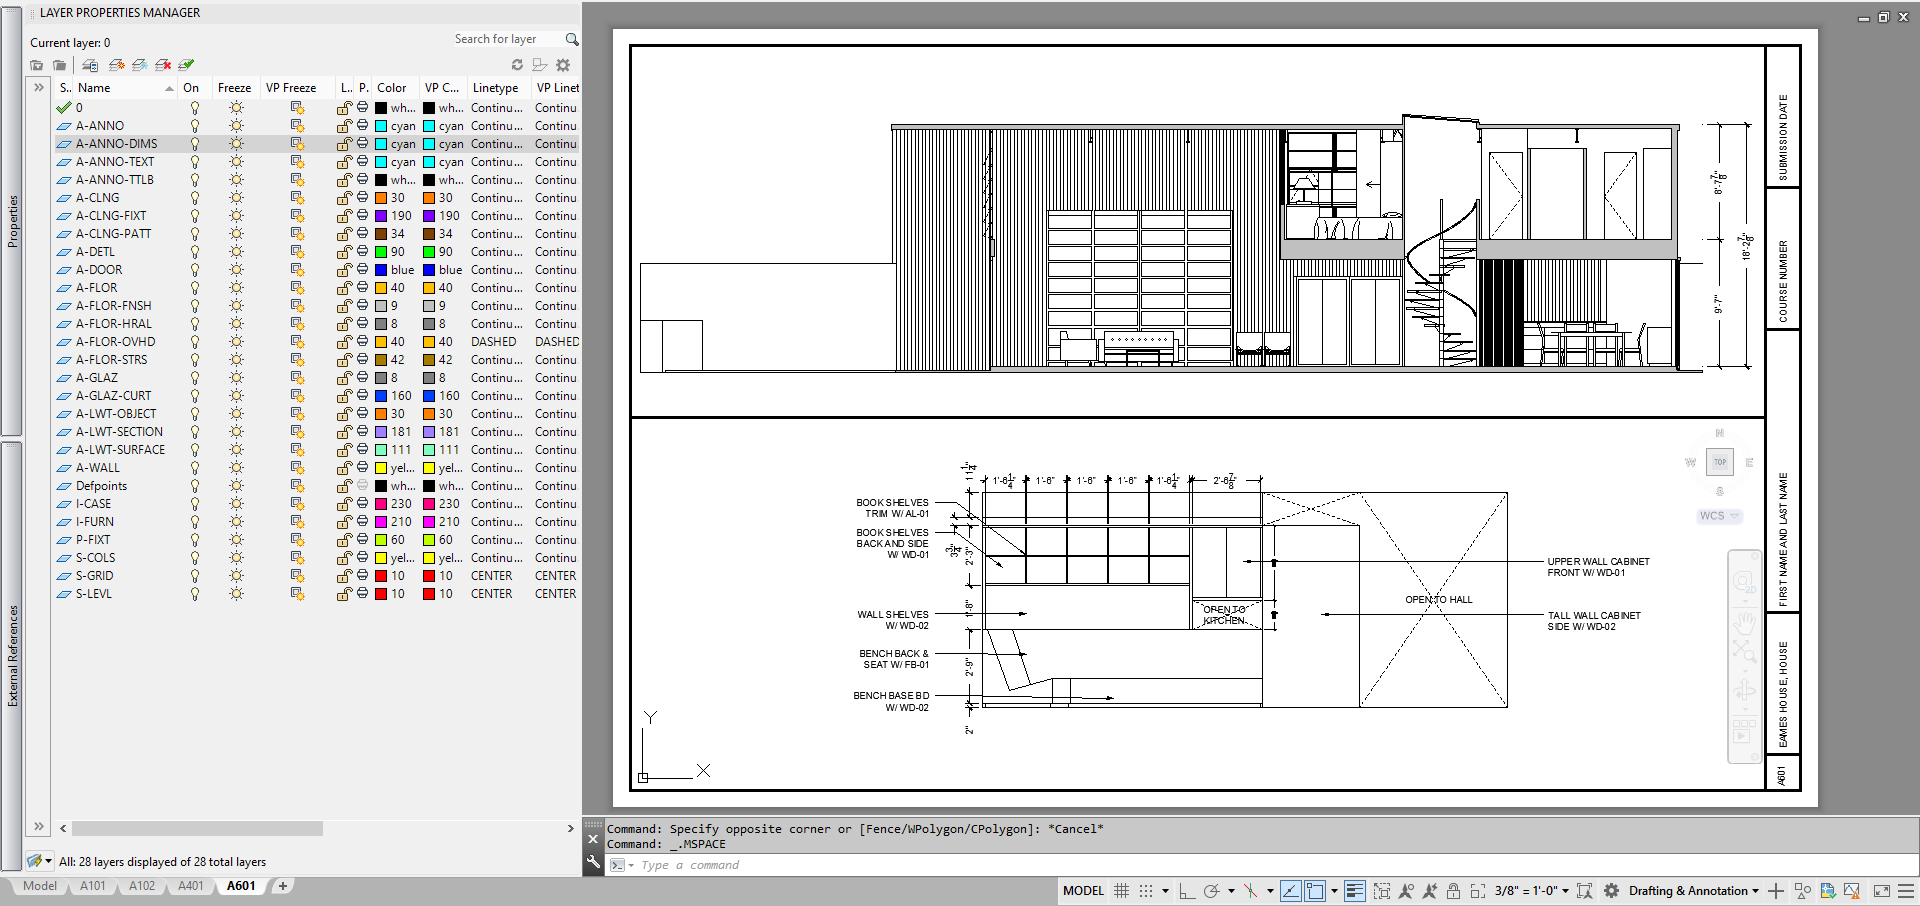
- Open [LAYER PROPERTIES MANAGER]
- A101 is for dimensioned floor plans. Thus, it would help if you hid the [I-FURN], [I-CASE], and [P-FIXT] layers
- Double-click the viewport, and click [VP FREEZE] on the I-FURN], [I-CASE], and [P-FIXT] layers
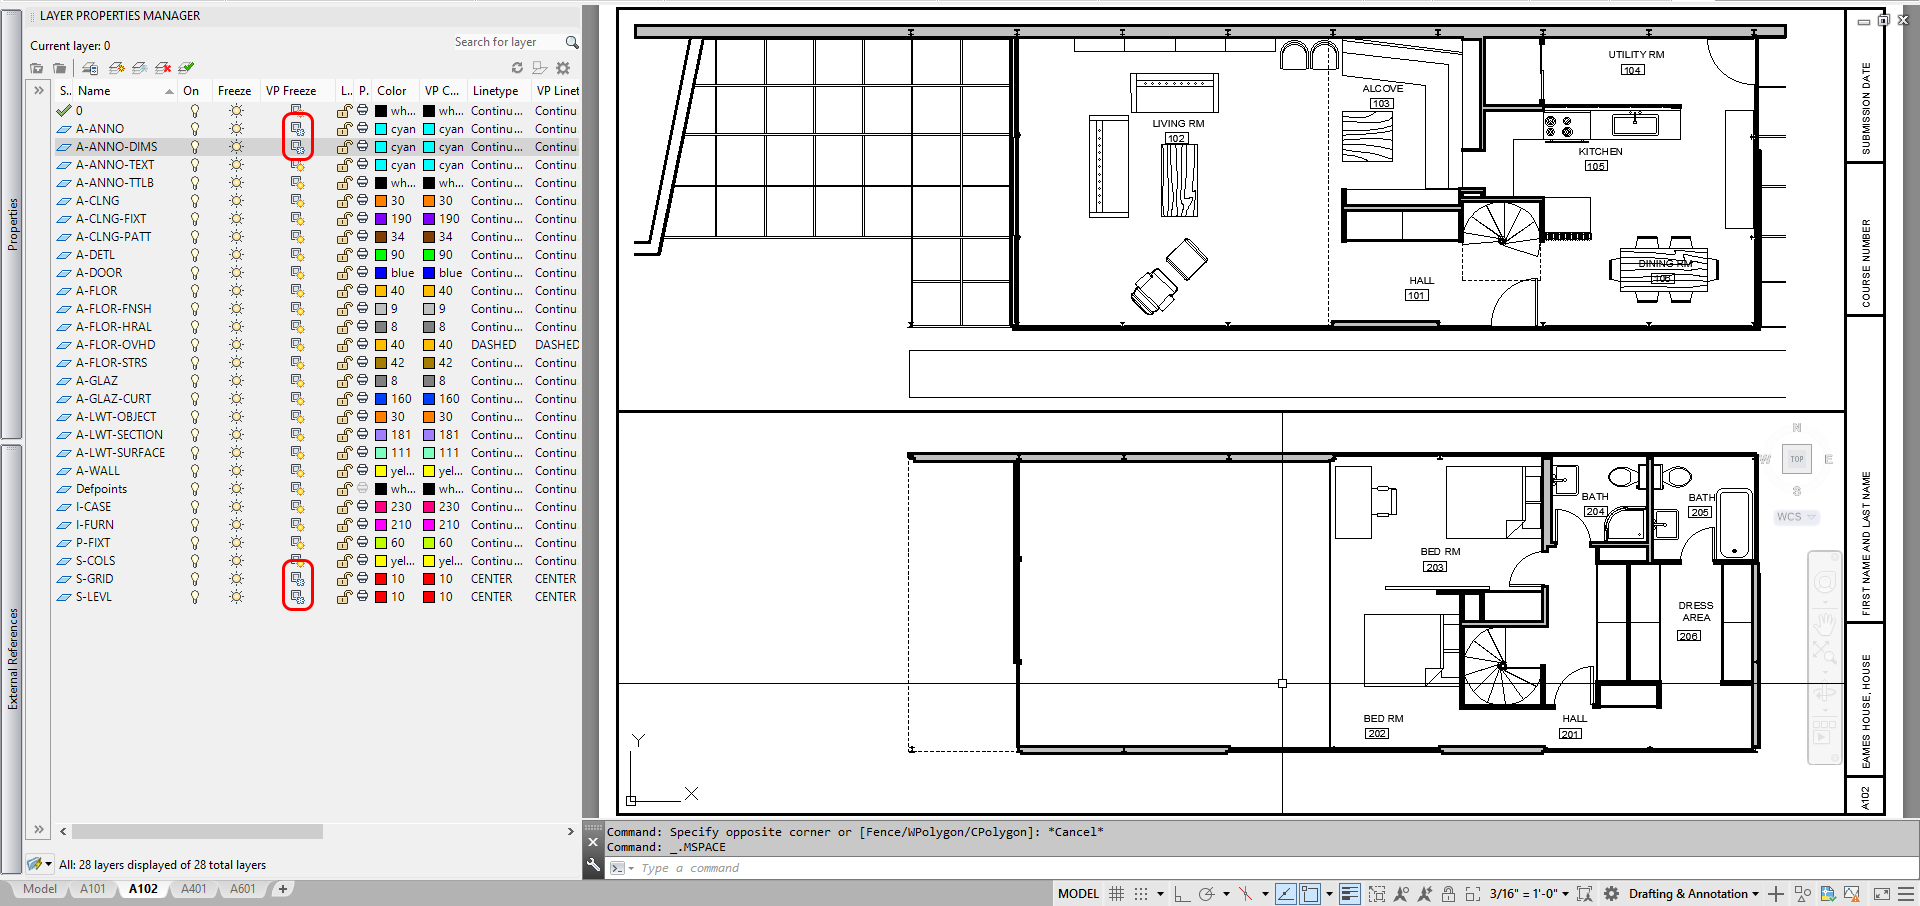
- [STEP 5] Set a furniture plan sheet
- The scale of the furniture plan is 3/16”= 1.’
- VP Freeze [A-ANNO], [A-ANNO-DIMS], [S-GRID], and [S-LEVEL]
- [STEP 6] Set an RCP sheet
- The scale of the RCP is 3/16”= 1.’
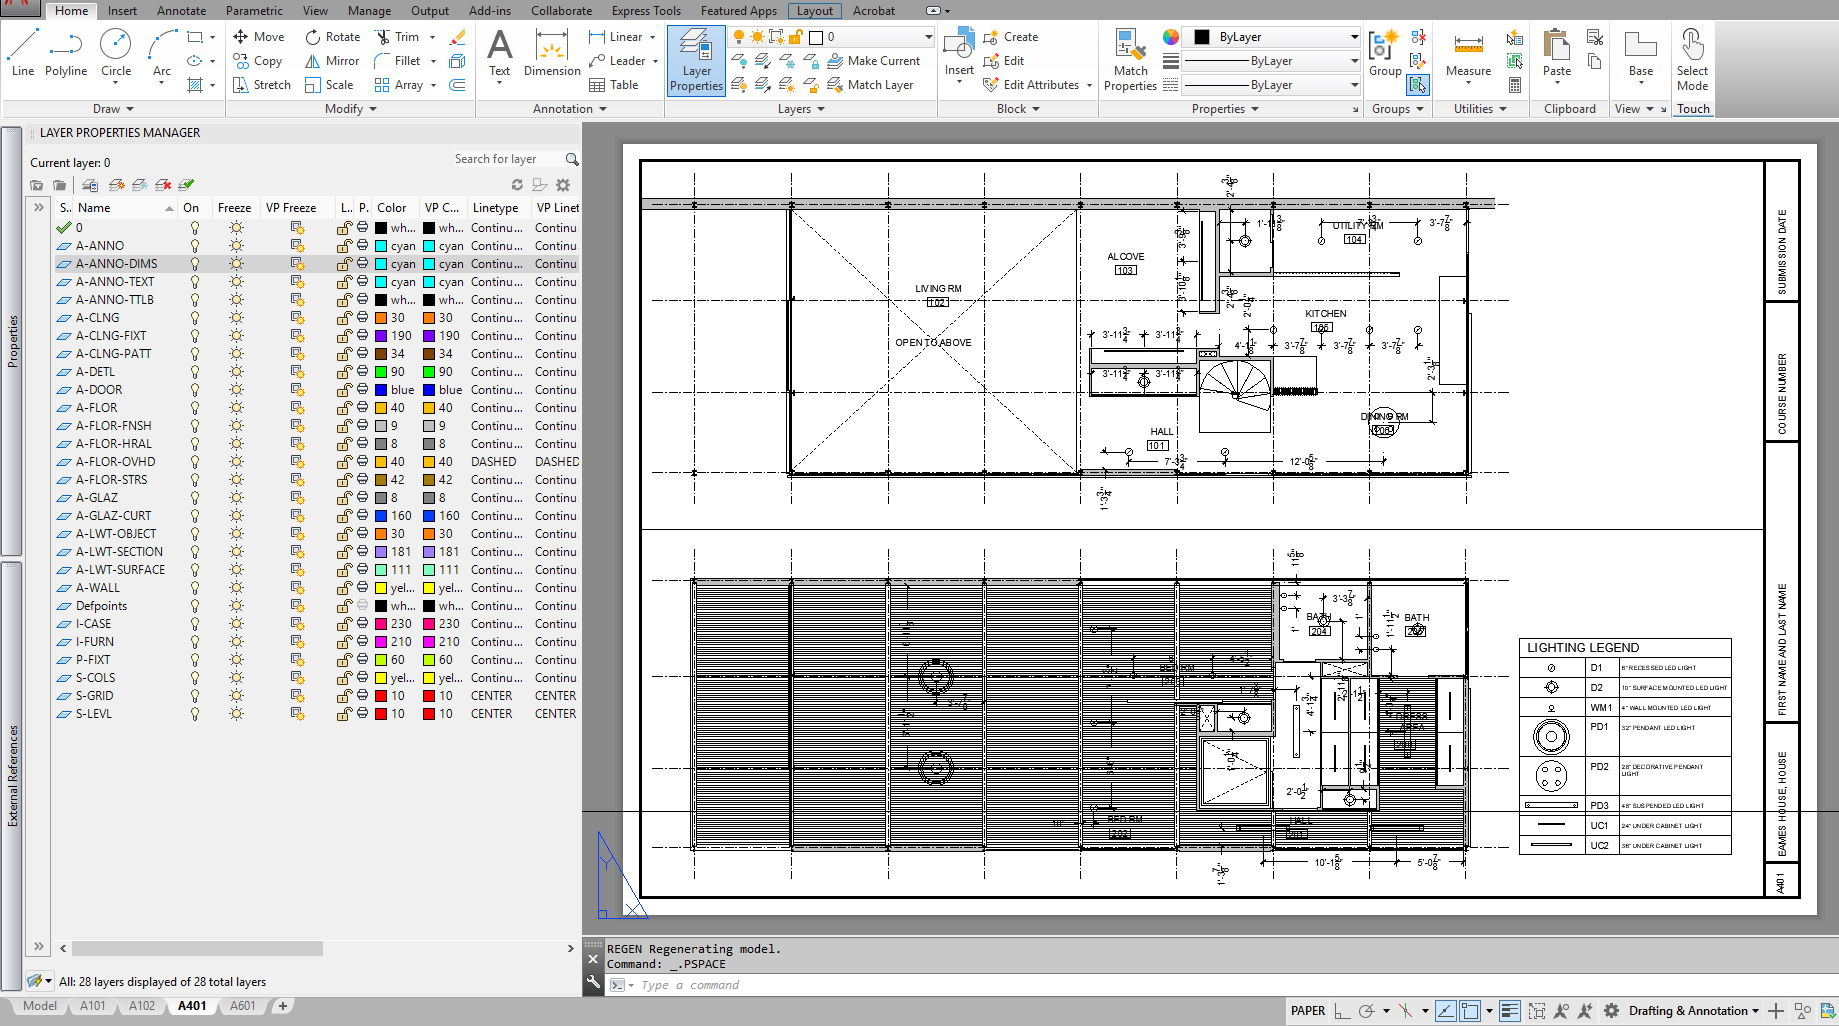
- The scale of the RCP is 3/16”= 1.’
- [STEP 7] Set a section view and elevation sheet
- The scale of the section view is 3/16”= 1.’
- The scale of the elevation is 3/8”= 1.’
SAVE the file before closing the application.
Save in a different location for the backup (e.g., a cloud folder)
 References
Autodesk.Help. (2020, March 29). About Model Space and Paper Space. Retrieved October 20, 2020, from https://knowledge.autodesk.com/support/autocad/getting-started/caas/CloudHelp/cloudhelp/2019/ENU/AutoCAD-Core/files/GUID-990538B6-DDA1-4190-BCC0-BB5BA94C9879-htm.html