
13: Chapter 13. Add/edit stairs, rails, and roof
- Page ID
- 13192

\( \newcommand{\vecs}[1]{\overset { \scriptstyle \rightharpoonup} {\mathbf{#1}} } \)
\( \newcommand{\vecd}[1]{\overset{-\!-\!\rightharpoonup}{\vphantom{a}\smash {#1}}} \)
\( \newcommand{\id}{\mathrm{id}}\) \( \newcommand{\Span}{\mathrm{span}}\)
( \newcommand{\kernel}{\mathrm{null}\,}\) \( \newcommand{\range}{\mathrm{range}\,}\)
\( \newcommand{\RealPart}{\mathrm{Re}}\) \( \newcommand{\ImaginaryPart}{\mathrm{Im}}\)
\( \newcommand{\Argument}{\mathrm{Arg}}\) \( \newcommand{\norm}[1]{\| #1 \|}\)
\( \newcommand{\inner}[2]{\langle #1, #2 \rangle}\)
\( \newcommand{\Span}{\mathrm{span}}\)
\( \newcommand{\id}{\mathrm{id}}\)
\( \newcommand{\Span}{\mathrm{span}}\)
\( \newcommand{\kernel}{\mathrm{null}\,}\)
\( \newcommand{\range}{\mathrm{range}\,}\)
\( \newcommand{\RealPart}{\mathrm{Re}}\)
\( \newcommand{\ImaginaryPart}{\mathrm{Im}}\)
\( \newcommand{\Argument}{\mathrm{Arg}}\)
\( \newcommand{\norm}[1]{\| #1 \|}\)
\( \newcommand{\inner}[2]{\langle #1, #2 \rangle}\)
\( \newcommand{\Span}{\mathrm{span}}\) \( \newcommand{\AA}{\unicode[.8,0]{x212B}}\)
\( \newcommand{\vectorA}[1]{\vec{#1}} % arrow\)
\( \newcommand{\vectorAt}[1]{\vec{\text{#1}}} % arrow\)
\( \newcommand{\vectorB}[1]{\overset { \scriptstyle \rightharpoonup} {\mathbf{#1}} } \)
\( \newcommand{\vectorC}[1]{\textbf{#1}} \)
\( \newcommand{\vectorD}[1]{\overrightarrow{#1}} \)
\( \newcommand{\vectorDt}[1]{\overrightarrow{\text{#1}}} \)
\( \newcommand{\vectE}[1]{\overset{-\!-\!\rightharpoonup}{\vphantom{a}\smash{\mathbf {#1}}}} \)
\( \newcommand{\vecs}[1]{\overset { \scriptstyle \rightharpoonup} {\mathbf{#1}} } \)
\( \newcommand{\vecd}[1]{\overset{-\!-\!\rightharpoonup}{\vphantom{a}\smash {#1}}} \)
\(\newcommand{\avec}{\mathbf a}\) \(\newcommand{\bvec}{\mathbf b}\) \(\newcommand{\cvec}{\mathbf c}\) \(\newcommand{\dvec}{\mathbf d}\) \(\newcommand{\dtil}{\widetilde{\mathbf d}}\) \(\newcommand{\evec}{\mathbf e}\) \(\newcommand{\fvec}{\mathbf f}\) \(\newcommand{\nvec}{\mathbf n}\) \(\newcommand{\pvec}{\mathbf p}\) \(\newcommand{\qvec}{\mathbf q}\) \(\newcommand{\svec}{\mathbf s}\) \(\newcommand{\tvec}{\mathbf t}\) \(\newcommand{\uvec}{\mathbf u}\) \(\newcommand{\vvec}{\mathbf v}\) \(\newcommand{\wvec}{\mathbf w}\) \(\newcommand{\xvec}{\mathbf x}\) \(\newcommand{\yvec}{\mathbf y}\) \(\newcommand{\zvec}{\mathbf z}\) \(\newcommand{\rvec}{\mathbf r}\) \(\newcommand{\mvec}{\mathbf m}\) \(\newcommand{\zerovec}{\mathbf 0}\) \(\newcommand{\onevec}{\mathbf 1}\) \(\newcommand{\real}{\mathbb R}\) \(\newcommand{\twovec}[2]{\left[\begin{array}{r}#1 \\ #2 \end{array}\right]}\) \(\newcommand{\ctwovec}[2]{\left[\begin{array}{c}#1 \\ #2 \end{array}\right]}\) \(\newcommand{\threevec}[3]{\left[\begin{array}{r}#1 \\ #2 \\ #3 \end{array}\right]}\) \(\newcommand{\cthreevec}[3]{\left[\begin{array}{c}#1 \\ #2 \\ #3 \end{array}\right]}\) \(\newcommand{\fourvec}[4]{\left[\begin{array}{r}#1 \\ #2 \\ #3 \\ #4 \end{array}\right]}\) \(\newcommand{\cfourvec}[4]{\left[\begin{array}{c}#1 \\ #2 \\ #3 \\ #4 \end{array}\right]}\) \(\newcommand{\fivevec}[5]{\left[\begin{array}{r}#1 \\ #2 \\ #3 \\ #4 \\ #5 \\ \end{array}\right]}\) \(\newcommand{\cfivevec}[5]{\left[\begin{array}{c}#1 \\ #2 \\ #3 \\ #4 \\ #5 \\ \end{array}\right]}\) \(\newcommand{\mattwo}[4]{\left[\begin{array}{rr}#1 \amp #2 \\ #3 \amp #4 \\ \end{array}\right]}\) \(\newcommand{\laspan}[1]{\text{Span}\{#1\}}\) \(\newcommand{\bcal}{\cal B}\) \(\newcommand{\ccal}{\cal C}\) \(\newcommand{\scal}{\cal S}\) \(\newcommand{\wcal}{\cal W}\) \(\newcommand{\ecal}{\cal E}\) \(\newcommand{\coords}[2]{\left\{#1\right\}_{#2}}\) \(\newcommand{\gray}[1]{\color{gray}{#1}}\) \(\newcommand{\lgray}[1]{\color{lightgray}{#1}}\) \(\newcommand{\rank}{\operatorname{rank}}\) \(\newcommand{\row}{\text{Row}}\) \(\newcommand{\col}{\text{Col}}\) \(\renewcommand{\row}{\text{Row}}\) \(\newcommand{\nul}{\text{Nul}}\) \(\newcommand{\var}{\text{Var}}\) \(\newcommand{\corr}{\text{corr}}\) \(\newcommand{\len}[1]{\left|#1\right|}\) \(\newcommand{\bbar}{\overline{\bvec}}\) \(\newcommand{\bhat}{\widehat{\bvec}}\) \(\newcommand{\bperp}{\bvec^\perp}\) \(\newcommand{\xhat}{\widehat{\xvec}}\) \(\newcommand{\vhat}{\widehat{\vvec}}\) \(\newcommand{\uhat}{\widehat{\uvec}}\) \(\newcommand{\what}{\widehat{\wvec}}\) \(\newcommand{\Sighat}{\widehat{\Sigma}}\) \(\newcommand{\lt}{<}\) \(\newcommand{\gt}{>}\) \(\newcommand{\amp}{&}\) \(\definecolor{fillinmathshade}{gray}{0.9}\) Session Objectives
Upon completing this session, students will be able to:
(CO 1) Add/Edit Stair – three types of staircases
(CO 2) Add/Edit Railing
(CO 3) Add/Edit Roof
 Session Highlights
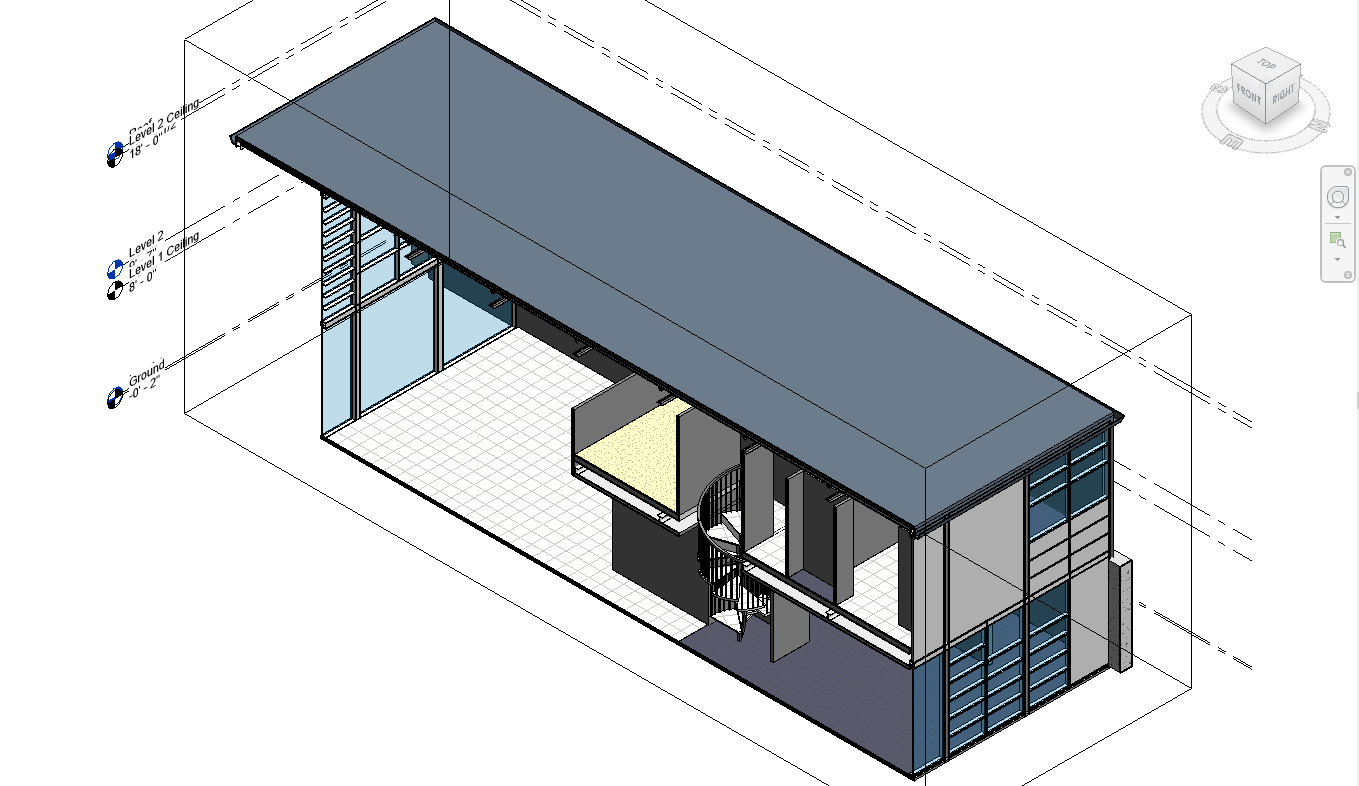
At the end of the session, students can create the graphics below.
 Lecture Contents
(CO 1) Add/Edit Stair – three types of staircases
A YouTube element has been excluded from this version of the text. You can view it online here: https://iastate.pressbooks.pub/visualgraphiccomm/?p=98
- Revit provides various types of staircases, and it is modifiable.
- Revit stair automatically calculates the number of stair runs, automatically creating landing, supports, and even handrails.
- In this tutorial, the instructor will demonstrate four types of staircases – a straight stair, two runs (a switchback stair), a spiral, and a custom with sketch in another Revit file only for reference.
- For the Eames house, students will only need a spiral staircase.
- For more information about Revit stairs, please visit this page
To create a straight stair
Be aware of the overall size of the staircase and create walls for the staircase before you create a staircase in Revit. If it is an open staircase, please use the reference plane for a guideline.
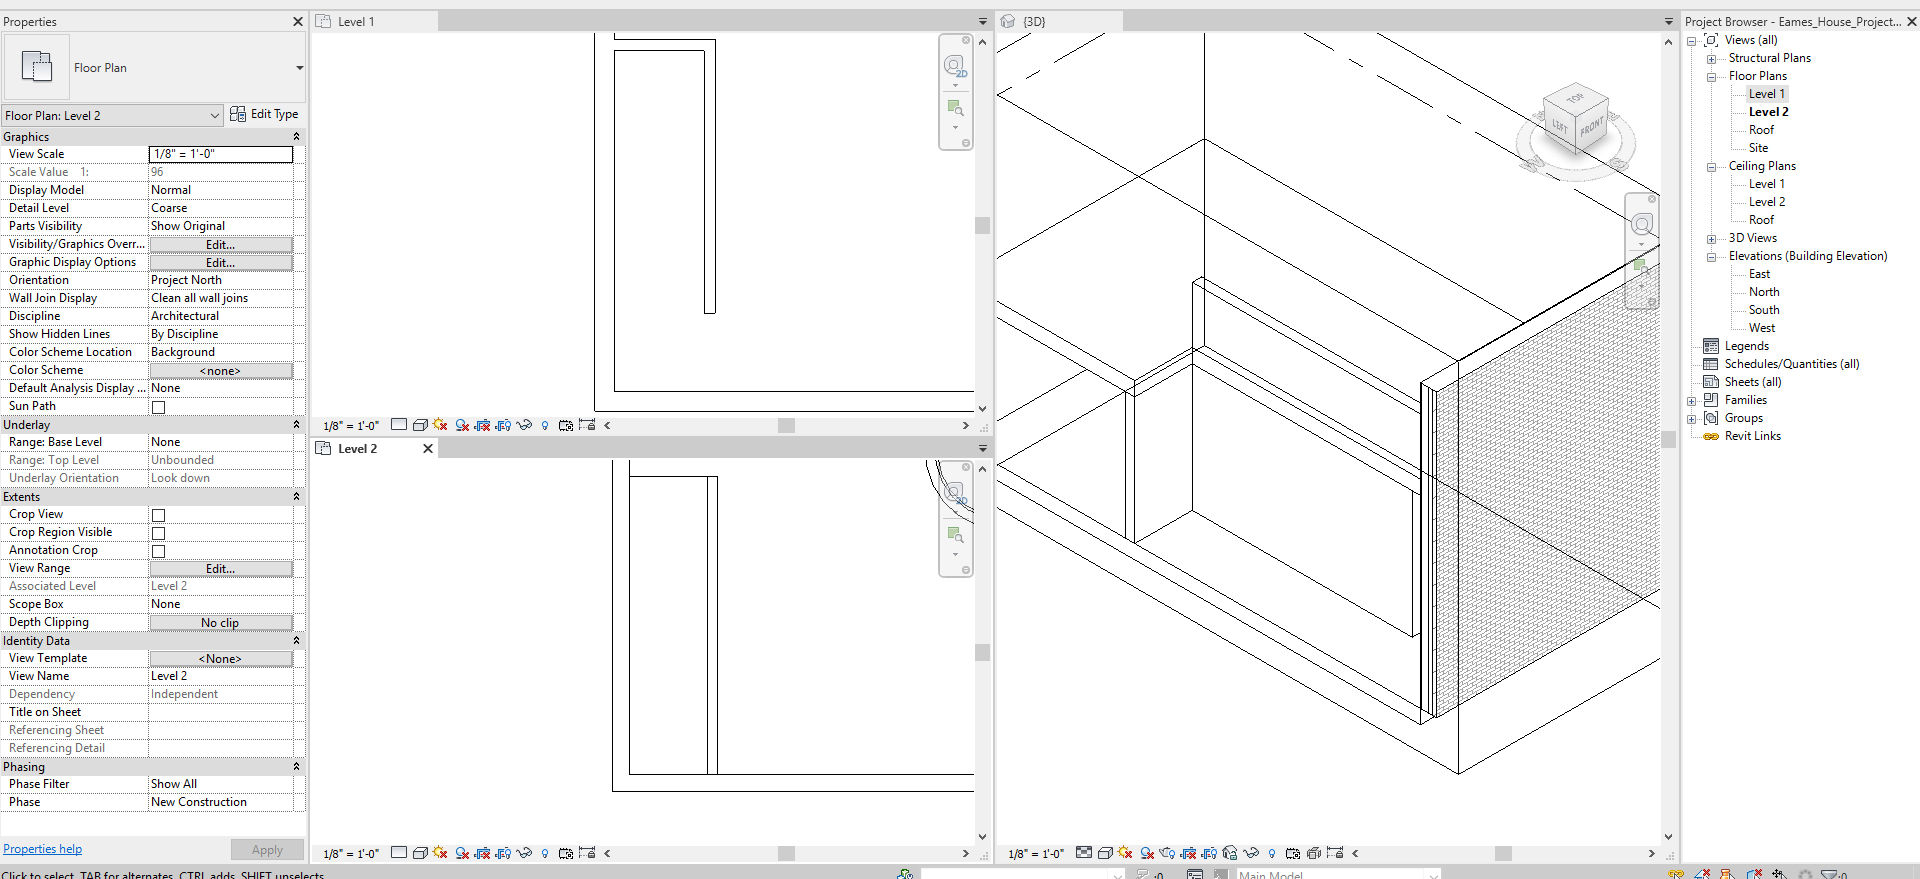
- [STEP 1] Open floor plan views (e.g., Level 1 floor plan view and Level 2 floor plan view) and 3D view or a section view with a perspective view to see the height and overall shape of the staircase. And view change to Window Tile view (WT)
- [STEP 2] Draw Detail Line (DL) for the outlines of the staircase. You may turn on the CAD drawing that you already imported.
- [STEP 3] Click [STAIR] from [ARCHITECTURE] tab, under [BUILD] panel
- [STEP 4] Select [STRAIGHT] from [MODIFY/CREATE STAIR], under [COMPONENT] panel
- [STEP 5] Select a center point for the stair start point on a plan view, then Revit automatically calculates and shows how many stairs are needed to reach the next floor. Then, click the endpoint on the current view to finish
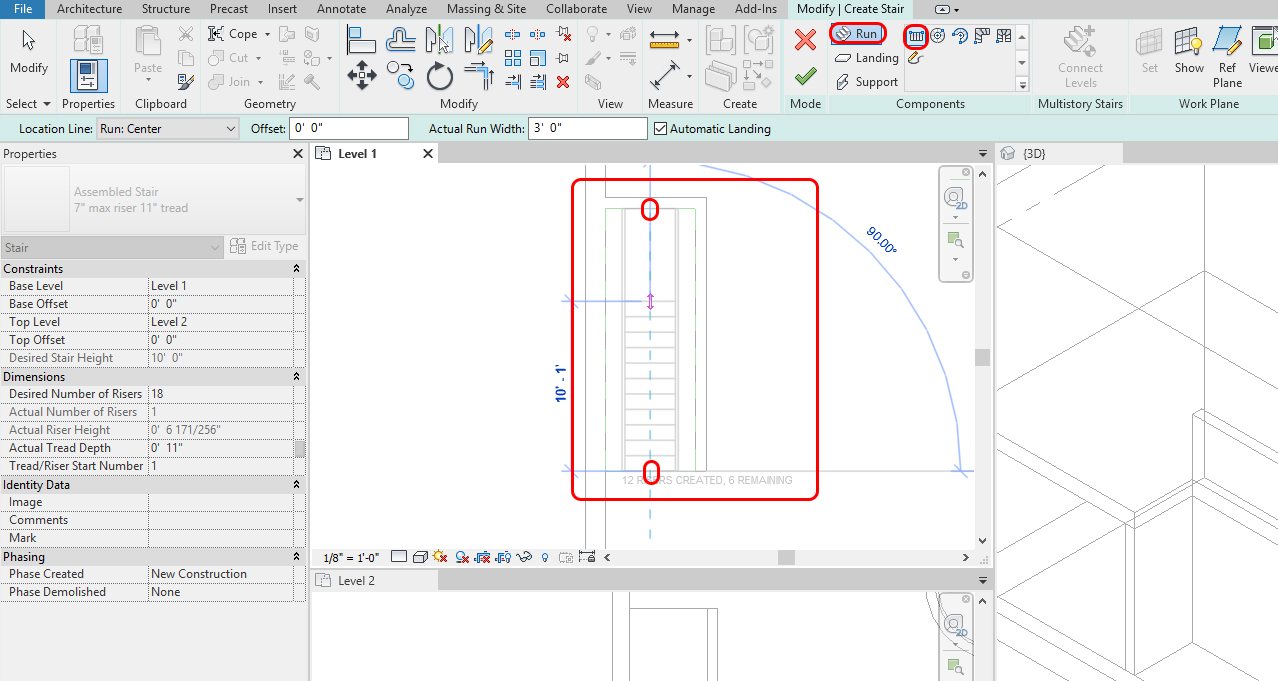
- [STEP 6] Then, the preview will show on all the views. If it looks OK, click the green checkmark to finish. If it needs changes, the types of family, click family type on [PROPERTIES] palette, and select the desired family. If you do not have a desired family for the stair, load the family first
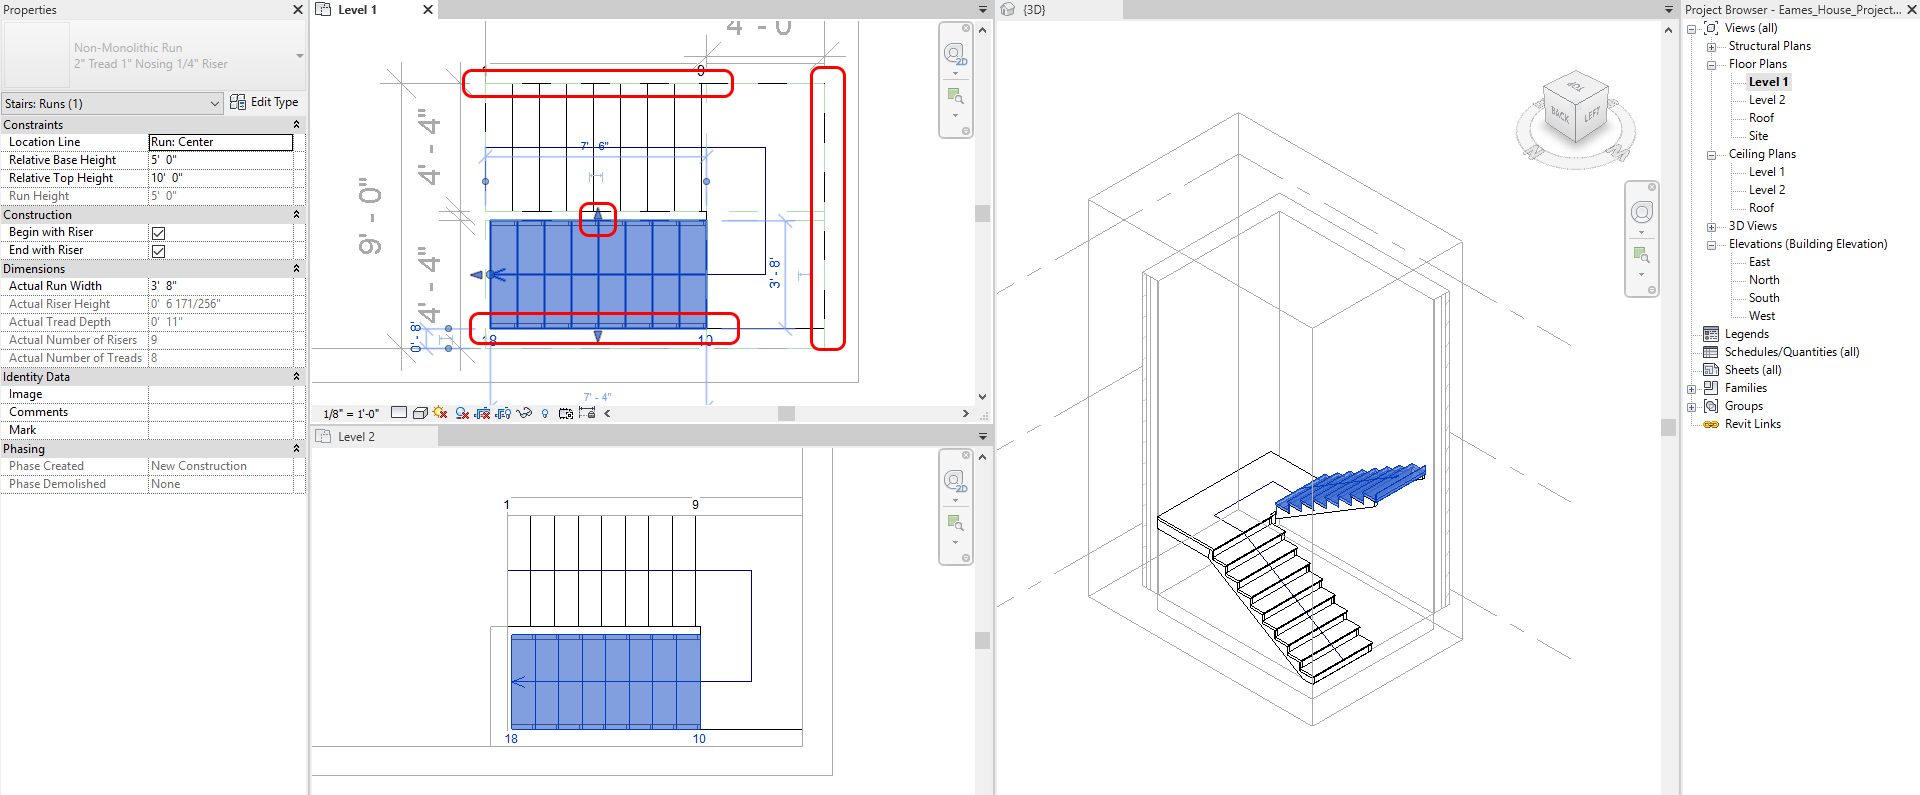
- [STEP 7] If the stair run width need a modification, click the run, then change the width by adjusting the arrows
If the stair Riser Height or/and Tread Depth change, click [EDIT TYPE] and change the Type Properties. Do not forget, if you change the type properties, all types will change. To prevent this, please [DUPLICATE] and edit.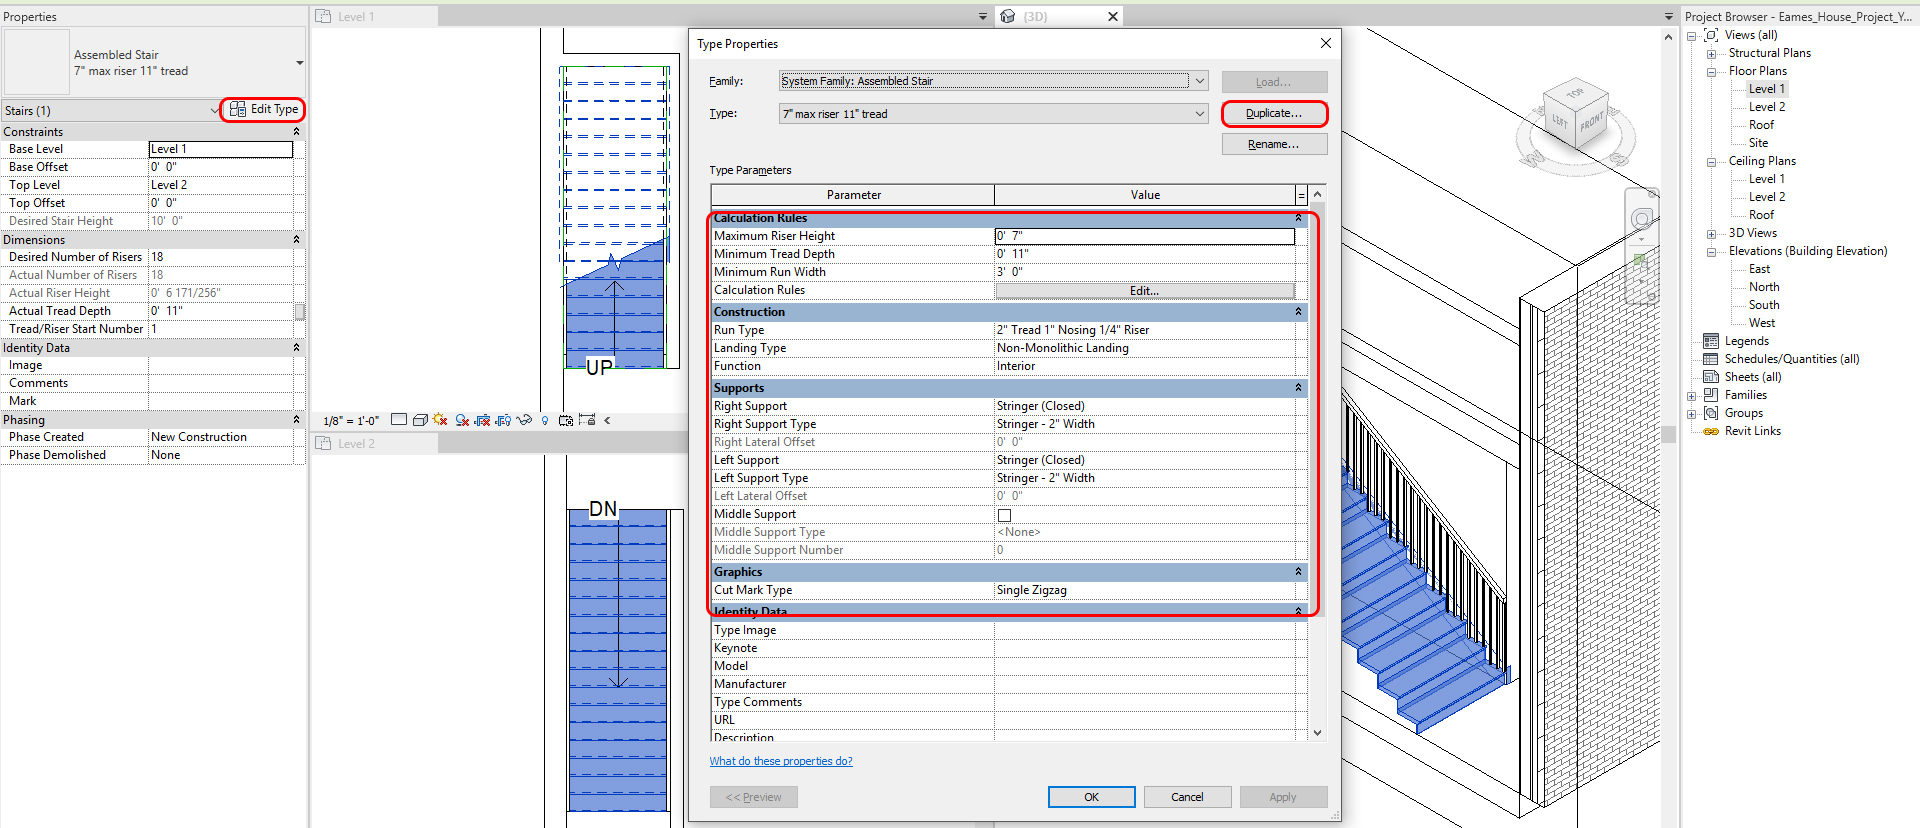
- [STEP 8] Click [GREEN CHECKMARK] to complete
- [STEP 9] Remove the Detail lines or the Reference Plans that you used for the stair
- [STEP 10] If you found errors on your stair, click [EDIT STAIRS] to fix the error
To create a two-runs stair (a switchback stair)
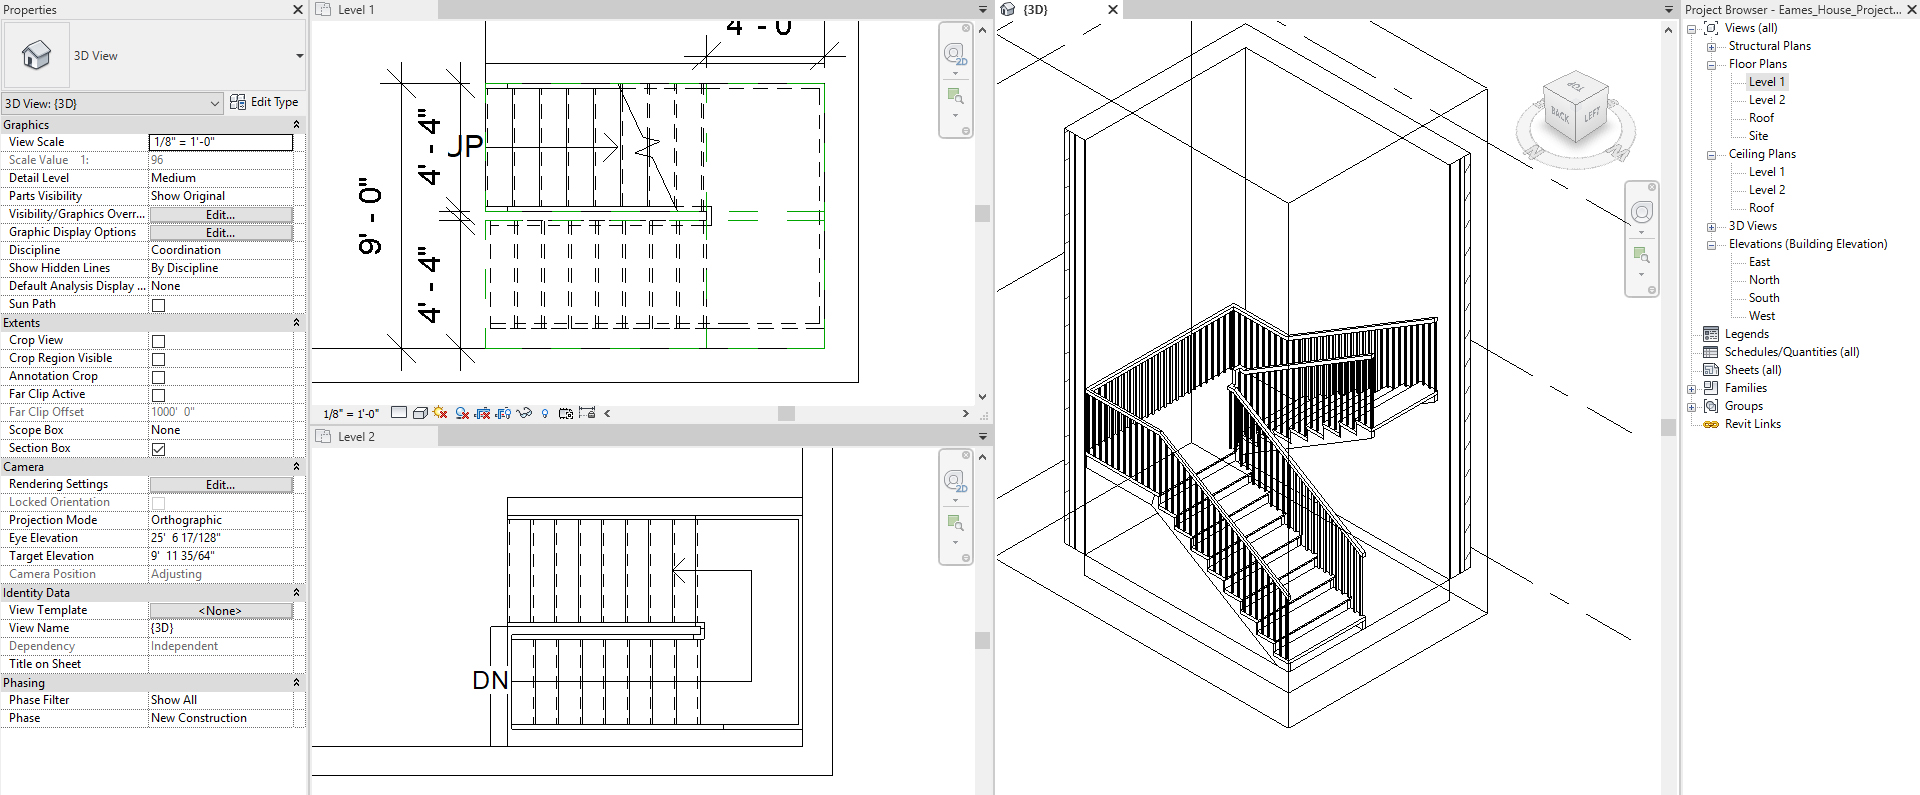
- [STEP 1] Open floor plan views (e.g., Level 1 floor plan view and Level 2 floor plan view) and 3D view or a section view with a perspective view to see the height and overall shape of the staircase. And view change to Window Tile view (WT)
- [STEP 2] Draw Detail Line (DL) for the outlines of the staircase. You may turn on the CAD drawing you already imported.

- [STEP 3] Click [STAIR] from [ARCHITECTURE] tab, under [BUILD] panel
- [STEP 4] Select [STRAIGHT] from [MODIFY/CREATE STAIR], under [COMPONENT] panel
- [STEP 5] Select a center point for the stair start point on a plan view, then Revit automatically calculates and shows how many stairs are needed to reach the next floor. Then, click the second point on the current view to create the landing start
Then, click the third point on the current view to create the second stair start point
Then, click the endpoint on the current view to finish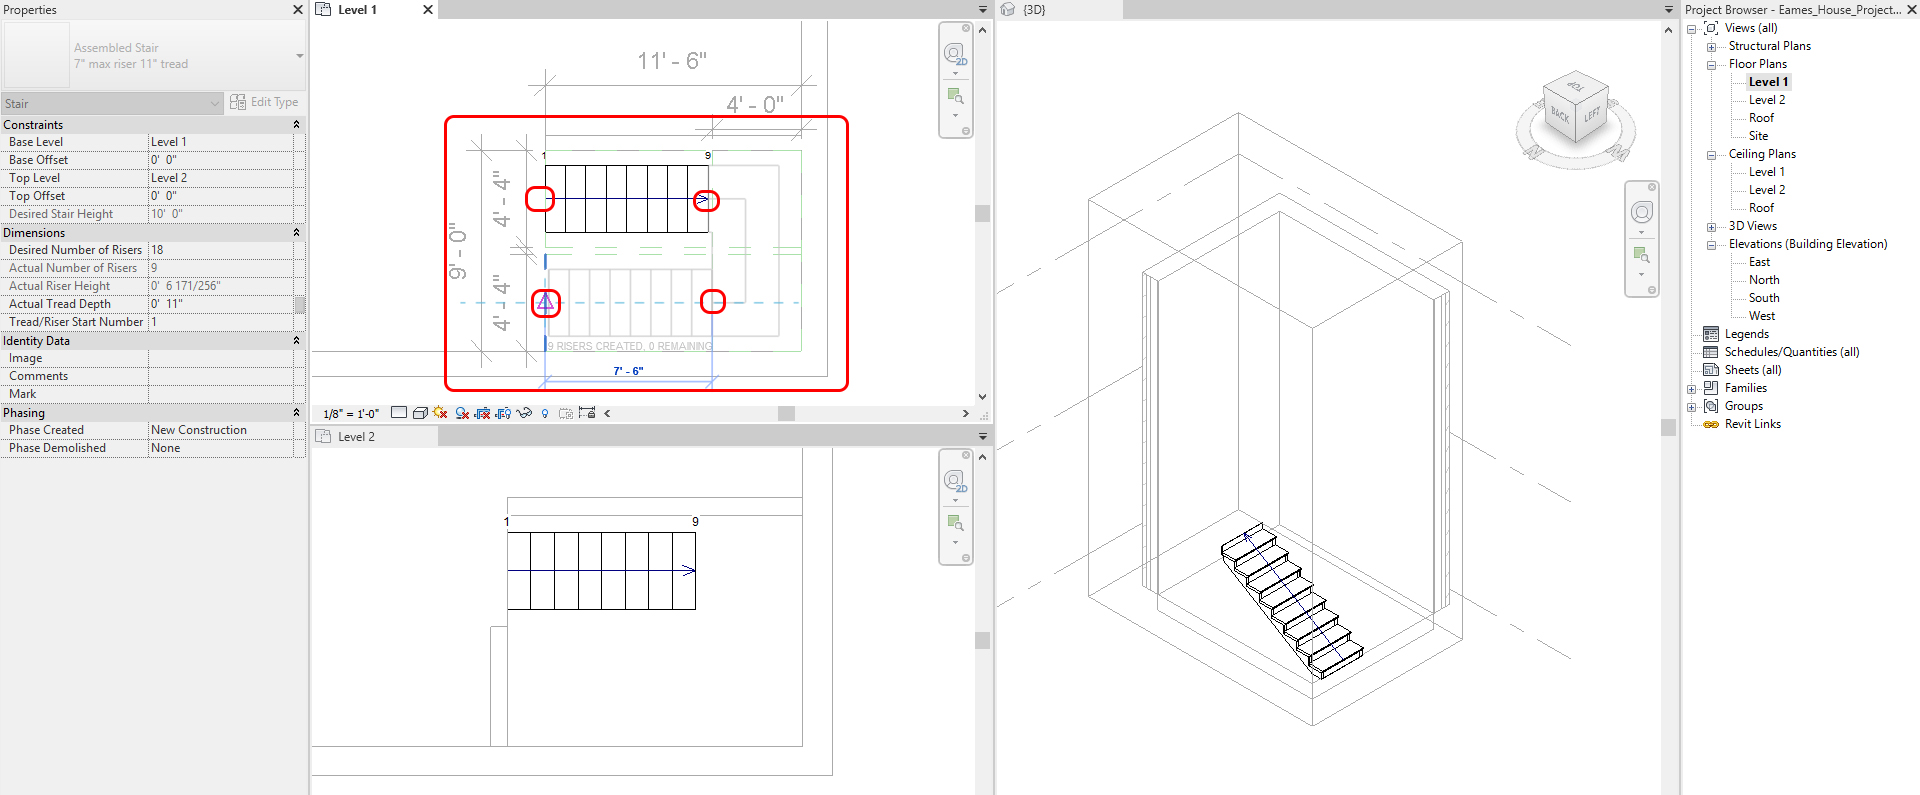
- [STEP 6] Then, the preview will show in all the views. If it looks OK, click the green checkmark to finish. If it needs changes, the types of family, click family type on [Properties] palette, and select a desire family. If you do not have a desire family for the stair, load the family first
- [STEP 7] If the stair run width needs a modification, click the run, then change the width by adjusting the arrows
- [STEP 8] Click [GREEN CHECKMARK] to complete
- [STEP 9] Remove the Detail lines or the Reference Plans that you used for the stair
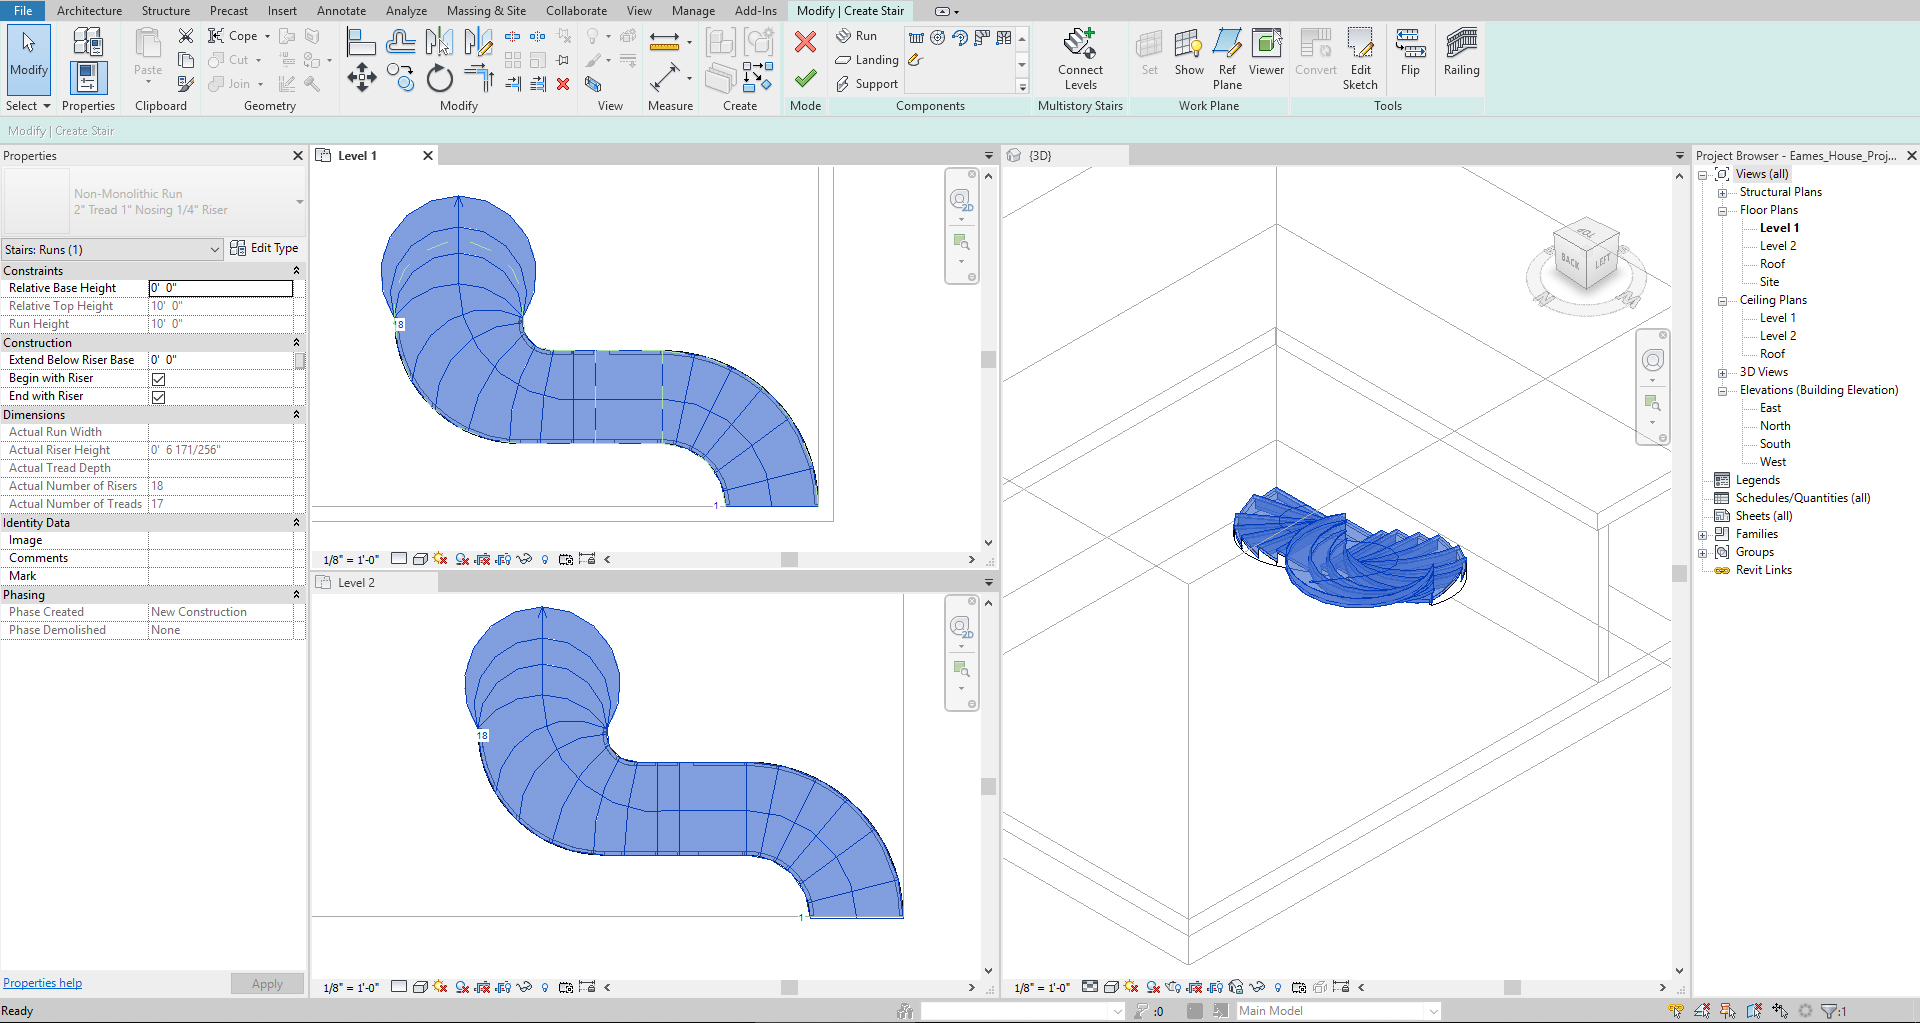
To create a spiral stair
- [STEP 1] Open floor plan views (e.g., Level 1 floor plan view and Level 2 floor plan view) and 3D view or a section views with a perspective views to see the height and overall shape of the staircase. And view change to Window Tile view (WT)
- [STEP 2] Draw Detail Line (DL) for the outlines of the staircase. You may turn on the CAD drawing you already imported.
- [STEP 3] Click [STAIR] from [ARCHITECTURE] tab, under [BUILD] panel
- [STEP 4] Select [FULL STEP SPIRAL] from [MODIFY/CREATE STAIR], under [COMPONENT] panel
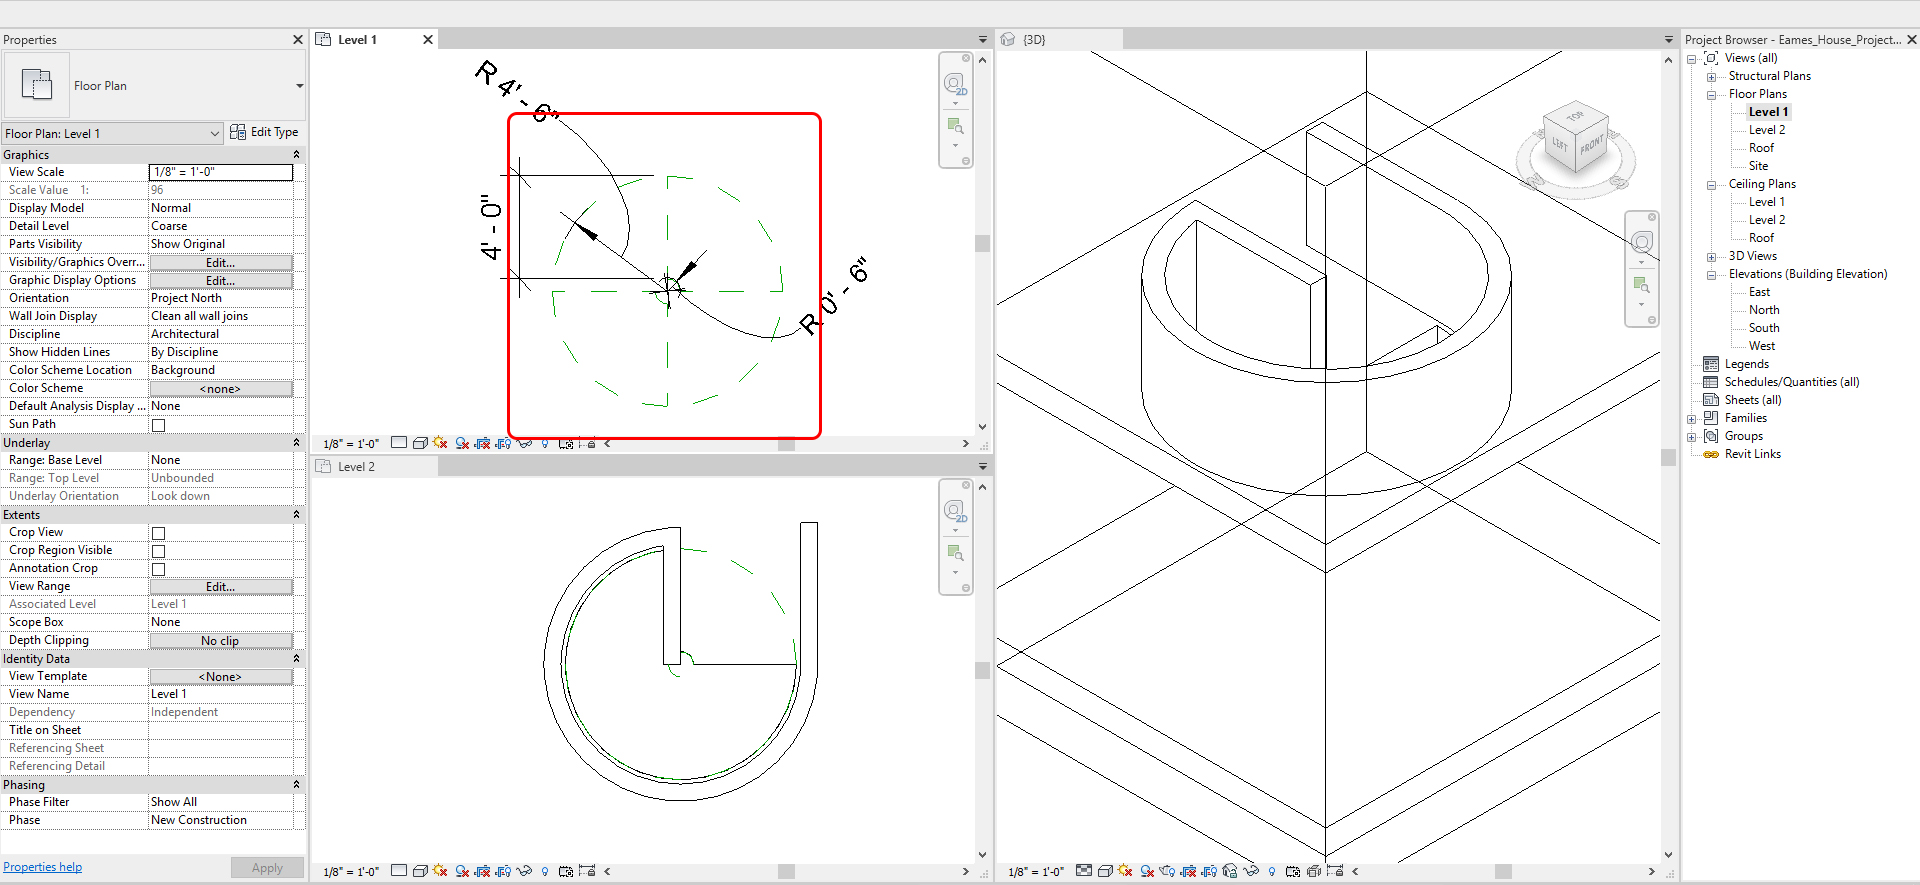
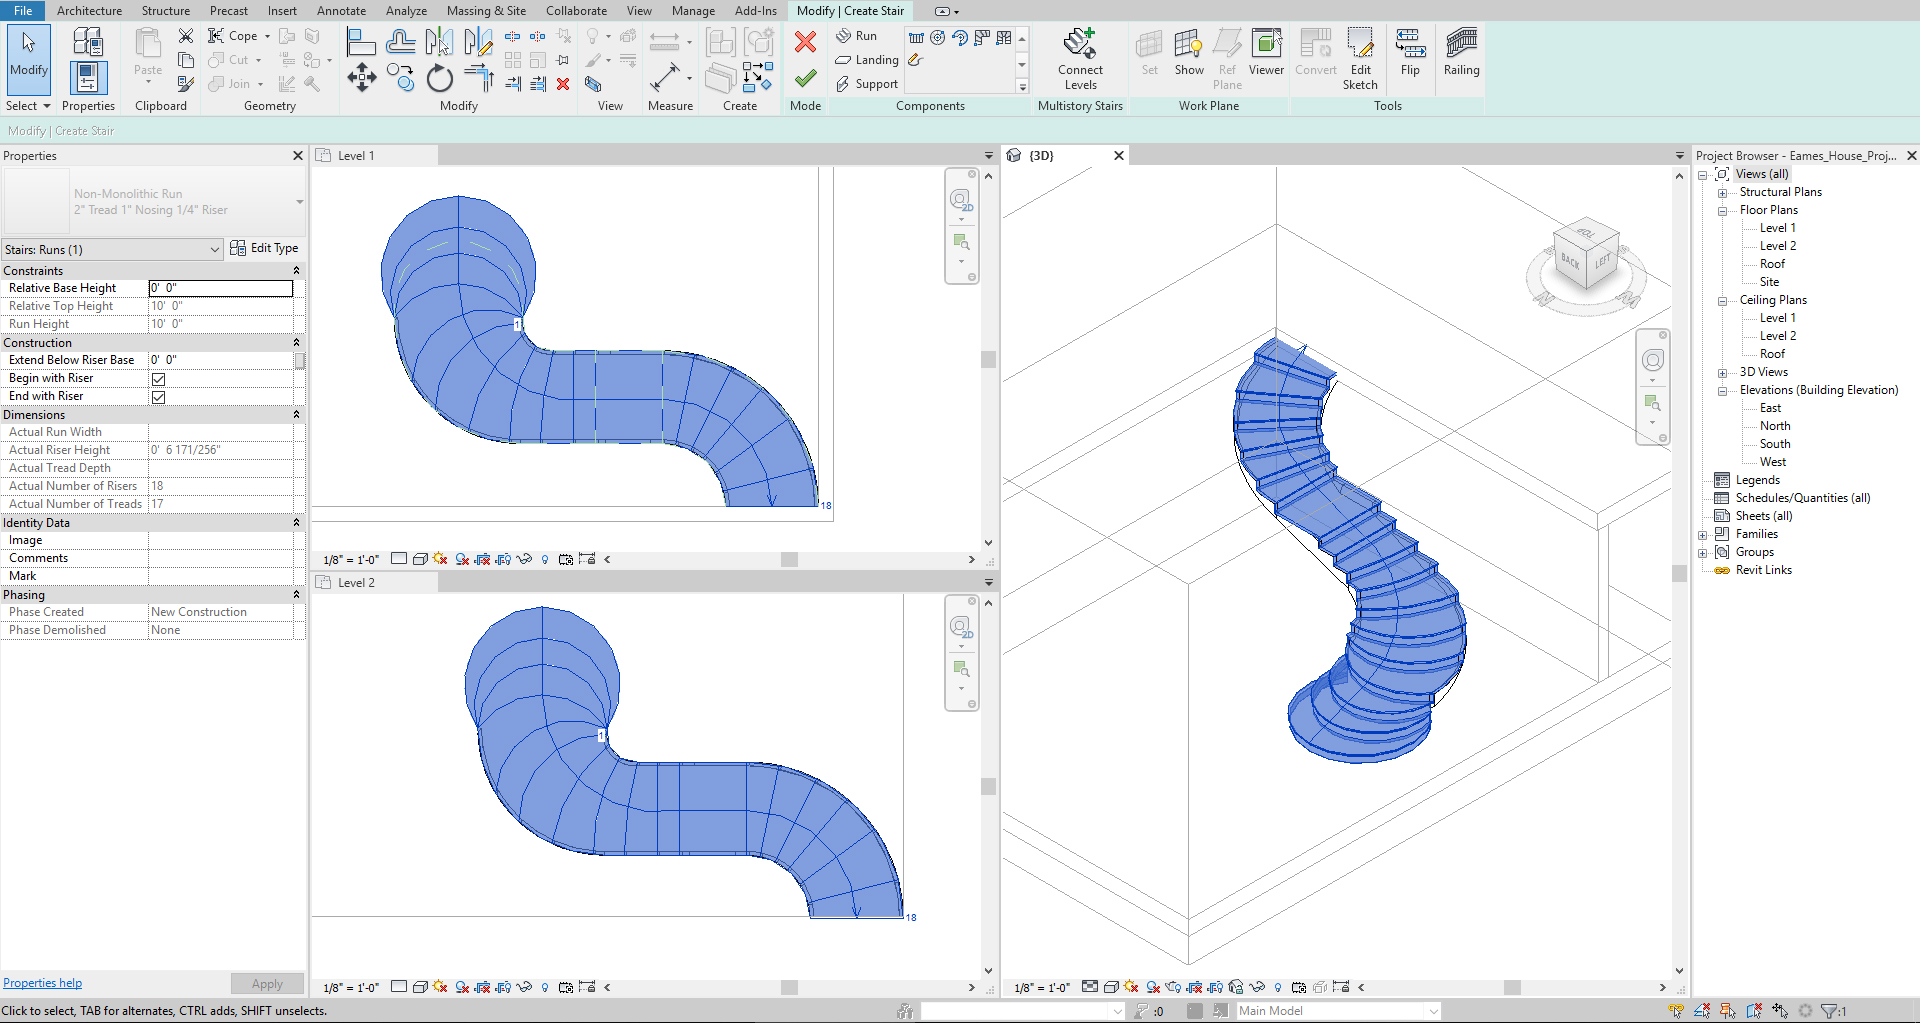
- [STEP 5] Select a center point of the staircase start point on a plan view, then Revit automatically calculates and shows how many stairs are needed to reach the next floor. Then, click the center point of the run start on the current view to create the staircase.
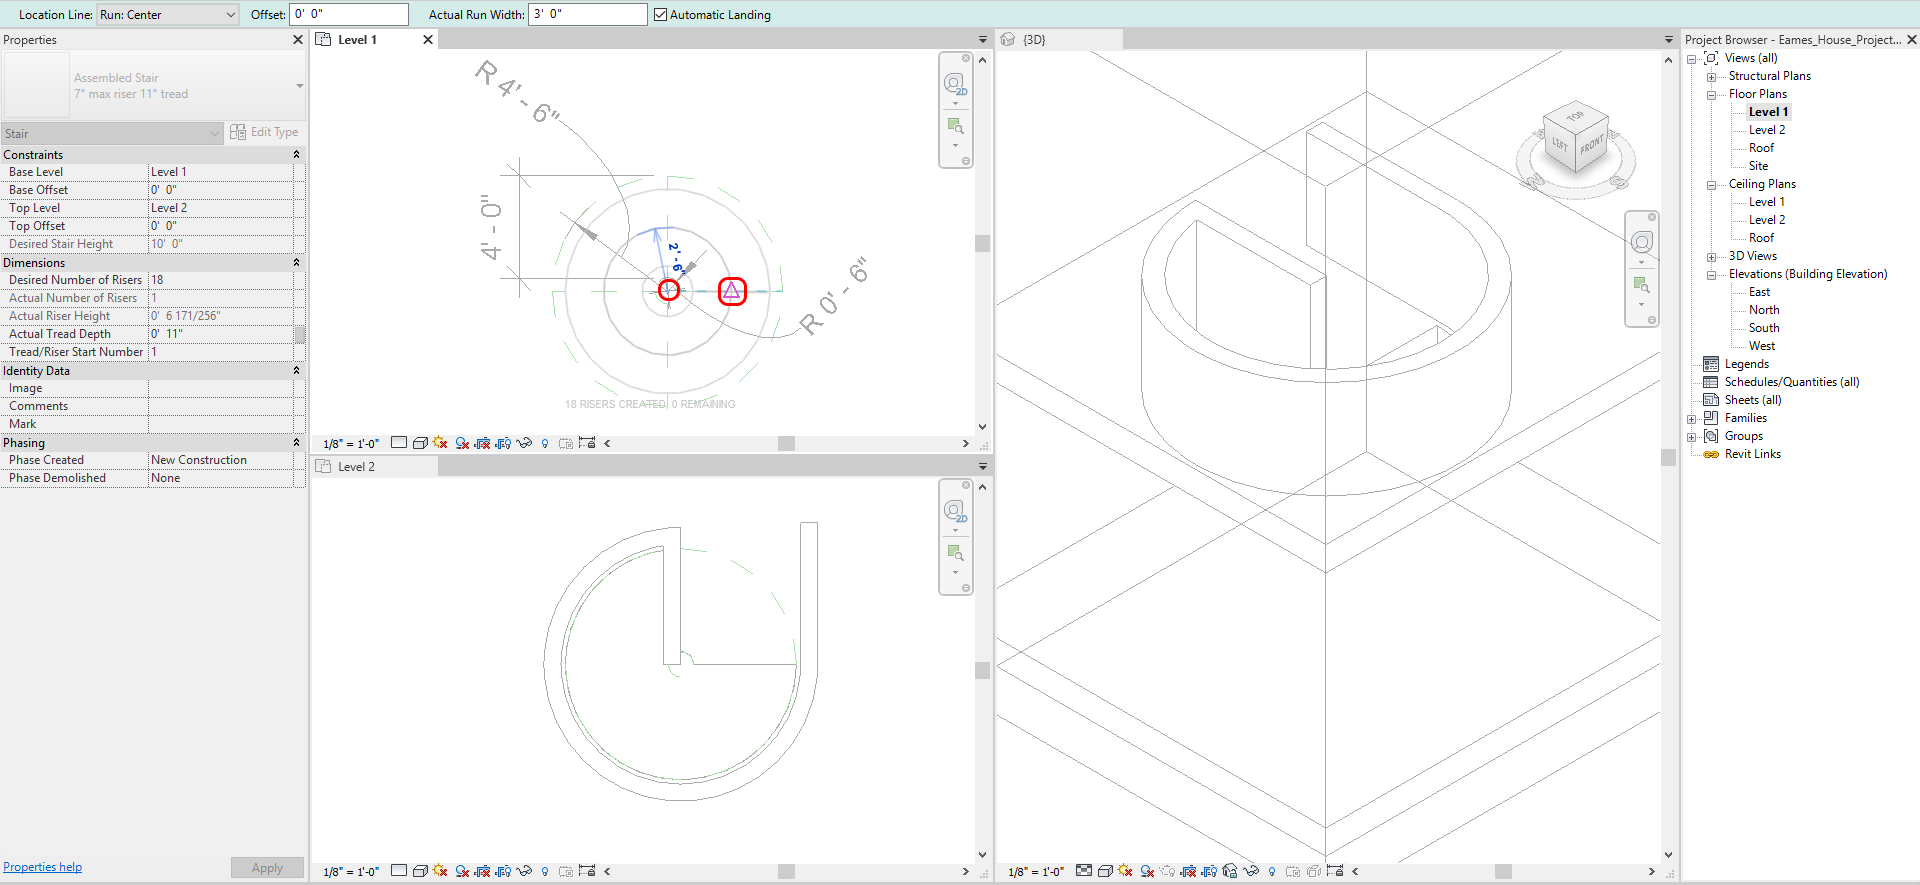
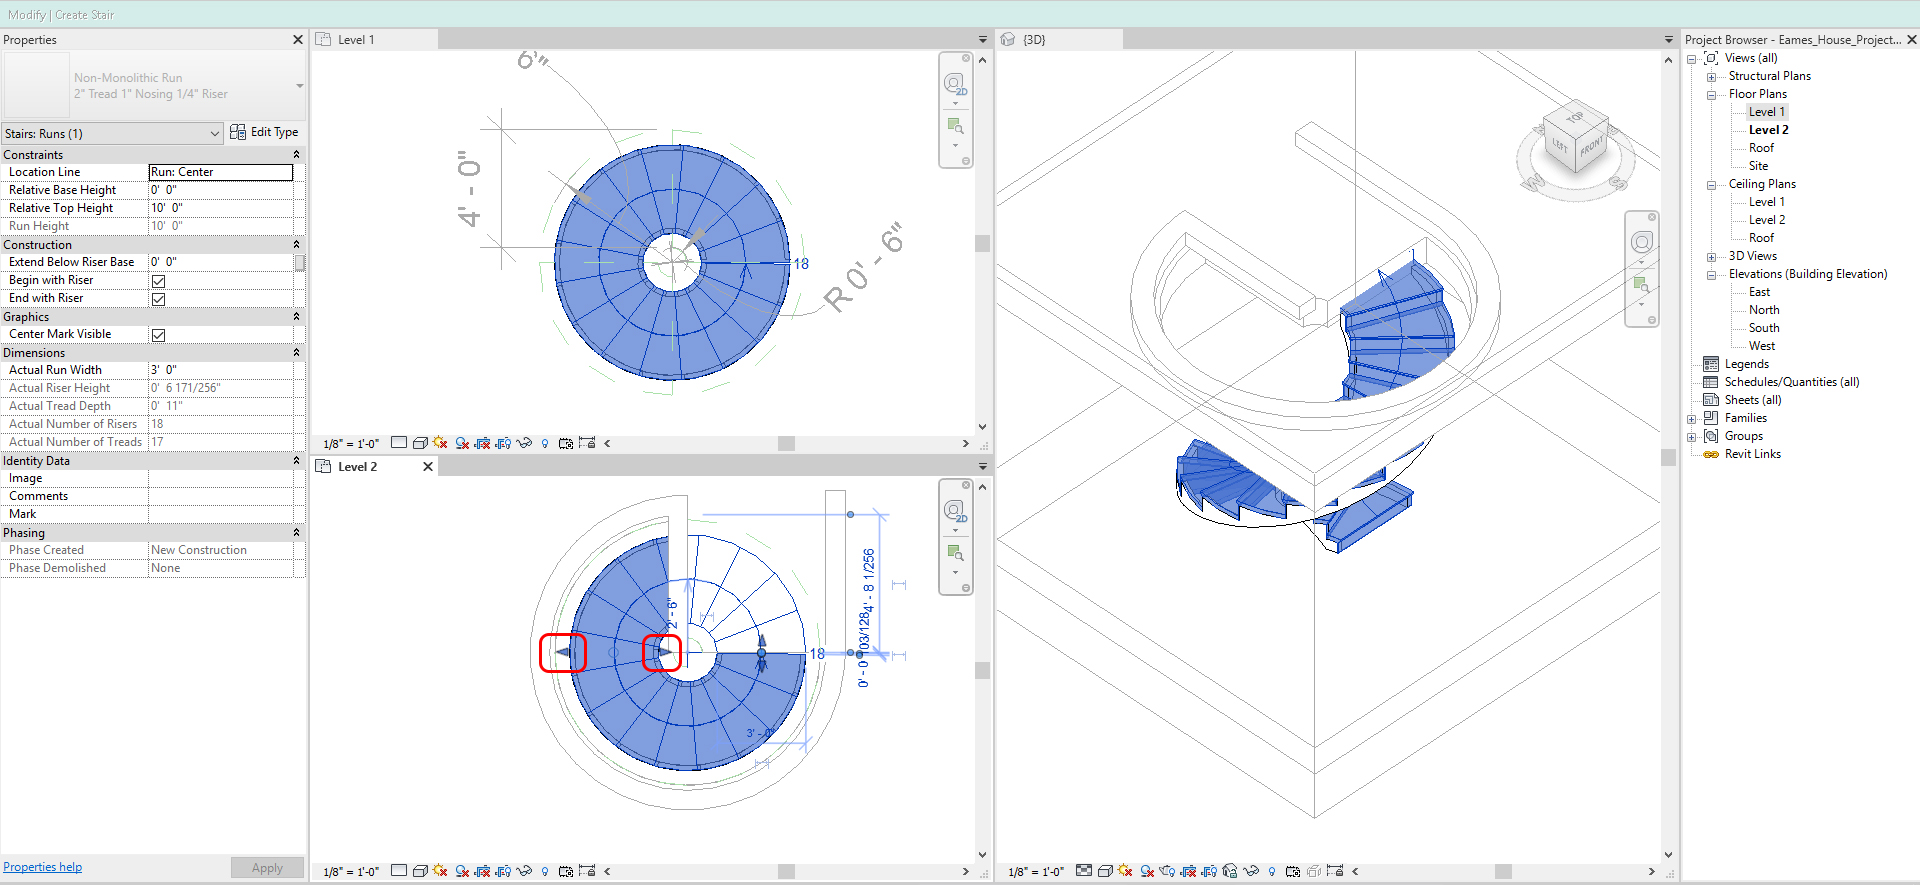
- [STEP 6] Then, the preview will show on all the views. If it looks OK, click the green checkmark to finish. If needs changes, the types of family, click family type on [PROPERTIES] palette and select a desired family. If you do not have a desired family for the stair, load the family first
- [STEP 7] If the stair run width needs a modification, click the run, then change the width by adjusting the arrows
- [STEP 8] Click [GREEN CHECKMARK] to complete
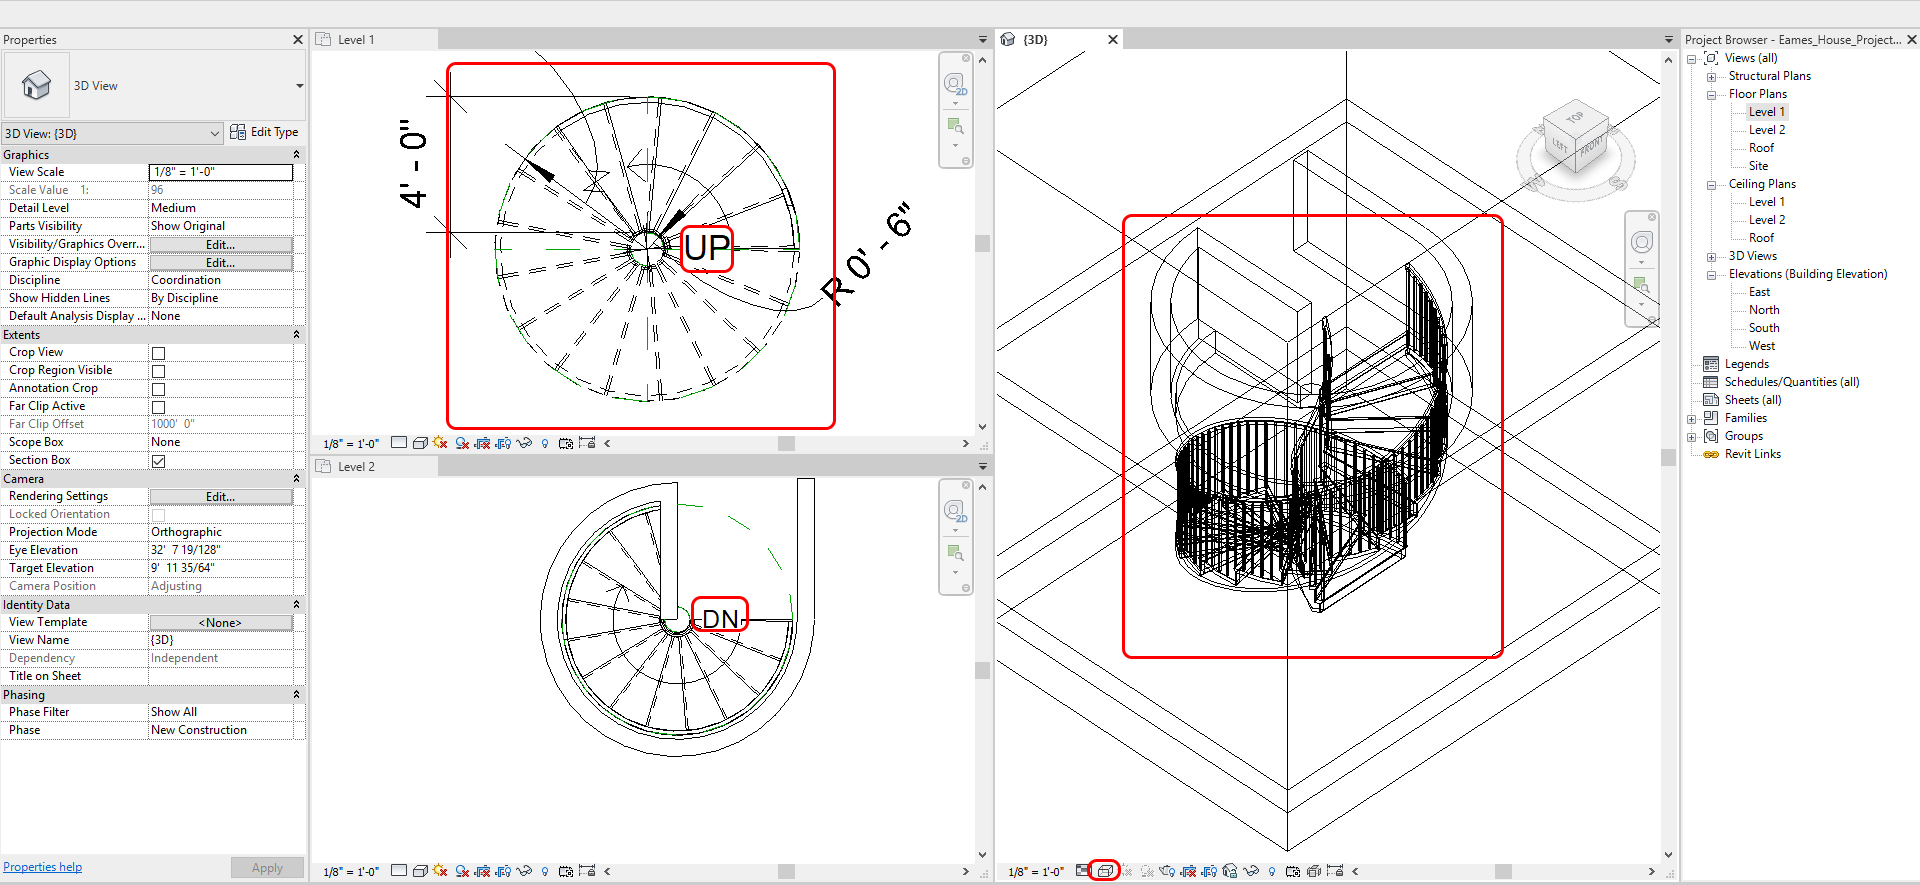
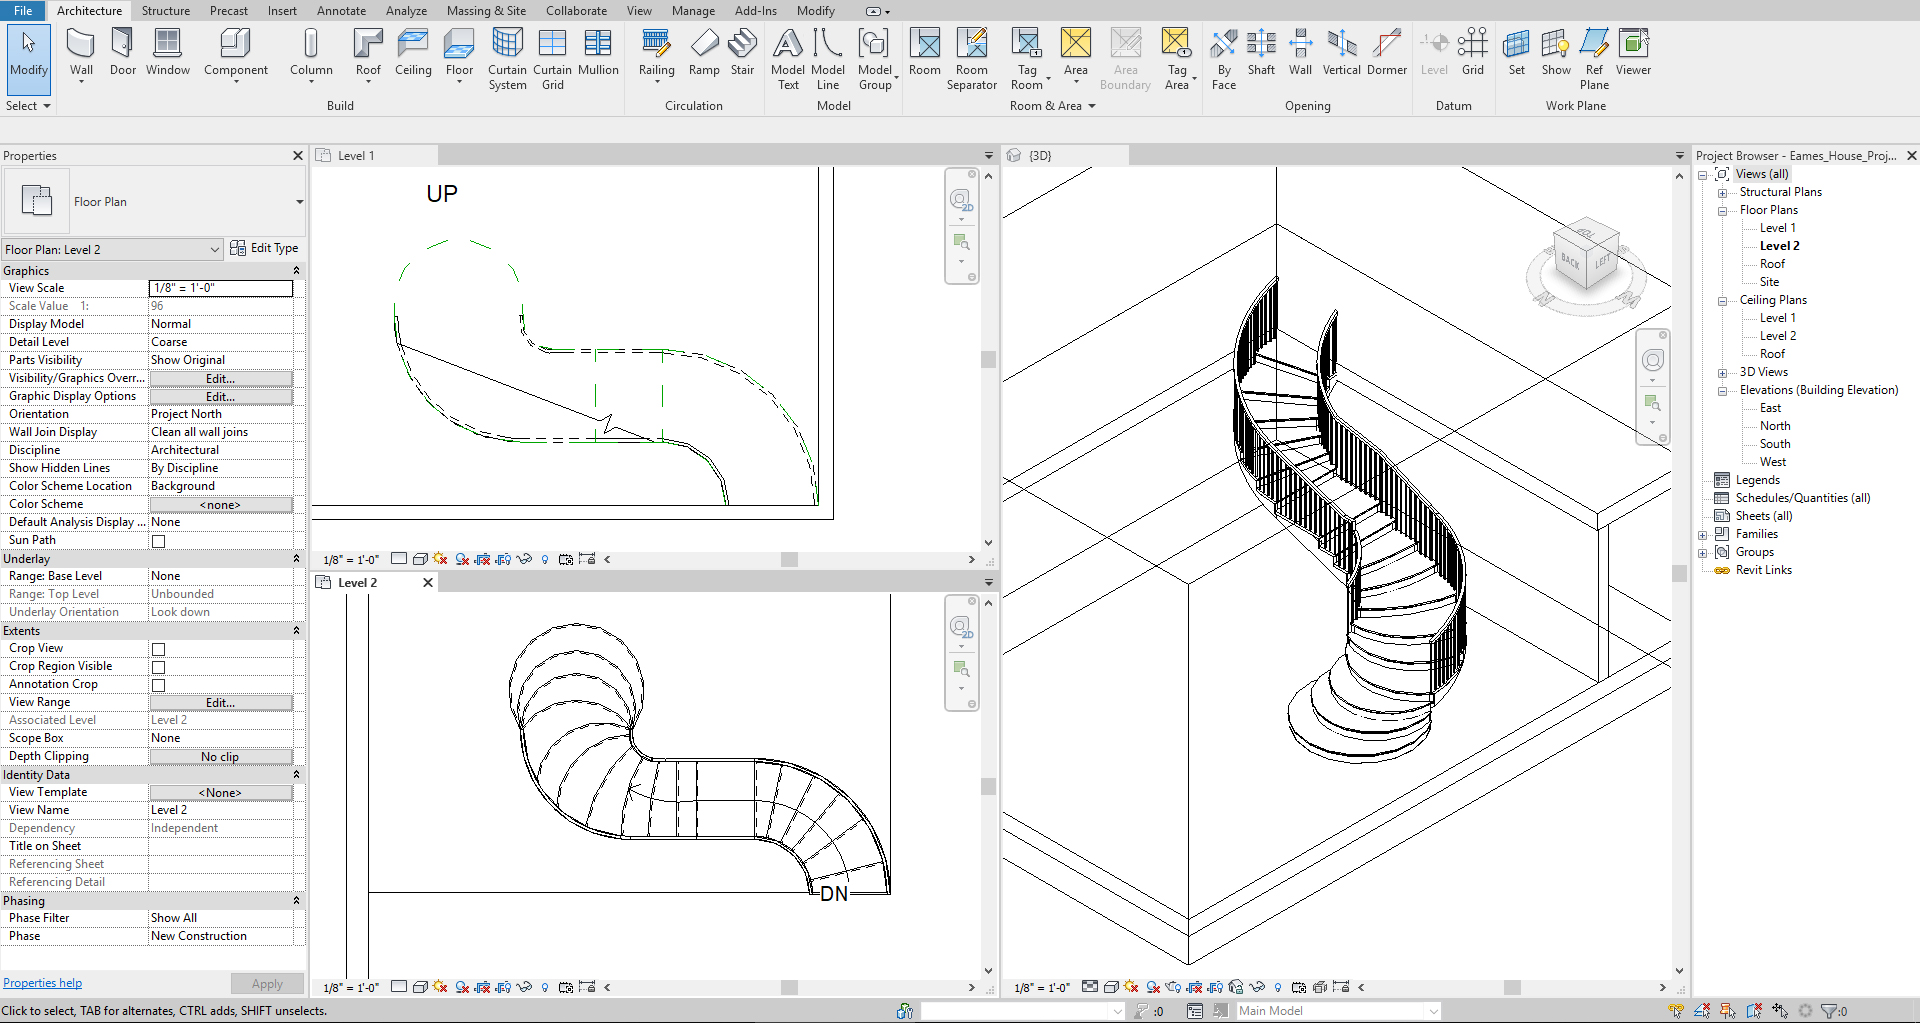
- [STEP 9] Remove the Detail lines or the Reference Plans that used for the stair
Complete the staircase for the Eames house project with [FULL STEP SPIRAL] tool. It may need some adjustment because of the structure and shape. Please experiment for the staircase.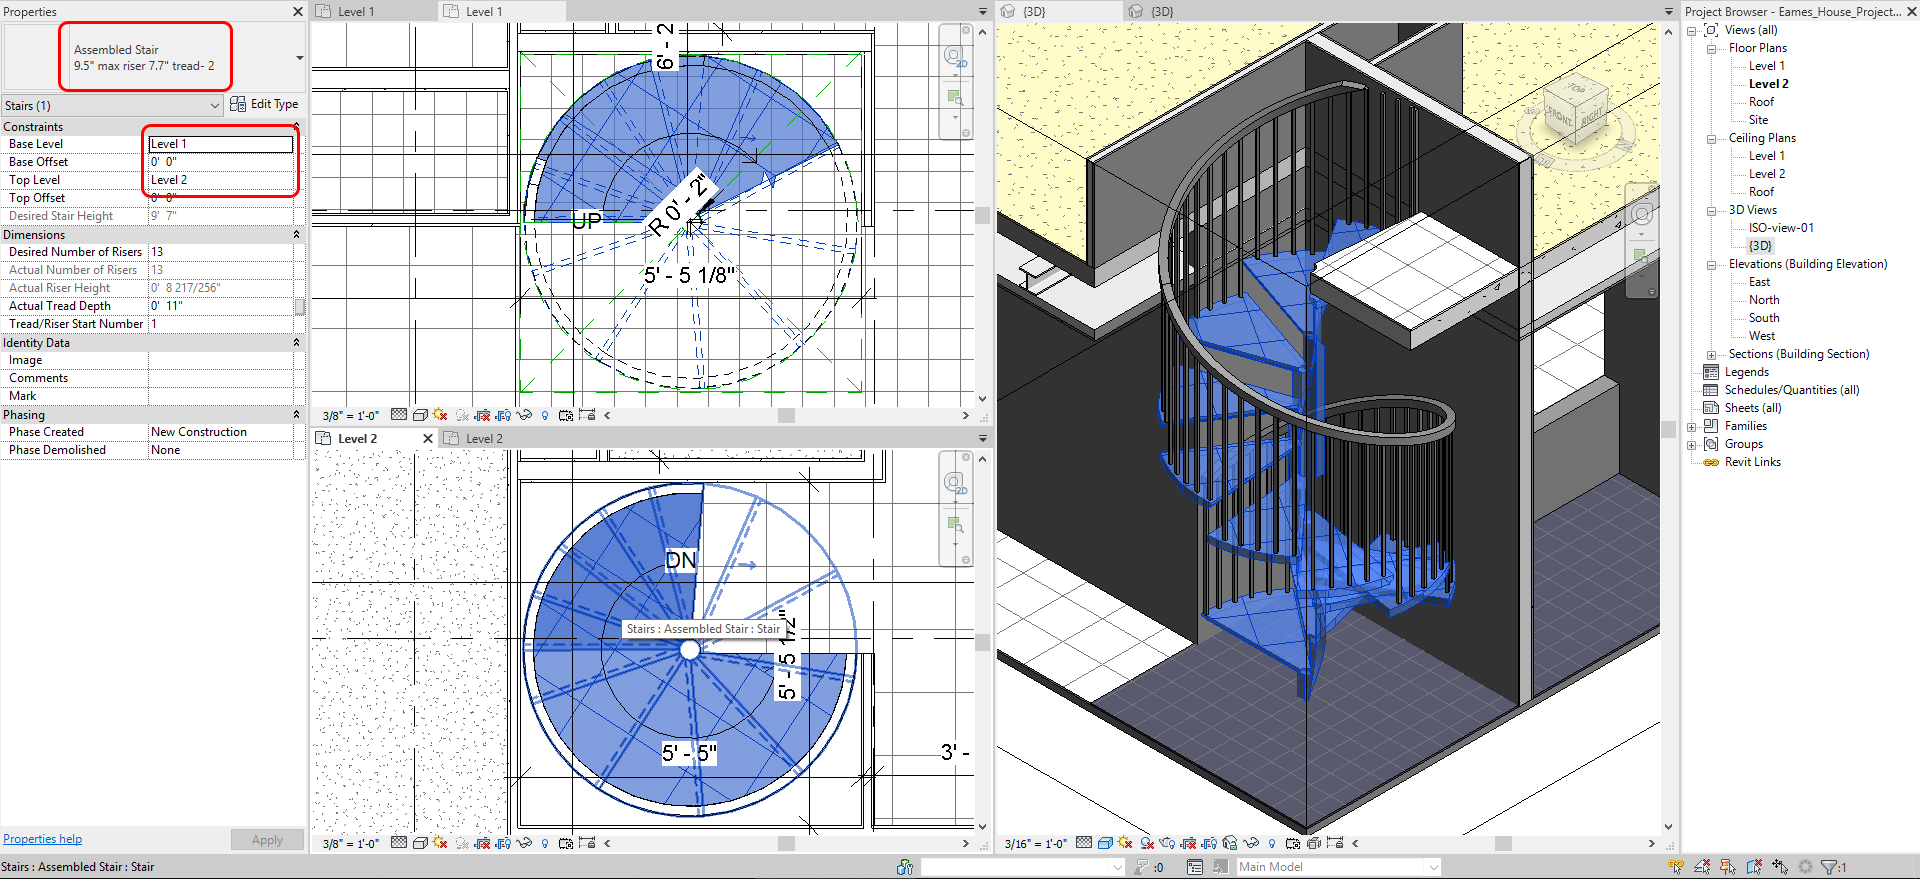
To create a custom stair
- [STEP 1] Open floor plan views (e.g., Level 1 floor plan view and Level 2 floor plan view) and 3D view or a section view with a perspective view to see the height and overall shape of the staircase. And view change to Window Tile view (WT)
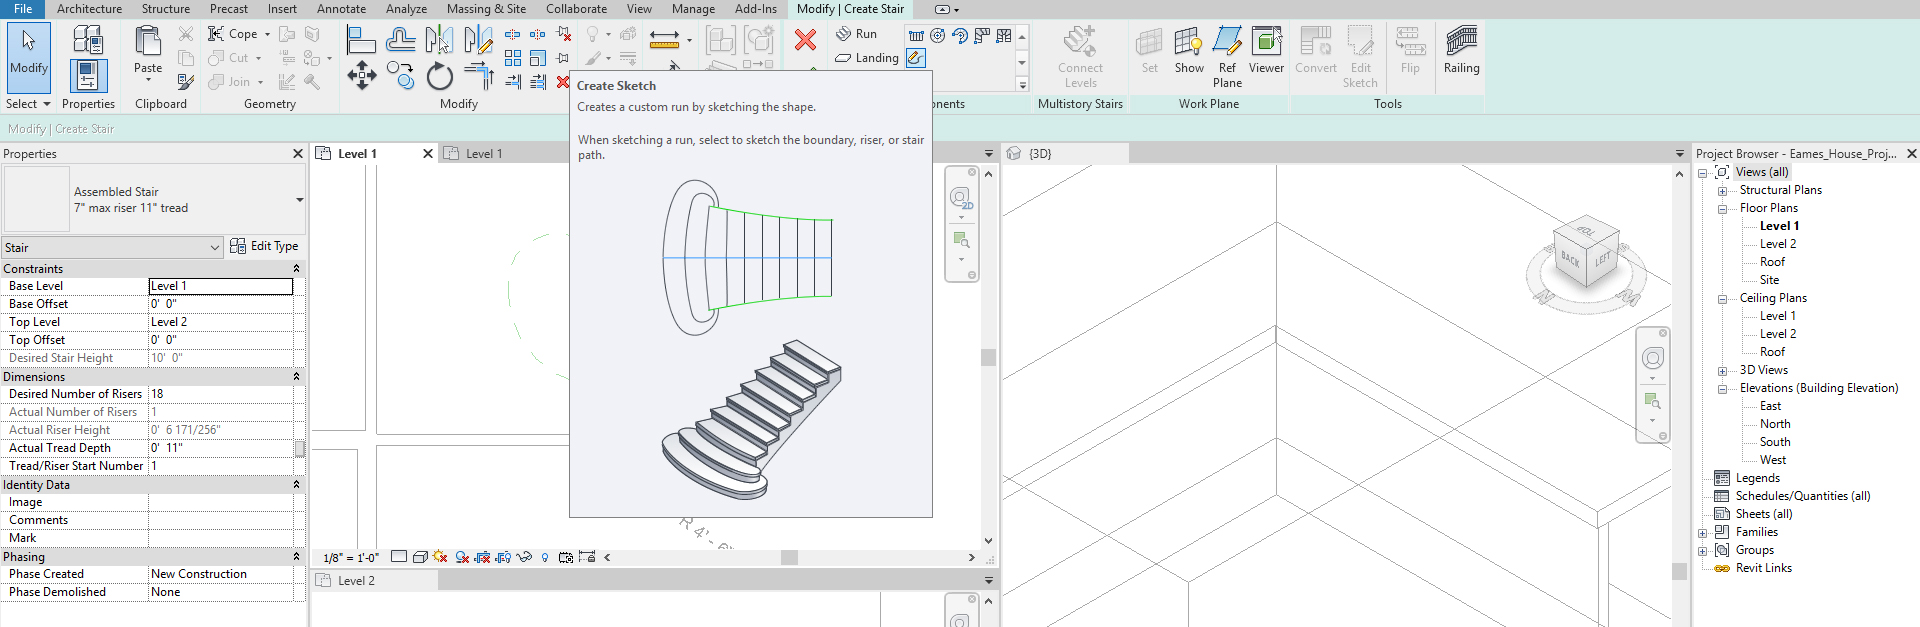
- [STEP 2] Draw [BOUNDARY]
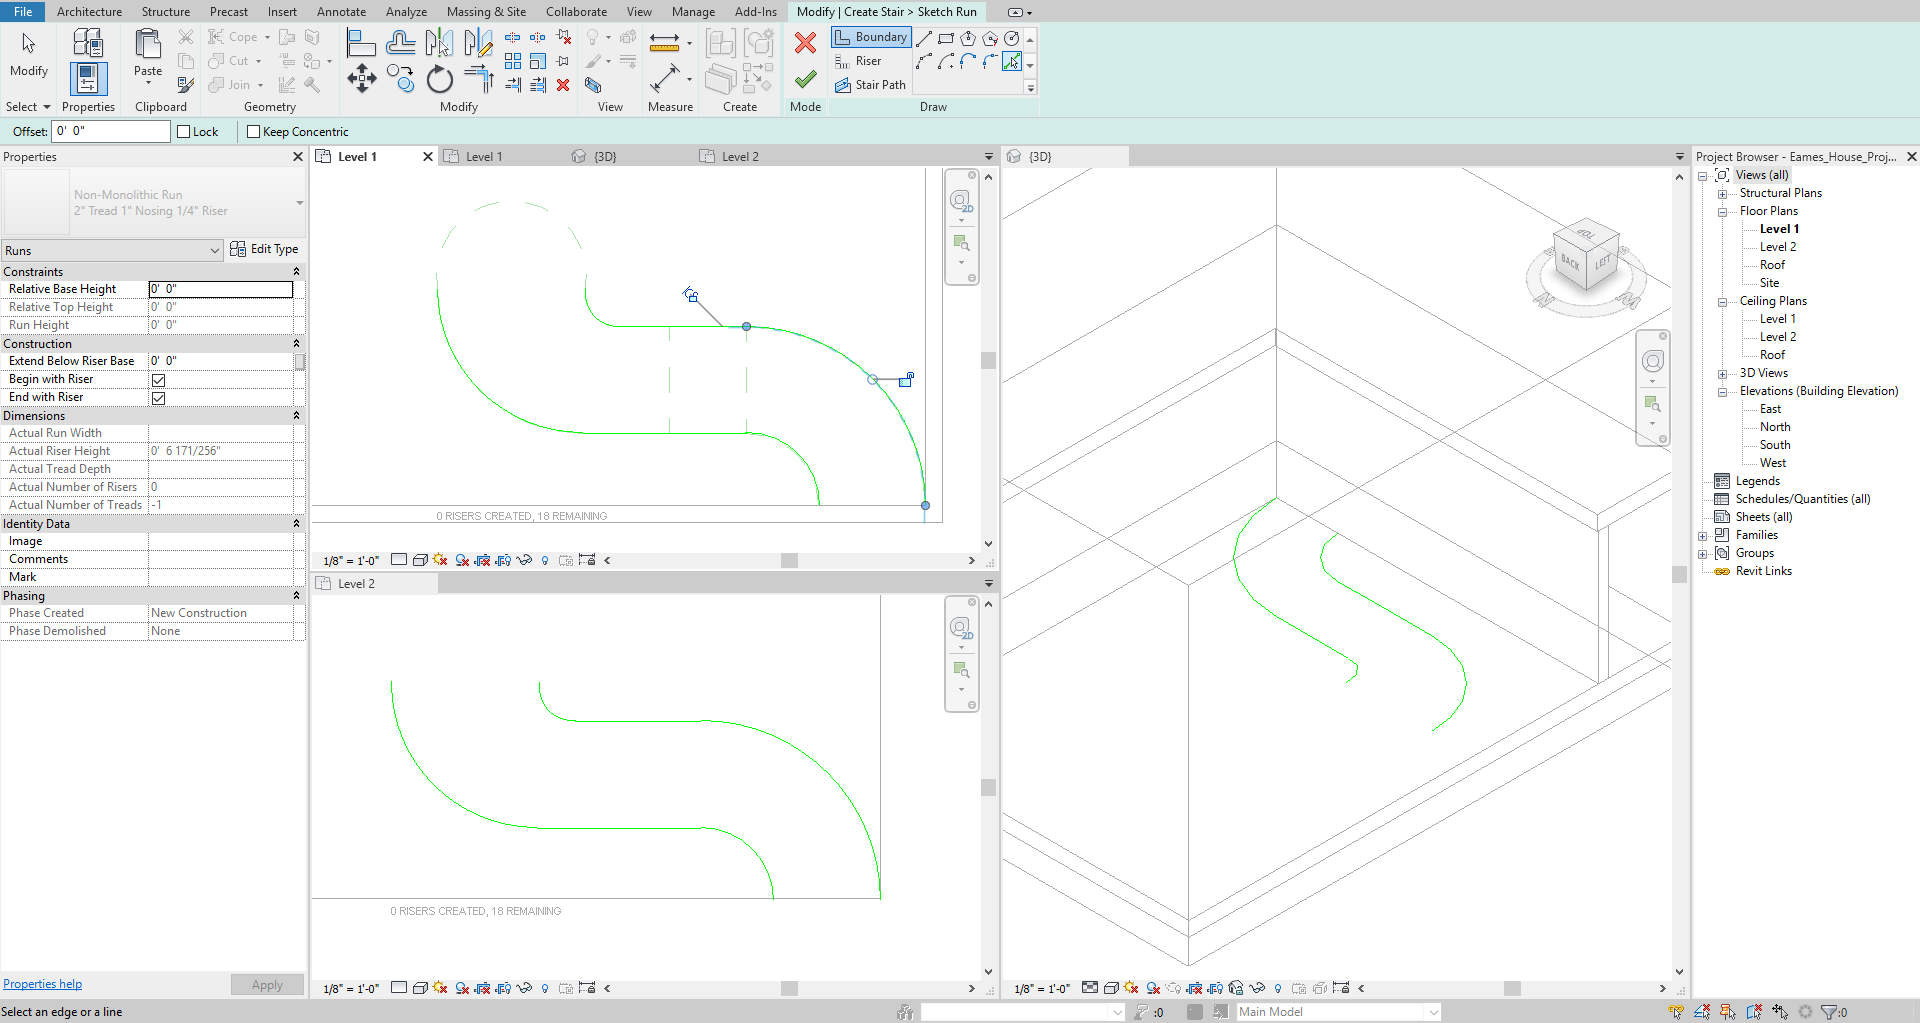
- [STEP 3] Draw [RISER]
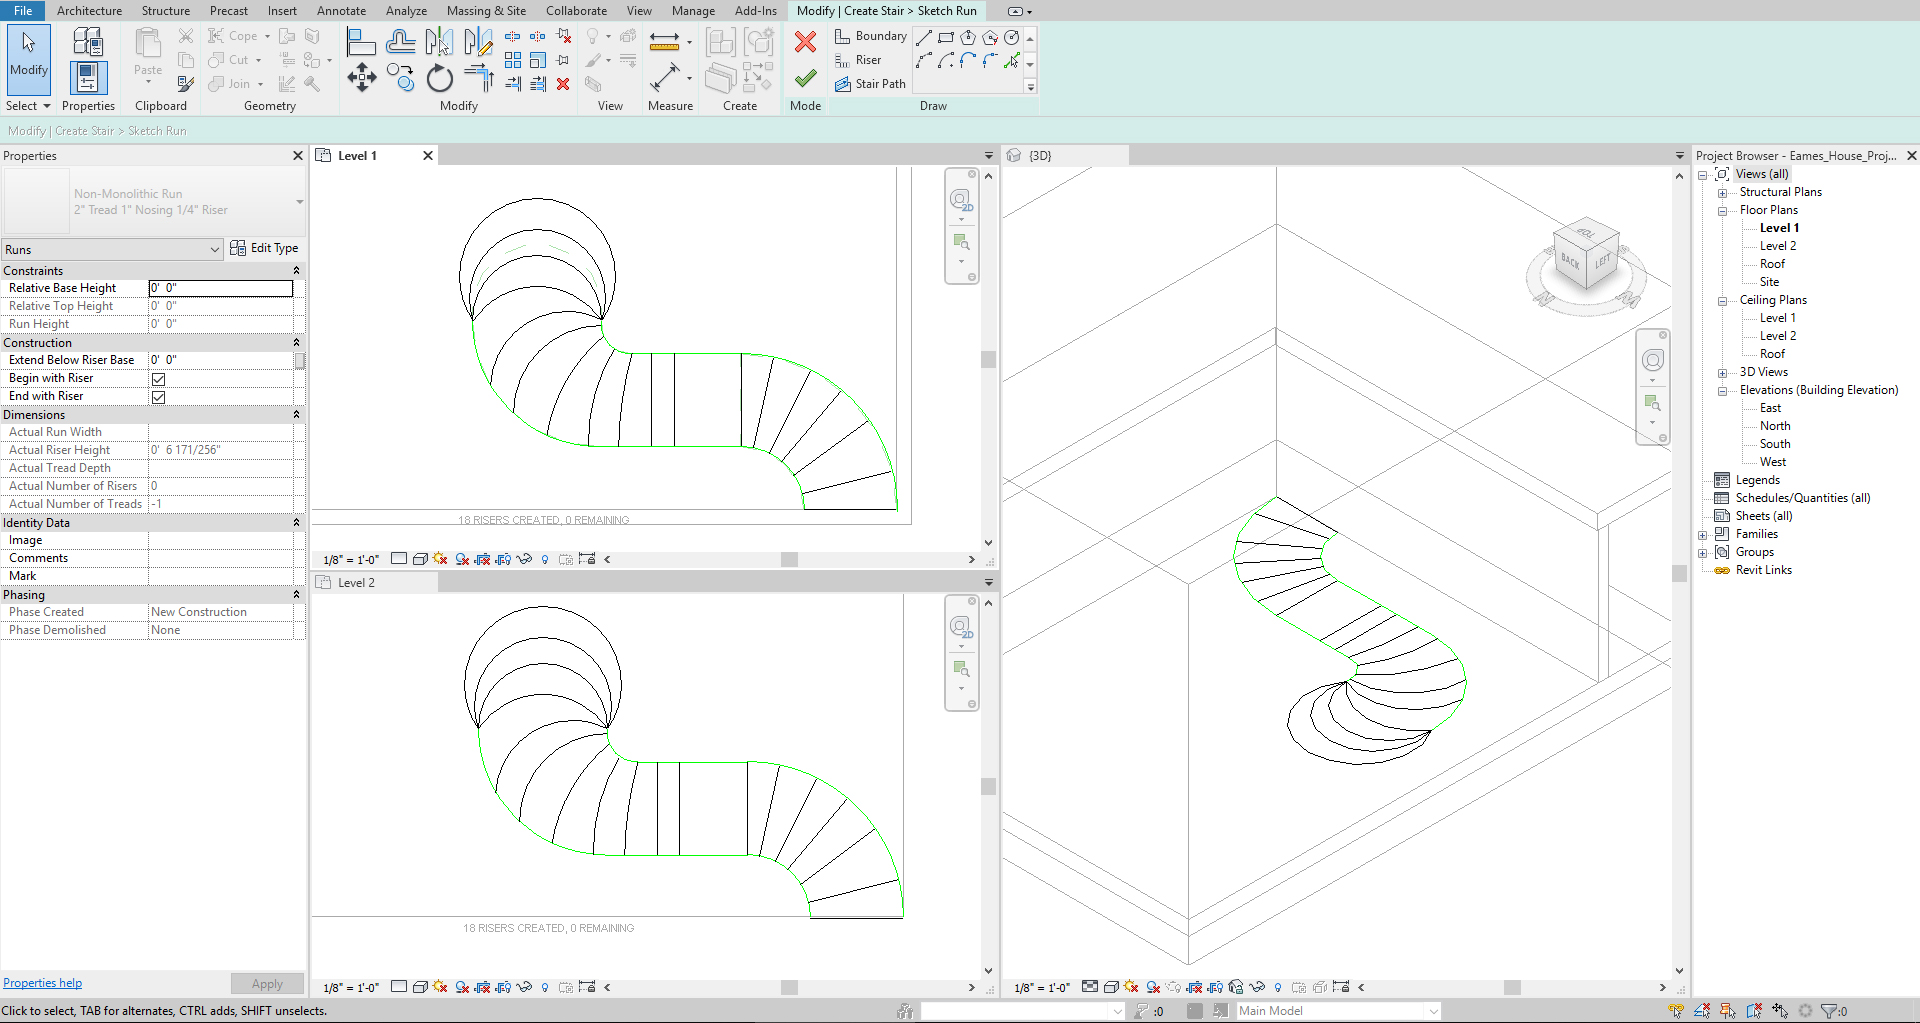
- [STEP 4] Draw [STAIR PATH]
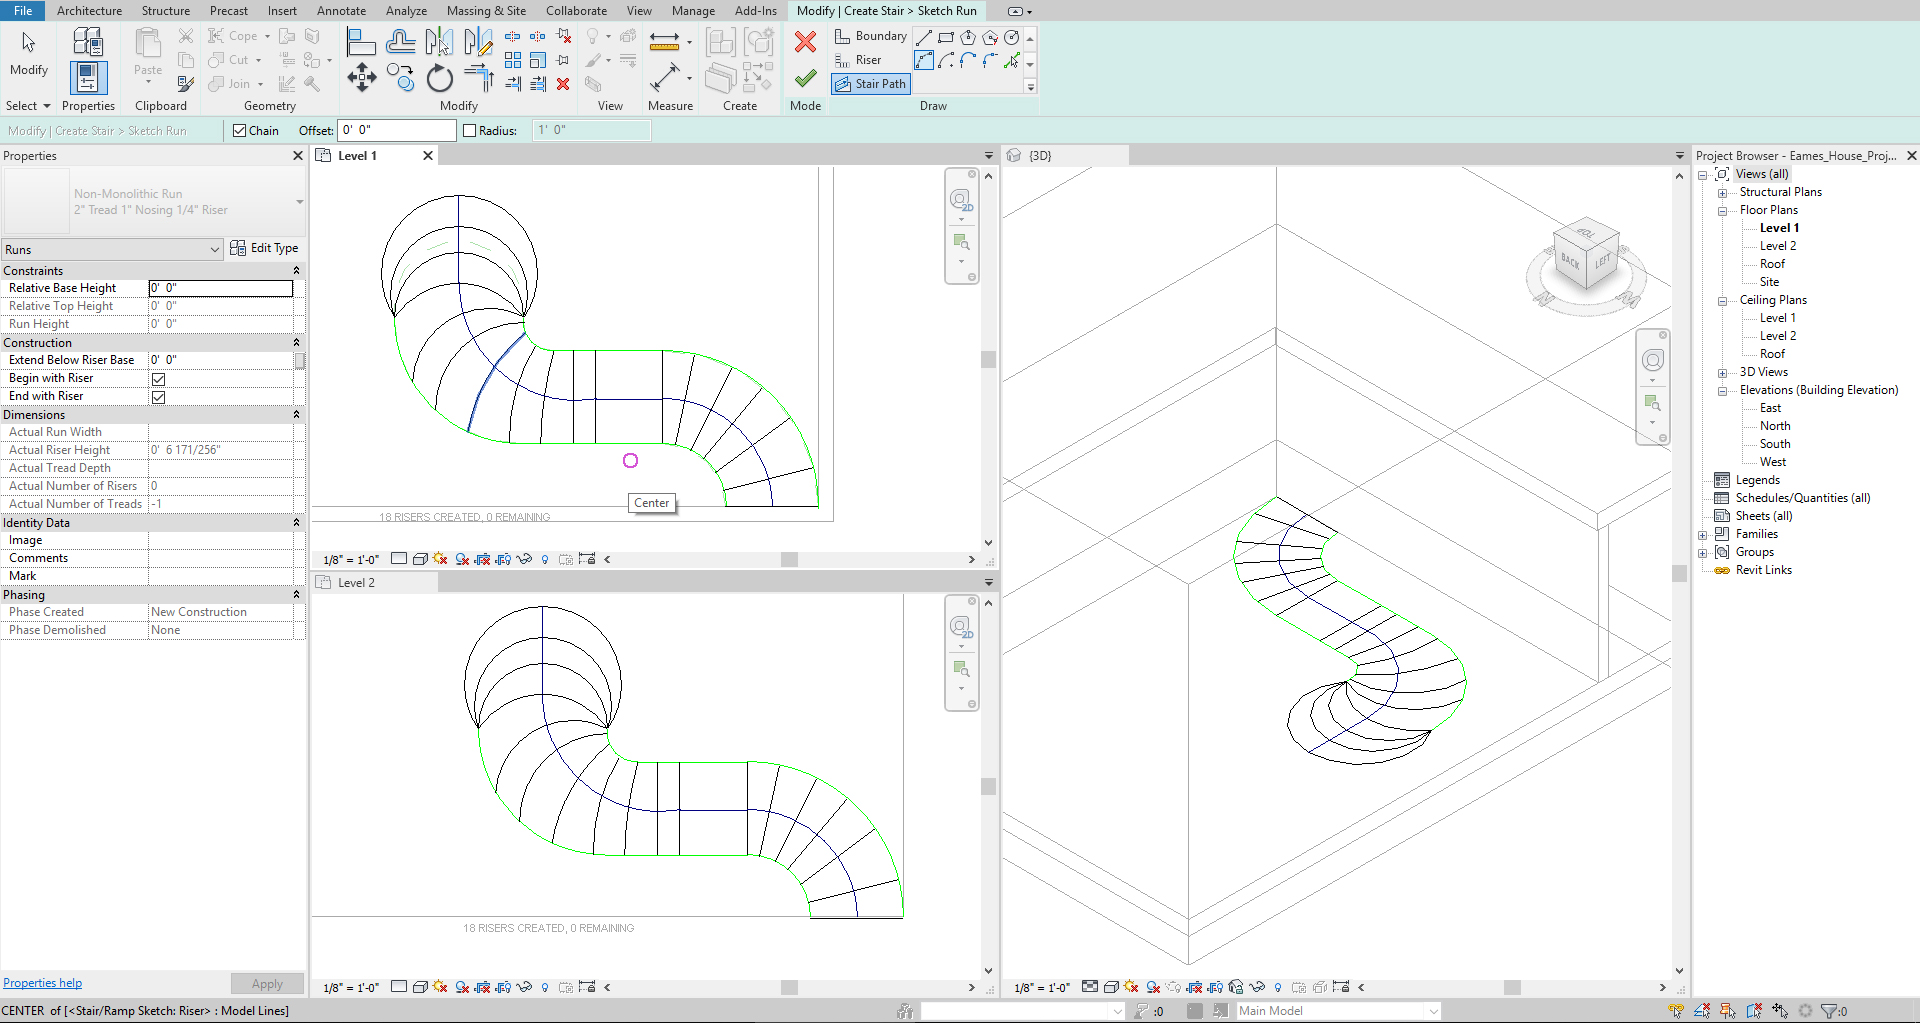
- [STEP 5] Click [GREEN CHECKMARK] to finish
- [STEP 6] If needed, click [FLIP] the direction of the staircase
- [STEP 7] Click [GREEN CHECKMARK] to complete the tool
Autodesk provides sample stairs and railings. Please download the samples by clicking this page and copy and paste that which you want to use in your project. This process will load the family files to your Revit file
(CO 2) Add/Edit Railing
A YouTube element has been excluded from this version of the text. You can view it online here: https://iastate.pressbooks.pub/visualgraphiccomm/?p=98
Typically, railings are automatically created when a staircase is made
For more information about Railings, please read this page
However, many times, your railings need modifications.
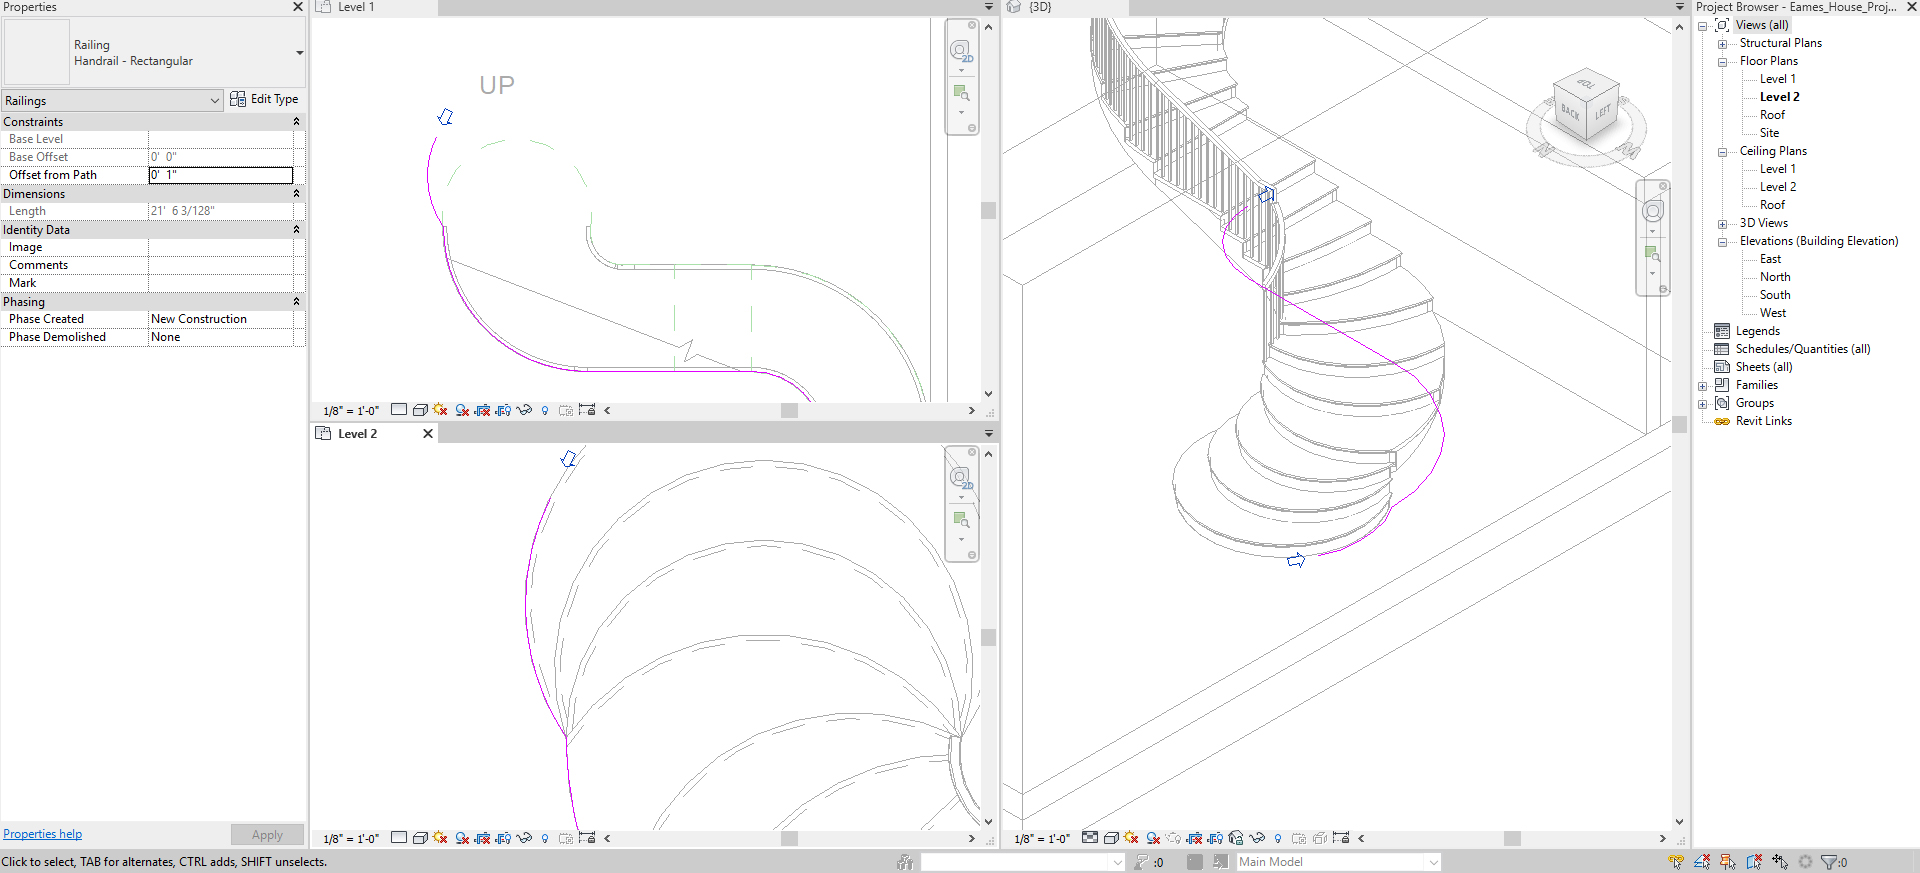
To extend your railings
- [STEP 1] click the railing
- [STEP 2] click [EDIT PATH]
- [STEP 3] edit/add the path
To edit handrail
- [STEP 1] If a Handrail path needs changing, you can select handrail only by pressing the [TAB] key
- [STEP 2] click [EDIT RAIL]
- [STEP 3] click [EDIT PATH] it would be better to work in Section or a 3d view
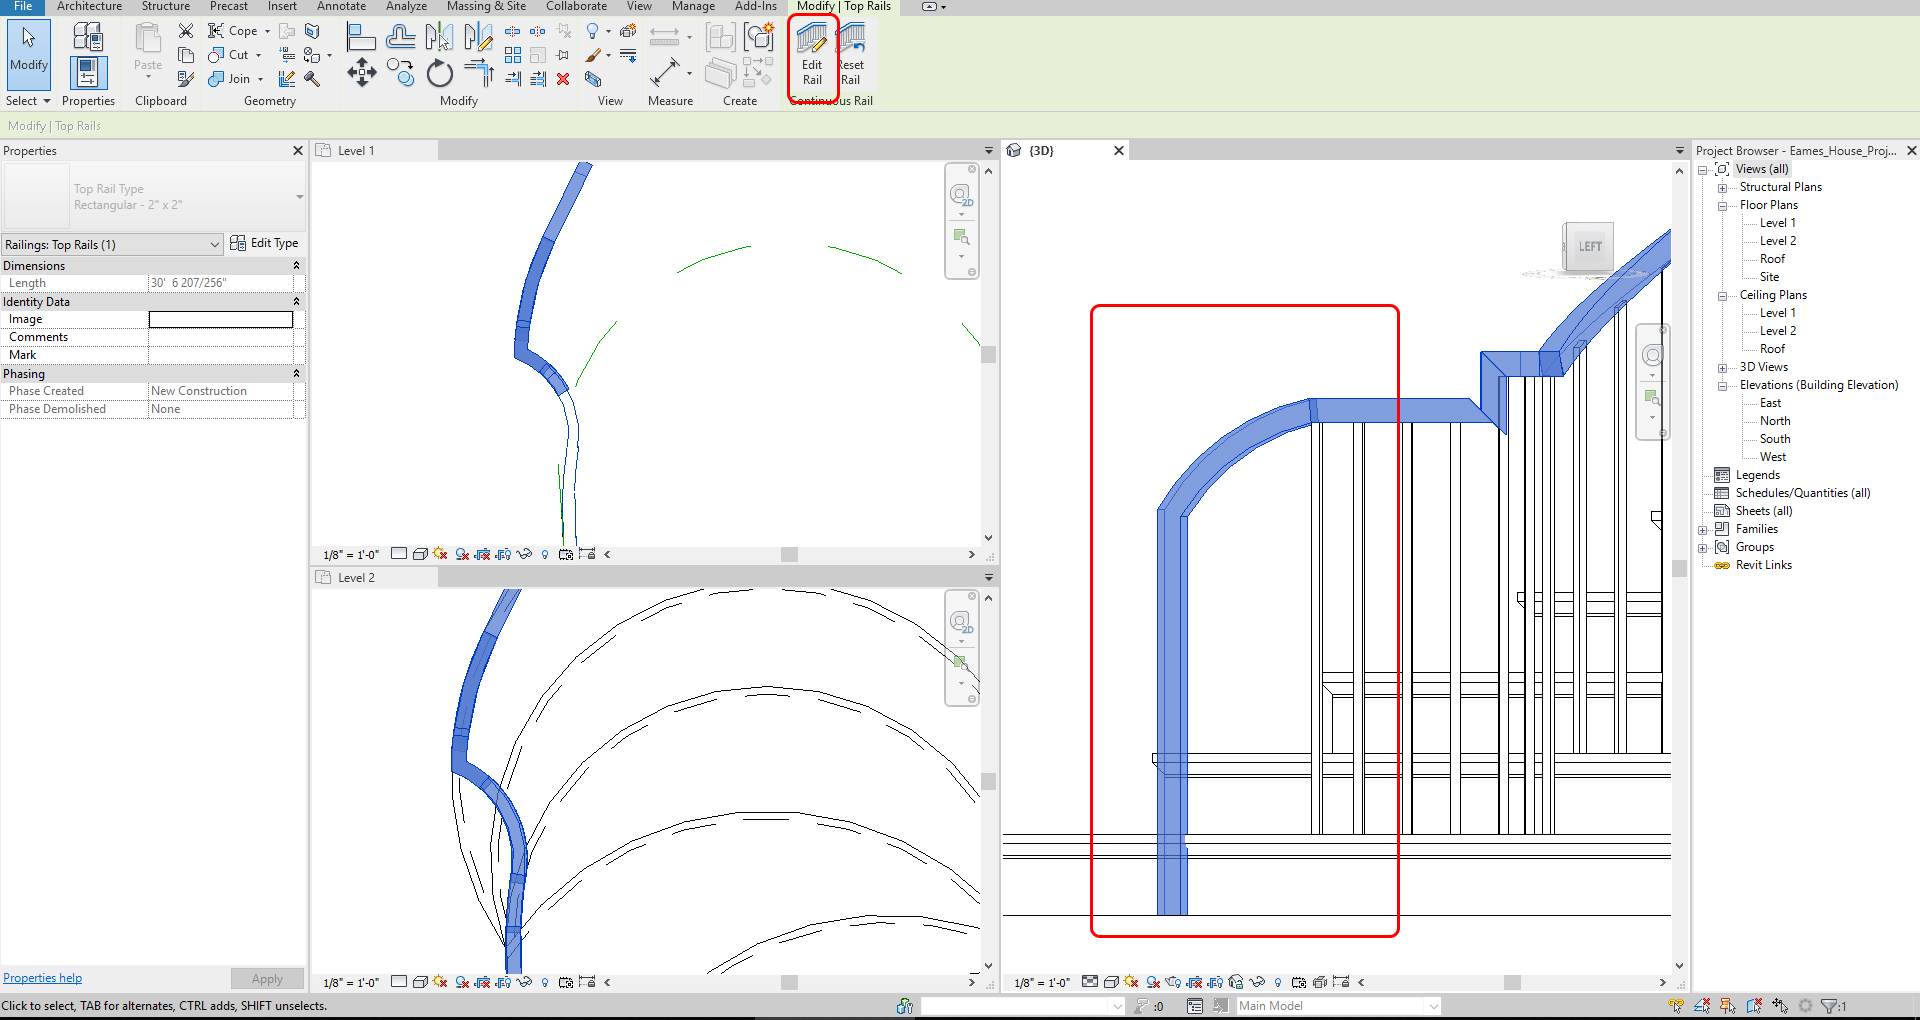
To change the handrail type, change the family type from [PROPERTIES] palette
To create a path without a stair
- [STEP 1] Click [RAILING]
- [STEP 2] Click [SKETCH PATH]
- [STEP 3] Sketch a path with a drawing tool on a plan view
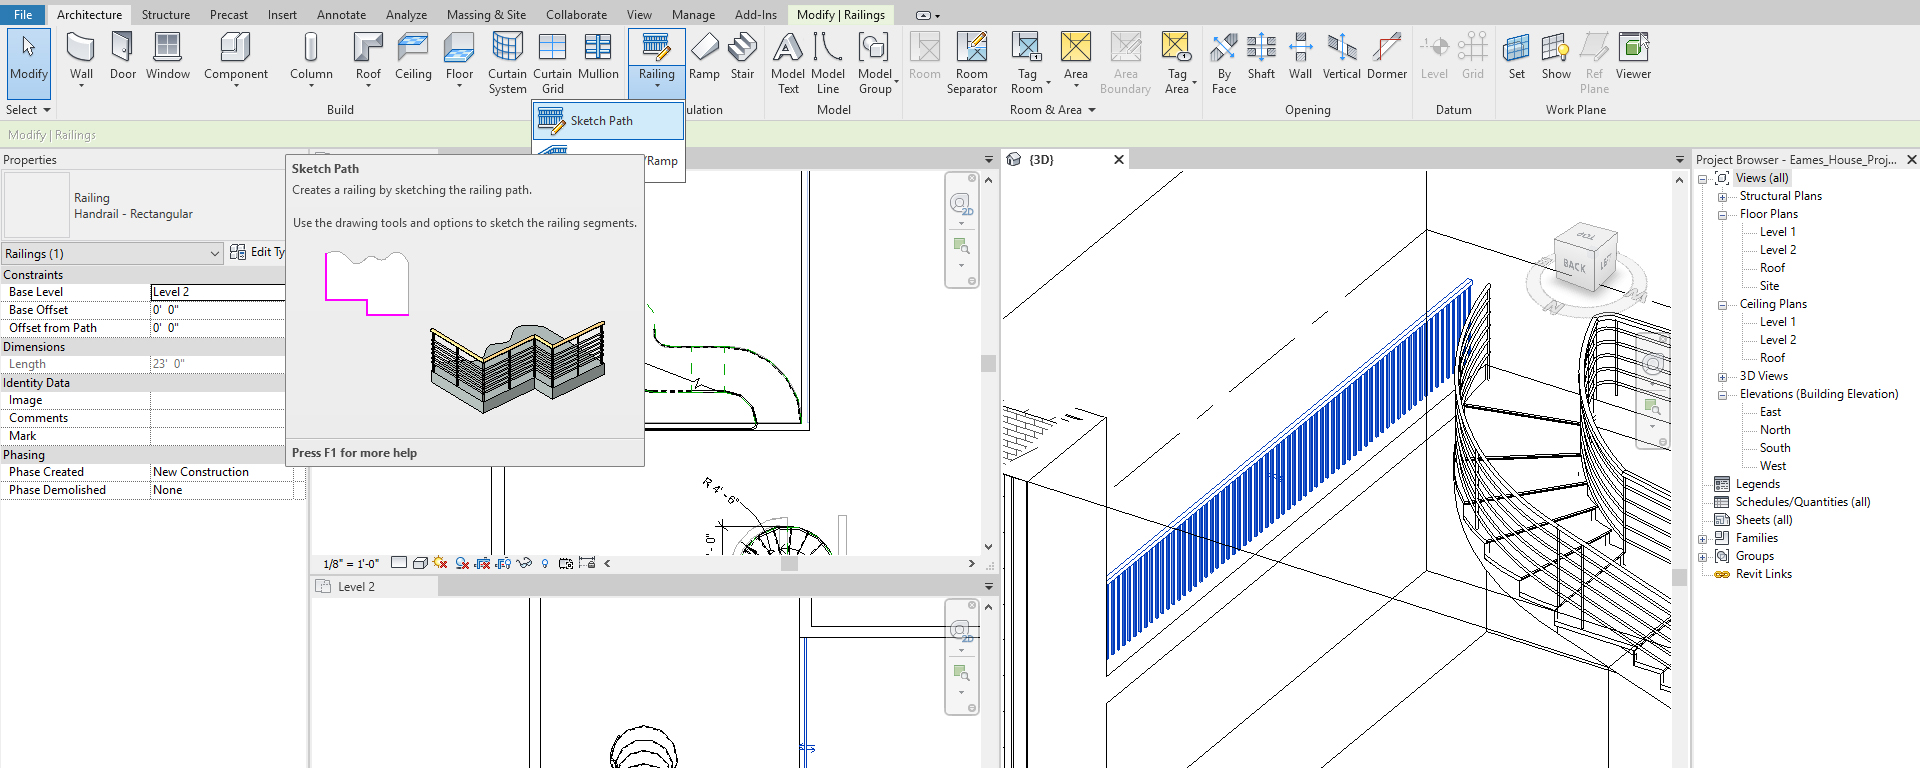
- [STEP 4] Click [GREEN CHECKMARK] to finish
(CO 3) Add/Edit Roof
A YouTube element has been excluded from this version of the text. You can view it online here: https://iastate.pressbooks.pub/visualgraphiccomm/?p=98
In this session, I will demonstrate the two types of roof; one is the Eames house roof – Flat roof and a typical residential roof – Hip roof
There are ten standard roof shape models in the Revit tutorial. Please watch this tutorial for your other projects
10 Common Roof Shapes Modeld in Revit Tutorial
Please find Autodesk provided roof tutorials from this link
If you want to create complex roof shapes in Revit, please watch this YouTube video
3 Complex Roof Shapes in Revit
For the Eames House project, you will create two models, which are the roof on the top of the metal deck and the Edge of the roof.
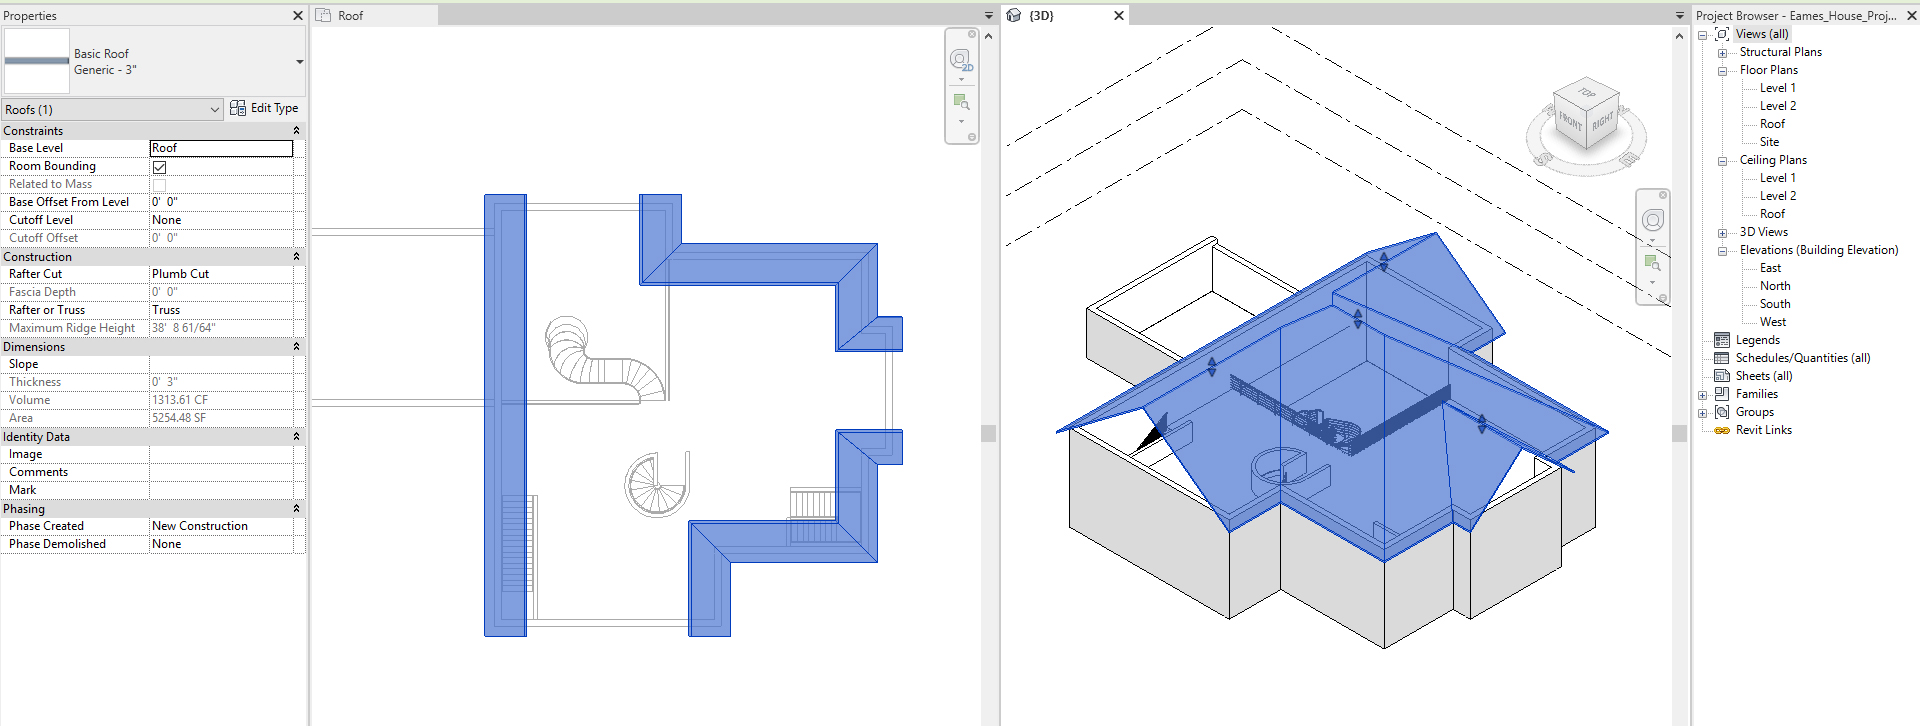
Add a flat roof
- [STEP 1] From the Project Browser, switch to the Roof plan.
- [STEP 2] In the Properties, with nothing selected, set the Underlay to level 2.
- [STEP 3] From the Architectural tab, click the small arrow on the roof] > Click [ROOF BY FOOTPRINT]
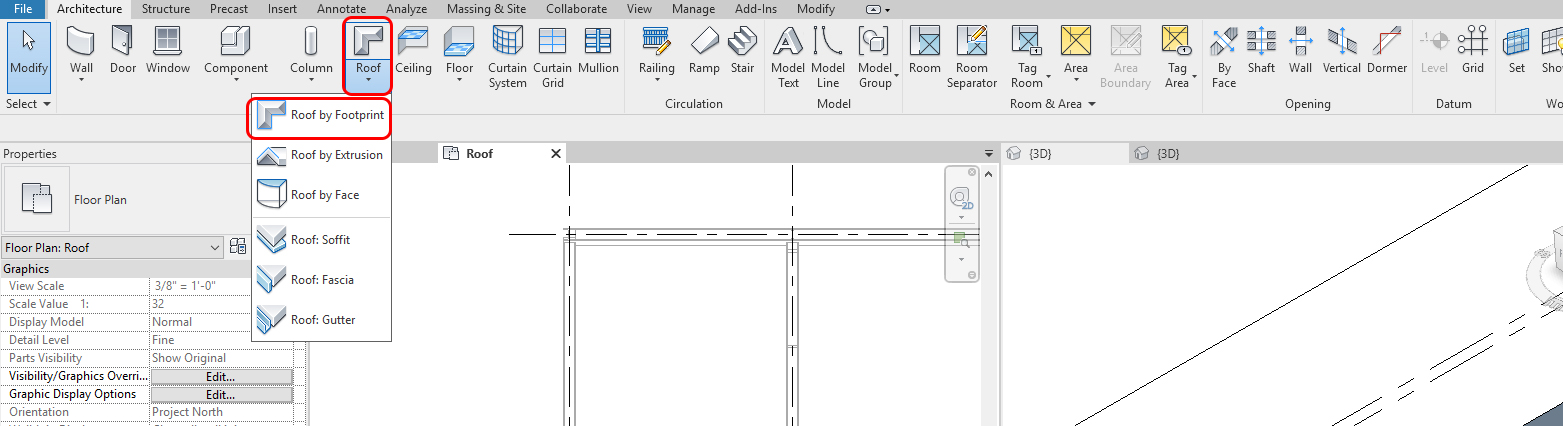
- [STEP 4] Use the Draw tool to create a boundary.
- Make sure you check Basic Roof – Generic – 9” > Duplicate – 3.”
- Base level – Roof
- Base offset from level – 0’ 0.”
- Uncheck – Defines slope
- Offset – 0’ 0.”
- [STEP 5] Once the boundary line is done, click the green checkmark
- [STEP 6] Your roof will be over the Metal deck; you can move the roof above the metal deck
- [STEP 7] You may add a point / a line for slope for a roof drain, click [ADD POINT] and click a point on the roof and change the height.
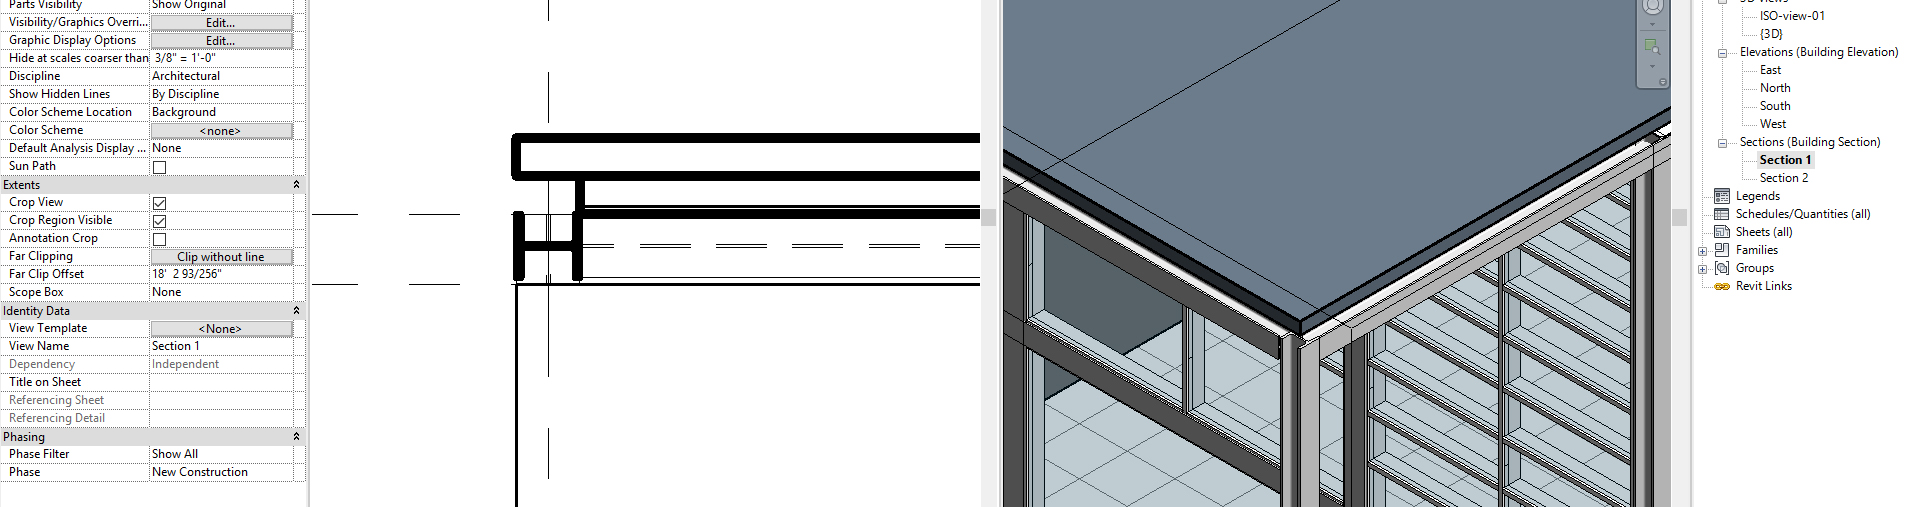
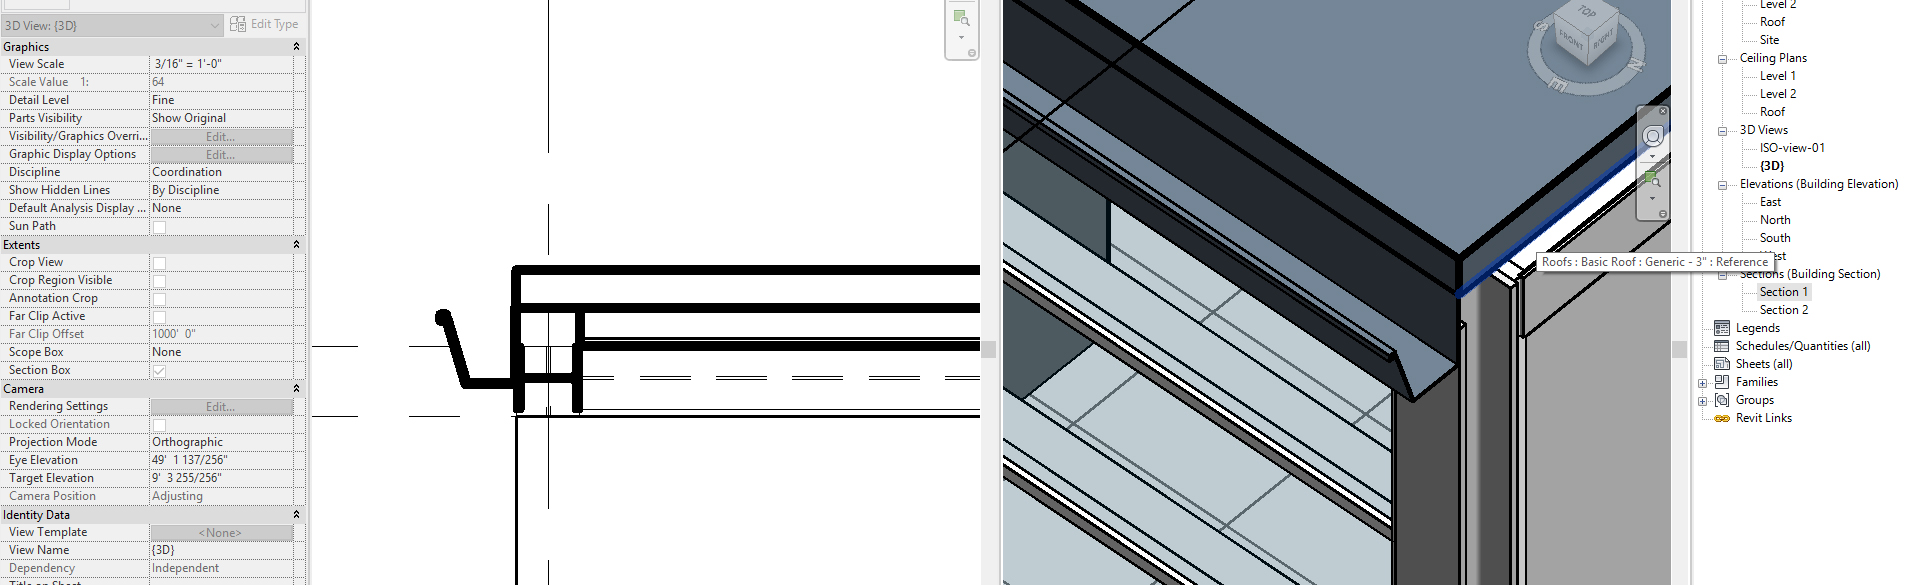
To create a gutter
- [STEP 1] From the Architectural tab, click the small arrow on the roof] > Click [ROOF: GUTTER]
- [STEP 2] Default will be Gutter – Bevel 5” x 5”. We will change to 6”x 6.”
- [STEP 3] Click [EDIT TYPE] > [DUPLICATE] > name change [000_Gutter – Bevel 6″ x 6″] > Click [OK]
- [STEP 4] Click Gutter Profile-Bevel: 5”x5” on profile
- [STEP 5] Change to 6”x 6” > Click [OK]
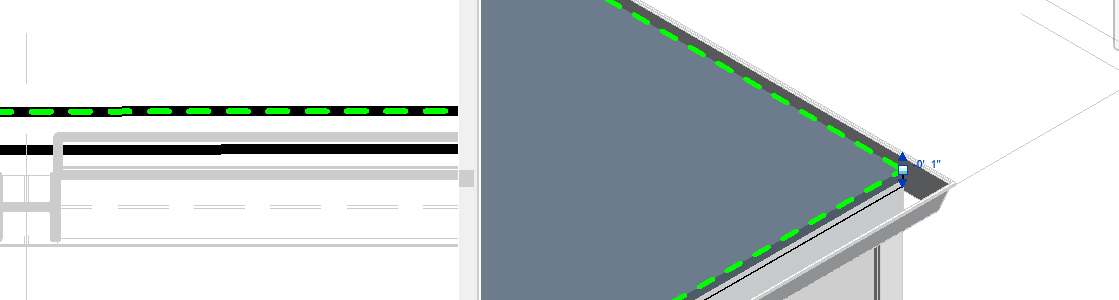
- [STEP 6] From the ISO view, click the top edges of the roof
- [STEP 7] To finish, [ESC] key
Add a hip roof (combined)
- [STEP 1] From the Project Browser, switch to the Roof plan.
- [STEP 2] In the Properties, with nothing selected, set the Underlay to level 2 or level 1.
- [STEP 3] From the Architectural tab, click the small arrow on the roof] > Click [ROOF BY FOOTPRINT]
- [STEP 4] Use the Draw tool to create a boundary.
- Make sure you check Basic Roof – Generic – 9” > Duplicate – 3.”
- Base level – Roof
- Base offset from level – 0’ 0.”
- Check – Defines slope
- Slope – 9”/12.”
- Offset – 1’ 6.”
- [STEP 5] Select 3 lines do not have a slope, uncheck [DEFINES SLOPE]

- [STEP 6] Click [GREEN CHECKMARK] when it is done
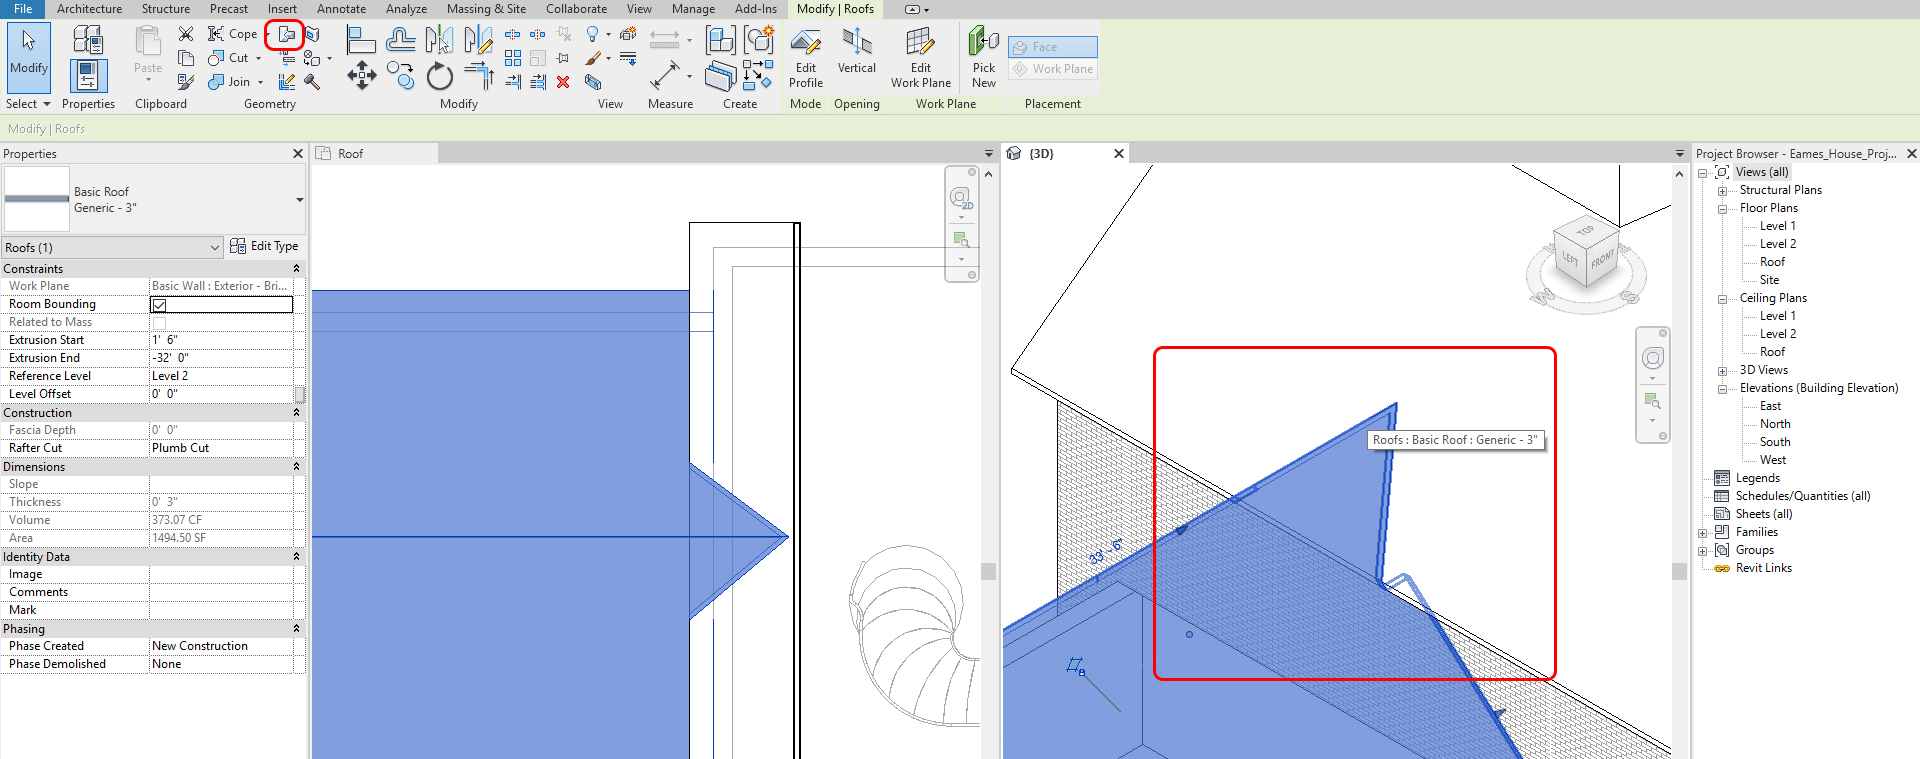
- [STEP 7] From the Architectural tab, click the small arrow on the roof > Click [ROOF BY EXTENSION]
- [STEP 8] Revit will ask you to select a work plan > Select [PICK A PLANE] > Pick a face of wall where the roof profile will start
- [STEP 9] Revit will ask you to select Roof reference level and offset > Click [OK]
- [STEP 10] Draw a continued open line for the roof on a Front view
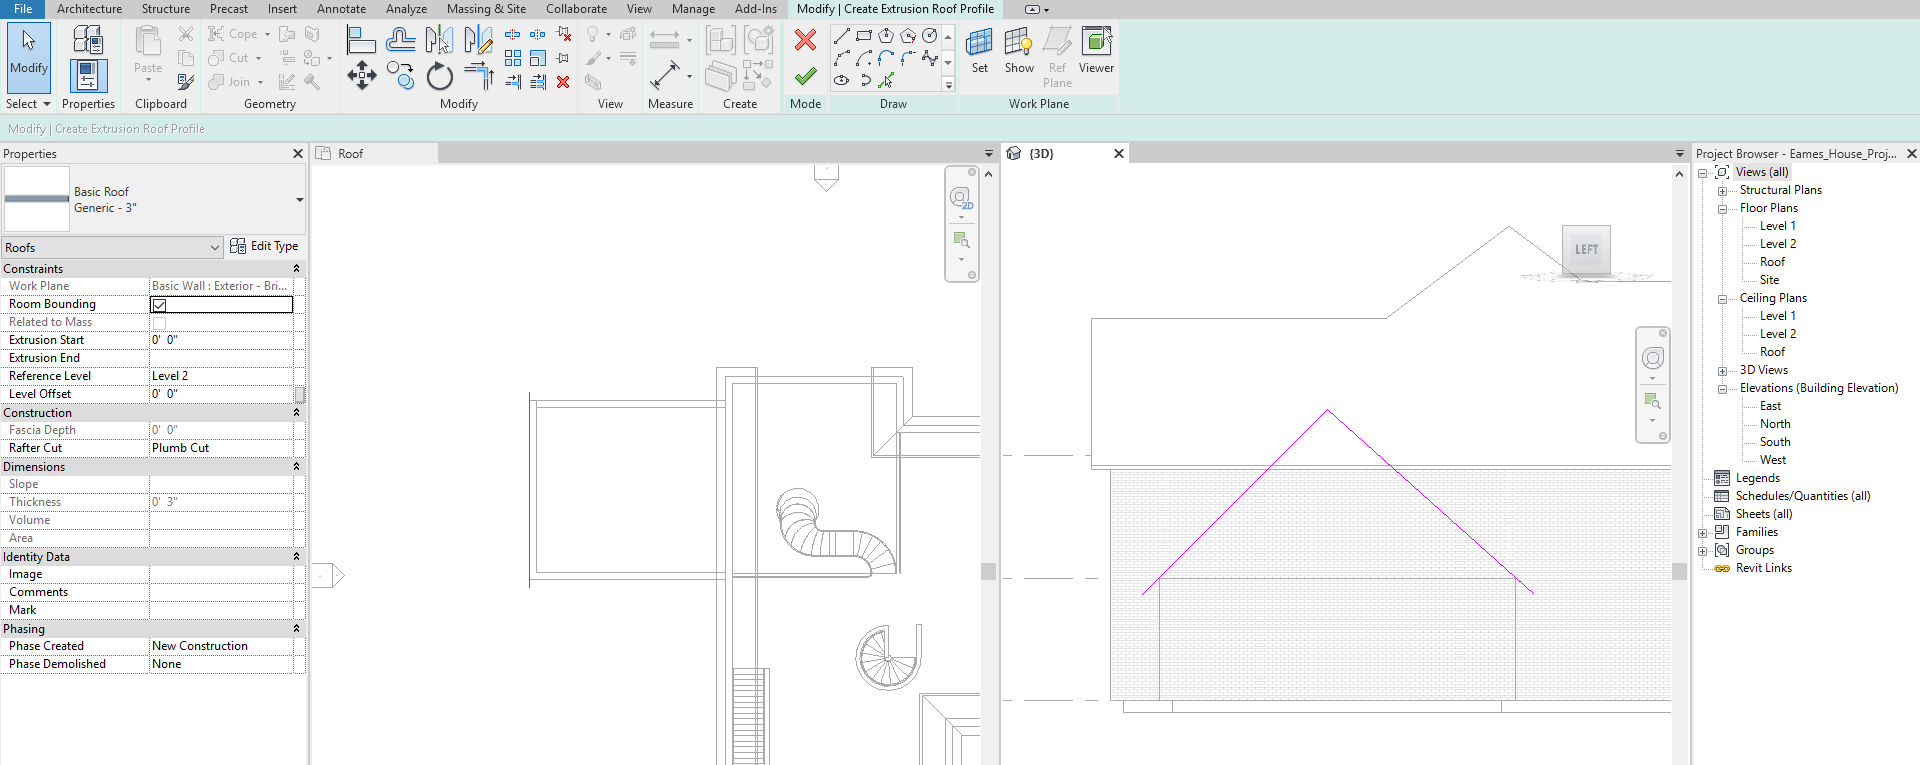
- [STEP 11] Click Green checkmark when it is done
- [STEP 12] On the plan view, you will adjust the depth of the roof
- [STEP 13] To fix the separated roof, you may use [JOIN/UNJOIN ROOF] on the Modify tab
- [STEP 14] Click the profile first and click the face where the profile will meet
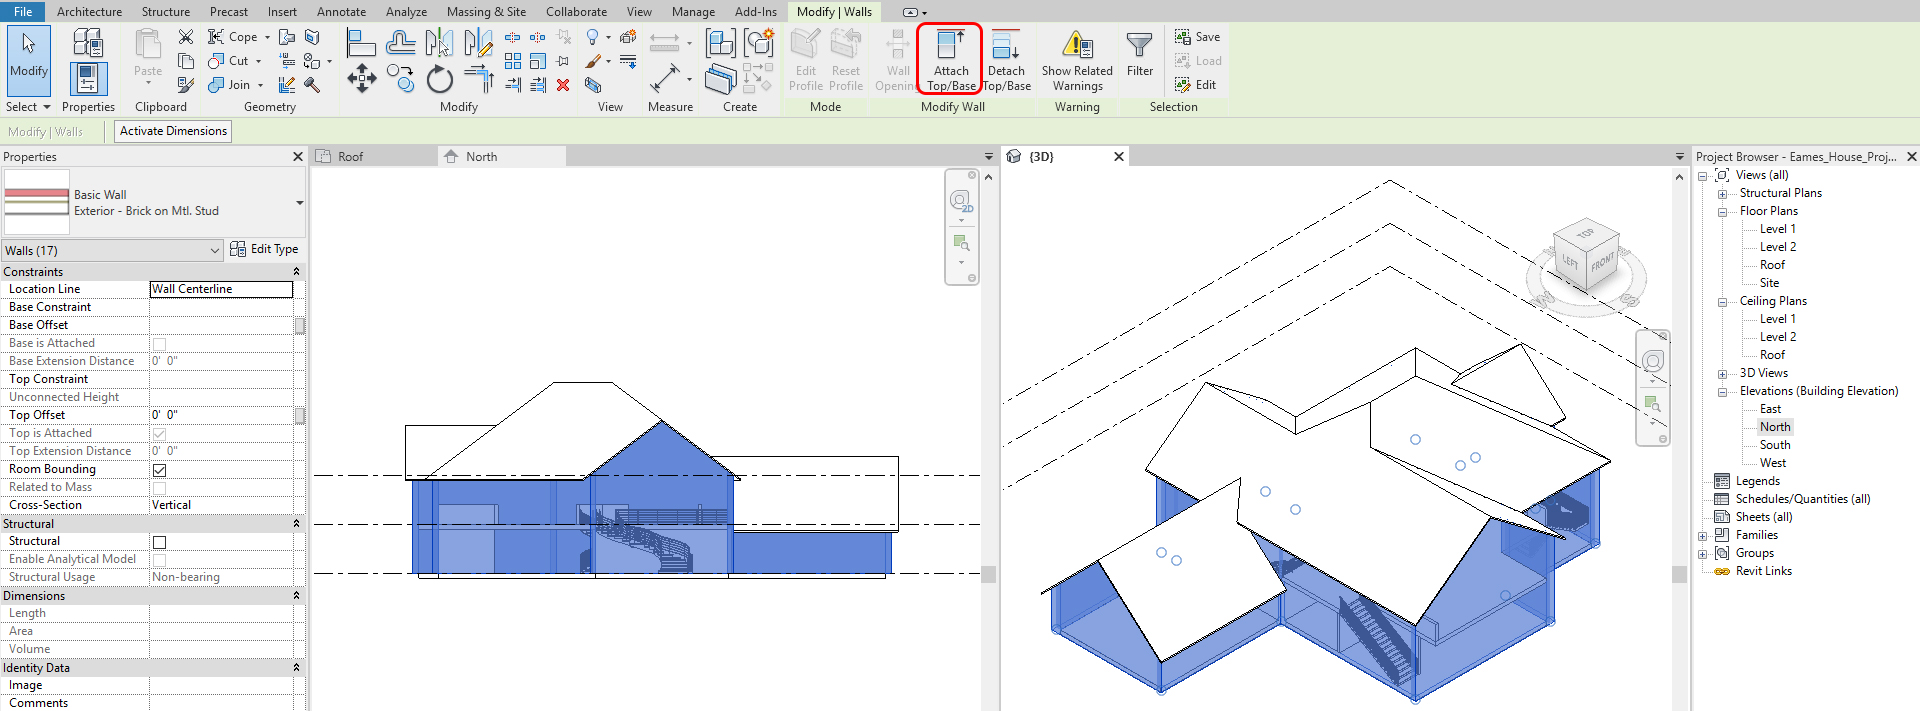
- [STEP 15] To meet all wall to the Roof, Select all walls
- [STEP 16] Click [ATTACH TOP/BASE]
- [STEP 17] Click the roof, you may get a warning, but it is OK.
SAVE the file before closing the application.
Save in a different location for the backup (e.g., a cloud folder)
 References
Autodesk.Help. (2020, September 10). Stairs. Retrieved October 22, 2020, from https://knowledge.autodesk.com/support/revit-products/learn-explore/caas/CloudHelp/cloudhelp/2019/ENU/Revit-Model/files/GUID-B1B305DF-8DBE-44A7-A7C6-16B70A3B580E-htm.html
Autodesk.Help. (2018, September 26). Revit Sample Stair and Railing Files. Retrieved October 22, 2020, from https://knowledge.autodesk.com/support/revit-products/getting-started/caas/CloudHelp/cloudhelp/2018/ENU/Revit-GetStarted/files/GUID-899499DB-C96A-4C66-8500-0CC4E3FD62B1-htm.html
Autodesk.Help. (2020, September 10). Railings. Retrieved October 22, 2020, from https://knowledge.autodesk.com/support/revit-products/learn-explore/caas/CloudHelp/cloudhelp/2019/ENU/Revit-Model/files/GUID-447460EC-DAC6-481B-8F0A-1AED56D51D48-htm.html
Balkan Architect. (2019, January 8). 10 Common Roof Shapes Modeld in Revit Tutorial. Retrieved October 22, 2020, from https://www.youtube.com/watch?v=enrmG9CMUfE
Autodesk.Help. (2018, September 26). Revit Roof Sample File. Retrieved October 22, 2020, from https://knowledge.autodesk.com/support/revit-products/getting-started/caas/CloudHelp/cloudhelp/2018/ENU/Revit-GetStarted/files/GUID-785EDA82-B8DD-4BF3-A508-E7FC4860E24D-htm.html
Balkan Architect. (2018, March 31). 3 Complex Roof Shapes in Revit. Retrieved October 22, 2020, from https://www.youtube.com/watch?v=tTmBA4mMKK8