2.7: More on AC “polarity”
- Page ID
- 1391
\( \newcommand{\vecs}[1]{\overset { \scriptstyle \rightharpoonup} {\mathbf{#1}} } \)
\( \newcommand{\vecd}[1]{\overset{-\!-\!\rightharpoonup}{\vphantom{a}\smash {#1}}} \)
\( \newcommand{\dsum}{\displaystyle\sum\limits} \)
\( \newcommand{\dint}{\displaystyle\int\limits} \)
\( \newcommand{\dlim}{\displaystyle\lim\limits} \)
\( \newcommand{\id}{\mathrm{id}}\) \( \newcommand{\Span}{\mathrm{span}}\)
( \newcommand{\kernel}{\mathrm{null}\,}\) \( \newcommand{\range}{\mathrm{range}\,}\)
\( \newcommand{\RealPart}{\mathrm{Re}}\) \( \newcommand{\ImaginaryPart}{\mathrm{Im}}\)
\( \newcommand{\Argument}{\mathrm{Arg}}\) \( \newcommand{\norm}[1]{\| #1 \|}\)
\( \newcommand{\inner}[2]{\langle #1, #2 \rangle}\)
\( \newcommand{\Span}{\mathrm{span}}\)
\( \newcommand{\id}{\mathrm{id}}\)
\( \newcommand{\Span}{\mathrm{span}}\)
\( \newcommand{\kernel}{\mathrm{null}\,}\)
\( \newcommand{\range}{\mathrm{range}\,}\)
\( \newcommand{\RealPart}{\mathrm{Re}}\)
\( \newcommand{\ImaginaryPart}{\mathrm{Im}}\)
\( \newcommand{\Argument}{\mathrm{Arg}}\)
\( \newcommand{\norm}[1]{\| #1 \|}\)
\( \newcommand{\inner}[2]{\langle #1, #2 \rangle}\)
\( \newcommand{\Span}{\mathrm{span}}\) \( \newcommand{\AA}{\unicode[.8,0]{x212B}}\)
\( \newcommand{\vectorA}[1]{\vec{#1}} % arrow\)
\( \newcommand{\vectorAt}[1]{\vec{\text{#1}}} % arrow\)
\( \newcommand{\vectorB}[1]{\overset { \scriptstyle \rightharpoonup} {\mathbf{#1}} } \)
\( \newcommand{\vectorC}[1]{\textbf{#1}} \)
\( \newcommand{\vectorD}[1]{\overrightarrow{#1}} \)
\( \newcommand{\vectorDt}[1]{\overrightarrow{\text{#1}}} \)
\( \newcommand{\vectE}[1]{\overset{-\!-\!\rightharpoonup}{\vphantom{a}\smash{\mathbf {#1}}}} \)
\( \newcommand{\vecs}[1]{\overset { \scriptstyle \rightharpoonup} {\mathbf{#1}} } \)
\(\newcommand{\longvect}{\overrightarrow}\)
\( \newcommand{\vecd}[1]{\overset{-\!-\!\rightharpoonup}{\vphantom{a}\smash {#1}}} \)
\(\newcommand{\avec}{\mathbf a}\) \(\newcommand{\bvec}{\mathbf b}\) \(\newcommand{\cvec}{\mathbf c}\) \(\newcommand{\dvec}{\mathbf d}\) \(\newcommand{\dtil}{\widetilde{\mathbf d}}\) \(\newcommand{\evec}{\mathbf e}\) \(\newcommand{\fvec}{\mathbf f}\) \(\newcommand{\nvec}{\mathbf n}\) \(\newcommand{\pvec}{\mathbf p}\) \(\newcommand{\qvec}{\mathbf q}\) \(\newcommand{\svec}{\mathbf s}\) \(\newcommand{\tvec}{\mathbf t}\) \(\newcommand{\uvec}{\mathbf u}\) \(\newcommand{\vvec}{\mathbf v}\) \(\newcommand{\wvec}{\mathbf w}\) \(\newcommand{\xvec}{\mathbf x}\) \(\newcommand{\yvec}{\mathbf y}\) \(\newcommand{\zvec}{\mathbf z}\) \(\newcommand{\rvec}{\mathbf r}\) \(\newcommand{\mvec}{\mathbf m}\) \(\newcommand{\zerovec}{\mathbf 0}\) \(\newcommand{\onevec}{\mathbf 1}\) \(\newcommand{\real}{\mathbb R}\) \(\newcommand{\twovec}[2]{\left[\begin{array}{r}#1 \\ #2 \end{array}\right]}\) \(\newcommand{\ctwovec}[2]{\left[\begin{array}{c}#1 \\ #2 \end{array}\right]}\) \(\newcommand{\threevec}[3]{\left[\begin{array}{r}#1 \\ #2 \\ #3 \end{array}\right]}\) \(\newcommand{\cthreevec}[3]{\left[\begin{array}{c}#1 \\ #2 \\ #3 \end{array}\right]}\) \(\newcommand{\fourvec}[4]{\left[\begin{array}{r}#1 \\ #2 \\ #3 \\ #4 \end{array}\right]}\) \(\newcommand{\cfourvec}[4]{\left[\begin{array}{c}#1 \\ #2 \\ #3 \\ #4 \end{array}\right]}\) \(\newcommand{\fivevec}[5]{\left[\begin{array}{r}#1 \\ #2 \\ #3 \\ #4 \\ #5 \\ \end{array}\right]}\) \(\newcommand{\cfivevec}[5]{\left[\begin{array}{c}#1 \\ #2 \\ #3 \\ #4 \\ #5 \\ \end{array}\right]}\) \(\newcommand{\mattwo}[4]{\left[\begin{array}{rr}#1 \amp #2 \\ #3 \amp #4 \\ \end{array}\right]}\) \(\newcommand{\laspan}[1]{\text{Span}\{#1\}}\) \(\newcommand{\bcal}{\cal B}\) \(\newcommand{\ccal}{\cal C}\) \(\newcommand{\scal}{\cal S}\) \(\newcommand{\wcal}{\cal W}\) \(\newcommand{\ecal}{\cal E}\) \(\newcommand{\coords}[2]{\left\{#1\right\}_{#2}}\) \(\newcommand{\gray}[1]{\color{gray}{#1}}\) \(\newcommand{\lgray}[1]{\color{lightgray}{#1}}\) \(\newcommand{\rank}{\operatorname{rank}}\) \(\newcommand{\row}{\text{Row}}\) \(\newcommand{\col}{\text{Col}}\) \(\renewcommand{\row}{\text{Row}}\) \(\newcommand{\nul}{\text{Nul}}\) \(\newcommand{\var}{\text{Var}}\) \(\newcommand{\corr}{\text{corr}}\) \(\newcommand{\len}[1]{\left|#1\right|}\) \(\newcommand{\bbar}{\overline{\bvec}}\) \(\newcommand{\bhat}{\widehat{\bvec}}\) \(\newcommand{\bperp}{\bvec^\perp}\) \(\newcommand{\xhat}{\widehat{\xvec}}\) \(\newcommand{\vhat}{\widehat{\vvec}}\) \(\newcommand{\uhat}{\widehat{\uvec}}\) \(\newcommand{\what}{\widehat{\wvec}}\) \(\newcommand{\Sighat}{\widehat{\Sigma}}\) \(\newcommand{\lt}{<}\) \(\newcommand{\gt}{>}\) \(\newcommand{\amp}{&}\) \(\definecolor{fillinmathshade}{gray}{0.9}\)Complex numbers are useful for AC circuit analysis because they provide a convenient method of symbolically denoting phase shift between AC quantities like voltage and current. However, for most people the equivalence between abstract vectors and real circuit quantities is not an easy one to grasp. Earlier in this chapter, we saw how AC voltage sources are given voltage figures in complex form (magnitude and phase angle), as well as polarity markings. Being that alternating current has no set “polarity” as direct current does, these polarity markings and their relationship to phase angle tends to be confusing. This section is written in the attempt to clarify some of these issues.
Voltage is an inherently relative quantity. When we measure a voltage, we have a choice in how we connect a voltmeter or other voltage-measuring instrument to the source of voltage, as there are two points between which the voltage exists, and two test leads on the instrument with which to make connection. In DC circuits, we denote the polarity of voltage sources and voltage drops explicitly, using “+” and “-” symbols, and use color-coded meter test leads (red and black). If a digital voltmeter indicates a negative DC voltage, we know that its test leads are connected “backward” to the voltage (red lead connected to the “-” and black lead to the “+”).
Batteries have their polarity designated by way of intrinsic symbology: the short-line side of a battery is always the negative (-) side and the long-line side always the positive(+): (Figure below)

Conventional battery polarity.
Although it would be mathematically correct to represent a battery’s voltage as a negative figure with reversed polarity markings, it would be decidedly unconventional: (Figure below)

Decidedly unconventional polarity marking.
Interpreting such notation might be easier if the “+” and “-” polarity markings were viewed as reference points for voltmeter test leads, the “+” meaning “red” and the “-” meaning “black.” A voltmeter connected to the above battery with red lead to the bottom terminal and black lead to the top terminal would indeed indicate a negative voltage (-6 volts). Actually, this form of notation and interpretation is not as unusual as you might think: it is commonly encountered in problems of DC network analysis where “+” and “-” polarity marks are initially drawn according to educated guess, and later interpreted as correct or “backward” according to the mathematical sign of the figure calculated.
In AC circuits, though, we don’t deal with “negative” quantities of voltage. Instead, we describe to what degree one voltage aids or opposes another by phase: the time-shift between two waveforms. We never describe an AC voltage as being negative in sign, because the facility of polar notation allows for vectors pointing in an opposite direction. If one AC voltage directly opposes another AC voltage, we simply say that one is 180o out of phase with the other.
Still, voltage is relative between two points, and we have a choice in how we might connect a voltage-measuring instrument between those two points. The mathematical sign of a DC voltmeter’s reading has meaning only in the context of its test lead connections: which terminal the red lead is touching, and which terminal the black lead is touching. Likewise, the phase angle of an AC voltage has meaning only in the context of knowing which of the two points is considered the “reference” point. Because of this fact, “+” and “-” polarity marks are often placed by the terminals of an AC voltage in schematic diagrams to give the stated phase angle a frame of reference.
Let’s review these principles with some graphical aids. First, the principle of relating test lead connections to the mathematical sign of a DC voltmeter indication: (Figure below)
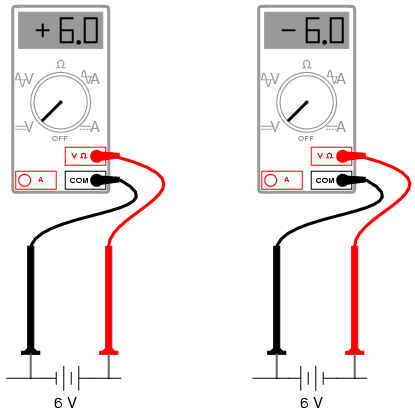
Test lead colors provide a frame of reference for interpreting the sign (+ or -) of the meter’s indication.
The mathematical sign of a digital DC voltmeter’s display has meaning only in the context of its test lead connections. Consider the use of a DC voltmeter in determining whether or not two DC voltage sources are aiding or opposing each other, assuming that both sources are unlabeled as to their polarities. Using the voltmeter to measure across the first source: (Figure below)
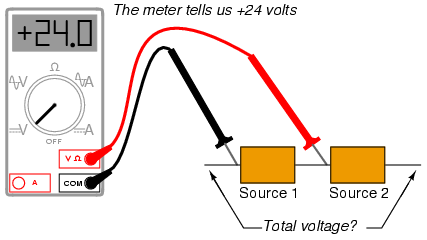
(+) Reading indicates black is (-), red is (+).
This first measurement of +24 across the left-hand voltage source tells us that the black lead of the meter really is touching the negative side of voltage source #1, and the red lead of the meter really is touching the positive. Thus, we know source #1 is a battery facing in this orientation: (Figure below)
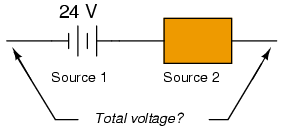
24V source is polarized (-) to (+).
Measuring the other unknown voltage source: (Figure below)
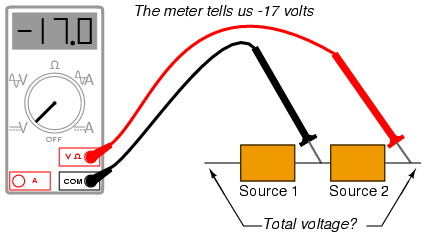
(-) Reading indicates black is (+), red is (-).
This second voltmeter reading, however, is a negative (-) 17 volts, which tells us that the black test lead is actually touching the positive side of voltage source #2, while the red test lead is actually touching the negative. Thus, we know that source #2 is a battery facing in the opposite direction: (Figure below)
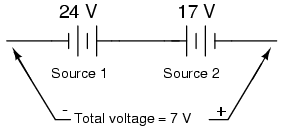
17V source is polarized (+) to (-)
It should be obvious to any experienced student of DC electricity that these two batteries are opposing one another. By definition, opposing voltages subtract from one another, so we subtract 17 volts from 24 volts to obtain the total voltage across the two: 7 volts.
We could, however, draw the two sources as nondescript boxes, labeled with the exact voltage figures obtained by the voltmeter, the polarity marks indicating voltmeter test lead placement: (Figure below)

Voltmeter readings as read from meters.
According to this diagram, the polarity marks (which indicate meter test lead placement) indicate the sources aiding each other. By definition, aiding voltage sources add with one another to form the total voltage, so we add 24 volts to -17 volts to obtain 7 volts: still the correct answer. If we let the polarity markings guide our decision to either add or subtract voltage figures—whether those polarity markings represent the true polarity or just the meter test lead orientation—and include the mathematical signs of those voltage figures in our calculations, the result will always be correct. Again, the polarity markings serve as frames of reference to place the voltage figures’ mathematical signs in proper context.
The same is true for AC voltages, except that phase angle substitutes for mathematical sign. In order to relate multiple AC voltages at different phase angles to each other, we need polarity markings to provide frames of reference for those voltages’ phase angles. (Figure below)
Take for example the following circuit:
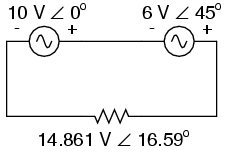 Phase angle substitutes for ± sign. The polarity markings show these two voltage sources aiding each other, so to determine the total voltage across the resistor we must add the voltage figures of 10 V ∠ 0o and 6 V ∠ 45o together to obtain 14.861 V ∠ 16.59o. However, it would be perfectly acceptable to represent the 6 volt source as 6 V ∠ 225o, with a reversed set of polarity markings, and still arrive at the same total voltage: (Figure below)
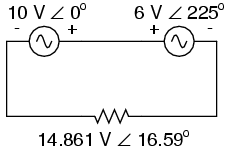
Reversing the voltmeter leads on the 6V source changes the phase angle by 180o.
6 V ∠ 45o with negative on the left and positive on the right is exactly the same as 6 V ∠ 225o with positive on the left and negative on the right: the reversal of polarity markings perfectly complements the addition of 180o to the phase angle designation: (Figure below)
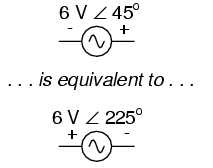
Reversing polarity adds 180o to phase angle
Unlike DC voltage sources, whose symbols intrinsically define polarity by means of short and long lines, AC voltage symbols have no intrinsic polarity marking. Therefore, any polarity marks must be included as additional symbols on the diagram, and there is no one “correct” way in which to place them. They must, however, correlate with the given phase angle to represent the true phase relationship of that voltage with other voltages in the circuit.
REVIEW
- Polarity markings are sometimes given to AC voltages in circuit schematics in order to provide a frame of reference for their phase angles.


