7.1: Single-Phase Power Systems
- Page ID
- 1432
\( \newcommand{\vecs}[1]{\overset { \scriptstyle \rightharpoonup} {\mathbf{#1}} } \)
\( \newcommand{\vecd}[1]{\overset{-\!-\!\rightharpoonup}{\vphantom{a}\smash {#1}}} \)
\( \newcommand{\id}{\mathrm{id}}\) \( \newcommand{\Span}{\mathrm{span}}\)
( \newcommand{\kernel}{\mathrm{null}\,}\) \( \newcommand{\range}{\mathrm{range}\,}\)
\( \newcommand{\RealPart}{\mathrm{Re}}\) \( \newcommand{\ImaginaryPart}{\mathrm{Im}}\)
\( \newcommand{\Argument}{\mathrm{Arg}}\) \( \newcommand{\norm}[1]{\| #1 \|}\)
\( \newcommand{\inner}[2]{\langle #1, #2 \rangle}\)
\( \newcommand{\Span}{\mathrm{span}}\)
\( \newcommand{\id}{\mathrm{id}}\)
\( \newcommand{\Span}{\mathrm{span}}\)
\( \newcommand{\kernel}{\mathrm{null}\,}\)
\( \newcommand{\range}{\mathrm{range}\,}\)
\( \newcommand{\RealPart}{\mathrm{Re}}\)
\( \newcommand{\ImaginaryPart}{\mathrm{Im}}\)
\( \newcommand{\Argument}{\mathrm{Arg}}\)
\( \newcommand{\norm}[1]{\| #1 \|}\)
\( \newcommand{\inner}[2]{\langle #1, #2 \rangle}\)
\( \newcommand{\Span}{\mathrm{span}}\) \( \newcommand{\AA}{\unicode[.8,0]{x212B}}\)
\( \newcommand{\vectorA}[1]{\vec{#1}} % arrow\)
\( \newcommand{\vectorAt}[1]{\vec{\text{#1}}} % arrow\)
\( \newcommand{\vectorB}[1]{\overset { \scriptstyle \rightharpoonup} {\mathbf{#1}} } \)
\( \newcommand{\vectorC}[1]{\textbf{#1}} \)
\( \newcommand{\vectorD}[1]{\overrightarrow{#1}} \)
\( \newcommand{\vectorDt}[1]{\overrightarrow{\text{#1}}} \)
\( \newcommand{\vectE}[1]{\overset{-\!-\!\rightharpoonup}{\vphantom{a}\smash{\mathbf {#1}}}} \)
\( \newcommand{\vecs}[1]{\overset { \scriptstyle \rightharpoonup} {\mathbf{#1}} } \)
\( \newcommand{\vecd}[1]{\overset{-\!-\!\rightharpoonup}{\vphantom{a}\smash {#1}}} \)
\(\newcommand{\avec}{\mathbf a}\) \(\newcommand{\bvec}{\mathbf b}\) \(\newcommand{\cvec}{\mathbf c}\) \(\newcommand{\dvec}{\mathbf d}\) \(\newcommand{\dtil}{\widetilde{\mathbf d}}\) \(\newcommand{\evec}{\mathbf e}\) \(\newcommand{\fvec}{\mathbf f}\) \(\newcommand{\nvec}{\mathbf n}\) \(\newcommand{\pvec}{\mathbf p}\) \(\newcommand{\qvec}{\mathbf q}\) \(\newcommand{\svec}{\mathbf s}\) \(\newcommand{\tvec}{\mathbf t}\) \(\newcommand{\uvec}{\mathbf u}\) \(\newcommand{\vvec}{\mathbf v}\) \(\newcommand{\wvec}{\mathbf w}\) \(\newcommand{\xvec}{\mathbf x}\) \(\newcommand{\yvec}{\mathbf y}\) \(\newcommand{\zvec}{\mathbf z}\) \(\newcommand{\rvec}{\mathbf r}\) \(\newcommand{\mvec}{\mathbf m}\) \(\newcommand{\zerovec}{\mathbf 0}\) \(\newcommand{\onevec}{\mathbf 1}\) \(\newcommand{\real}{\mathbb R}\) \(\newcommand{\twovec}[2]{\left[\begin{array}{r}#1 \\ #2 \end{array}\right]}\) \(\newcommand{\ctwovec}[2]{\left[\begin{array}{c}#1 \\ #2 \end{array}\right]}\) \(\newcommand{\threevec}[3]{\left[\begin{array}{r}#1 \\ #2 \\ #3 \end{array}\right]}\) \(\newcommand{\cthreevec}[3]{\left[\begin{array}{c}#1 \\ #2 \\ #3 \end{array}\right]}\) \(\newcommand{\fourvec}[4]{\left[\begin{array}{r}#1 \\ #2 \\ #3 \\ #4 \end{array}\right]}\) \(\newcommand{\cfourvec}[4]{\left[\begin{array}{c}#1 \\ #2 \\ #3 \\ #4 \end{array}\right]}\) \(\newcommand{\fivevec}[5]{\left[\begin{array}{r}#1 \\ #2 \\ #3 \\ #4 \\ #5 \\ \end{array}\right]}\) \(\newcommand{\cfivevec}[5]{\left[\begin{array}{c}#1 \\ #2 \\ #3 \\ #4 \\ #5 \\ \end{array}\right]}\) \(\newcommand{\mattwo}[4]{\left[\begin{array}{rr}#1 \amp #2 \\ #3 \amp #4 \\ \end{array}\right]}\) \(\newcommand{\laspan}[1]{\text{Span}\{#1\}}\) \(\newcommand{\bcal}{\cal B}\) \(\newcommand{\ccal}{\cal C}\) \(\newcommand{\scal}{\cal S}\) \(\newcommand{\wcal}{\cal W}\) \(\newcommand{\ecal}{\cal E}\) \(\newcommand{\coords}[2]{\left\{#1\right\}_{#2}}\) \(\newcommand{\gray}[1]{\color{gray}{#1}}\) \(\newcommand{\lgray}[1]{\color{lightgray}{#1}}\) \(\newcommand{\rank}{\operatorname{rank}}\) \(\newcommand{\row}{\text{Row}}\) \(\newcommand{\col}{\text{Col}}\) \(\renewcommand{\row}{\text{Row}}\) \(\newcommand{\nul}{\text{Nul}}\) \(\newcommand{\var}{\text{Var}}\) \(\newcommand{\corr}{\text{corr}}\) \(\newcommand{\len}[1]{\left|#1\right|}\) \(\newcommand{\bbar}{\overline{\bvec}}\) \(\newcommand{\bhat}{\widehat{\bvec}}\) \(\newcommand{\bperp}{\bvec^\perp}\) \(\newcommand{\xhat}{\widehat{\xvec}}\) \(\newcommand{\vhat}{\widehat{\vvec}}\) \(\newcommand{\uhat}{\widehat{\uvec}}\) \(\newcommand{\what}{\widehat{\wvec}}\) \(\newcommand{\Sighat}{\widehat{\Sigma}}\) \(\newcommand{\lt}{<}\) \(\newcommand{\gt}{>}\) \(\newcommand{\amp}{&}\) \(\definecolor{fillinmathshade}{gray}{0.9}\)Depicted below is a very simple AC circuit. If the load resistor’s power dissipation were substantial, we might call this a “power circuit” or “power system” instead of regarding it as just a regular circuit. The distinction between a “power circuit” and a “regular circuit” may seem arbitrary, but the practical concerns are definitely not.

Single phase power system schematic diagram shows little about the wiring of a practical power circuit.
One such concern is the size and cost of wiring necessary to deliver power from the AC source to the load. Normally, we do not give much thought to this type of concern if we’re merely analyzing a circuit for the sake of learning about the laws of electricity. However, in the real world it can be a major concern. If we give the source in the above circuit a voltage value and also give power dissipation values to the two load resistors, we can determine the wiring needs for this particular circuit: (Figure below)

As a practical matter, the wiring for the 20 kW loads at 120 Vac is rather substantial (167 A).
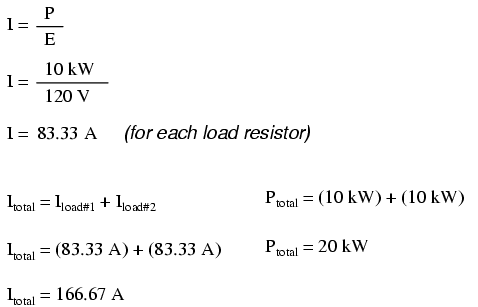
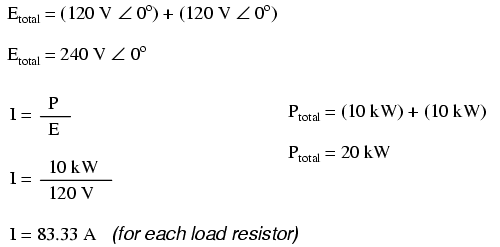
83.33 amps for each load resistor in Figure above adds up to 166.66 amps total circuit current. This is no small amount of current, and would necessitate copper wire conductors of at least 1/0 gage. Such wire is well over 1/4 inch (6 mm) in diameter, weighing over 300 pounds per thousand feet. Bear in mind that copper is not cheap either! It would be in our best interest to find ways to minimize such costs if we were designing a power system with long conductor lengths.
One way to do this would be to increase the voltage of the power source and use loads built to dissipate 10 kW each at this higher voltage. The loads, of course, would have to have greater resistance values to dissipate the same power as before (10 kW each) at a greater voltage than before. The advantage would be less current required, permitting the use of smaller, lighter, and cheaper wire: (Figure below)

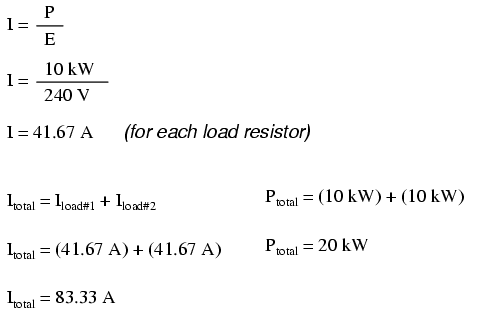
Now our total circuit current is 83.33 amps, half of what it was before. We can now use number 4 gage wire, which weighs less than half of what 1/0 gage wire does per unit length. This is a considerable reduction in system cost with no degradation in performance. This is why power distribution system designers elect to transmit electric power using very high voltages (many thousands of volts): to capitalize on the savings realized by the use of smaller, lighter, cheaper wire.
However, this solution is not without disadvantages. Another practical concern with power circuits is the danger of electric shock from high voltages. Again, this is not usually the sort of thing we concentrate on while learning about the laws of electricity, but it is a very valid concern in the real world, especially when large amounts of power are being dealt with. The gain in efficiency realized by stepping up the circuit voltage presents us with increased danger of electric shock. Power distribution companies tackle this problem by stringing their power lines along high poles or towers, and insulating the lines from the supporting structures with large, porcelain insulators.
At the point of use (the electric power customer), there is still the issue of what voltage to use for powering loads. High voltage gives greater system efficiency by means of reduced conductor current, but it might not always be practical to keep power wiring out of reach at the point of use the way it can be elevated out of reach in distribution systems. This tradeoff between efficiency and danger is one that European power system designers have decided to risk, all their households and appliances operating at a nominal voltage of 240 volts instead of 120 volts as it is in North America. That is why tourists from America visiting Europe must carry small step-down transformers for their portable appliances, to step the 240 VAC (volts AC) power down to a more suitable 120 VAC.
Is there any way to realize the advantages of both increased efficiency and reduced safety hazard at the same time? One solution would be to install step-down transformers at the end-point of power use, just as the American tourist must do while in Europe. However, this would be expensive and inconvenient for anything but very small loads (where the transformers can be built cheaply) or very large loads (where the expense of thick copper wires would exceed the expense of a transformer).
An alternative solution would be to use a higher voltage supply to provide power to two lower voltage loads in series. This approach combines the efficiency of a high-voltage system with the safety of a low-voltage system: (Figure below)
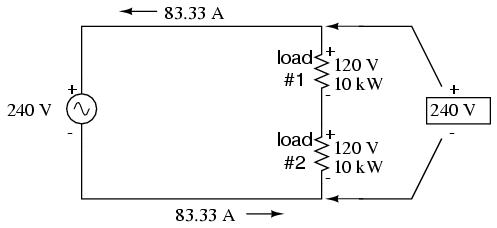
Series connected 120 Vac loads, driven by 240 Vac source at 83.3 A total current.
Notice the polarity markings (+ and -) for each voltage shown, as well as the unidirectional arrows for current. For the most part, I’ve avoided labeling “polarities” in the AC circuits we’ve been analyzing, even though the notation is valid to provide a frame of reference for phase. In later sections of this chapter, phase relationships will become very important, so I’m introducing this notation early on in the chapter for your familiarity.
The current through each load is the same as it was in the simple 120 volt circuit, but the currents are not additive because the loads are in series rather than parallel. The voltage across each load is only 120 volts, not 240, so the safety factor is better. Mind you, we still have a full 240 volts across the power system wires, but each load is operating at a reduced voltage. If anyone is going to get shocked, the odds are that it will be from coming into contact with the conductors of a particular load rather than from contact across the main wires of a power system.
There’s only one disadvantage to this design: the consequences of one load failing open, or being turned off (assuming each load has a series on/off switch to interrupt current) are not good. Being a series circuit, if either load were to open, current would stop in the other load as well. For this reason, we need to modify the design a bit: (Figure below)
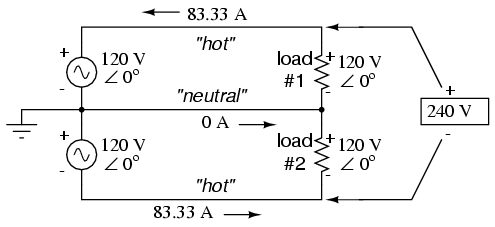
Addition of neutral conductor allows loads to be individually driven.
Instead of a single 240 volt power supply, we use two 120 volt supplies (in phase with each other!) in series to produce 240 volts, then run a third wire to the connection point between the loads to handle the eventuality of one load opening. This is called a split-phase power system. Three smaller wires are still cheaper than the two wires needed with the simple parallel design, so we’re still ahead on efficiency. The astute observer will note that the neutral wire only has to carry the difference of current between the two loads back to the source. In the above case, with perfectly “balanced” loads consuming equal amounts of power, the neutral wire carries zero current.
Notice how the neutral wire is connected to earth ground at the power supply end. This is a common feature in power systems containing “neutral” wires, since grounding the neutral wire ensures the least possible voltage at any given time between any “hot” wire and earth ground.
An essential component to a split-phase power system is the dual AC voltage source. Fortunately, designing and building one is not difficult. Since most AC systems receive their power from a step-down transformer anyway (stepping voltage down from high distribution levels to a user-level voltage like 120 or 240), that transformer can be built with a center-tapped secondary winding: (Figure below)
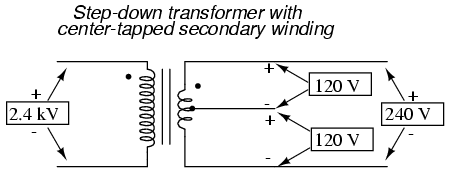
American 120/240 Vac power is derived from a center tapped utility transformer.
If the AC power comes directly from a generator (alternator), the coils can be similarly center-tapped for the same effect. The extra expense to include a center-tap connection in a transformer or alternator winding is minimal.
Here is where the (+) and (-) polarity markings really become important. This notation is often used to reference the phasings of multiple AC voltage sources, so it is clear whether they are aiding (“boosting”) each other or opposing (“bucking”) each other. If not for these polarity markings, phase relations between multiple AC sources might be very confusing. Note that the split-phase sources in the schematic (each one 120 volts ∠ 0o), with polarity marks (+) to (-) just like series-aiding batteries can alternatively be represented as such: (Figure below)
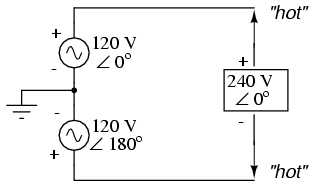
Split phase 120/240 Vac source is equivalent to two series aiding 120 Vac sources.
To mathematically calculate voltage between “hot” wires, we must subtract voltages, because their polarity marks show them to be opposed to each other:

If we mark the two sources’ common connection point (the neutral wire) with the same polarity mark (-), we must express their relative phase shifts as being 180o apart. Otherwise, we’d be denoting two voltage sources in direct opposition with each other, which would give 0 volts between the two “hot” conductors. Why am I taking the time to elaborate on polarity marks and phase angles? It will make more sense in the next section!
Power systems in American households and light industry are most often of the split-phase variety, providing so-called 120/240 VAC power. The term “split-phase” merely refers to the split-voltage supply in such a system. In a more general sense, this kind of AC power supply is called single phase because both voltage waveforms are in phase, or in step, with each other.
The term “single phase” is a counterpoint to another kind of power system called “polyphase” which we are about to investigate in detail. Apologies for the long introduction leading up to the title-topic of this chapter. The advantages of polyphase power systems are more obvious if one first has a good understanding of single phase systems.
REVIEW
- Single phase power systems are defined by having an AC source with only one voltage waveform.
- A split-phase power system is one with multiple (in-phase) AC voltage sources connected in series, delivering power to loads at more than one voltage, with more than two wires. They are used primarily to achieve balance between system efficiency (low conductor currents) and safety (low load voltages).
- Split-phase AC sources can be easily created by center-tapping the coil windings of transformers or alternators.


