1.1: Tools
- Page ID
- 3226
\( \newcommand{\vecs}[1]{\overset { \scriptstyle \rightharpoonup} {\mathbf{#1}} } \)
\( \newcommand{\vecd}[1]{\overset{-\!-\!\rightharpoonup}{\vphantom{a}\smash {#1}}} \)
\( \newcommand{\id}{\mathrm{id}}\) \( \newcommand{\Span}{\mathrm{span}}\)
( \newcommand{\kernel}{\mathrm{null}\,}\) \( \newcommand{\range}{\mathrm{range}\,}\)
\( \newcommand{\RealPart}{\mathrm{Re}}\) \( \newcommand{\ImaginaryPart}{\mathrm{Im}}\)
\( \newcommand{\Argument}{\mathrm{Arg}}\) \( \newcommand{\norm}[1]{\| #1 \|}\)
\( \newcommand{\inner}[2]{\langle #1, #2 \rangle}\)
\( \newcommand{\Span}{\mathrm{span}}\)
\( \newcommand{\id}{\mathrm{id}}\)
\( \newcommand{\Span}{\mathrm{span}}\)
\( \newcommand{\kernel}{\mathrm{null}\,}\)
\( \newcommand{\range}{\mathrm{range}\,}\)
\( \newcommand{\RealPart}{\mathrm{Re}}\)
\( \newcommand{\ImaginaryPart}{\mathrm{Im}}\)
\( \newcommand{\Argument}{\mathrm{Arg}}\)
\( \newcommand{\norm}[1]{\| #1 \|}\)
\( \newcommand{\inner}[2]{\langle #1, #2 \rangle}\)
\( \newcommand{\Span}{\mathrm{span}}\) \( \newcommand{\AA}{\unicode[.8,0]{x212B}}\)
\( \newcommand{\vectorA}[1]{\vec{#1}} % arrow\)
\( \newcommand{\vectorAt}[1]{\vec{\text{#1}}} % arrow\)
\( \newcommand{\vectorB}[1]{\overset { \scriptstyle \rightharpoonup} {\mathbf{#1}} } \)
\( \newcommand{\vectorC}[1]{\textbf{#1}} \)
\( \newcommand{\vectorD}[1]{\overrightarrow{#1}} \)
\( \newcommand{\vectorDt}[1]{\overrightarrow{\text{#1}}} \)
\( \newcommand{\vectE}[1]{\overset{-\!-\!\rightharpoonup}{\vphantom{a}\smash{\mathbf {#1}}}} \)
\( \newcommand{\vecs}[1]{\overset { \scriptstyle \rightharpoonup} {\mathbf{#1}} } \)
\( \newcommand{\vecd}[1]{\overset{-\!-\!\rightharpoonup}{\vphantom{a}\smash {#1}}} \)
\(\newcommand{\avec}{\mathbf a}\) \(\newcommand{\bvec}{\mathbf b}\) \(\newcommand{\cvec}{\mathbf c}\) \(\newcommand{\dvec}{\mathbf d}\) \(\newcommand{\dtil}{\widetilde{\mathbf d}}\) \(\newcommand{\evec}{\mathbf e}\) \(\newcommand{\fvec}{\mathbf f}\) \(\newcommand{\nvec}{\mathbf n}\) \(\newcommand{\pvec}{\mathbf p}\) \(\newcommand{\qvec}{\mathbf q}\) \(\newcommand{\svec}{\mathbf s}\) \(\newcommand{\tvec}{\mathbf t}\) \(\newcommand{\uvec}{\mathbf u}\) \(\newcommand{\vvec}{\mathbf v}\) \(\newcommand{\wvec}{\mathbf w}\) \(\newcommand{\xvec}{\mathbf x}\) \(\newcommand{\yvec}{\mathbf y}\) \(\newcommand{\zvec}{\mathbf z}\) \(\newcommand{\rvec}{\mathbf r}\) \(\newcommand{\mvec}{\mathbf m}\) \(\newcommand{\zerovec}{\mathbf 0}\) \(\newcommand{\onevec}{\mathbf 1}\) \(\newcommand{\real}{\mathbb R}\) \(\newcommand{\twovec}[2]{\left[\begin{array}{r}#1 \\ #2 \end{array}\right]}\) \(\newcommand{\ctwovec}[2]{\left[\begin{array}{c}#1 \\ #2 \end{array}\right]}\) \(\newcommand{\threevec}[3]{\left[\begin{array}{r}#1 \\ #2 \\ #3 \end{array}\right]}\) \(\newcommand{\cthreevec}[3]{\left[\begin{array}{c}#1 \\ #2 \\ #3 \end{array}\right]}\) \(\newcommand{\fourvec}[4]{\left[\begin{array}{r}#1 \\ #2 \\ #3 \\ #4 \end{array}\right]}\) \(\newcommand{\cfourvec}[4]{\left[\begin{array}{c}#1 \\ #2 \\ #3 \\ #4 \end{array}\right]}\) \(\newcommand{\fivevec}[5]{\left[\begin{array}{r}#1 \\ #2 \\ #3 \\ #4 \\ #5 \\ \end{array}\right]}\) \(\newcommand{\cfivevec}[5]{\left[\begin{array}{c}#1 \\ #2 \\ #3 \\ #4 \\ #5 \\ \end{array}\right]}\) \(\newcommand{\mattwo}[4]{\left[\begin{array}{rr}#1 \amp #2 \\ #3 \amp #4 \\ \end{array}\right]}\) \(\newcommand{\laspan}[1]{\text{Span}\{#1\}}\) \(\newcommand{\bcal}{\cal B}\) \(\newcommand{\ccal}{\cal C}\) \(\newcommand{\scal}{\cal S}\) \(\newcommand{\wcal}{\cal W}\) \(\newcommand{\ecal}{\cal E}\) \(\newcommand{\coords}[2]{\left\{#1\right\}_{#2}}\) \(\newcommand{\gray}[1]{\color{gray}{#1}}\) \(\newcommand{\lgray}[1]{\color{lightgray}{#1}}\) \(\newcommand{\rank}{\operatorname{rank}}\) \(\newcommand{\row}{\text{Row}}\) \(\newcommand{\col}{\text{Col}}\) \(\renewcommand{\row}{\text{Row}}\) \(\newcommand{\nul}{\text{Nul}}\) \(\newcommand{\var}{\text{Var}}\) \(\newcommand{\corr}{\text{corr}}\) \(\newcommand{\len}[1]{\left|#1\right|}\) \(\newcommand{\bbar}{\overline{\bvec}}\) \(\newcommand{\bhat}{\widehat{\bvec}}\) \(\newcommand{\bperp}{\bvec^\perp}\) \(\newcommand{\xhat}{\widehat{\xvec}}\) \(\newcommand{\vhat}{\widehat{\vvec}}\) \(\newcommand{\uhat}{\widehat{\uvec}}\) \(\newcommand{\what}{\widehat{\wvec}}\) \(\newcommand{\Sighat}{\widehat{\Sigma}}\) \(\newcommand{\lt}{<}\) \(\newcommand{\gt}{>}\) \(\newcommand{\amp}{&}\) \(\definecolor{fillinmathshade}{gray}{0.9}\)Drafting tools are needed to lay out the different shapes and lines used to create drawings and sketches. Basic knowledge of the available tools and how to use them will assist you in your drawing.
Drafting board or table
The drafting board is an essential tool. Paper will be attached and kept straight and still, so the surface of the drafting board must be smooth and true, with no warps or twists. The surfaces of most drafting boards are covered with vinyl because it is smooth and even.
The drafting board or table should have two parallel outside working edges made of either hardwood or steel.
Most drafting table tops can be set at different heights from the floor and at any angle from vertical to horizontal. Other drafting tables may not have the same adjustments and may be limited to being raised only from horizontal to a low slope.
To reduce back strain, use an adjustable drafting stool when working at a drafting table. Tables or boards should be a minimum of 1.2 m (4’) in width and 0.9 m (3’) in height.
T-square
The fixed head T-square is used for most work. It should be made of durable materials and have a transparent edge on the blade. To do accurate work, the blade must be perfectly square and straight, which should be checked regularly.
The T-square is used to draw horizontal lines and align other drawing instruments. If you are right-handed, you hold it tight against the left edge of the drawing board and move it up and down as required. When you make close adjustments, your fingers should be on top of the square, and you should use your thumb to control the T-square’s movement, Figure \(\PageIndex{1}\).
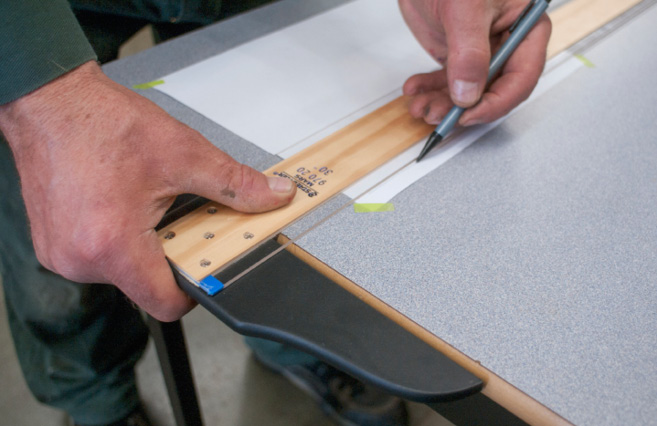
When drawing horizontal lines, incline your pencil in the direction you are drawing the line. Hold the pencil point as close as possible to the blade. Roll the pencil between your fingers to prevent the point from becoming flat on one side.
Triangle
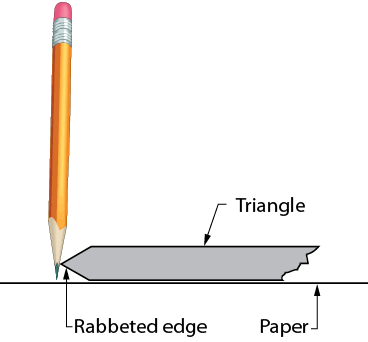
A triangle (set-square) is made of clear plastic. Some triangles have rabbeted edges (Figure \(\PageIndex{2}\)) so that when you draw lines, the corner of the edge is set away from the paper to help prevent smudges and ink blotches.
Triangles are available in 45°-90°-45° or 30°-60°-90° combinations. For most work, triangles should be about 200 mm to 250 mm (8” to 10”) long. Triangles should be stored flat to prevent warping and not stored underneath other objects to prevent any pressure from causing them to deform.
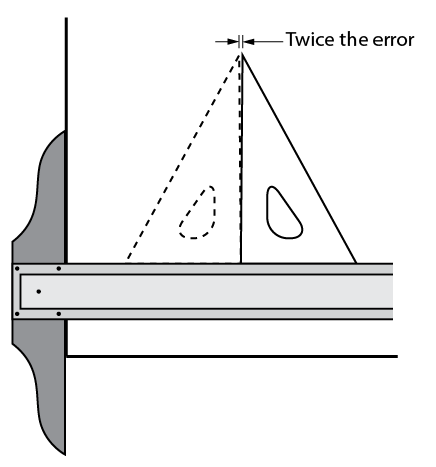
Check a triangle for accuracy by drawing a perpendicular line, then reversing the triangle and drawing another perpendicular line (Figure 3).
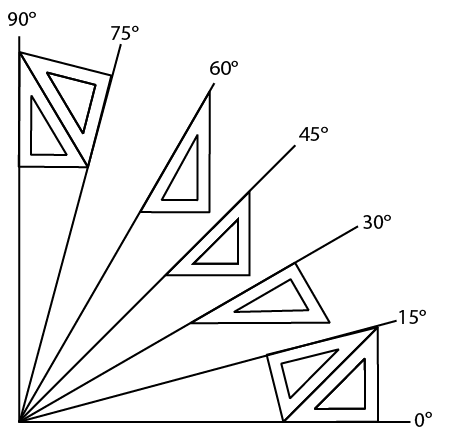
Triangles are used to draw vertical lines and other lines at set angles. Rest the triangle on the T-square blade and slide it along the blade to the desired location. Draw the full length of the vertical line in one pass if possible. Hold the blades of the T-square and the triangle together to prevent movement when you are drawing, and hold the pencil point as close as possible to
the triangle. You can also draw 15° and 75° angles by using both a 45°-90°-45° and a 30°-60°-90° in combination. Figure \(\PageIndex{4}\) shows how triangles are placed to draw angles that are every multiple of 15°.
Protractor
A protractor, Figure \(\PageIndex{5}\), is an instrument used to measure angles. It is typically made of transparent plastic or glass. Protractors can be used for checking and transferring angles to and from a drawing sheet.

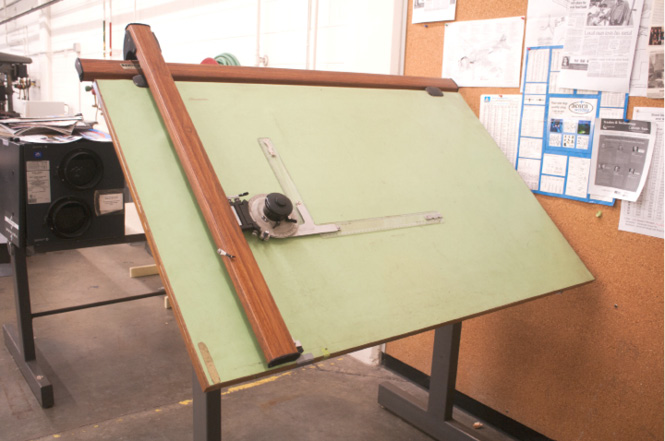
Drafting machine
A drafting machine (Figure \(\PageIndex{6}\)) is a device that is mounted to the drawing board. The drafting machine replaces the T-square and triangles, as it has rulers with angles that can be precisely adjusted with a controlling mechanism. A drafting machine allows easy drawing of parallel lines over the paper. The adjustable angle between the rulers allows the lines to be drawn at various accurate angles. The rulers are replaceable and can be replaced with scale rulers. Rulers may also be used as a support for separate special rulers and letter templates.
Drawing pencils
Both wood and mechanical pencils are used for drafting (Figure \(\PageIndex{7}\)). Manufacturers grade drawing pencils using numbers and letters. These range from 6B (very soft and black) to 9H (the hardest). From 6B, the pencils progress through 5B, 4B, 3B, 2B, B, and HB, and then to F, the medium grade. After that, they move to the harder graphite: H, 2H, 3H, 4H, 5H, 6H, 7H, 8H, and finally 9H. The softer grades are used for sketching and rendering drawings. The harder grades are used for instrument drawings. Mechanical pencils do not require sharpening and are made to hold leads (they are actually made of graphite) that are bought separately. Thin-lead mechanical pencils, with leads as small as 0.5 mm, are available in different grades of lead. Most draftspersons use four or five different mechanical pencils with a different lead in each. The pencils come in different colors, so it is easy to track which lead is in each.

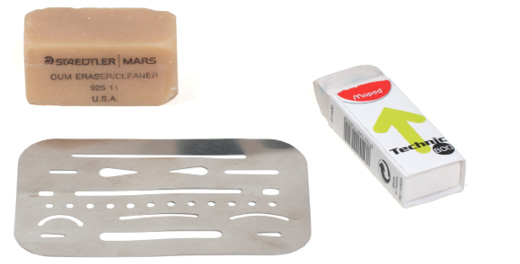
Erasers and erasing shields
The best eraser to use on drawings is either a soft pink eraser with beveled ends or a white plastic eraser. Electric rotary erasers are also available. They permit easy erasure of small errors without erasing adjacent lines. A metal erasing shield helps to confine erasures to the desired area. Erasing shields are made from very thin stainless steel and have holes of various shapes to accommodate the sections to be erased. Figure \(\PageIndex{8}\) shows two erasers and an erasing shield.
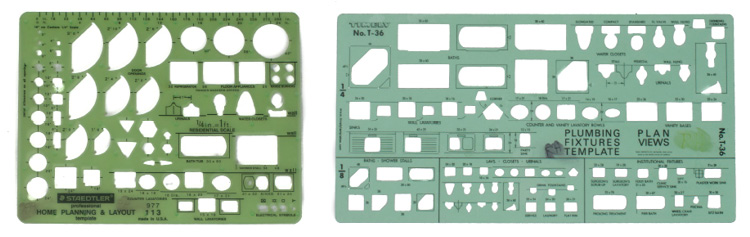
Templates
Templates (Figure \(\PageIndex{9}\)) are available for many different trades. Templates incorporate cut-outs of symbols and fixtures commonly used in that trade. These cut-outs make it easy to trace shapes onto drawing paper.
French curves and splines
A French curve (\(\PageIndex{10}\)) is a plastic template designed to help you draw curves. The French curve contains many different curves, but each is represented over a very short distance only. One radius of the curve blends into another radius. It takes a lot of practice to use French curves effectively.
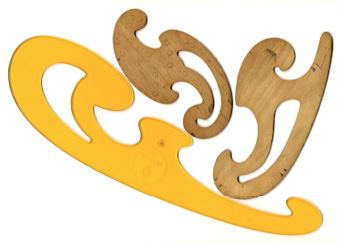
A spline or flexible curve (Figure 11) can be used instead of a French curve to draw most curves. A spline is a plastic or rubber rod that is reinforced with metal. To use a spline, bend it to the shape of the curve you need. The design of the spline lets you hold a pencil against an edge and draw an accurate line without smudging. A spline cannot be used to draw curves with a very short radius because the spline will not bend tightly.
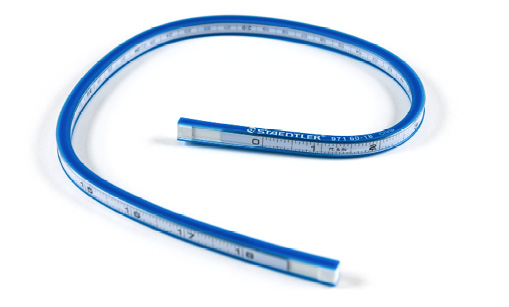
Figure \(\PageIndex{11}\): Spline
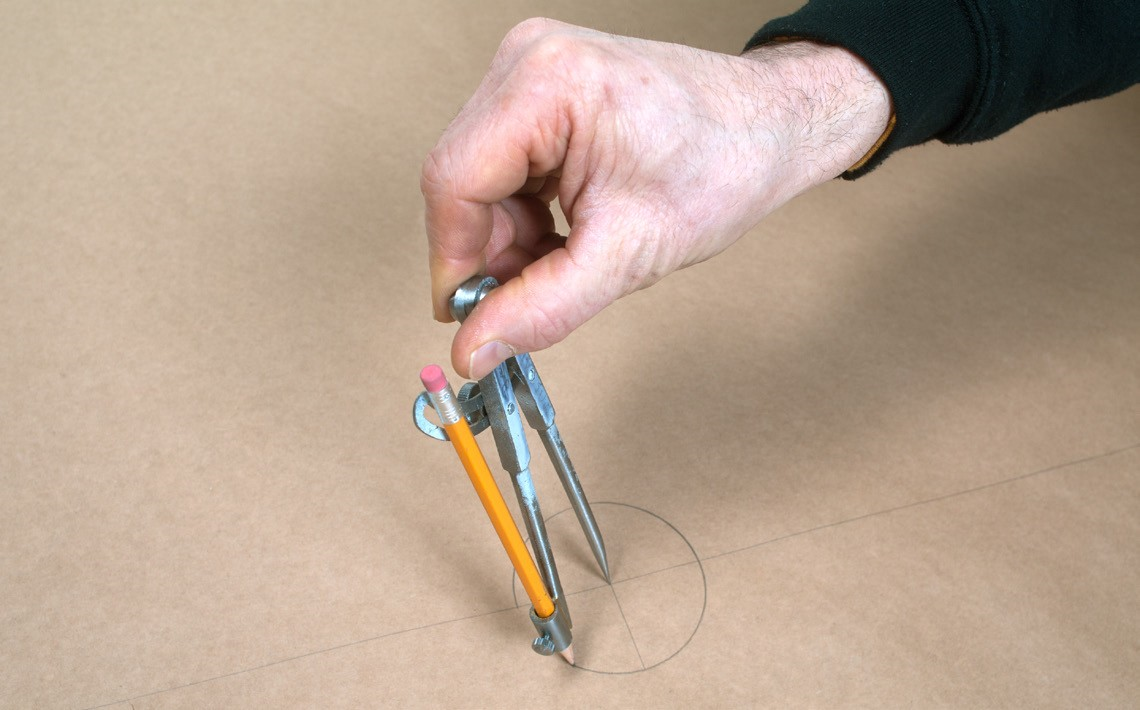
Compass
A compass can be used for drawing circles, bisecting lines, or dividing angles. For very large circles, you can use a beam compass. The four types of compasses are shown in Figure \(\PageIndex{12}\) — Figure \(\PageIndex{14}\). Most compasses can be fitted with leads, pens, or points.

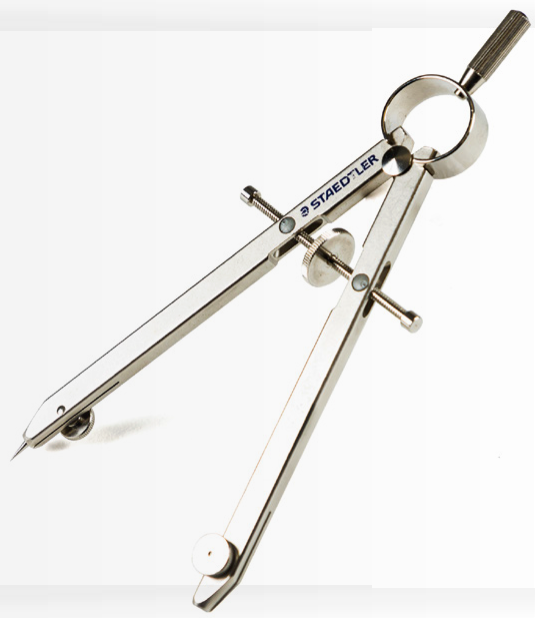
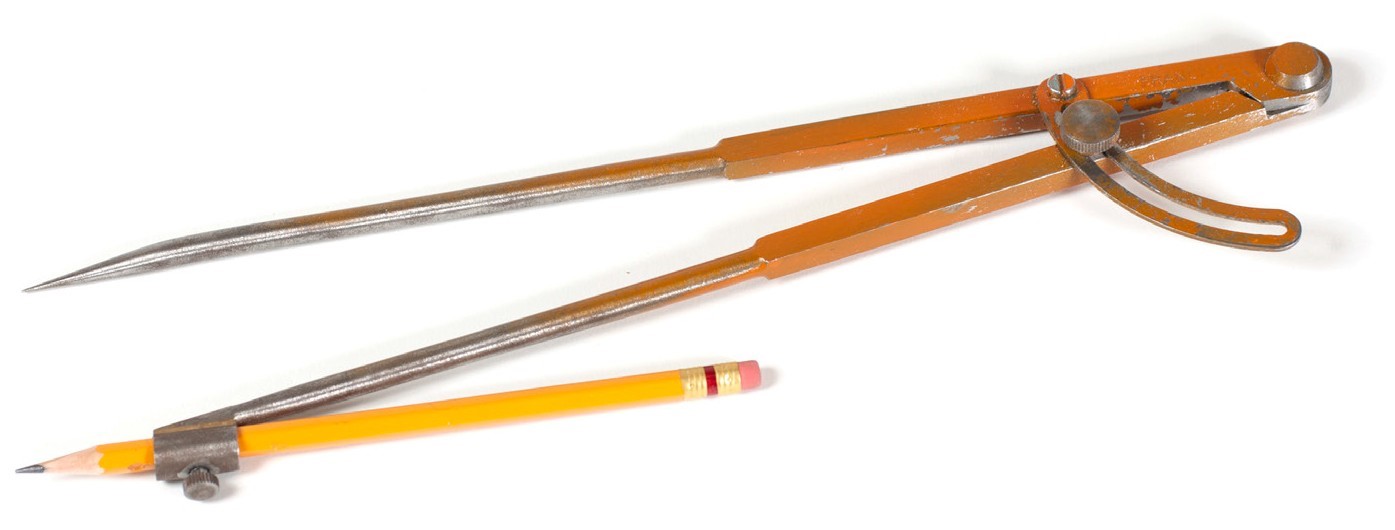
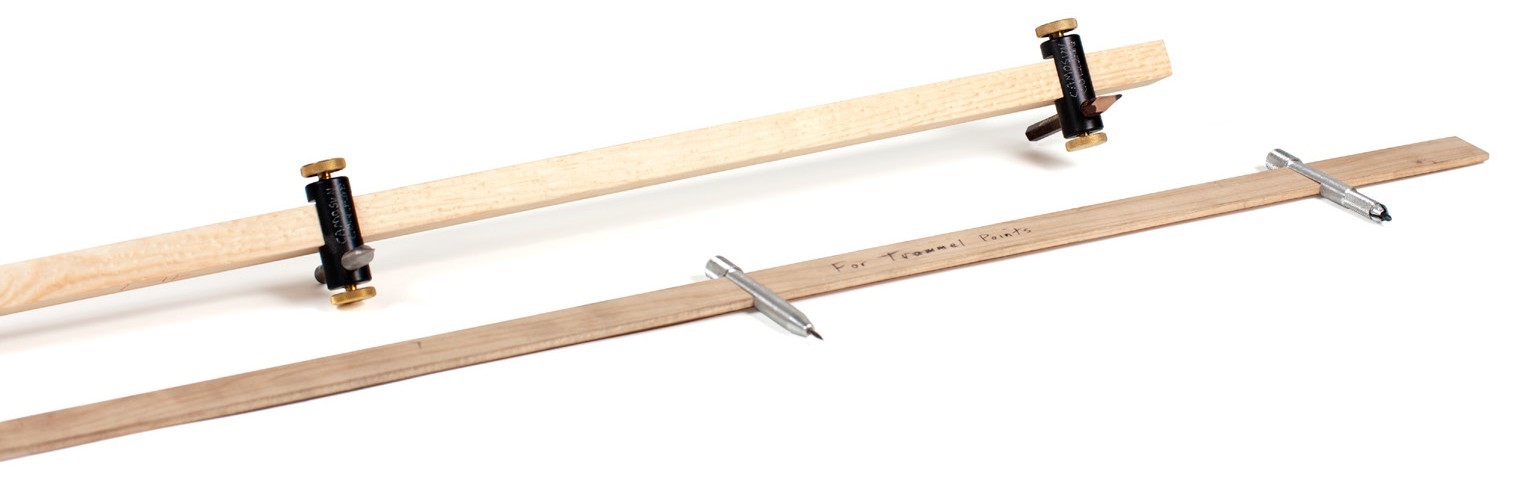
When using the compass, tilt it in the direction of the line, as shown in Figure 13
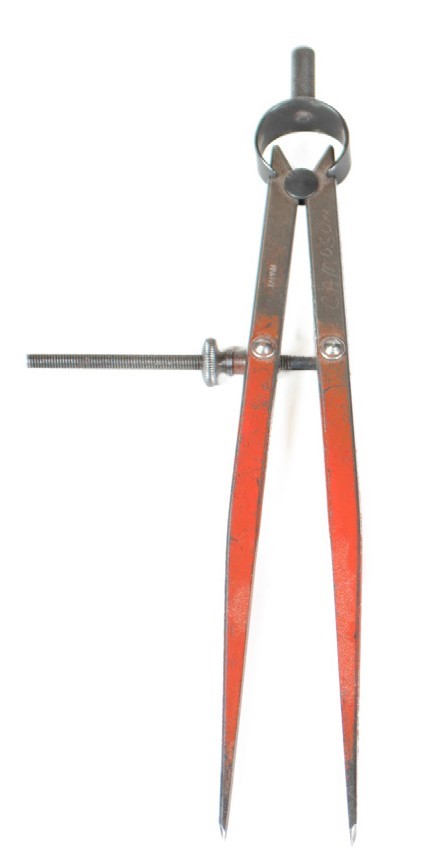
Dividers
Dividers (Figure \(\PageIndex{16}\)) are used for transferring dimensions from a drawing to a measuring device such as a ruler or scale. They are also used when scribing directly on material like metal.
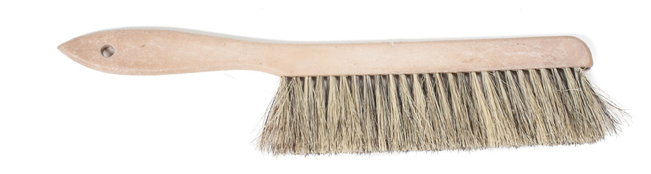
Dusting cloth or brush
It is essential to keep your drawings and drafting surface clean. When equipment gets dirty from the lead pencils, you should clean it regularly so that it does not smudge your drawings. Any soft, clean cloth is suitable. You may want to wash your board occasionally with a spray cleaner.
Use a brush like the one in Figure \(\PageIndex{17}\) to clean your table before placing paper down and sweep away any debris as you draw. If you use your hand to brush, you could leave marks on the paper. After sharpening a pencil, wipe off any dust clinging to the pencil’s point to prevent smudging.
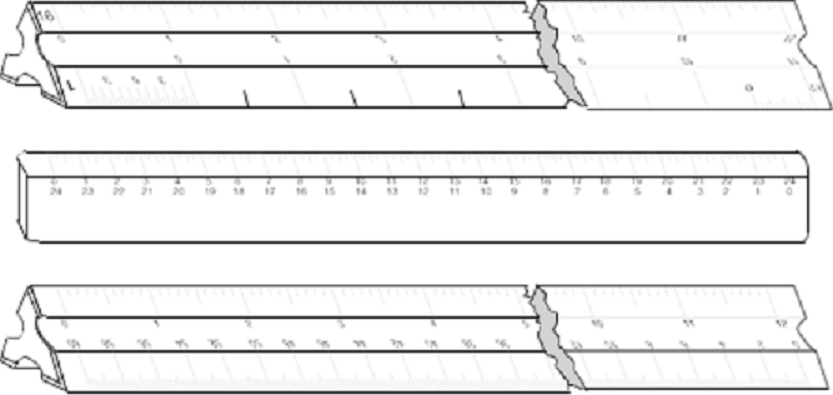
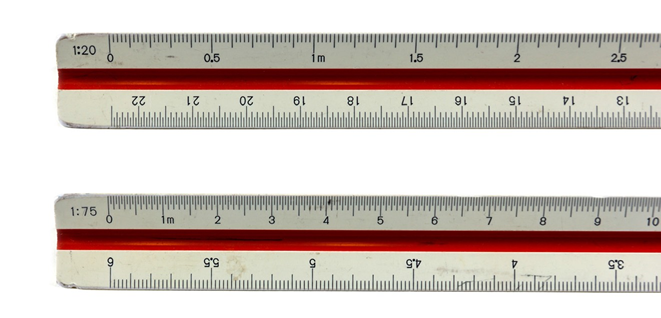
Scale rulers
Scale rulers let you draw diagrams at a reduced scale. They also let you obtain dimensions from a scaled drawing. Scale rulers come in various types to meet the requirements of many kinds of work. Most scale rulers have three edges and six different scales. The scales are read from either end of the rule. A typical combination of metric scales is 1:20, 1:50, 1:100, 1:25, 1:75, and 1:125.
Because of the decimal basis of metric measurements, metric scale rulers are both applicable and easy to use at any scale. Figure \(\PageIndex{18}\) shows the two scales from both ends of the same side.
Imperial scale rulers may be an architect’s ruler, a mechanical engineer’s ruler, or a civil engineer’s ruler (Figure 17). The architect’s scale ruler is the most common and is in inches and fractions of inches. A mechanical engineer’s scale ruler comes in inches and decimals of inches. A civil engineer’s scale ruler comes in feet and decimals of feet.