1.8: Managing Windows
- Page ID
- 14622
\( \newcommand{\vecs}[1]{\overset { \scriptstyle \rightharpoonup} {\mathbf{#1}} } \)
\( \newcommand{\vecd}[1]{\overset{-\!-\!\rightharpoonup}{\vphantom{a}\smash {#1}}} \)
\( \newcommand{\id}{\mathrm{id}}\) \( \newcommand{\Span}{\mathrm{span}}\)
( \newcommand{\kernel}{\mathrm{null}\,}\) \( \newcommand{\range}{\mathrm{range}\,}\)
\( \newcommand{\RealPart}{\mathrm{Re}}\) \( \newcommand{\ImaginaryPart}{\mathrm{Im}}\)
\( \newcommand{\Argument}{\mathrm{Arg}}\) \( \newcommand{\norm}[1]{\| #1 \|}\)
\( \newcommand{\inner}[2]{\langle #1, #2 \rangle}\)
\( \newcommand{\Span}{\mathrm{span}}\)
\( \newcommand{\id}{\mathrm{id}}\)
\( \newcommand{\Span}{\mathrm{span}}\)
\( \newcommand{\kernel}{\mathrm{null}\,}\)
\( \newcommand{\range}{\mathrm{range}\,}\)
\( \newcommand{\RealPart}{\mathrm{Re}}\)
\( \newcommand{\ImaginaryPart}{\mathrm{Im}}\)
\( \newcommand{\Argument}{\mathrm{Arg}}\)
\( \newcommand{\norm}[1]{\| #1 \|}\)
\( \newcommand{\inner}[2]{\langle #1, #2 \rangle}\)
\( \newcommand{\Span}{\mathrm{span}}\) \( \newcommand{\AA}{\unicode[.8,0]{x212B}}\)
\( \newcommand{\vectorA}[1]{\vec{#1}} % arrow\)
\( \newcommand{\vectorAt}[1]{\vec{\text{#1}}} % arrow\)
\( \newcommand{\vectorB}[1]{\overset { \scriptstyle \rightharpoonup} {\mathbf{#1}} } \)
\( \newcommand{\vectorC}[1]{\textbf{#1}} \)
\( \newcommand{\vectorD}[1]{\overrightarrow{#1}} \)
\( \newcommand{\vectorDt}[1]{\overrightarrow{\text{#1}}} \)
\( \newcommand{\vectE}[1]{\overset{-\!-\!\rightharpoonup}{\vphantom{a}\smash{\mathbf {#1}}}} \)
\( \newcommand{\vecs}[1]{\overset { \scriptstyle \rightharpoonup} {\mathbf{#1}} } \)
\( \newcommand{\vecd}[1]{\overset{-\!-\!\rightharpoonup}{\vphantom{a}\smash {#1}}} \)
\(\newcommand{\avec}{\mathbf a}\) \(\newcommand{\bvec}{\mathbf b}\) \(\newcommand{\cvec}{\mathbf c}\) \(\newcommand{\dvec}{\mathbf d}\) \(\newcommand{\dtil}{\widetilde{\mathbf d}}\) \(\newcommand{\evec}{\mathbf e}\) \(\newcommand{\fvec}{\mathbf f}\) \(\newcommand{\nvec}{\mathbf n}\) \(\newcommand{\pvec}{\mathbf p}\) \(\newcommand{\qvec}{\mathbf q}\) \(\newcommand{\svec}{\mathbf s}\) \(\newcommand{\tvec}{\mathbf t}\) \(\newcommand{\uvec}{\mathbf u}\) \(\newcommand{\vvec}{\mathbf v}\) \(\newcommand{\wvec}{\mathbf w}\) \(\newcommand{\xvec}{\mathbf x}\) \(\newcommand{\yvec}{\mathbf y}\) \(\newcommand{\zvec}{\mathbf z}\) \(\newcommand{\rvec}{\mathbf r}\) \(\newcommand{\mvec}{\mathbf m}\) \(\newcommand{\zerovec}{\mathbf 0}\) \(\newcommand{\onevec}{\mathbf 1}\) \(\newcommand{\real}{\mathbb R}\) \(\newcommand{\twovec}[2]{\left[\begin{array}{r}#1 \\ #2 \end{array}\right]}\) \(\newcommand{\ctwovec}[2]{\left[\begin{array}{c}#1 \\ #2 \end{array}\right]}\) \(\newcommand{\threevec}[3]{\left[\begin{array}{r}#1 \\ #2 \\ #3 \end{array}\right]}\) \(\newcommand{\cthreevec}[3]{\left[\begin{array}{c}#1 \\ #2 \\ #3 \end{array}\right]}\) \(\newcommand{\fourvec}[4]{\left[\begin{array}{r}#1 \\ #2 \\ #3 \\ #4 \end{array}\right]}\) \(\newcommand{\cfourvec}[4]{\left[\begin{array}{c}#1 \\ #2 \\ #3 \\ #4 \end{array}\right]}\) \(\newcommand{\fivevec}[5]{\left[\begin{array}{r}#1 \\ #2 \\ #3 \\ #4 \\ #5 \\ \end{array}\right]}\) \(\newcommand{\cfivevec}[5]{\left[\begin{array}{c}#1 \\ #2 \\ #3 \\ #4 \\ #5 \\ \end{array}\right]}\) \(\newcommand{\mattwo}[4]{\left[\begin{array}{rr}#1 \amp #2 \\ #3 \amp #4 \\ \end{array}\right]}\) \(\newcommand{\laspan}[1]{\text{Span}\{#1\}}\) \(\newcommand{\bcal}{\cal B}\) \(\newcommand{\ccal}{\cal C}\) \(\newcommand{\scal}{\cal S}\) \(\newcommand{\wcal}{\cal W}\) \(\newcommand{\ecal}{\cal E}\) \(\newcommand{\coords}[2]{\left\{#1\right\}_{#2}}\) \(\newcommand{\gray}[1]{\color{gray}{#1}}\) \(\newcommand{\lgray}[1]{\color{lightgray}{#1}}\) \(\newcommand{\rank}{\operatorname{rank}}\) \(\newcommand{\row}{\text{Row}}\) \(\newcommand{\col}{\text{Col}}\) \(\renewcommand{\row}{\text{Row}}\) \(\newcommand{\nul}{\text{Nul}}\) \(\newcommand{\var}{\text{Var}}\) \(\newcommand{\corr}{\text{corr}}\) \(\newcommand{\len}[1]{\left|#1\right|}\) \(\newcommand{\bbar}{\overline{\bvec}}\) \(\newcommand{\bhat}{\widehat{\bvec}}\) \(\newcommand{\bperp}{\bvec^\perp}\) \(\newcommand{\xhat}{\widehat{\xvec}}\) \(\newcommand{\vhat}{\widehat{\vvec}}\) \(\newcommand{\uhat}{\widehat{\uvec}}\) \(\newcommand{\what}{\widehat{\wvec}}\) \(\newcommand{\Sighat}{\widehat{\Sigma}}\) \(\newcommand{\lt}{<}\) \(\newcommand{\gt}{>}\) \(\newcommand{\amp}{&}\) \(\definecolor{fillinmathshade}{gray}{0.9}\)Learning Objectives
- Manage multiple windows
There are several terms that are commonly used in discussions about and instructions for computer use. This guide will define these common terms to help you read instructions.
Desktop
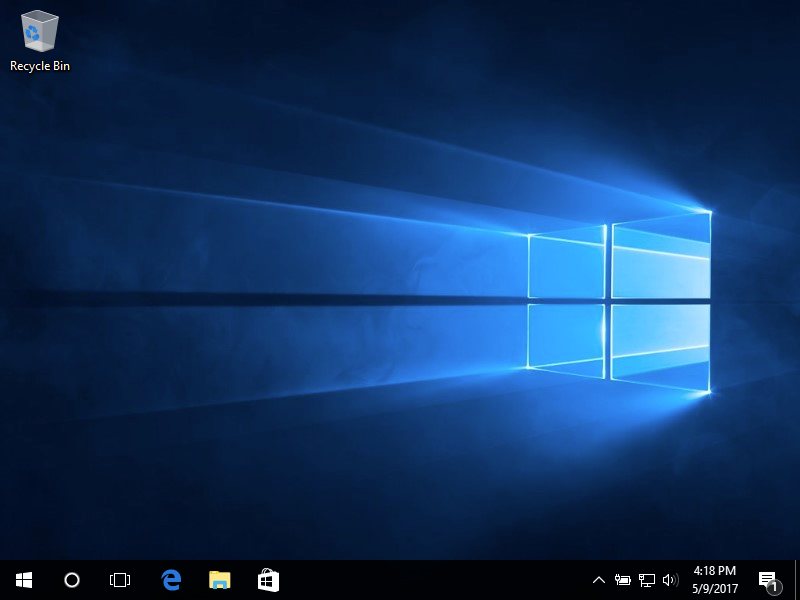
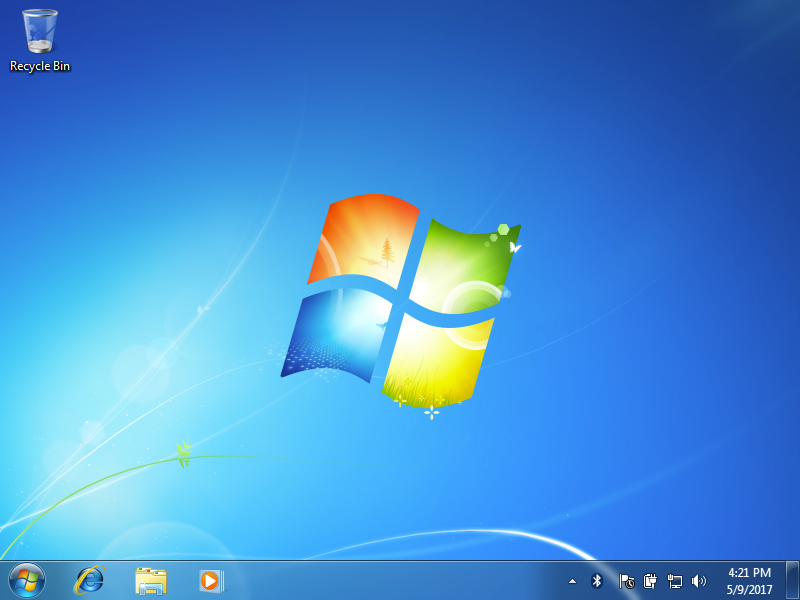
Desktop refers to the main screen of the computer. It is the first screen you see after logging in. The desktop’s appearance can vary widely because it is highly customizable, but generally desktops will feature a large image, icons, and a taskbar (covered later on this page).
Note that the word desktop is also used to refer to a desktop computer. A desktop computer is not portable (it stays on the desk) while a laptop computer is portable.
Window
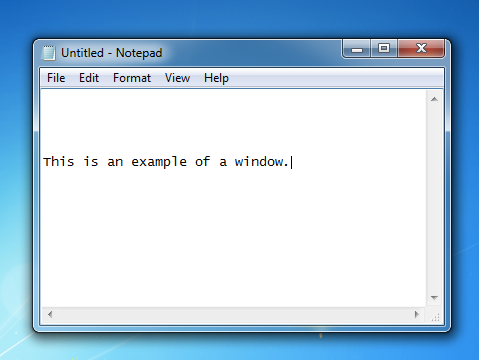
A window is a viewing area that graphically displays a program so that the user can interact with it. A window is adjustable, so it can take up the entire screen or just part of the screen. Note that this is a different term from the Windows operating system—Macs also have windows.
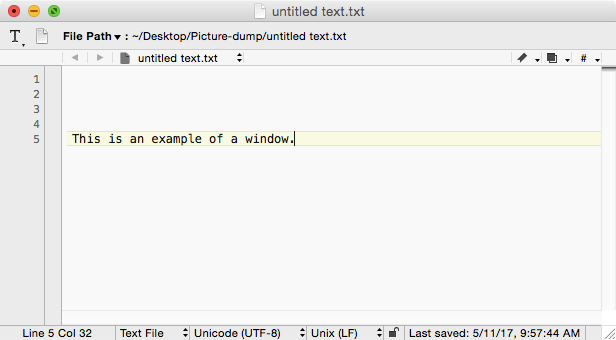 A Mac window. |
The look of windows varies by operating system and program. Not every program’s window will function the same. For example, many programs open in full screen by default, so you will not see any of the window’s toolbars or buttons. Most windows have the same features, which we will cover here.
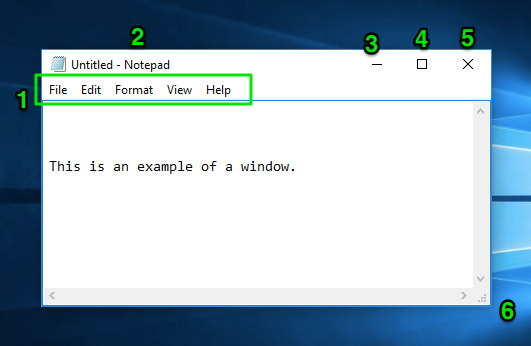
- Menu bar. This toolbar contains various commands that often lead to dialog menus (covered later on this page). Windows computers have this bar at the top of windows; Macs have this bar at the top of the screen instead. The options contained in this toolbar vary greatly from program to program.
- Title bar. This shows the title of the program (in this case, Notepad) and has the minimize, maximize/resize, and close buttons. If the window is not maximized, you can click and drag the title bar to move the window.
- Minimize. Minimizing a program means making the program “collapse” into the taskbar. A minimized window is no longer visible but still running.
- Maximize/resize. Clicking this button will maximize the window so it takes up the whole screen. If the window is already maximized, clicking this button will resize the window to be smaller.
- Close. This button closes the window.
- Resize corner. Clicking and dragging this button will change the size of the window.
Working with Multiple Windows: Resizing
Resizing windows can help you see multiple windows at once, as shown below.

PRactice Question
Menu Bar and Dialog Menus
Clicking an option on the menu bar, such as File, opens a dialog menu that gives you more options to interact with the program.

Instructions in this course—and elsewhere—will often use shorthand to indicate how to get to a particular command through dialog menus. This shorthand separates phrases that should be clicked with a > symbol. For example, the instructions for the screenshot above would be “File>Save.”
Taskbar
The taskbar runs at one edge of the screen, almost always the bottom. The taskbar is used to access the Start menu and currently running programs. Like the desktop, it is very customizable.

- Start menu button. The appearance of the Start button varies between versions, but it is always the left-most button of the taskbar. The Start menu can also be opened by pressing the Windows key (
 ) on the keyboard.
 - Pinned programs. Programs can be pinned to the taskbar so that they are quicker to get to: you can open a pinned program simply by clicking on it. You can customize which programs are pinned to the taskbar by opening a program, then right-clicking on the program’s taskbar icon and selecting “Pin to Taskbar.” You can also unpin pinned programs by right-clicking the program’s icon and selecting “Unpin from Taskbar.”
- Open (minimized) program. The icons of open programs will appear to the right of the pinned programs. In Windows 10, the blue line beneath the icon indicates the program is minimized.
- System tray. The system tray is on the right side of the taskbar. It displays the date and time and has icons that show helpful information related to computer and program functions. The icons in the system tray vary widely from computer to computer depending on what programs are installed and what version of Windows you have, so do not worry if your system tray does not match the screenshots in this course or your classmates’ system trays. In the screenshot above, from left to right in the system tray:
- Arrow. When clicked expands to show more system tray icons
- Battery. This is a feature of laptop computers. Hover over the battery icon to see how much charge is left.
- Network. This icon shows the status of your internet connection. In the screenshot above, the computer is connected to the internet with a cable; wireless connection icons often look like a fan or a bar chart.
- Sound. Clicking on the sound icon in the system tray allows you to change the volume or mute your computer.
- Date/time.
- Notification center. When your computer needs updates or has security notifications, those messages can be accessed here.
- Show desktop. At the very far right side of the taskbar is a thin line. Clicking the sliver of the taskbar between that line and the edge of your screen will minimize all programs. Hovering the mouse over that sliver of screen will allow you to “peek” at the desktop.
Note that Macs do not have a taskbar, but they do have a similar feature called the Dock.
Working with Multiple Windows: Taskbar
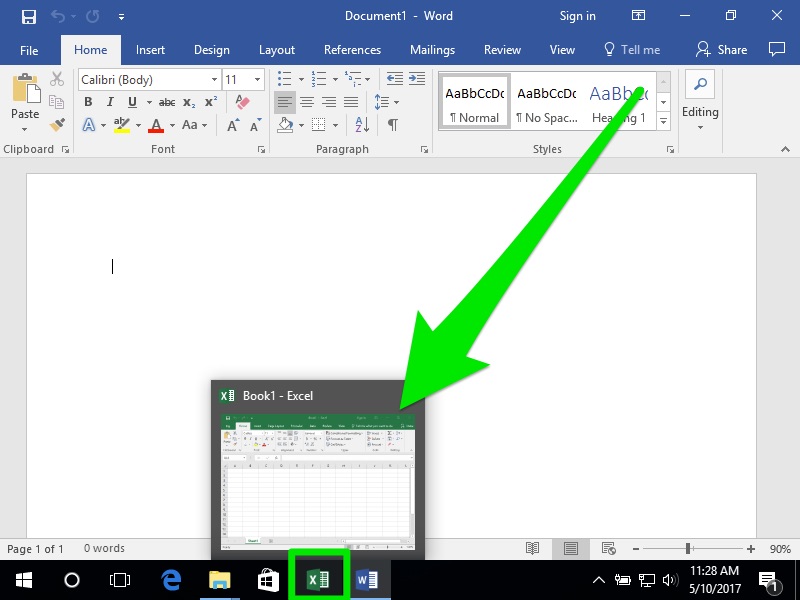
The taskbar can be very useful for multitasking. By clicking between the icons of two open windows on the taskbar, you can work in two different documents or programs at once. Move your mouse over an icon to have a preview of the other window, then click on it to switch.
Contributors and Attributions
- Managing Windows. Authored by: Lumen Learning. License: CC BY: Attribution


