3.25: Find and Replace
- Page ID
- 14738
\( \newcommand{\vecs}[1]{\overset { \scriptstyle \rightharpoonup} {\mathbf{#1}} } \)
\( \newcommand{\vecd}[1]{\overset{-\!-\!\rightharpoonup}{\vphantom{a}\smash {#1}}} \)
\( \newcommand{\id}{\mathrm{id}}\) \( \newcommand{\Span}{\mathrm{span}}\)
( \newcommand{\kernel}{\mathrm{null}\,}\) \( \newcommand{\range}{\mathrm{range}\,}\)
\( \newcommand{\RealPart}{\mathrm{Re}}\) \( \newcommand{\ImaginaryPart}{\mathrm{Im}}\)
\( \newcommand{\Argument}{\mathrm{Arg}}\) \( \newcommand{\norm}[1]{\| #1 \|}\)
\( \newcommand{\inner}[2]{\langle #1, #2 \rangle}\)
\( \newcommand{\Span}{\mathrm{span}}\)
\( \newcommand{\id}{\mathrm{id}}\)
\( \newcommand{\Span}{\mathrm{span}}\)
\( \newcommand{\kernel}{\mathrm{null}\,}\)
\( \newcommand{\range}{\mathrm{range}\,}\)
\( \newcommand{\RealPart}{\mathrm{Re}}\)
\( \newcommand{\ImaginaryPart}{\mathrm{Im}}\)
\( \newcommand{\Argument}{\mathrm{Arg}}\)
\( \newcommand{\norm}[1]{\| #1 \|}\)
\( \newcommand{\inner}[2]{\langle #1, #2 \rangle}\)
\( \newcommand{\Span}{\mathrm{span}}\) \( \newcommand{\AA}{\unicode[.8,0]{x212B}}\)
\( \newcommand{\vectorA}[1]{\vec{#1}} % arrow\)
\( \newcommand{\vectorAt}[1]{\vec{\text{#1}}} % arrow\)
\( \newcommand{\vectorB}[1]{\overset { \scriptstyle \rightharpoonup} {\mathbf{#1}} } \)
\( \newcommand{\vectorC}[1]{\textbf{#1}} \)
\( \newcommand{\vectorD}[1]{\overrightarrow{#1}} \)
\( \newcommand{\vectorDt}[1]{\overrightarrow{\text{#1}}} \)
\( \newcommand{\vectE}[1]{\overset{-\!-\!\rightharpoonup}{\vphantom{a}\smash{\mathbf {#1}}}} \)
\( \newcommand{\vecs}[1]{\overset { \scriptstyle \rightharpoonup} {\mathbf{#1}} } \)
\( \newcommand{\vecd}[1]{\overset{-\!-\!\rightharpoonup}{\vphantom{a}\smash {#1}}} \)
\(\newcommand{\avec}{\mathbf a}\) \(\newcommand{\bvec}{\mathbf b}\) \(\newcommand{\cvec}{\mathbf c}\) \(\newcommand{\dvec}{\mathbf d}\) \(\newcommand{\dtil}{\widetilde{\mathbf d}}\) \(\newcommand{\evec}{\mathbf e}\) \(\newcommand{\fvec}{\mathbf f}\) \(\newcommand{\nvec}{\mathbf n}\) \(\newcommand{\pvec}{\mathbf p}\) \(\newcommand{\qvec}{\mathbf q}\) \(\newcommand{\svec}{\mathbf s}\) \(\newcommand{\tvec}{\mathbf t}\) \(\newcommand{\uvec}{\mathbf u}\) \(\newcommand{\vvec}{\mathbf v}\) \(\newcommand{\wvec}{\mathbf w}\) \(\newcommand{\xvec}{\mathbf x}\) \(\newcommand{\yvec}{\mathbf y}\) \(\newcommand{\zvec}{\mathbf z}\) \(\newcommand{\rvec}{\mathbf r}\) \(\newcommand{\mvec}{\mathbf m}\) \(\newcommand{\zerovec}{\mathbf 0}\) \(\newcommand{\onevec}{\mathbf 1}\) \(\newcommand{\real}{\mathbb R}\) \(\newcommand{\twovec}[2]{\left[\begin{array}{r}#1 \\ #2 \end{array}\right]}\) \(\newcommand{\ctwovec}[2]{\left[\begin{array}{c}#1 \\ #2 \end{array}\right]}\) \(\newcommand{\threevec}[3]{\left[\begin{array}{r}#1 \\ #2 \\ #3 \end{array}\right]}\) \(\newcommand{\cthreevec}[3]{\left[\begin{array}{c}#1 \\ #2 \\ #3 \end{array}\right]}\) \(\newcommand{\fourvec}[4]{\left[\begin{array}{r}#1 \\ #2 \\ #3 \\ #4 \end{array}\right]}\) \(\newcommand{\cfourvec}[4]{\left[\begin{array}{c}#1 \\ #2 \\ #3 \\ #4 \end{array}\right]}\) \(\newcommand{\fivevec}[5]{\left[\begin{array}{r}#1 \\ #2 \\ #3 \\ #4 \\ #5 \\ \end{array}\right]}\) \(\newcommand{\cfivevec}[5]{\left[\begin{array}{c}#1 \\ #2 \\ #3 \\ #4 \\ #5 \\ \end{array}\right]}\) \(\newcommand{\mattwo}[4]{\left[\begin{array}{rr}#1 \amp #2 \\ #3 \amp #4 \\ \end{array}\right]}\) \(\newcommand{\laspan}[1]{\text{Span}\{#1\}}\) \(\newcommand{\bcal}{\cal B}\) \(\newcommand{\ccal}{\cal C}\) \(\newcommand{\scal}{\cal S}\) \(\newcommand{\wcal}{\cal W}\) \(\newcommand{\ecal}{\cal E}\) \(\newcommand{\coords}[2]{\left\{#1\right\}_{#2}}\) \(\newcommand{\gray}[1]{\color{gray}{#1}}\) \(\newcommand{\lgray}[1]{\color{lightgray}{#1}}\) \(\newcommand{\rank}{\operatorname{rank}}\) \(\newcommand{\row}{\text{Row}}\) \(\newcommand{\col}{\text{Col}}\) \(\renewcommand{\row}{\text{Row}}\) \(\newcommand{\nul}{\text{Nul}}\) \(\newcommand{\var}{\text{Var}}\) \(\newcommand{\corr}{\text{corr}}\) \(\newcommand{\len}[1]{\left|#1\right|}\) \(\newcommand{\bbar}{\overline{\bvec}}\) \(\newcommand{\bhat}{\widehat{\bvec}}\) \(\newcommand{\bperp}{\bvec^\perp}\) \(\newcommand{\xhat}{\widehat{\xvec}}\) \(\newcommand{\vhat}{\widehat{\vvec}}\) \(\newcommand{\uhat}{\widehat{\uvec}}\) \(\newcommand{\what}{\widehat{\wvec}}\) \(\newcommand{\Sighat}{\widehat{\Sigma}}\) \(\newcommand{\lt}{<}\) \(\newcommand{\gt}{>}\) \(\newcommand{\amp}{&}\) \(\definecolor{fillinmathshade}{gray}{0.9}\)Learning Objectives
- Find and replace text.
Find and Replace helps you to find words or formats in a document and can let you replace all instances of a word or format. This is particularly handy in long documents.
To use Find and Replace, use the shortcut Ctrl+H or navigate to Editing in the Home tab of the ribbon, then choose Replace. To just quickly find something, use the shortcut Ctrl+F (Cmnd+F) or navigate to Home>Editing>Find.

Replace
Use the shortcut Ctrl+H or navigate to Home>Editing>Replace to reach the Find and Replace dialog box.
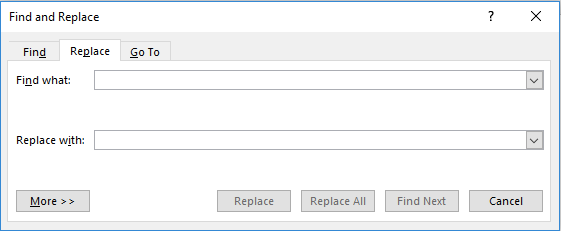
Type what you want to find in the Find what field, and the replacement in the Replace with field. (Note that you can move the Find and Replace dialog box by clicking the title bar and dragging it elsewhere so you can see what was behind it.)
Find Next highlights the first occurrence of the Find word. Clicking Find Next again will highlight the second occurrence, clicking Find Next again will highlight the next occurrence, and so on.
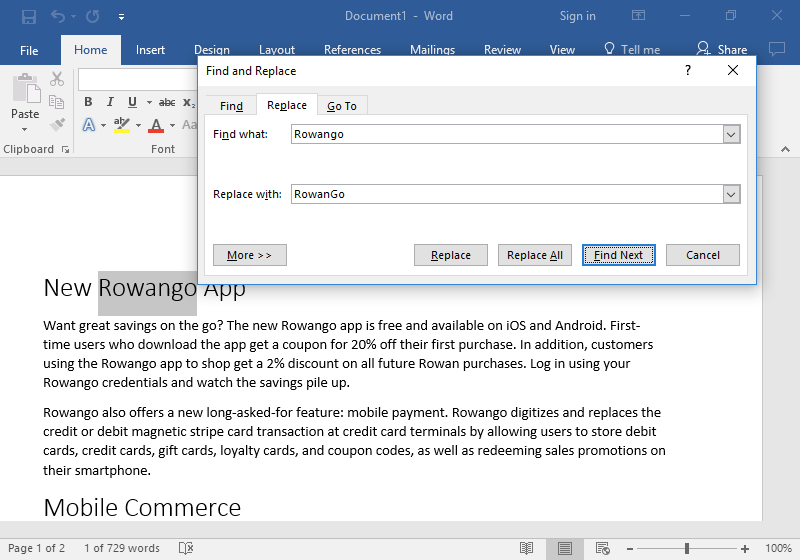
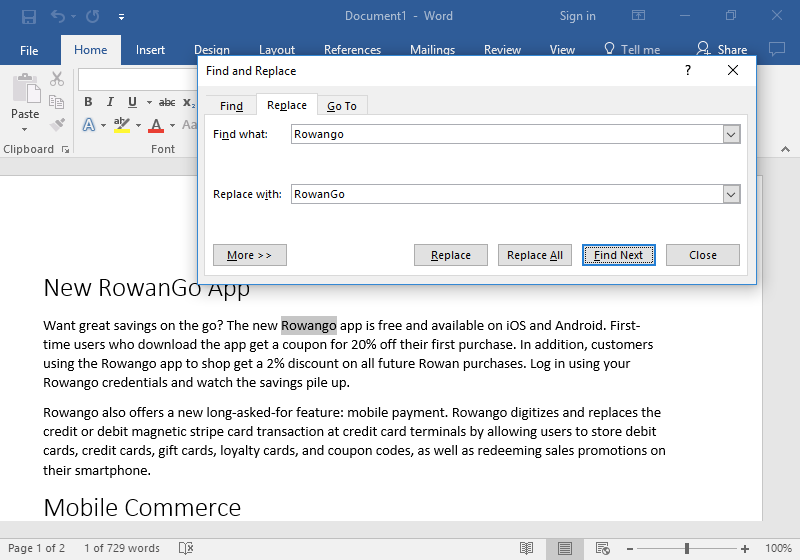
Clicking Replace replaces only the highlighted occurrence of the Find word.
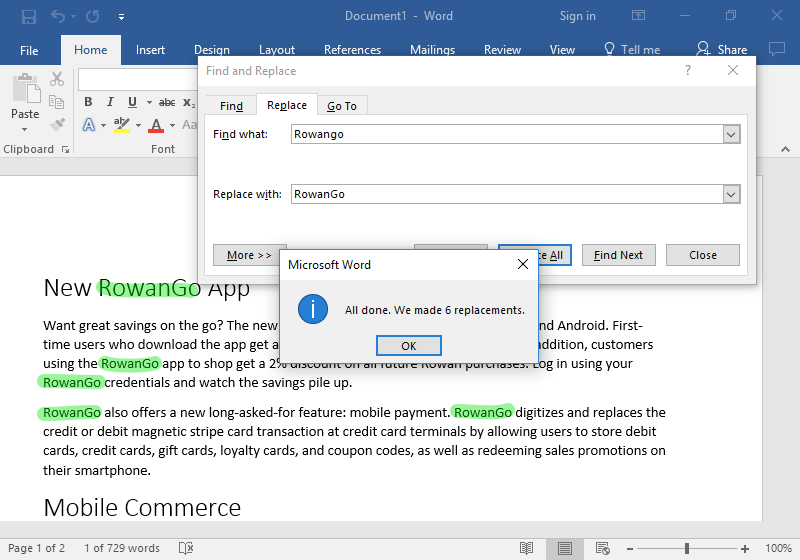
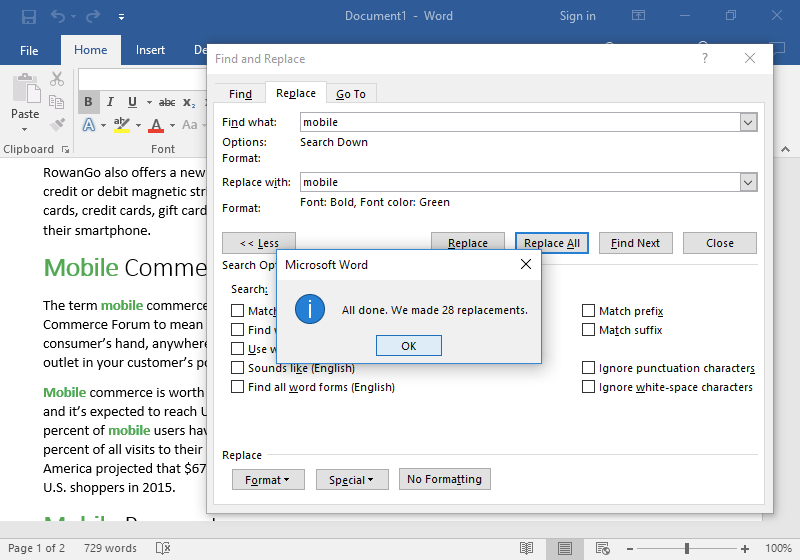
Replace All replaces every instance of the Find word with the Replace word. A small dialog box will appear to tell you how many replacements were made.
The Pitfalls of Replace All
Be careful when you use Replace All. It will replace every occurrence of the Find phrase, including occurrences you hadn’t intended to replace. For example, replacing every “kg” with “kilogram” could result in the word backilogramround instead of background. Use spaces in the Find field to avoid this: replacing ” kg ” with ” kilogram ” will leave background the way it is. Some versions of Word also have a Whole Words checkbox option; this will ignore when a search term appears in the middle of a word.
Replace: More Options
Click the More>>> button in the bottom-left corner of the Find and Replace dialog box to find more options. There are many options here, but we will focus on three.
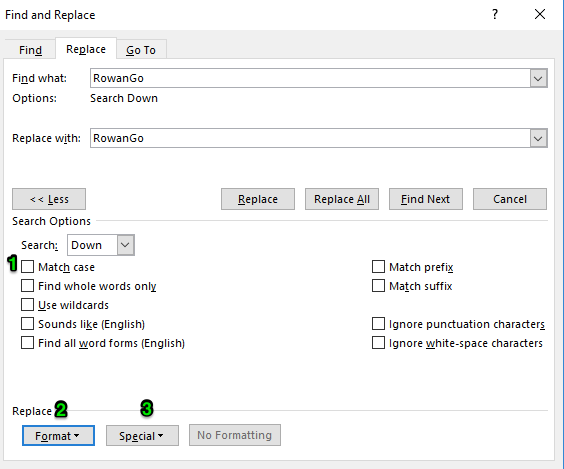
- Match case. Case is whether a letter is uppercase or lowercase. If the Match case box is checked, then Find and Replace becomes case-sensitive. For example, checking the Match case button and then searching for “Fishing Goods” will find “Fishing Goods” but NOT “fishing goods” or “Fishing goods.” If the Match case box is unchecked, then searching for “Fishing Goods” will find “Fishing Goods” and “fishing goods” and “Fishing goods” and so on.
- Format. Click the Format button to select from a variety of formatting options such as Font, Paragraph, and so on. When a formatting style is selected for Find, the Find term must have that formatting to be found. (Leave the Find field blank and choose a formatting style to find all occurrences of that formatting.) Similarly, choosing a formatting style for the Replace field will replace the Find term with whatever is in the Replace field with the Replace formatting. For example, this search finds all instances of the word mobile and applies bold and green formatting:
- Special. Special refers to special characters, or characters that are not on the typical keyboard. In Find and Replace, some of these characters can also be things like “any digit” or “any letter.”
Find Function
You can also find words with the Find function. Simply finding where a word is used in a document is faster with the Find function.
To open the Find function, use the shortcut Ctrl+F or navigate to Home>Editing>Find. This will open a Navigation menu to the left.
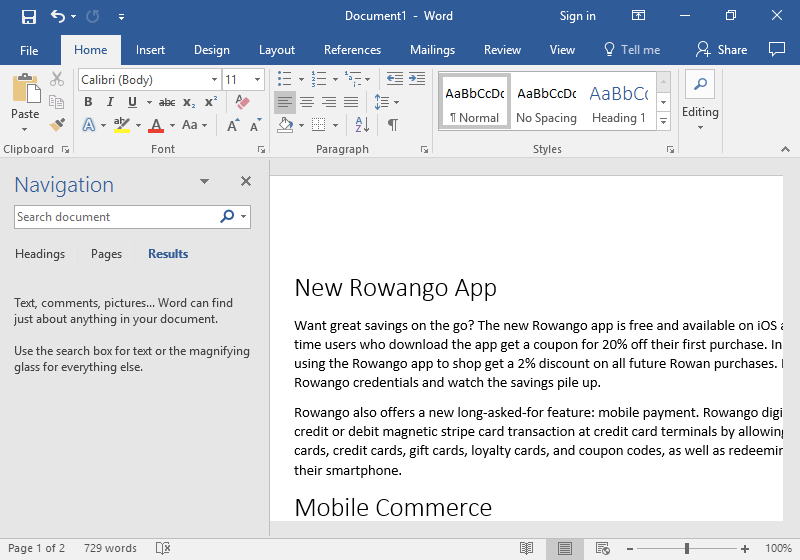
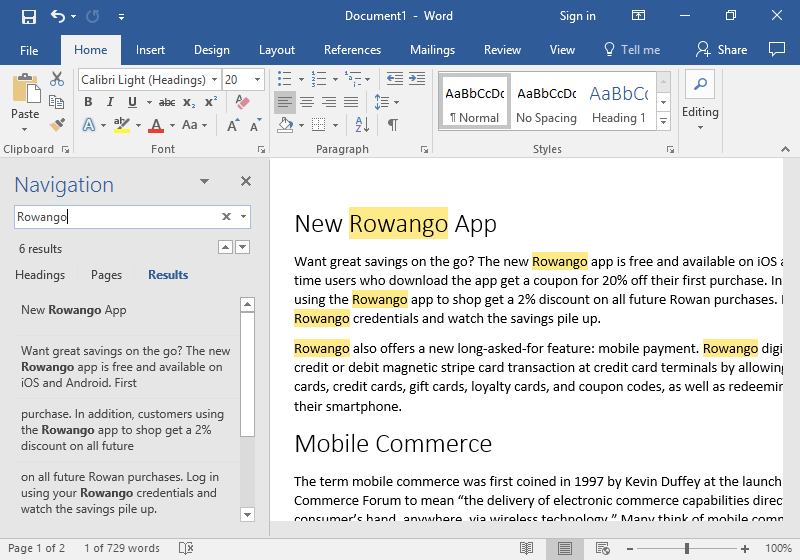
Type in the Navigation text field that says “Search document” for the term you want to find. The term will be highlighted throughout the document. You can scroll through the document to see the highlighted occurrences, or you can scroll down through the Navigation pane to see where each word occurs in the text.
Practice Question
Contributors and Attributions
- How to use REPLACE FUNCTION | MICROSOFT WORD 2016. Authored by: Burn to Learn. Located at: https://www.youtube.com/watch?v=ZAMLYuFblXw. License: CC BY: Attribution
- How to use FIND | MICROSOFT WORD 2016. Authored by: Burn to Learn. Located at: https://www.youtube.com/watch?v=uBbtLy8R1oI. License: CC BY: Attribution
- Find and Replace. Authored by: Lumen Learning. License: CC BY: Attribution

