4.1: Sketching Technique
- Page ID
- 43350
\( \newcommand{\vecs}[1]{\overset { \scriptstyle \rightharpoonup} {\mathbf{#1}} } \)
\( \newcommand{\vecd}[1]{\overset{-\!-\!\rightharpoonup}{\vphantom{a}\smash {#1}}} \)
\( \newcommand{\dsum}{\displaystyle\sum\limits} \)
\( \newcommand{\dint}{\displaystyle\int\limits} \)
\( \newcommand{\dlim}{\displaystyle\lim\limits} \)
\( \newcommand{\id}{\mathrm{id}}\) \( \newcommand{\Span}{\mathrm{span}}\)
( \newcommand{\kernel}{\mathrm{null}\,}\) \( \newcommand{\range}{\mathrm{range}\,}\)
\( \newcommand{\RealPart}{\mathrm{Re}}\) \( \newcommand{\ImaginaryPart}{\mathrm{Im}}\)
\( \newcommand{\Argument}{\mathrm{Arg}}\) \( \newcommand{\norm}[1]{\| #1 \|}\)
\( \newcommand{\inner}[2]{\langle #1, #2 \rangle}\)
\( \newcommand{\Span}{\mathrm{span}}\)
\( \newcommand{\id}{\mathrm{id}}\)
\( \newcommand{\Span}{\mathrm{span}}\)
\( \newcommand{\kernel}{\mathrm{null}\,}\)
\( \newcommand{\range}{\mathrm{range}\,}\)
\( \newcommand{\RealPart}{\mathrm{Re}}\)
\( \newcommand{\ImaginaryPart}{\mathrm{Im}}\)
\( \newcommand{\Argument}{\mathrm{Arg}}\)
\( \newcommand{\norm}[1]{\| #1 \|}\)
\( \newcommand{\inner}[2]{\langle #1, #2 \rangle}\)
\( \newcommand{\Span}{\mathrm{span}}\) \( \newcommand{\AA}{\unicode[.8,0]{x212B}}\)
\( \newcommand{\vectorA}[1]{\vec{#1}} % arrow\)
\( \newcommand{\vectorAt}[1]{\vec{\text{#1}}} % arrow\)
\( \newcommand{\vectorB}[1]{\overset { \scriptstyle \rightharpoonup} {\mathbf{#1}} } \)
\( \newcommand{\vectorC}[1]{\textbf{#1}} \)
\( \newcommand{\vectorD}[1]{\overrightarrow{#1}} \)
\( \newcommand{\vectorDt}[1]{\overrightarrow{\text{#1}}} \)
\( \newcommand{\vectE}[1]{\overset{-\!-\!\rightharpoonup}{\vphantom{a}\smash{\mathbf {#1}}}} \)
\( \newcommand{\vecs}[1]{\overset { \scriptstyle \rightharpoonup} {\mathbf{#1}} } \)
\(\newcommand{\longvect}{\overrightarrow}\)
\( \newcommand{\vecd}[1]{\overset{-\!-\!\rightharpoonup}{\vphantom{a}\smash {#1}}} \)
\(\newcommand{\avec}{\mathbf a}\) \(\newcommand{\bvec}{\mathbf b}\) \(\newcommand{\cvec}{\mathbf c}\) \(\newcommand{\dvec}{\mathbf d}\) \(\newcommand{\dtil}{\widetilde{\mathbf d}}\) \(\newcommand{\evec}{\mathbf e}\) \(\newcommand{\fvec}{\mathbf f}\) \(\newcommand{\nvec}{\mathbf n}\) \(\newcommand{\pvec}{\mathbf p}\) \(\newcommand{\qvec}{\mathbf q}\) \(\newcommand{\svec}{\mathbf s}\) \(\newcommand{\tvec}{\mathbf t}\) \(\newcommand{\uvec}{\mathbf u}\) \(\newcommand{\vvec}{\mathbf v}\) \(\newcommand{\wvec}{\mathbf w}\) \(\newcommand{\xvec}{\mathbf x}\) \(\newcommand{\yvec}{\mathbf y}\) \(\newcommand{\zvec}{\mathbf z}\) \(\newcommand{\rvec}{\mathbf r}\) \(\newcommand{\mvec}{\mathbf m}\) \(\newcommand{\zerovec}{\mathbf 0}\) \(\newcommand{\onevec}{\mathbf 1}\) \(\newcommand{\real}{\mathbb R}\) \(\newcommand{\twovec}[2]{\left[\begin{array}{r}#1 \\ #2 \end{array}\right]}\) \(\newcommand{\ctwovec}[2]{\left[\begin{array}{c}#1 \\ #2 \end{array}\right]}\) \(\newcommand{\threevec}[3]{\left[\begin{array}{r}#1 \\ #2 \\ #3 \end{array}\right]}\) \(\newcommand{\cthreevec}[3]{\left[\begin{array}{c}#1 \\ #2 \\ #3 \end{array}\right]}\) \(\newcommand{\fourvec}[4]{\left[\begin{array}{r}#1 \\ #2 \\ #3 \\ #4 \end{array}\right]}\) \(\newcommand{\cfourvec}[4]{\left[\begin{array}{c}#1 \\ #2 \\ #3 \\ #4 \end{array}\right]}\) \(\newcommand{\fivevec}[5]{\left[\begin{array}{r}#1 \\ #2 \\ #3 \\ #4 \\ #5 \\ \end{array}\right]}\) \(\newcommand{\cfivevec}[5]{\left[\begin{array}{c}#1 \\ #2 \\ #3 \\ #4 \\ #5 \\ \end{array}\right]}\) \(\newcommand{\mattwo}[4]{\left[\begin{array}{rr}#1 \amp #2 \\ #3 \amp #4 \\ \end{array}\right]}\) \(\newcommand{\laspan}[1]{\text{Span}\{#1\}}\) \(\newcommand{\bcal}{\cal B}\) \(\newcommand{\ccal}{\cal C}\) \(\newcommand{\scal}{\cal S}\) \(\newcommand{\wcal}{\cal W}\) \(\newcommand{\ecal}{\cal E}\) \(\newcommand{\coords}[2]{\left\{#1\right\}_{#2}}\) \(\newcommand{\gray}[1]{\color{gray}{#1}}\) \(\newcommand{\lgray}[1]{\color{lightgray}{#1}}\) \(\newcommand{\rank}{\operatorname{rank}}\) \(\newcommand{\row}{\text{Row}}\) \(\newcommand{\col}{\text{Col}}\) \(\renewcommand{\row}{\text{Row}}\) \(\newcommand{\nul}{\text{Nul}}\) \(\newcommand{\var}{\text{Var}}\) \(\newcommand{\corr}{\text{corr}}\) \(\newcommand{\len}[1]{\left|#1\right|}\) \(\newcommand{\bbar}{\overline{\bvec}}\) \(\newcommand{\bhat}{\widehat{\bvec}}\) \(\newcommand{\bperp}{\bvec^\perp}\) \(\newcommand{\xhat}{\widehat{\xvec}}\) \(\newcommand{\vhat}{\widehat{\vvec}}\) \(\newcommand{\uhat}{\widehat{\uvec}}\) \(\newcommand{\what}{\widehat{\wvec}}\) \(\newcommand{\Sighat}{\widehat{\Sigma}}\) \(\newcommand{\lt}{<}\) \(\newcommand{\gt}{>}\) \(\newcommand{\amp}{&}\) \(\definecolor{fillinmathshade}{gray}{0.9}\)Freehand sketching is a crucial skill that can be mastered with practice and a few fundamental guidelines. It's an essential tool for interpreting drawings and a valuable method for conveying job information to others, especially when no formal drawing is available. While professionally produced drawings may often be used in your work, there are many instances in the field where you might find yourself working off sketches drawn on various surfaces, from napkins and cardboard to wood scraps or any flat surface.
The ability to create technical sketches doesn't necessitate being an artist. Sketching isn't difficult if you follow a few simple rules, and while you might be slow at first, with practice, you'll be able to create reasonably good sketches without too much effort. The goal isn't to be judged as a professional draftsperson or architect but to be able to describe with lines what you need to be built, repaired, or modified. This requires practice and is an essential skill to develop.
For freehand sketching, a pad of graph paper (8 ½" × 11" sheets with a 5 mm or ¼" grid), a sharp HB pencil, and an eraser are the tools of the trade. Always ensure your pencil is sharp before starting any sketch, as this will enhance the quality and precision of your work. Remember, sometimes you'll need to work with what you have, using the tools and materials at hand, to communicate effectively about a project.
Sketching techniques
All you need to start with is a pencil and some paper. A soft pencil works best for most people, so try a #2 or an F. Keep the pencil sharp but not too sharp: hold it firmly enough for control but not so tight that your arm isn't relaxed. Don't draw heavily at first. That way, it is easier to erase without smudging. Darken the sketch when it begins to shape up the way you want it.
It's generally best to begin sketching with grid paper, although some prefer plain paper. On the job, you may find yourself sketching on the back of a work order or piece of packing crate. In any case, learning to sketch quickly and effectively is essential.
Here are some limbering-up exercises wot get you started. To keep your pencil sharper longer and for more precise lines widths, try turning your pencil slowly while completing the lines in the exercises below.

Sketching parallel lines
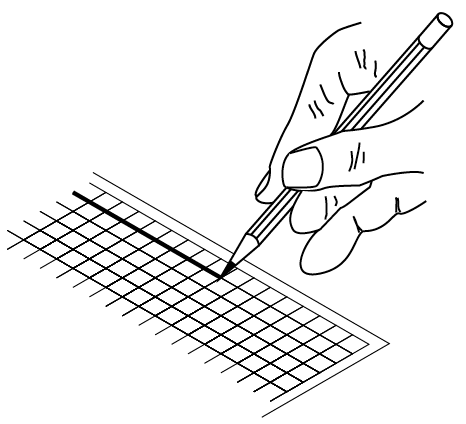
Start by drawing lines parallel to the paper's edges, such as a border line and title block. Use your finger as a guide when you draw along the grid line on the sketch pad (Figure \(\PageIndex{2}\)). Letting the end of your little finger run down the edge of the paper pad as you draw will steady your hand and make it easier to get a straight line.
Sketching non-parallel lines
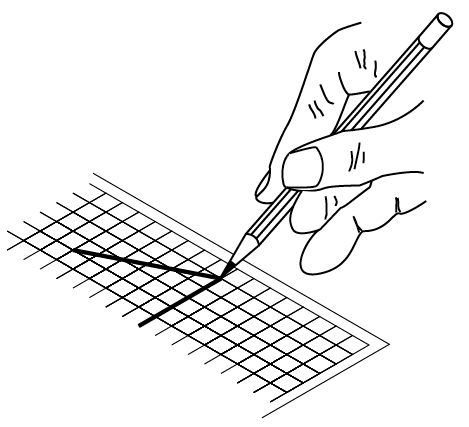
When sketching lines that are not parallel to the sides of the paper, turn the paper around so that the line you wish to draw is either straight up and down in front of you or straight across the sheet of paper.
Drawing lines this way rather than at an angle across the sheet is much easier. Let the side of your little finger rest on the paper as you draw. This will help you steady your hand (Figure \(\PageIndex{3}\)).
Sketching a rectangle
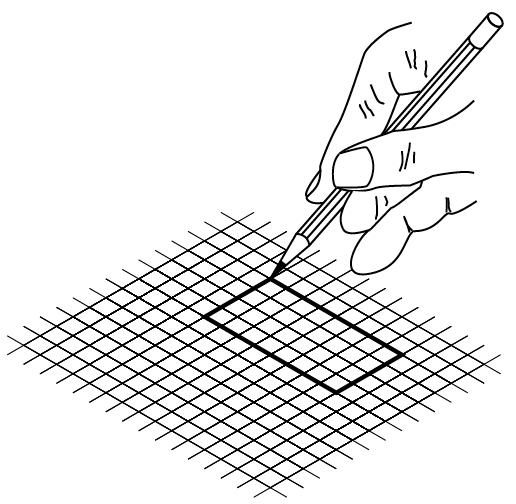
Locate the corners of the rectangle first. Then place your paper in a comfortable position for sketching and sketch downward for vertical lines and left to right for horizontal lines. Use the grid lines as a guide to help maintain your parallel and at 90 degrees lines to each other (Figure \(\PageIndex{4}\)).
Sketching a circle
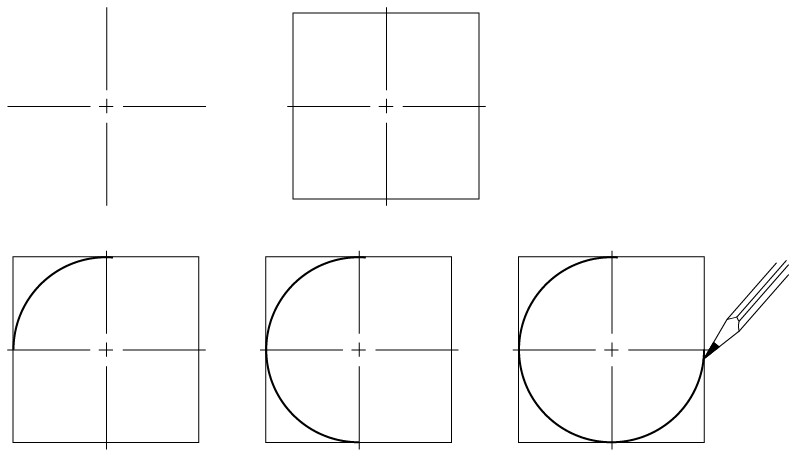
First, locate the center of the circle (Figure \(\PageIndex{5}\)), and then very lightly box in the size of the circle (using the diameter as a guide), as in the top right. Sketch in the circle, one quarter at a time, as shown in the bottom row, left to right. You may find it necessary at first to add light points along the projected circumference to help guide you through each quarter. Remember to move your sketch pad to maintain a comfortable sketching position.
Sketching to approximate scale
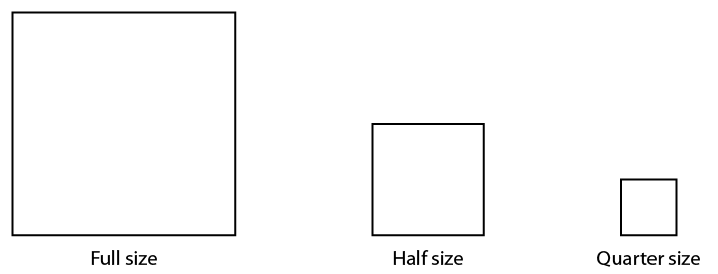
Figure \(\PageIndex{6}\) shows the full square on the left. The center square is half size, and the right square is quarter size. Note that the center and right squares are the same shape as the left square, only smaller.
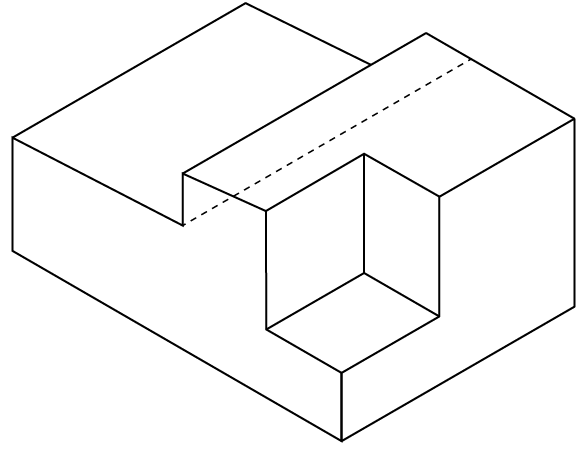
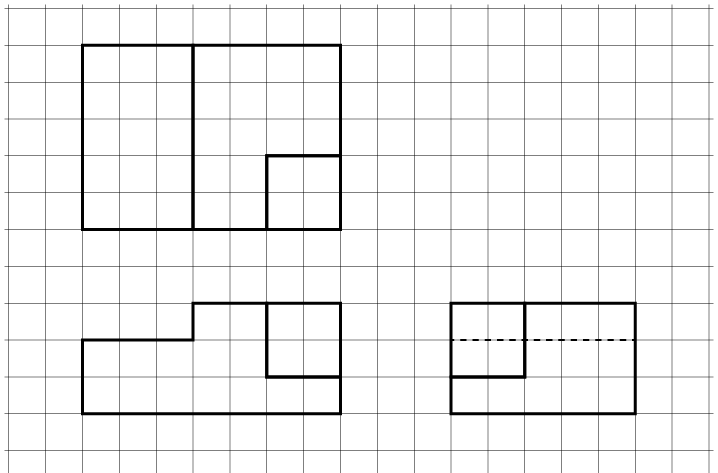
When sketching freehand, your sketches should reflect the actual shapes of objects as much as possible. Using grid paper, sketching to an approximate scale is not difficult. Assume that the object in Figure \(\PageIndex{7}\) is shown full size. As it is necessary to show all orthographic views on the same sheet of paper, the views must be scaled. Figure \(\PageIndex{8}\) shows the views at approximately one-half the original size.