Workforce LibreTexts

8.4: Winding Configurations

  • Page ID
    13301
  • \( \newcommand{\vecs}[1]{\overset { \scriptstyle \rightharpoonup} {\mathbf{#1}} } \)

    \( \newcommand{\vecd}[1]{\overset{-\!-\!\rightharpoonup}{\vphantom{a}\smash {#1}}} \)

    \( \newcommand{\id}{\mathrm{id}}\) \( \newcommand{\Span}{\mathrm{span}}\)

    ( \newcommand{\kernel}{\mathrm{null}\,}\) \( \newcommand{\range}{\mathrm{range}\,}\)

    \( \newcommand{\RealPart}{\mathrm{Re}}\) \( \newcommand{\ImaginaryPart}{\mathrm{Im}}\)

    \( \newcommand{\Argument}{\mathrm{Arg}}\) \( \newcommand{\norm}[1]{\| #1 \|}\)

    \( \newcommand{\inner}[2]{\langle #1, #2 \rangle}\)

    \( \newcommand{\Span}{\mathrm{span}}\)

    \( \newcommand{\id}{\mathrm{id}}\)

    \( \newcommand{\Span}{\mathrm{span}}\)

    \( \newcommand{\kernel}{\mathrm{null}\,}\)

    \( \newcommand{\range}{\mathrm{range}\,}\)

    \( \newcommand{\RealPart}{\mathrm{Re}}\)

    \( \newcommand{\ImaginaryPart}{\mathrm{Im}}\)

    \( \newcommand{\Argument}{\mathrm{Arg}}\)

    \( \newcommand{\norm}[1]{\| #1 \|}\)

    \( \newcommand{\inner}[2]{\langle #1, #2 \rangle}\)

    \( \newcommand{\Span}{\mathrm{span}}\) \( \newcommand{\AA}{\unicode[.8,0]{x212B}}\)

    \( \newcommand{\vectorA}[1]{\vec{#1}}      % arrow\)

    \( \newcommand{\vectorAt}[1]{\vec{\text{#1}}}      % arrow\)

    \( \newcommand{\vectorB}[1]{\overset { \scriptstyle \rightharpoonup} {\mathbf{#1}} } \)

    \( \newcommand{\vectorC}[1]{\textbf{#1}} \)

    \( \newcommand{\vectorD}[1]{\overrightarrow{#1}} \)

    \( \newcommand{\vectorDt}[1]{\overrightarrow{\text{#1}}} \)

    \( \newcommand{\vectE}[1]{\overset{-\!-\!\rightharpoonup}{\vphantom{a}\smash{\mathbf {#1}}}} \)

    \( \newcommand{\vecs}[1]{\overset { \scriptstyle \rightharpoonup} {\mathbf{#1}} } \)

    \( \newcommand{\vecd}[1]{\overset{-\!-\!\rightharpoonup}{\vphantom{a}\smash {#1}}} \)

    \(\newcommand{\avec}{\mathbf a}\) \(\newcommand{\bvec}{\mathbf b}\) \(\newcommand{\cvec}{\mathbf c}\) \(\newcommand{\dvec}{\mathbf d}\) \(\newcommand{\dtil}{\widetilde{\mathbf d}}\) \(\newcommand{\evec}{\mathbf e}\) \(\newcommand{\fvec}{\mathbf f}\) \(\newcommand{\nvec}{\mathbf n}\) \(\newcommand{\pvec}{\mathbf p}\) \(\newcommand{\qvec}{\mathbf q}\) \(\newcommand{\svec}{\mathbf s}\) \(\newcommand{\tvec}{\mathbf t}\) \(\newcommand{\uvec}{\mathbf u}\) \(\newcommand{\vvec}{\mathbf v}\) \(\newcommand{\wvec}{\mathbf w}\) \(\newcommand{\xvec}{\mathbf x}\) \(\newcommand{\yvec}{\mathbf y}\) \(\newcommand{\zvec}{\mathbf z}\) \(\newcommand{\rvec}{\mathbf r}\) \(\newcommand{\mvec}{\mathbf m}\) \(\newcommand{\zerovec}{\mathbf 0}\) \(\newcommand{\onevec}{\mathbf 1}\) \(\newcommand{\real}{\mathbb R}\) \(\newcommand{\twovec}[2]{\left[\begin{array}{r}#1 \\ #2 \end{array}\right]}\) \(\newcommand{\ctwovec}[2]{\left[\begin{array}{c}#1 \\ #2 \end{array}\right]}\) \(\newcommand{\threevec}[3]{\left[\begin{array}{r}#1 \\ #2 \\ #3 \end{array}\right]}\) \(\newcommand{\cthreevec}[3]{\left[\begin{array}{c}#1 \\ #2 \\ #3 \end{array}\right]}\) \(\newcommand{\fourvec}[4]{\left[\begin{array}{r}#1 \\ #2 \\ #3 \\ #4 \end{array}\right]}\) \(\newcommand{\cfourvec}[4]{\left[\begin{array}{c}#1 \\ #2 \\ #3 \\ #4 \end{array}\right]}\) \(\newcommand{\fivevec}[5]{\left[\begin{array}{r}#1 \\ #2 \\ #3 \\ #4 \\ #5 \\ \end{array}\right]}\) \(\newcommand{\cfivevec}[5]{\left[\begin{array}{c}#1 \\ #2 \\ #3 \\ #4 \\ #5 \\ \end{array}\right]}\) \(\newcommand{\mattwo}[4]{\left[\begin{array}{rr}#1 \amp #2 \\ #3 \amp #4 \\ \end{array}\right]}\) \(\newcommand{\laspan}[1]{\text{Span}\{#1\}}\) \(\newcommand{\bcal}{\cal B}\) \(\newcommand{\ccal}{\cal C}\) \(\newcommand{\scal}{\cal S}\) \(\newcommand{\wcal}{\cal W}\) \(\newcommand{\ecal}{\cal E}\) \(\newcommand{\coords}[2]{\left\{#1\right\}_{#2}}\) \(\newcommand{\gray}[1]{\color{gray}{#1}}\) \(\newcommand{\lgray}[1]{\color{lightgray}{#1}}\) \(\newcommand{\rank}{\operatorname{rank}}\) \(\newcommand{\row}{\text{Row}}\) \(\newcommand{\col}{\text{Col}}\) \(\renewcommand{\row}{\text{Row}}\) \(\newcommand{\nul}{\text{Nul}}\) \(\newcommand{\var}{\text{Var}}\) \(\newcommand{\corr}{\text{corr}}\) \(\newcommand{\len}[1]{\left|#1\right|}\) \(\newcommand{\bbar}{\overline{\bvec}}\) \(\newcommand{\bhat}{\widehat{\bvec}}\) \(\newcommand{\bperp}{\bvec^\perp}\) \(\newcommand{\xhat}{\widehat{\xvec}}\) \(\newcommand{\vhat}{\widehat{\vvec}}\) \(\newcommand{\uhat}{\widehat{\uvec}}\) \(\newcommand{\what}{\widehat{\wvec}}\) \(\newcommand{\Sighat}{\widehat{\Sigma}}\) \(\newcommand{\lt}{<}\) \(\newcommand{\gt}{>}\) \(\newcommand{\amp}{&}\) \(\definecolor{fillinmathshade}{gray}{0.9}\)

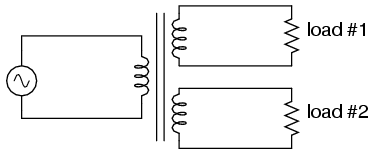
    Transformers are very versatile devices. The basic concept of energy transfer between mutual inductors is useful enough between a single primary and single secondary coil, but transformers don’t have to be made with just two sets of windings. Consider this transformer circuit: (Figure below)

    02141.webp

    Transformer with multiple secondaries provides multiple output voltages.

    Here, three inductor coils share a common magnetic core, magnetically “coupling” or “linking” them together. The relationship of winding turn ratios and voltage ratios seen with a single pair of mutual inductors still holds true here for multiple pairs of coils. It is entirely possible to assemble a transformer such as the one above (one primary winding, two secondary windings) in which one secondary winding is a step-down and the other is a step-up. In fact, this design of transformer was quite common in vacuum tube power supply circuits, which were required to supply low voltage for the tubes’ filaments (typically 6 or 12 volts) and high voltage for the tubes’ plates (several hundred volts) from a nominal primary voltage of 110 volts AC. Not only are voltages and currents of completely different magnitudes possible with such a transformer, but all circuits are electrically isolated from one another.

    52010.webp

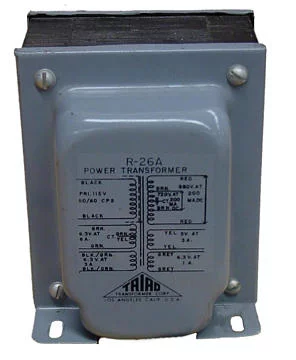
    Photograph of multiple-winding transformer with six windings, a primary and five secondaries.

    The transformer in Figure above is intended to provide both high and low voltages necessary in an electronic system using vacuum tubes. Low voltage is required to power the filaments of vacuum tubes, while high voltage is required to create the potential difference between the plate and cathode elements of each tube. One transformer with multiple windings suffices elegantly to provide all the necessary voltage levels from a single 115 V source. The wires for this transformer (15 of them!) are not shown in the photograph, being hidden from view.

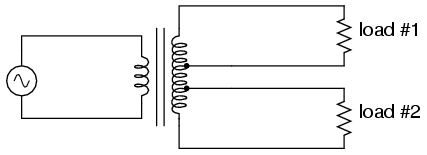
    If electrical isolation between secondary circuits is not of great importance, a similar effect can be obtained by “tapping” a single secondary winding at multiple points along its length, like Figure below.

    02142.webp

    A single tapped secondary provides multiple voltages.

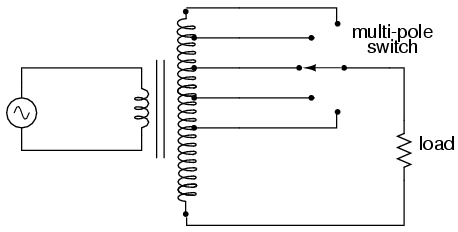
    A tap is nothing more than a wire connection made at some point on a winding between the very ends. Not surprisingly, the winding turn/voltage magnitude relationship of a normal transformer holds true for all tapped segments of windings. This fact can be exploited to produce a transformer capable of multiple ratios: (Figure below)

    02143.webp

    A tapped secondary using a switch to select one of many possible voltages

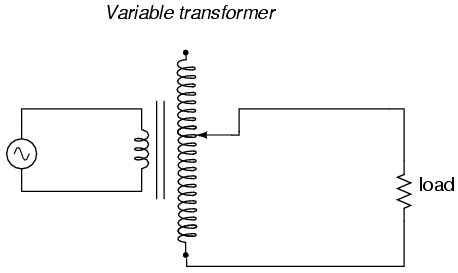
    Carrying the concept of winding taps further, we end up with a “variable transformer,” where a sliding contact is moved along the length of an exposed secondary winding, able to connect with it at any point along its length. The effect is equivalent to having a winding tap at every turn of the winding, and a switch with poles at every tap position: (Figure below)

    02144.webp

    A sliding contact on the secondary continuously varies the secondary voltage.

    One consumer application of the variable transformer is in speed controls for model train sets, especially the train sets of the 1950’s and 1960’s. These transformers were essentially step-down units, the highest voltage obtainable from the secondary winding being substantially less than the primary voltage of 110 to 120 volts AC. The variable-sweep contact provided a simple means of voltage control with little-wasted power, much more efficient than control using a variable resistor!

    Moving-slide contacts are too impractical to be used in large industrial power transformer designs, but multi-pole switches and winding taps are common for voltage adjustment. Adjustments need to be made periodically in power systems to accommodate changes in loads over months or years in time, and these switching circuits provide a convenient means. Typically, such “tap switches” are not engineered to handle full-load current, but must be actuated only when the transformer has been de-energized (no power).

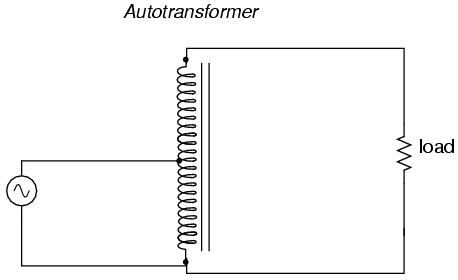
    Seeing as how we can tap any transformer winding to obtain the equivalent of several windings (albeit with loss of electrical isolation between them), it makes sense that it should be possible to forego electrical isolation altogether and build a transformer from a single winding. Indeed this is possible, and the resulting device is called an autotransformer: (Figure below)

    02145.webp

    This autotransformer steps voltage up with a single tapped winding, saving copper, sacrificing isolation.

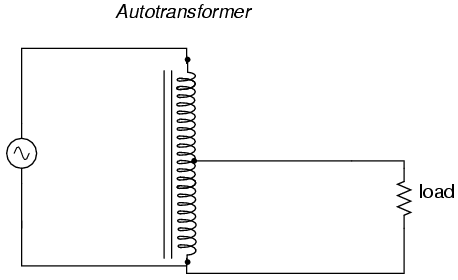
    The autotransformer depicted above performs a voltage step-up function. A step-down autotransformer would look something like Figure below.

    02146.webp

    This auto transformer steps voltage down with a single copper-saving tapped winding.

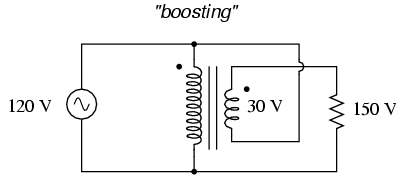
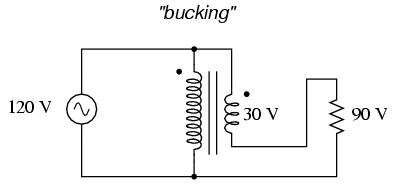
    Autotransformers find popular use in applications requiring a slight boost or reduction in voltage to a load. The alternative with a normal (isolated) transformer would be to either have just the right primary/secondary winding ratio made for the job or use a step-down configuration with the secondary winding connected in series-aiding (“boosting”) or series-opposing (“bucking”) fashion. Primary, secondary, and load voltages are given to illustrate how this would work.

    First, the “boosting” configuration. In Figure below the secondary coil’s polarity is oriented so that its voltage directly adds to the primary voltage.

    02147.webp

    Ordinary transformer wired as an autotransformer to boost the line voltage.

    Next, the “bucking” configuration. In Figure below the secondary coil’s polarity is oriented so that its voltage directly subtracts from the primary voltage:

    02148.webp

    Ordinary transformer wired as an autotransformer to buck the line voltage down.

    The prime advantage of an autotransformer is that the same boosting or bucking function is obtained with only a single winding, making it cheaper and lighter to manufacture than a regular (isolating) transformer having both primary and secondary windings.

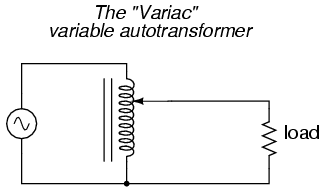
    Like regular transformers, autotransformer windings can be tapped to provide variations in ratio. Additionally, they can be made continuously variable with a sliding contact to tap the winding at any point along its length. The latter configuration is popular enough to have earned itself its own name: the Variac. (Figure below)

    02149.webp

    A variac is an autotransformer with a sliding tap.

    Small variacs for benchtop use are popular pieces of equipment for the electronics experimenter, being able to step household AC voltage down (or sometimes up as well) with a wide, fine range of control by a simple twist of a knob.

    Review

    • Transformers can be equipped with more than just a single primary and single secondary winding pair. This allows for multiple step-up and/or step-down ratios in the same device.
    • Transformer windings can also be “tapped:” that is, intersected at many points to segment a single winding into sections.
    • Variable transformers can be made by providing a movable arm that sweeps across the length of a winding, making contact with the winding at any point along its length. The winding, of course, has to be bare (no insulation) in the area where the arm sweeps.
    • An autotransformer is a single, tapped inductor coil used to step up or step down voltage like a transformer, except without providing electrical isolation.
    • A Variac is a variable autotransformer.

    This page titled 8.4: Winding Configurations is shared under a GNU Free Documentation License 1.3 license and was authored, remixed, and/or curated by Tony R. Kuphaldt (All About Circuits) via source content that was edited to the style and standards of the LibreTexts platform.