6.4: Electrophotographic Process
- Page ID
- 9545
\( \newcommand{\vecs}[1]{\overset { \scriptstyle \rightharpoonup} {\mathbf{#1}} } \)
\( \newcommand{\vecd}[1]{\overset{-\!-\!\rightharpoonup}{\vphantom{a}\smash {#1}}} \)
\( \newcommand{\id}{\mathrm{id}}\) \( \newcommand{\Span}{\mathrm{span}}\)
( \newcommand{\kernel}{\mathrm{null}\,}\) \( \newcommand{\range}{\mathrm{range}\,}\)
\( \newcommand{\RealPart}{\mathrm{Re}}\) \( \newcommand{\ImaginaryPart}{\mathrm{Im}}\)
\( \newcommand{\Argument}{\mathrm{Arg}}\) \( \newcommand{\norm}[1]{\| #1 \|}\)
\( \newcommand{\inner}[2]{\langle #1, #2 \rangle}\)
\( \newcommand{\Span}{\mathrm{span}}\)
\( \newcommand{\id}{\mathrm{id}}\)
\( \newcommand{\Span}{\mathrm{span}}\)
\( \newcommand{\kernel}{\mathrm{null}\,}\)
\( \newcommand{\range}{\mathrm{range}\,}\)
\( \newcommand{\RealPart}{\mathrm{Re}}\)
\( \newcommand{\ImaginaryPart}{\mathrm{Im}}\)
\( \newcommand{\Argument}{\mathrm{Arg}}\)
\( \newcommand{\norm}[1]{\| #1 \|}\)
\( \newcommand{\inner}[2]{\langle #1, #2 \rangle}\)
\( \newcommand{\Span}{\mathrm{span}}\) \( \newcommand{\AA}{\unicode[.8,0]{x212B}}\)
\( \newcommand{\vectorA}[1]{\vec{#1}} % arrow\)
\( \newcommand{\vectorAt}[1]{\vec{\text{#1}}} % arrow\)
\( \newcommand{\vectorB}[1]{\overset { \scriptstyle \rightharpoonup} {\mathbf{#1}} } \)
\( \newcommand{\vectorC}[1]{\textbf{#1}} \)
\( \newcommand{\vectorD}[1]{\overrightarrow{#1}} \)
\( \newcommand{\vectorDt}[1]{\overrightarrow{\text{#1}}} \)
\( \newcommand{\vectE}[1]{\overset{-\!-\!\rightharpoonup}{\vphantom{a}\smash{\mathbf {#1}}}} \)
\( \newcommand{\vecs}[1]{\overset { \scriptstyle \rightharpoonup} {\mathbf{#1}} } \)
\( \newcommand{\vecd}[1]{\overset{-\!-\!\rightharpoonup}{\vphantom{a}\smash {#1}}} \)
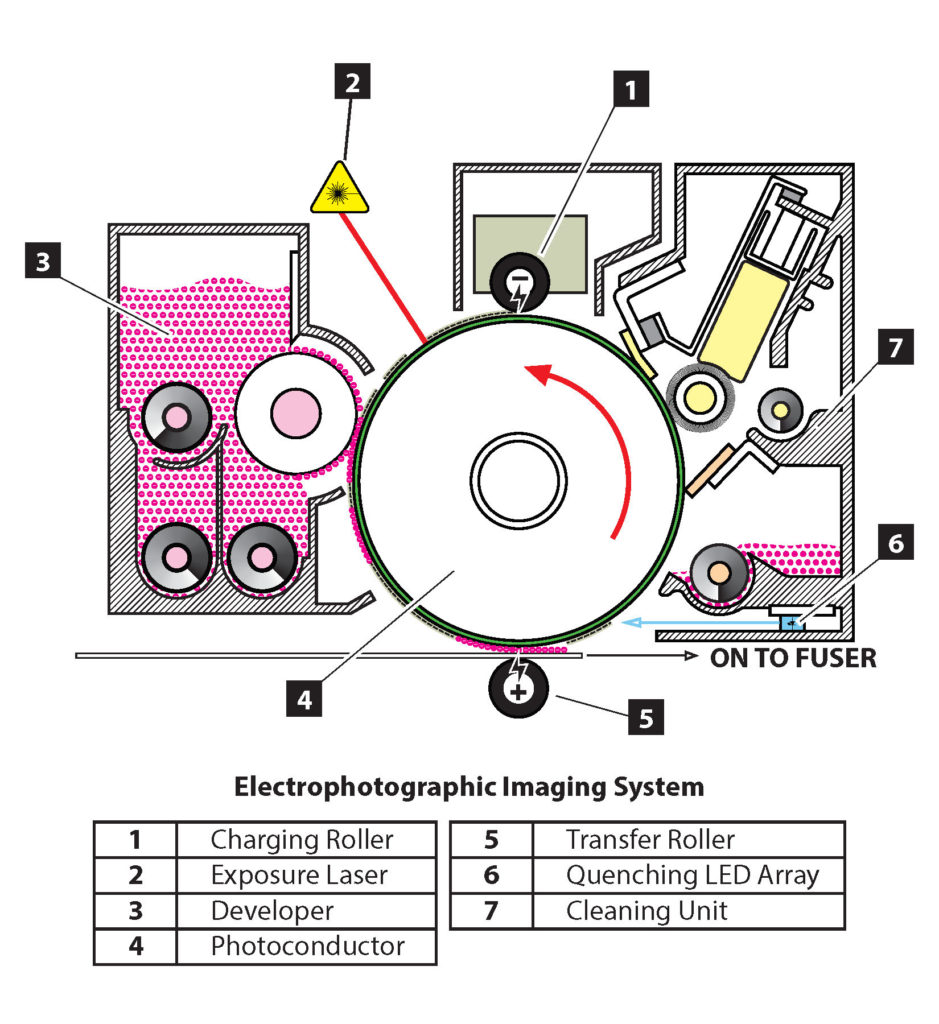
\(\newcommand{\avec}{\mathbf a}\) \(\newcommand{\bvec}{\mathbf b}\) \(\newcommand{\cvec}{\mathbf c}\) \(\newcommand{\dvec}{\mathbf d}\) \(\newcommand{\dtil}{\widetilde{\mathbf d}}\) \(\newcommand{\evec}{\mathbf e}\) \(\newcommand{\fvec}{\mathbf f}\) \(\newcommand{\nvec}{\mathbf n}\) \(\newcommand{\pvec}{\mathbf p}\) \(\newcommand{\qvec}{\mathbf q}\) \(\newcommand{\svec}{\mathbf s}\) \(\newcommand{\tvec}{\mathbf t}\) \(\newcommand{\uvec}{\mathbf u}\) \(\newcommand{\vvec}{\mathbf v}\) \(\newcommand{\wvec}{\mathbf w}\) \(\newcommand{\xvec}{\mathbf x}\) \(\newcommand{\yvec}{\mathbf y}\) \(\newcommand{\zvec}{\mathbf z}\) \(\newcommand{\rvec}{\mathbf r}\) \(\newcommand{\mvec}{\mathbf m}\) \(\newcommand{\zerovec}{\mathbf 0}\) \(\newcommand{\onevec}{\mathbf 1}\) \(\newcommand{\real}{\mathbb R}\) \(\newcommand{\twovec}[2]{\left[\begin{array}{r}#1 \\ #2 \end{array}\right]}\) \(\newcommand{\ctwovec}[2]{\left[\begin{array}{c}#1 \\ #2 \end{array}\right]}\) \(\newcommand{\threevec}[3]{\left[\begin{array}{r}#1 \\ #2 \\ #3 \end{array}\right]}\) \(\newcommand{\cthreevec}[3]{\left[\begin{array}{c}#1 \\ #2 \\ #3 \end{array}\right]}\) \(\newcommand{\fourvec}[4]{\left[\begin{array}{r}#1 \\ #2 \\ #3 \\ #4 \end{array}\right]}\) \(\newcommand{\cfourvec}[4]{\left[\begin{array}{c}#1 \\ #2 \\ #3 \\ #4 \end{array}\right]}\) \(\newcommand{\fivevec}[5]{\left[\begin{array}{r}#1 \\ #2 \\ #3 \\ #4 \\ #5 \\ \end{array}\right]}\) \(\newcommand{\cfivevec}[5]{\left[\begin{array}{c}#1 \\ #2 \\ #3 \\ #4 \\ #5 \\ \end{array}\right]}\) \(\newcommand{\mattwo}[4]{\left[\begin{array}{rr}#1 \amp #2 \\ #3 \amp #4 \\ \end{array}\right]}\) \(\newcommand{\laspan}[1]{\text{Span}\{#1\}}\) \(\newcommand{\bcal}{\cal B}\) \(\newcommand{\ccal}{\cal C}\) \(\newcommand{\scal}{\cal S}\) \(\newcommand{\wcal}{\cal W}\) \(\newcommand{\ecal}{\cal E}\) \(\newcommand{\coords}[2]{\left\{#1\right\}_{#2}}\) \(\newcommand{\gray}[1]{\color{gray}{#1}}\) \(\newcommand{\lgray}[1]{\color{lightgray}{#1}}\) \(\newcommand{\rank}{\operatorname{rank}}\) \(\newcommand{\row}{\text{Row}}\) \(\newcommand{\col}{\text{Col}}\) \(\renewcommand{\row}{\text{Row}}\) \(\newcommand{\nul}{\text{Nul}}\) \(\newcommand{\var}{\text{Var}}\) \(\newcommand{\corr}{\text{corr}}\) \(\newcommand{\len}[1]{\left|#1\right|}\) \(\newcommand{\bbar}{\overline{\bvec}}\) \(\newcommand{\bhat}{\widehat{\bvec}}\) \(\newcommand{\bperp}{\bvec^\perp}\) \(\newcommand{\xhat}{\widehat{\xvec}}\) \(\newcommand{\vhat}{\widehat{\vvec}}\) \(\newcommand{\uhat}{\widehat{\uvec}}\) \(\newcommand{\what}{\widehat{\wvec}}\) \(\newcommand{\Sighat}{\widehat{\Sigma}}\) \(\newcommand{\lt}{<}\) \(\newcommand{\gt}{>}\) \(\newcommand{\amp}{&}\) \(\definecolor{fillinmathshade}{gray}{0.9}\)The electrophotographic process consists of seven stages (see Figure 6.4). For the purpose of this text, we will be describing the process using a negatively charged dry toner. The process is the same for a positive toner except the polarity would be reversed in each stage.
Charging
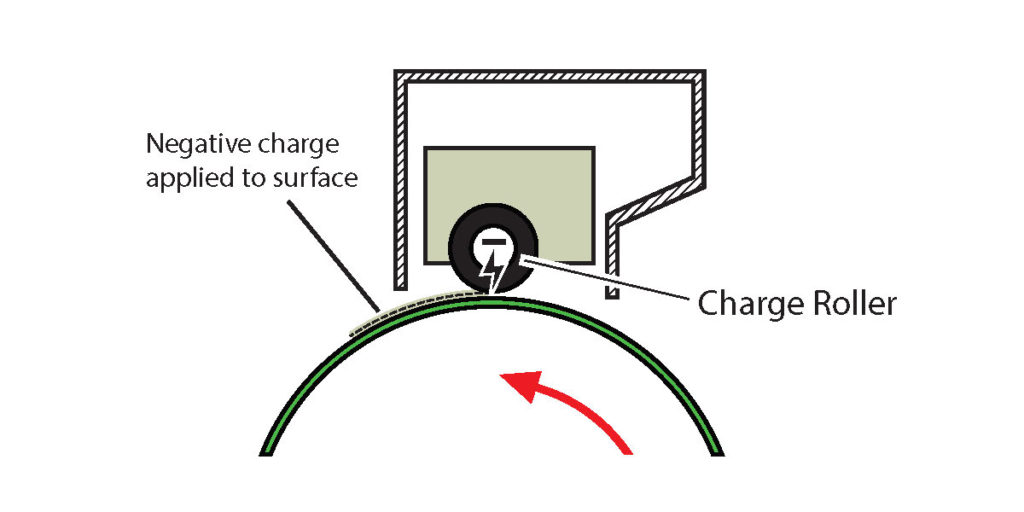
In the first stage, a high negative voltage of approximately -900 volts is provided to a charge roller (see Figure 6.5). The voltage used varies by manufacturer and model. The charge roller applies a uniform layer of negative charge to the surface of the drum. The resistivity of the unexposed photosensitive drum coating allows the charge to remain on the surface.
Exposure
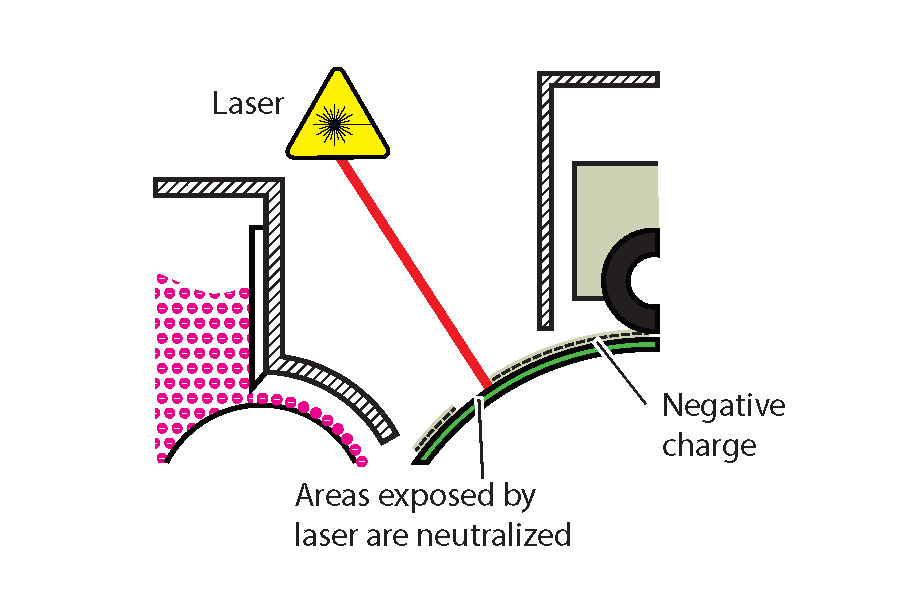
A laser is used to write the image onto the charged surface (see Figure 6.6). Because the photosensitive coating on the drum becomes conductive when exposed to light, the charges on the surface of the drum exposed to the laser conduct to the base layer, which is connected to a ground. The result is a near zero volt image and a negative background. This is known as the latent image.
Development
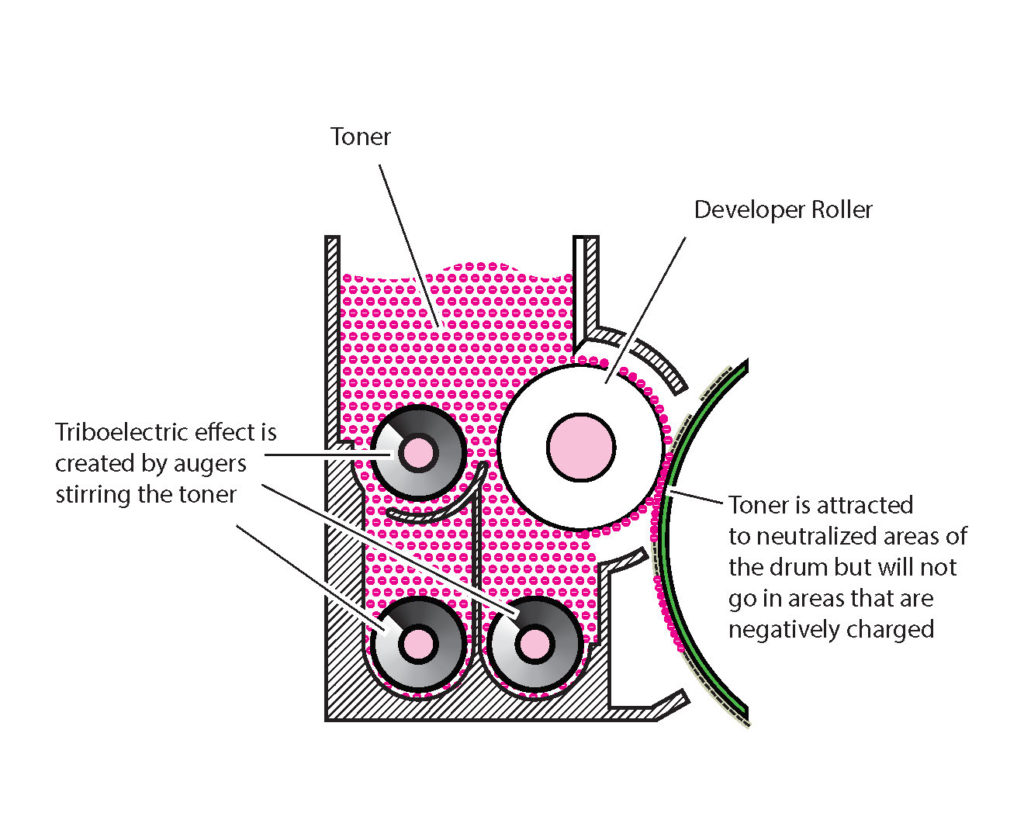
Many digital printers and presses use a dual component development system (see Figure 6.7). The developer is a mixture of non-magnetic toner and a magnetic carrier. As the developer is stirred and the particles rub up against each other, a triboelectric charge is generated between the them. The toner becomes negatively charged while the carrier becomes positive. The opposite charges cause the toner to be attracted to the carrier. A magnetic development roller holds the mostly iron carrier in alignment with magnetic lines of force forming a magnetic brush. This magnetic brush in turn ‘carries’ the attracted toner to the surface of the drum. A high negative bias is applied to the development roller repelling the toner onto the drum. The toner is attracted to the areas of the drum exposed by the laser, which, being close to zero volts, is much more positive than the negatively charged toner. In this way, the latent image is developed. As the carrier remains on the development roller, it continues to attract toner from the hopper to maintain the optimal concentration on the magnetic brush.
Transfer
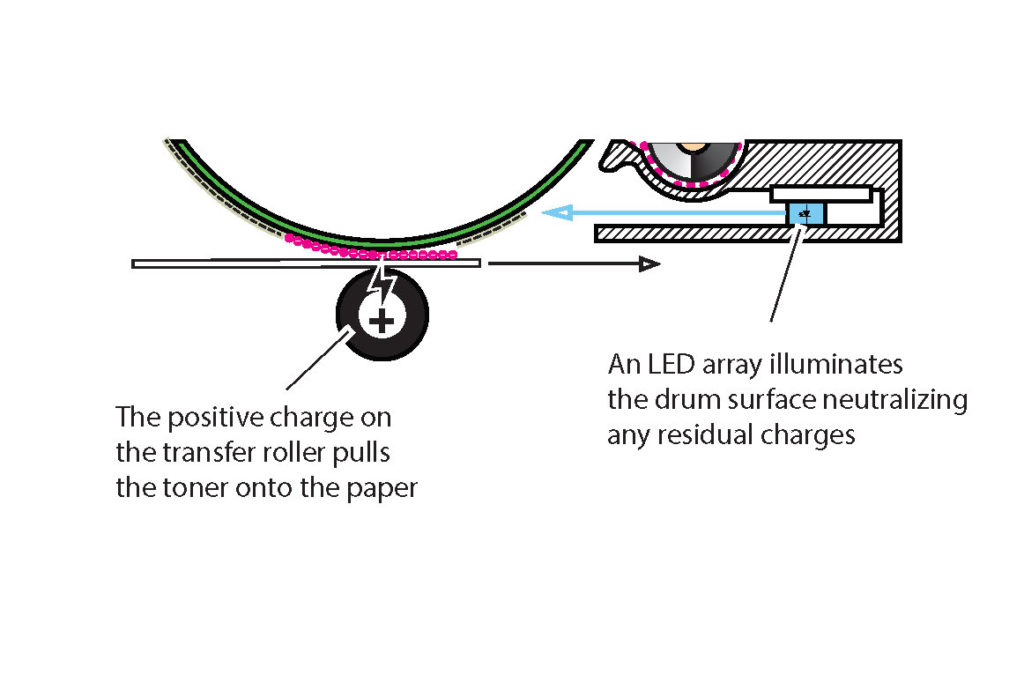
A sheet of paper or substrate passes between the drum and a transfer charge roller that has a high positive voltage applied to it (see Figure 6.8). The negatively charged toner of the developed latent image on the drum is attracted to the more positive transfer roller and adheres to the sheet in-between. The charge applied to the back of the sheet causes the paper to cling to the drum. A high negative voltage is applied to a discharge plate immediately after the transfer charge roller to aid in the separation of the sheet from the drum. The curvature of the drum along with the weight and rigidity of the sheet also aid in the separation.
A more advanced method of transfer utilizes an intermediate transfer belt system. This is most common on colour digital presses where four or more colours are transferred onto the belt before transferring the complete image onto the sheet. Charge rollers beneath the belt, under each drum, pull off the developed latent images of each separation directly onto the belt. In the transfer stage, a transfer charge roller beneath the belt applies a negative charge to push the toner onto the sheet. A second roller, directly beneath the first on the other side of the belt, applies pressure keeping the paper in contact with the belt and aiding in transfer for more textured stocks. The lower roller may have a small positive charge applied to it or may be grounded. Some systems can also alternate the charge applied to the transfer charge roller to further aid toner application onto textured substrates.
After this stage, the sheet moves on to fusing where the toner permanently adheres to the substrate. The next two stages described below are post-imaging steps that are necessary to prepare the drum surface for the next print cycle.
Cleaning
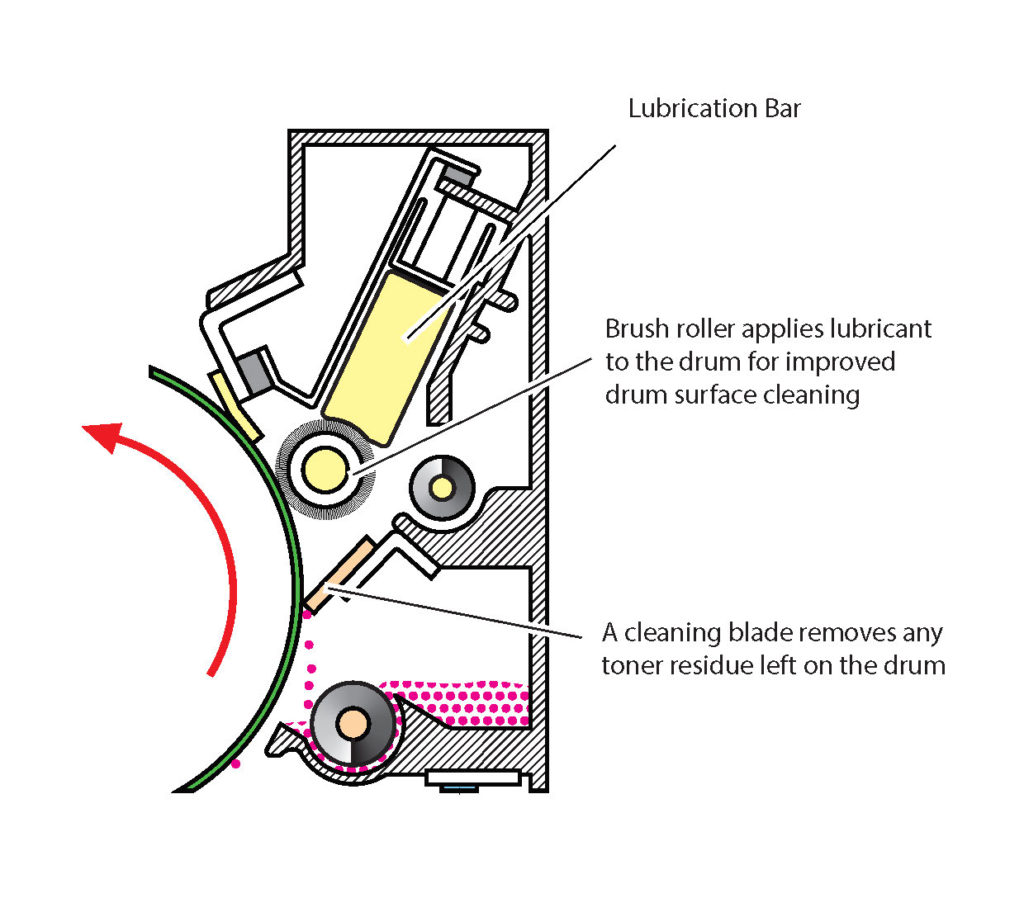
After the transfer stage, some toner may be left behind on the surface of the drum. If left there, the background of each successive print would slowly become darker and dirtier. To prevent this, a cleaning blade removes any residual toner from the drum’s surface (see Figure 6.9). Some systems will recycle this toner back to the developing unit, but mostly the waste toner is collected in a container for disposal.
Erasing
In this stage, an LED array exposes the length of the drum, bringing this area of the drum to near zero volts. This prepares the drum surface for the charging stage of the next print cycle.
Fusing
This is the final stage in the electophotographic process. The fusing mechanism, or fuser, consists of a heat roller, a pressure roller, and cleaning mechanism (see Figure 6.10). Toner is composed mostly of resin. When the toner is heated by the heat roller and pressure applied by the complement pressure roller, it melts and is pressed into the fibres of the sheet. The toner is never absorbed by the paper or substrate but rather is bonded to the surface. A negative charge is applied to the heat roller or belt to prevent the toner from being attracted to it and the cleaning section removes any toner or other contaminates that may have remained on the heat roller. Heat may also be applied to the pressure roller (at a much lower temperature) to prevent the sheet from curling.
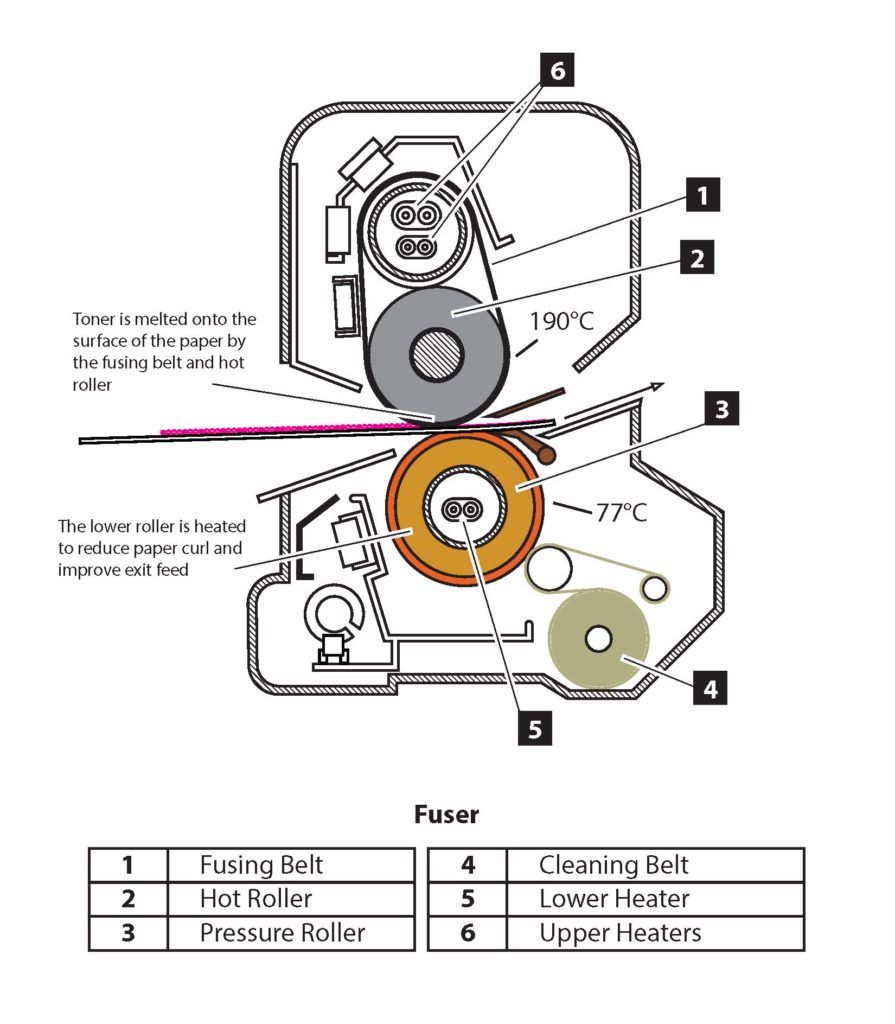
Along with the transfer stage, fusing can be greatly affected by the paper or substrate used. The thicker and heavier the sheet, the more heat it absorbs. Because of this, these sheets require higher temperatures so there is sufficient heat remaining to melt the toner. Insufficient heat can cause the toner to scratch off easily or not bond at all. Too much heat can cause moisture in the substrate to evaporate quickly and get trapped beneath the toner causing tiny bubbles that prevent the toner from sticking wherever they occur. This issue is seen more on thinner stocks that do not absorb as much heat. Too much heat can also cause toner residue to stick to the heater roller and deposit it on subsequent sheets.
The heat roller can heat up quite quickly but may take much longer to cool down. This can cause delays in producing work that switches between different paper weights. To combat this, some devices use a thin belt that can be both heated and cooled quickly in place of the heater roller. In some cases, a cooling mechanism is also employed further mitigating the cooling lag.
Media Attributions
- EP Imaging System – Complete by Roberto Medeiros
- EP Imaging System – Charging by Roberto Medeiros)
- EP Imaging System – Development by Roberto Medeiros
- EP Imaging System – Transfer by Roberto Medeiros
- EP Imaging System – Cleaning by Roberto Medeiros
- EP Imaging System – Fusing by Roberto Medeiros


