
18: Chapter 18. Create Revit rendering, Revit clouding rendering
- Page ID
- 13201

\( \newcommand{\vecs}[1]{\overset { \scriptstyle \rightharpoonup} {\mathbf{#1}} } \)
\( \newcommand{\vecd}[1]{\overset{-\!-\!\rightharpoonup}{\vphantom{a}\smash {#1}}} \)
\( \newcommand{\id}{\mathrm{id}}\) \( \newcommand{\Span}{\mathrm{span}}\)
( \newcommand{\kernel}{\mathrm{null}\,}\) \( \newcommand{\range}{\mathrm{range}\,}\)
\( \newcommand{\RealPart}{\mathrm{Re}}\) \( \newcommand{\ImaginaryPart}{\mathrm{Im}}\)
\( \newcommand{\Argument}{\mathrm{Arg}}\) \( \newcommand{\norm}[1]{\| #1 \|}\)
\( \newcommand{\inner}[2]{\langle #1, #2 \rangle}\)
\( \newcommand{\Span}{\mathrm{span}}\)
\( \newcommand{\id}{\mathrm{id}}\)
\( \newcommand{\Span}{\mathrm{span}}\)
\( \newcommand{\kernel}{\mathrm{null}\,}\)
\( \newcommand{\range}{\mathrm{range}\,}\)
\( \newcommand{\RealPart}{\mathrm{Re}}\)
\( \newcommand{\ImaginaryPart}{\mathrm{Im}}\)
\( \newcommand{\Argument}{\mathrm{Arg}}\)
\( \newcommand{\norm}[1]{\| #1 \|}\)
\( \newcommand{\inner}[2]{\langle #1, #2 \rangle}\)
\( \newcommand{\Span}{\mathrm{span}}\) \( \newcommand{\AA}{\unicode[.8,0]{x212B}}\)
\( \newcommand{\vectorA}[1]{\vec{#1}} % arrow\)
\( \newcommand{\vectorAt}[1]{\vec{\text{#1}}} % arrow\)
\( \newcommand{\vectorB}[1]{\overset { \scriptstyle \rightharpoonup} {\mathbf{#1}} } \)
\( \newcommand{\vectorC}[1]{\textbf{#1}} \)
\( \newcommand{\vectorD}[1]{\overrightarrow{#1}} \)
\( \newcommand{\vectorDt}[1]{\overrightarrow{\text{#1}}} \)
\( \newcommand{\vectE}[1]{\overset{-\!-\!\rightharpoonup}{\vphantom{a}\smash{\mathbf {#1}}}} \)
\( \newcommand{\vecs}[1]{\overset { \scriptstyle \rightharpoonup} {\mathbf{#1}} } \)
\( \newcommand{\vecd}[1]{\overset{-\!-\!\rightharpoonup}{\vphantom{a}\smash {#1}}} \)
\(\newcommand{\avec}{\mathbf a}\) \(\newcommand{\bvec}{\mathbf b}\) \(\newcommand{\cvec}{\mathbf c}\) \(\newcommand{\dvec}{\mathbf d}\) \(\newcommand{\dtil}{\widetilde{\mathbf d}}\) \(\newcommand{\evec}{\mathbf e}\) \(\newcommand{\fvec}{\mathbf f}\) \(\newcommand{\nvec}{\mathbf n}\) \(\newcommand{\pvec}{\mathbf p}\) \(\newcommand{\qvec}{\mathbf q}\) \(\newcommand{\svec}{\mathbf s}\) \(\newcommand{\tvec}{\mathbf t}\) \(\newcommand{\uvec}{\mathbf u}\) \(\newcommand{\vvec}{\mathbf v}\) \(\newcommand{\wvec}{\mathbf w}\) \(\newcommand{\xvec}{\mathbf x}\) \(\newcommand{\yvec}{\mathbf y}\) \(\newcommand{\zvec}{\mathbf z}\) \(\newcommand{\rvec}{\mathbf r}\) \(\newcommand{\mvec}{\mathbf m}\) \(\newcommand{\zerovec}{\mathbf 0}\) \(\newcommand{\onevec}{\mathbf 1}\) \(\newcommand{\real}{\mathbb R}\) \(\newcommand{\twovec}[2]{\left[\begin{array}{r}#1 \\ #2 \end{array}\right]}\) \(\newcommand{\ctwovec}[2]{\left[\begin{array}{c}#1 \\ #2 \end{array}\right]}\) \(\newcommand{\threevec}[3]{\left[\begin{array}{r}#1 \\ #2 \\ #3 \end{array}\right]}\) \(\newcommand{\cthreevec}[3]{\left[\begin{array}{c}#1 \\ #2 \\ #3 \end{array}\right]}\) \(\newcommand{\fourvec}[4]{\left[\begin{array}{r}#1 \\ #2 \\ #3 \\ #4 \end{array}\right]}\) \(\newcommand{\cfourvec}[4]{\left[\begin{array}{c}#1 \\ #2 \\ #3 \\ #4 \end{array}\right]}\) \(\newcommand{\fivevec}[5]{\left[\begin{array}{r}#1 \\ #2 \\ #3 \\ #4 \\ #5 \\ \end{array}\right]}\) \(\newcommand{\cfivevec}[5]{\left[\begin{array}{c}#1 \\ #2 \\ #3 \\ #4 \\ #5 \\ \end{array}\right]}\) \(\newcommand{\mattwo}[4]{\left[\begin{array}{rr}#1 \amp #2 \\ #3 \amp #4 \\ \end{array}\right]}\) \(\newcommand{\laspan}[1]{\text{Span}\{#1\}}\) \(\newcommand{\bcal}{\cal B}\) \(\newcommand{\ccal}{\cal C}\) \(\newcommand{\scal}{\cal S}\) \(\newcommand{\wcal}{\cal W}\) \(\newcommand{\ecal}{\cal E}\) \(\newcommand{\coords}[2]{\left\{#1\right\}_{#2}}\) \(\newcommand{\gray}[1]{\color{gray}{#1}}\) \(\newcommand{\lgray}[1]{\color{lightgray}{#1}}\) \(\newcommand{\rank}{\operatorname{rank}}\) \(\newcommand{\row}{\text{Row}}\) \(\newcommand{\col}{\text{Col}}\) \(\renewcommand{\row}{\text{Row}}\) \(\newcommand{\nul}{\text{Nul}}\) \(\newcommand{\var}{\text{Var}}\) \(\newcommand{\corr}{\text{corr}}\) \(\newcommand{\len}[1]{\left|#1\right|}\) \(\newcommand{\bbar}{\overline{\bvec}}\) \(\newcommand{\bhat}{\widehat{\bvec}}\) \(\newcommand{\bperp}{\bvec^\perp}\) \(\newcommand{\xhat}{\widehat{\xvec}}\) \(\newcommand{\vhat}{\widehat{\vvec}}\) \(\newcommand{\uhat}{\widehat{\uvec}}\) \(\newcommand{\what}{\widehat{\wvec}}\) \(\newcommand{\Sighat}{\widehat{\Sigma}}\) \(\newcommand{\lt}{<}\) \(\newcommand{\gt}{>}\) \(\newcommand{\amp}{&}\) \(\definecolor{fillinmathshade}{gray}{0.9}\) Session Objectives
Upon completing this session, students will be able to:
(CO 1) Insert other types of files – Sketchup, AutoCAD
(CO 2) Advanced render settings
(CO 3) Edit render qualities
(CO 4) Understand and make cloud renderings
(CO 5) Save Rendering outputs
 Session Highlights
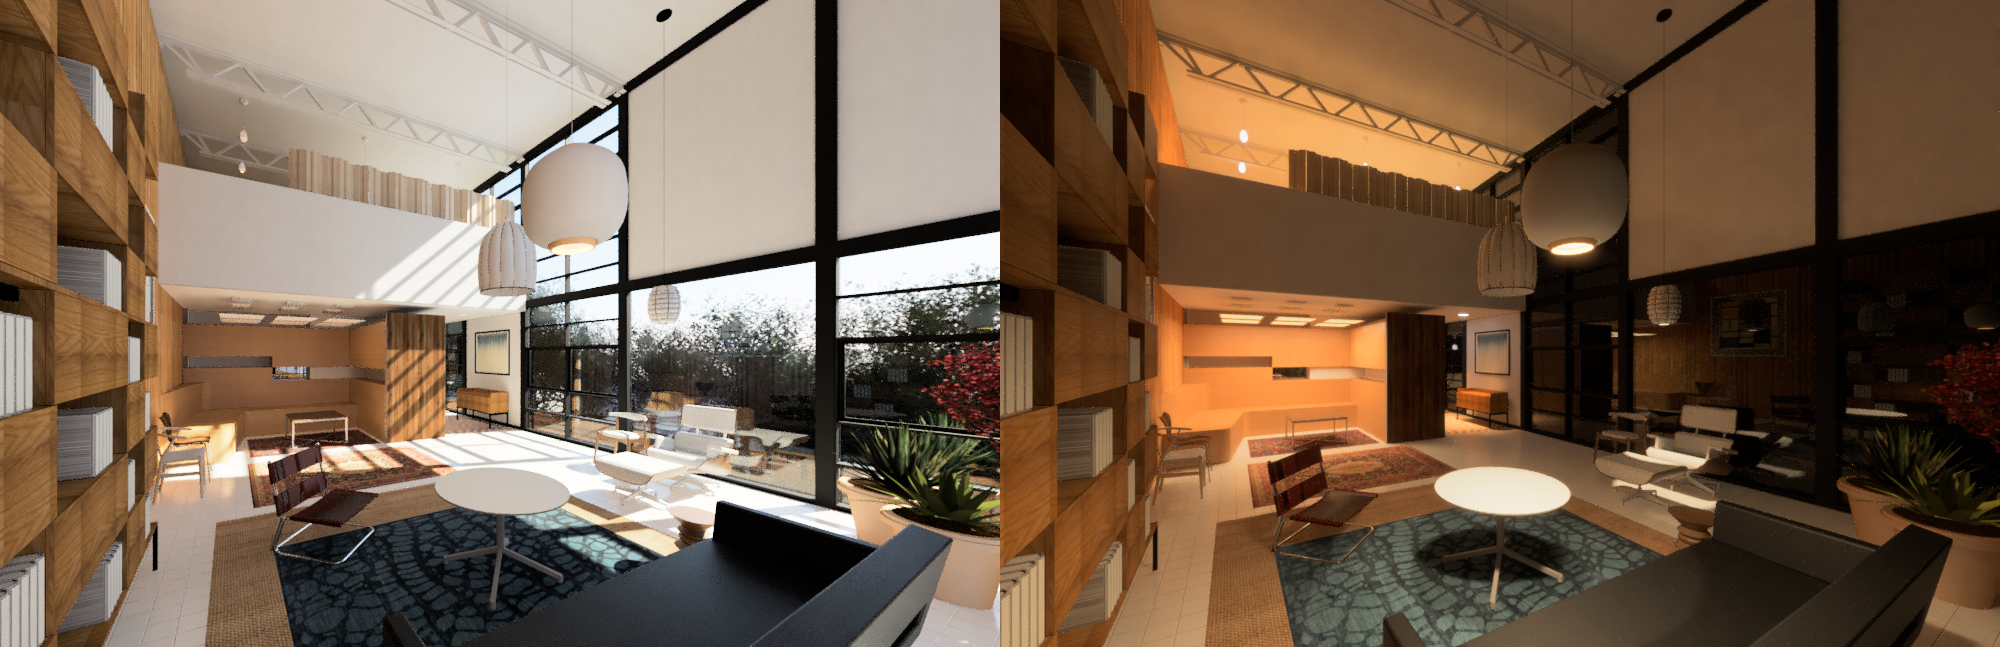
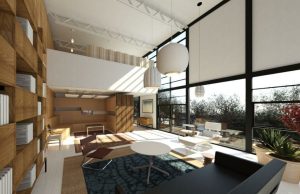
At the end of the session, students can create the graphics below.
 Lecture Contents
(CO 1) Insert other types of files – Sketchup, AutoCAD

A YouTube element has been excluded from this version of the text. You can view it online here: https://iastate.pressbooks.pub/visualgraphiccomm/?p=108
Although many manufactures provide Revit Family and Revit also provide numerous libraries, designers always seek new models and objects for their design and renderings. Sketchup 3D Warehouse provides a great library from designers and manufacturers. I added three Video tutorials to import the Sketchup model to Revit Family for your reference. You may try.
- Sketchup Model to Revit
Importing SketchUp Files into Revit Tutorial - Sketchup Model to Revit – Material changes
Revit Architecture | Convert SketchUp Models Into Revit(With Materials) - Complex 3D max Model to Revit – Hide the complex model lines in Revit (Super advanced level)
AMAZING REVIT 1 – FROM 3DS MAX TO REVIT WITHOUT VIEWING TRIANGLES EDGES
Sketchup model to Revit with updating material changes
- [STEP 1] Sketchup Model to DXF file
- Open the Sketchup model in Sketchup, or your download furniture model from a 3D warehouse. In this process, you may need Sketchup Pro.
- Create layers by material. If you have 3 materials, create 3 layers with unique names (e.g. 000_Chair_sk_seat_01, 000_Chair_sk_leg_01, 000_Chair_sk_base_01)
- The entire model until there is nothing left to explode.

Modeling credit: Vojislav N. downloaded from 3D warehouse
-
- Select one material > Mouse right click and Select > All with the same material
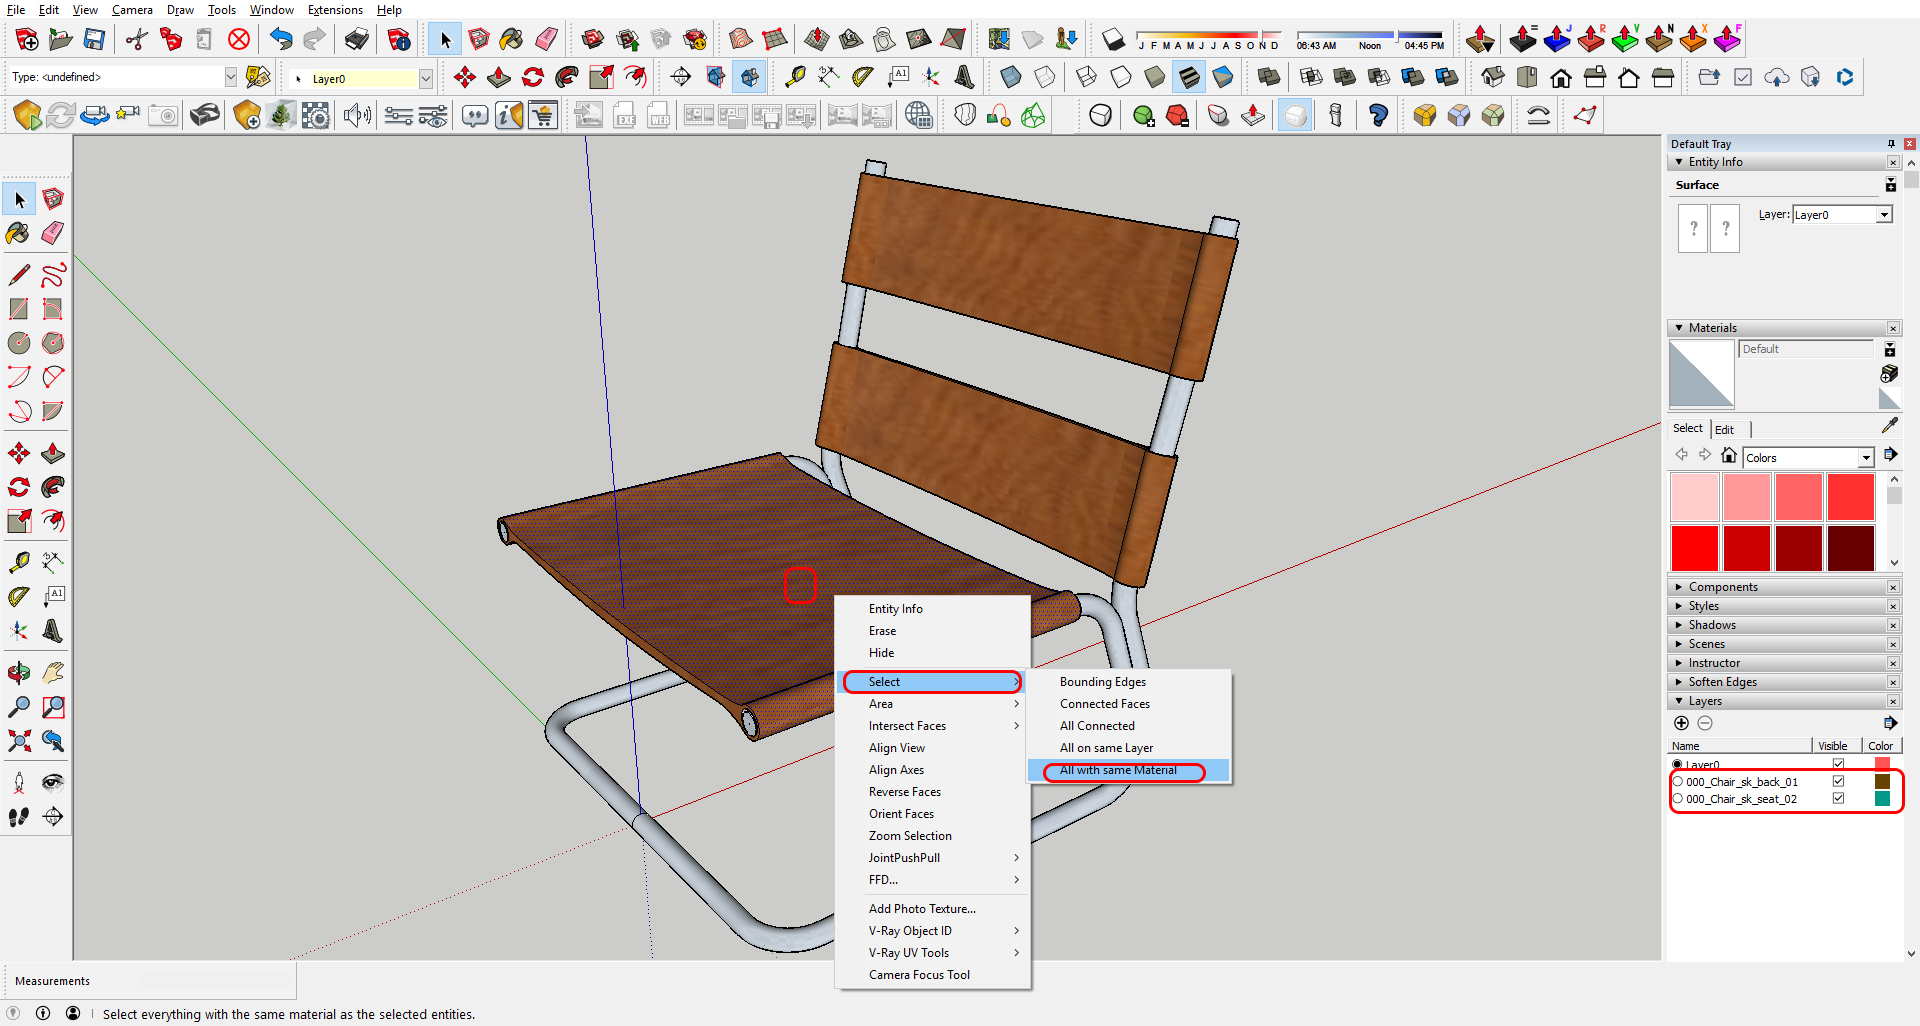
Modeling credit: Vojislav N. downloaded from 3D warehouse
- Select one material > Mouse right click and Select > All with the same material
-
- Change layer in [Entity Info] Tray by selecting the desired layer that you previously made
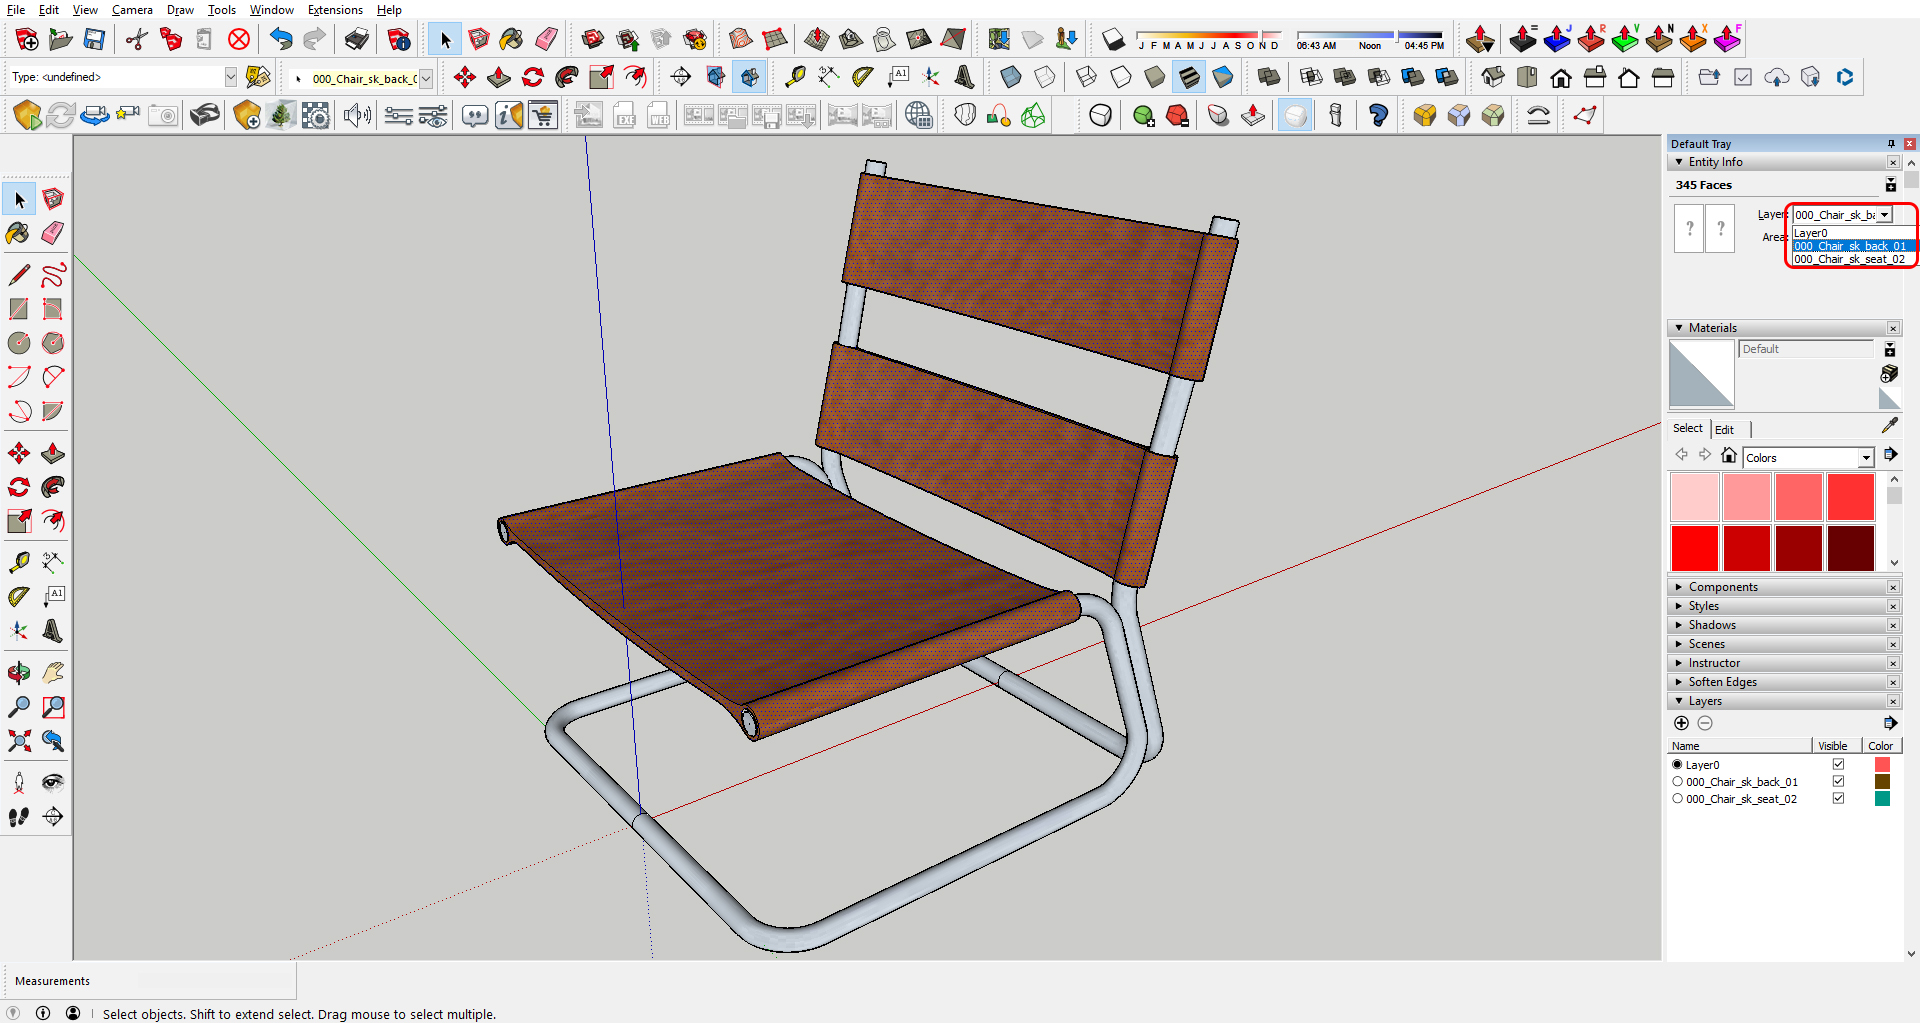
Modeling credit: Vojislav N. downloaded from 3D warehouse
- Change layer in [Entity Info] Tray by selecting the desired layer that you previously made
-
- Do the same procedure (material selection and layer change) for the other materials
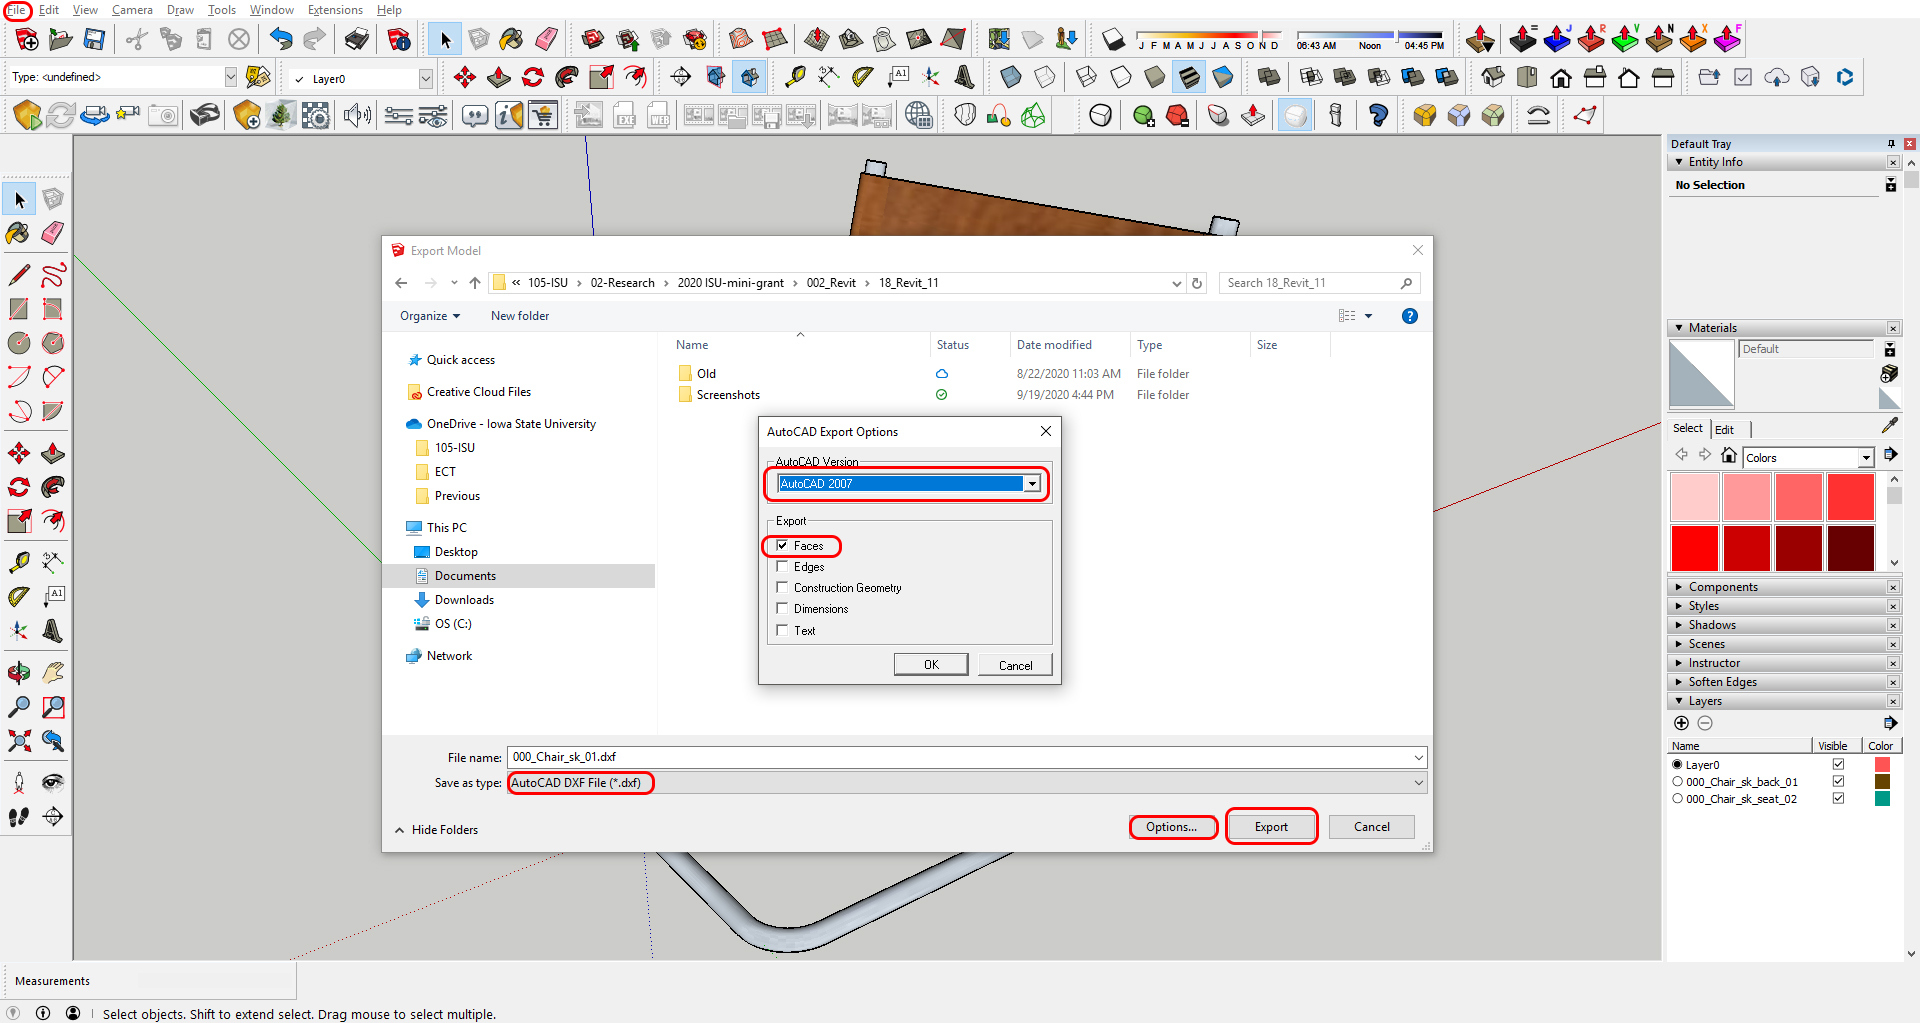
- Export > 3D model > Select DXF file > Click option > Select only Faces > Version 2007> OK > Export
Modeling credit: Vojislav N. downloaded from 3D warehouse
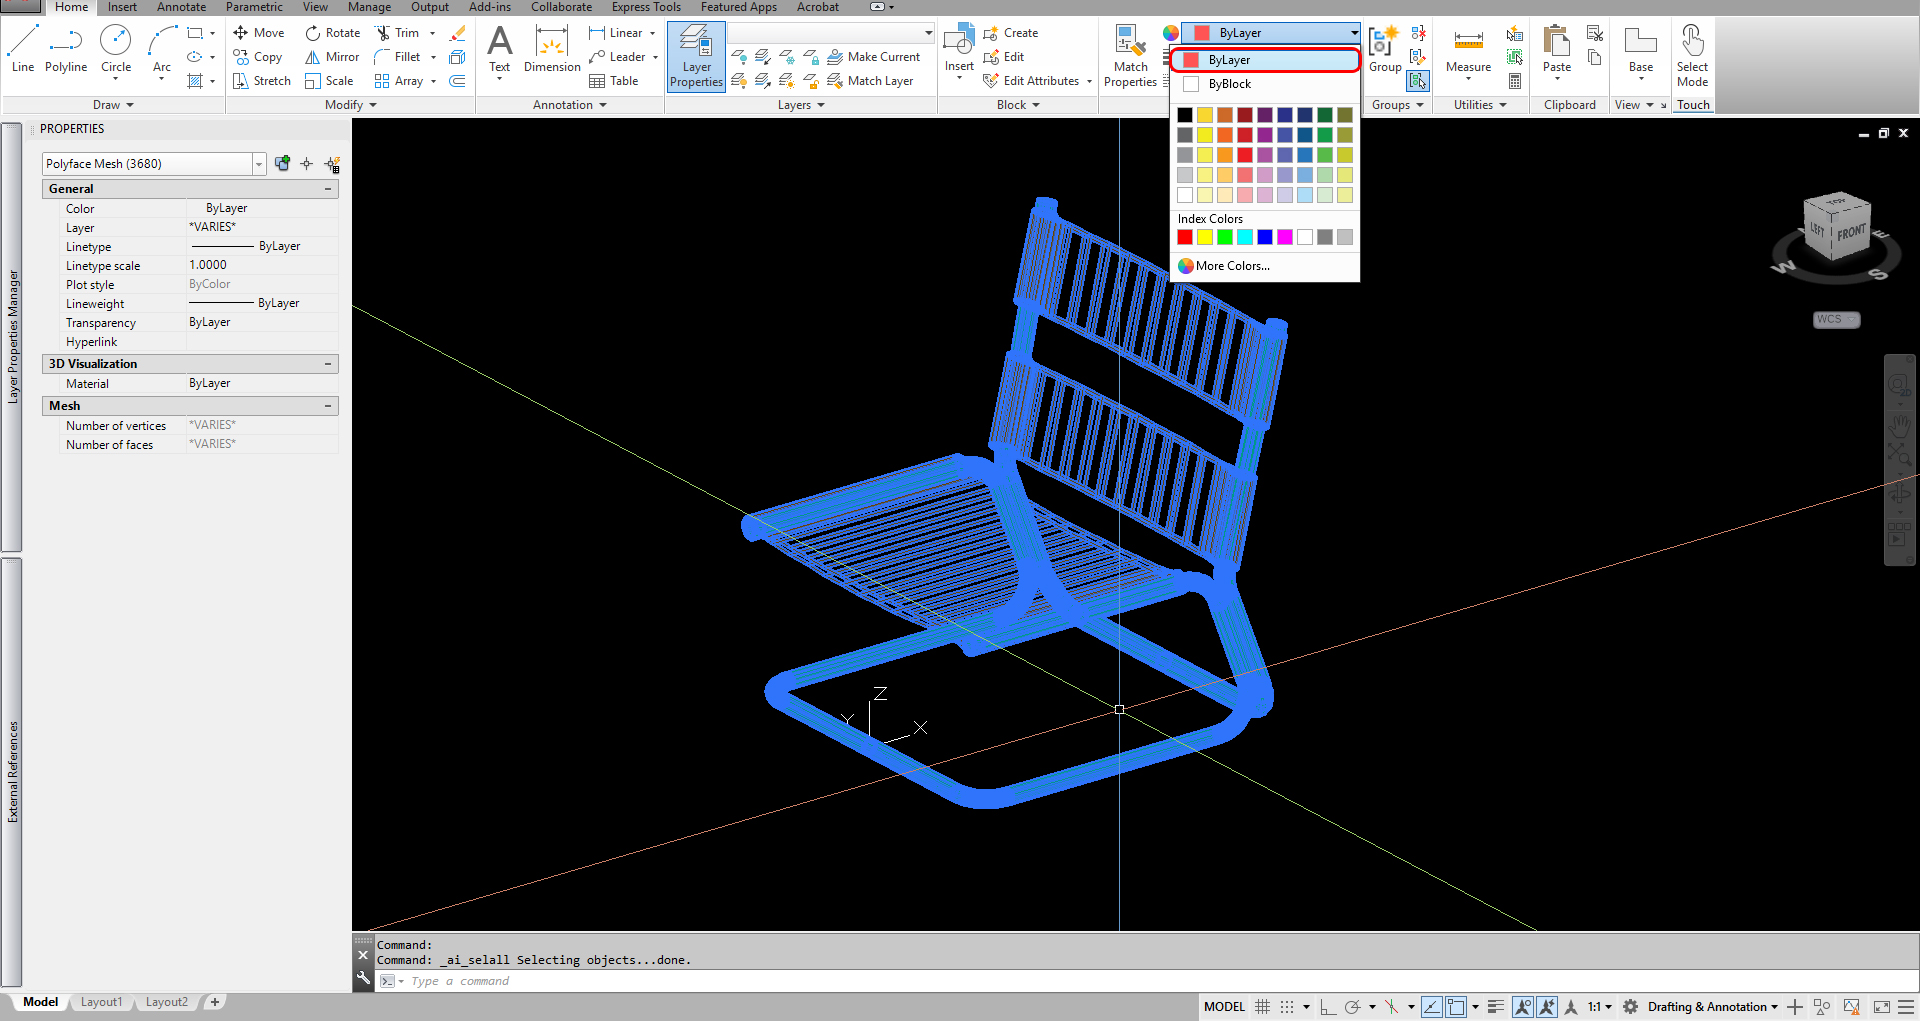
- [STEP 2] DXF file Properties change
- Open AutoCAD
- Open the DXF file in AutoCAD. It will show in a 3D view
- Select all lines by pressing [Ctrl+A]
- Change Object color from [Home] tab > Color [By Layer]
- Save the DXF file with Version 2007
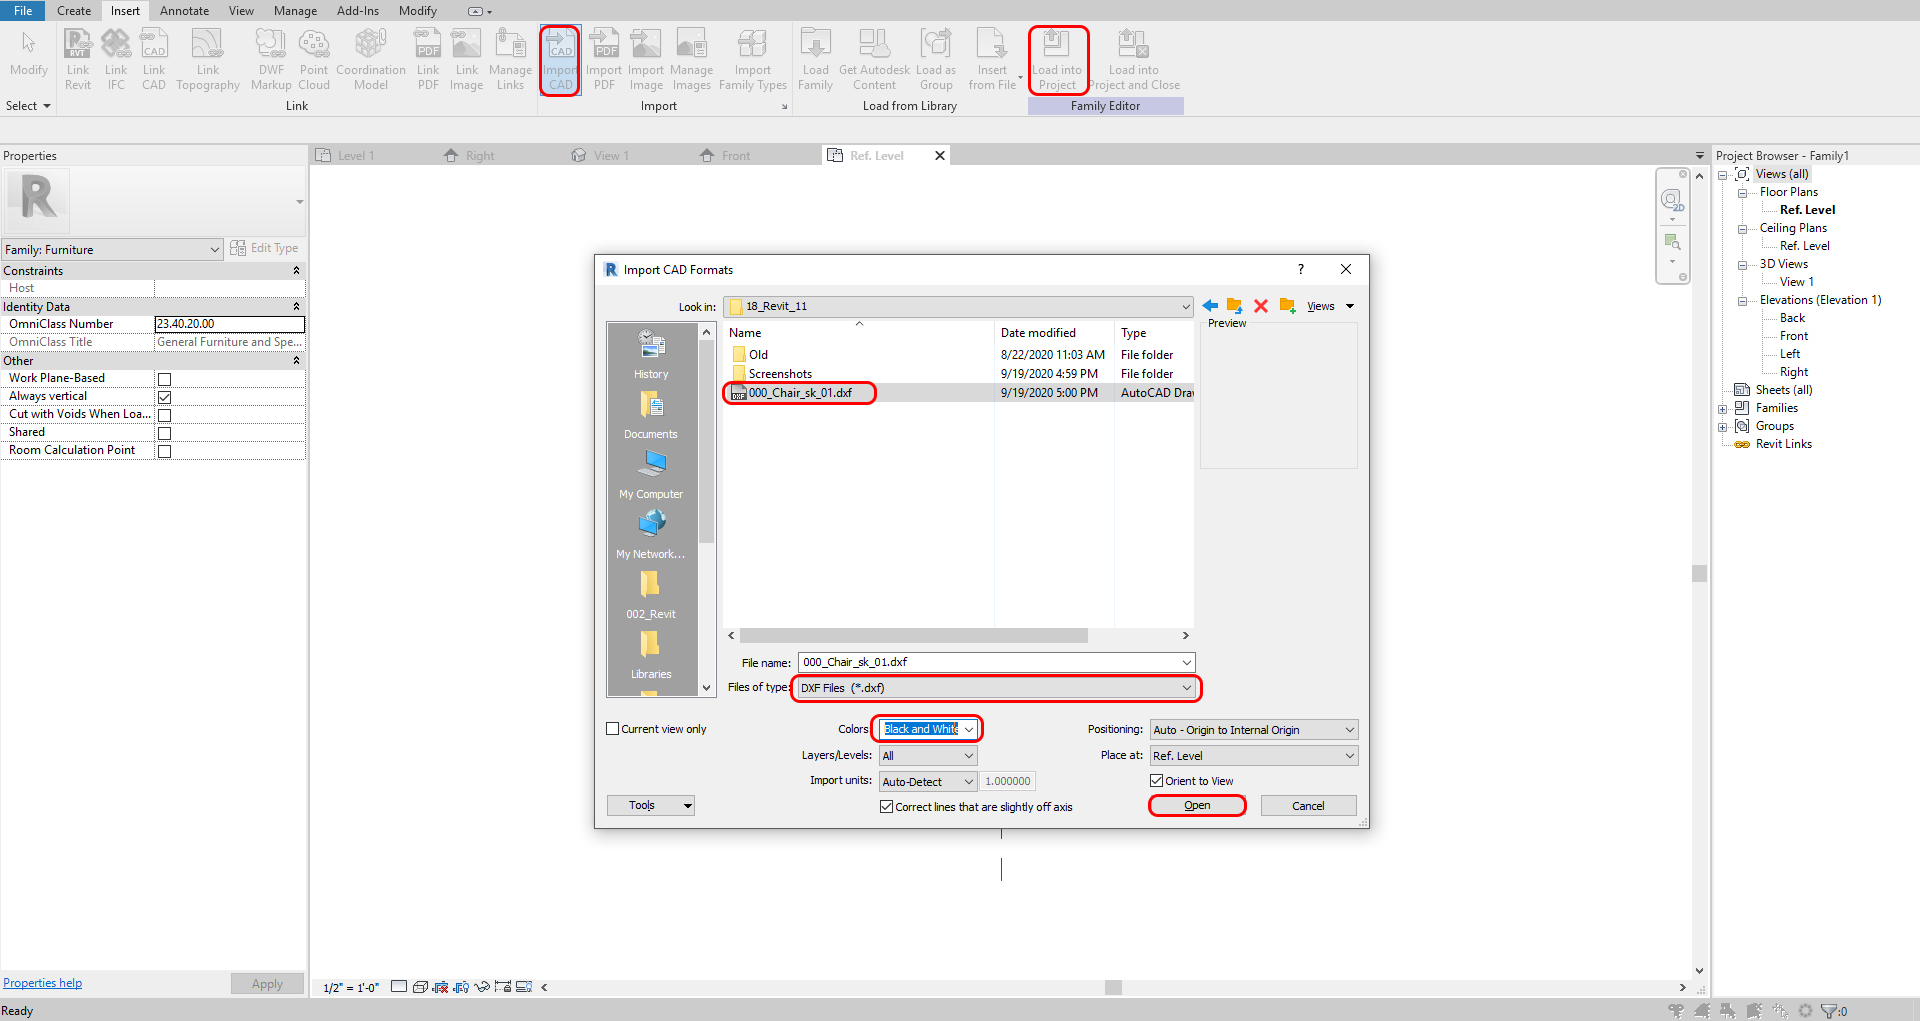
- [STEP 3] Import DWF file (Furniture) to Revit
- File > New > Family > Select Family Template file (Furniture)
- Insert tab > Import CAD > Change files of type to DXF > Select the file > Click [Open] > Save the family file > Load into Project
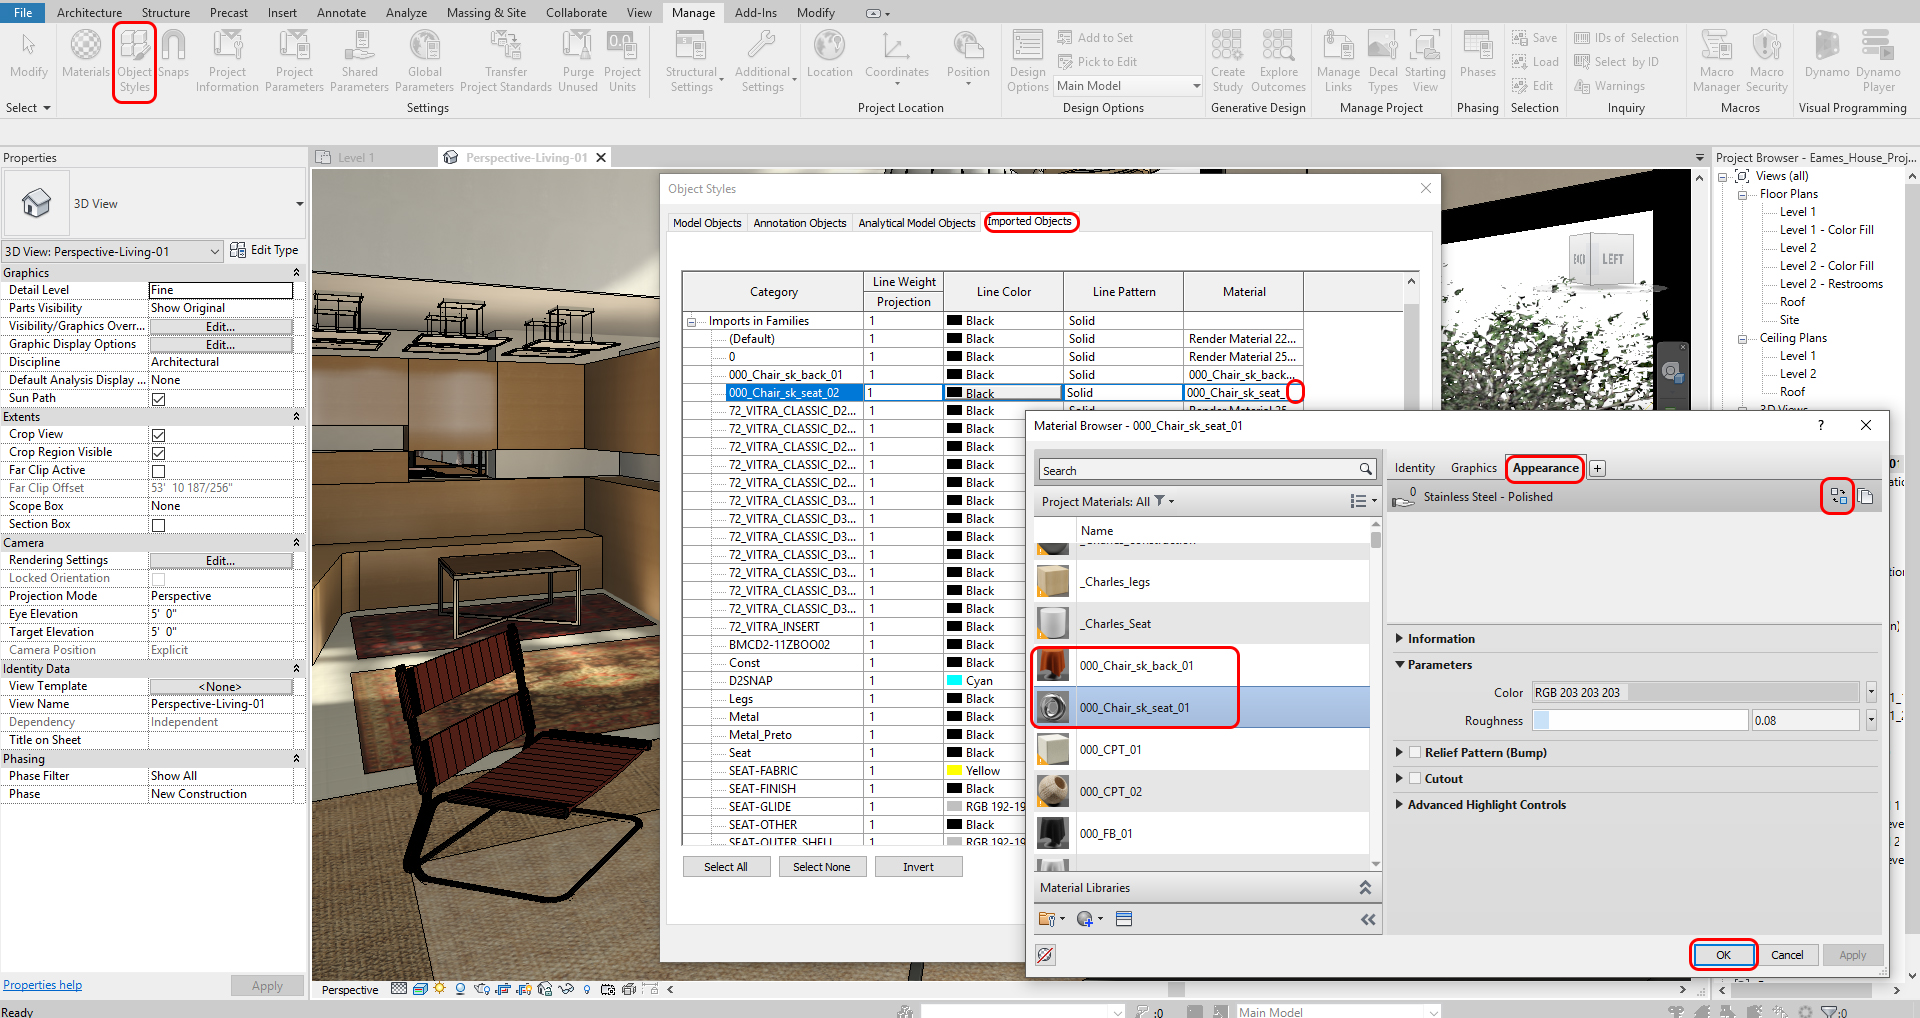
- [STEP 4] Change materials for an imported file in the Revit project file
- Manage tab > Object Style
- Click Imported objects
- Change material by clicking the material slot
(CO 2) Advanced render settings

A YouTube element has been excluded from this version of the text. You can view it online here: https://iastate.pressbooks.pub/visualgraphiccomm/?p=108
Region renders
The Region render function saves time while rendering
- [STEP 1] Check Region on Render Setting
- [STEP 2] You will see RED square on the perspective view. You can adjust the box that you wish to render
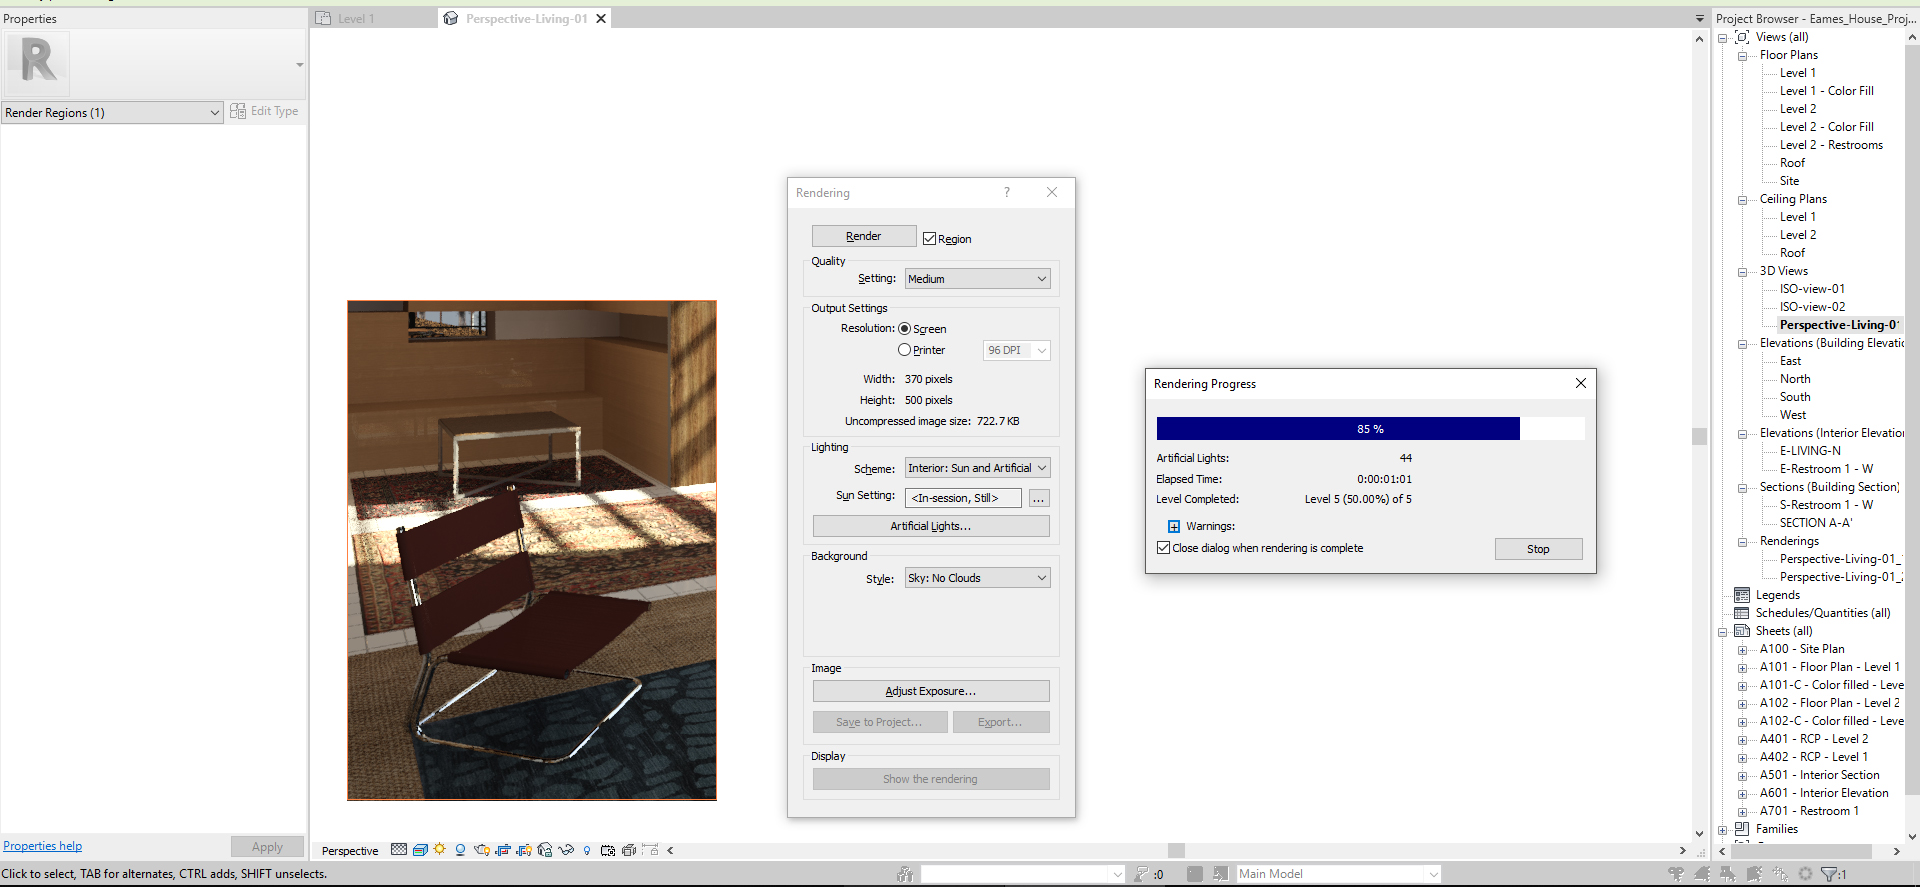
Output Settings
The default setting is Screen, which shows the entire screen size. If you need a perspective view for presentations or print, your rendering size should be a different setting
- [STEP 1] Click Print on Render Settings
- [STEP 2] Change the resolution
- 75 DPI – Screen presentation
- 150 DPI – Regular print size
- 300 DPI – Fine print size
- 600 DPI – Not used
- [STEP 3] If you need to change image size, you can adjust the width and height on Crop Region Size
Render image
- [STEP 1] After your rendering process is done, you can save the image in the Revit project file for your future use. You can find the saved rendering under the project browser by clicking [Save to Project] on the [Rendering settings] window. You can include the rendered images on the sheets with a titleblock.
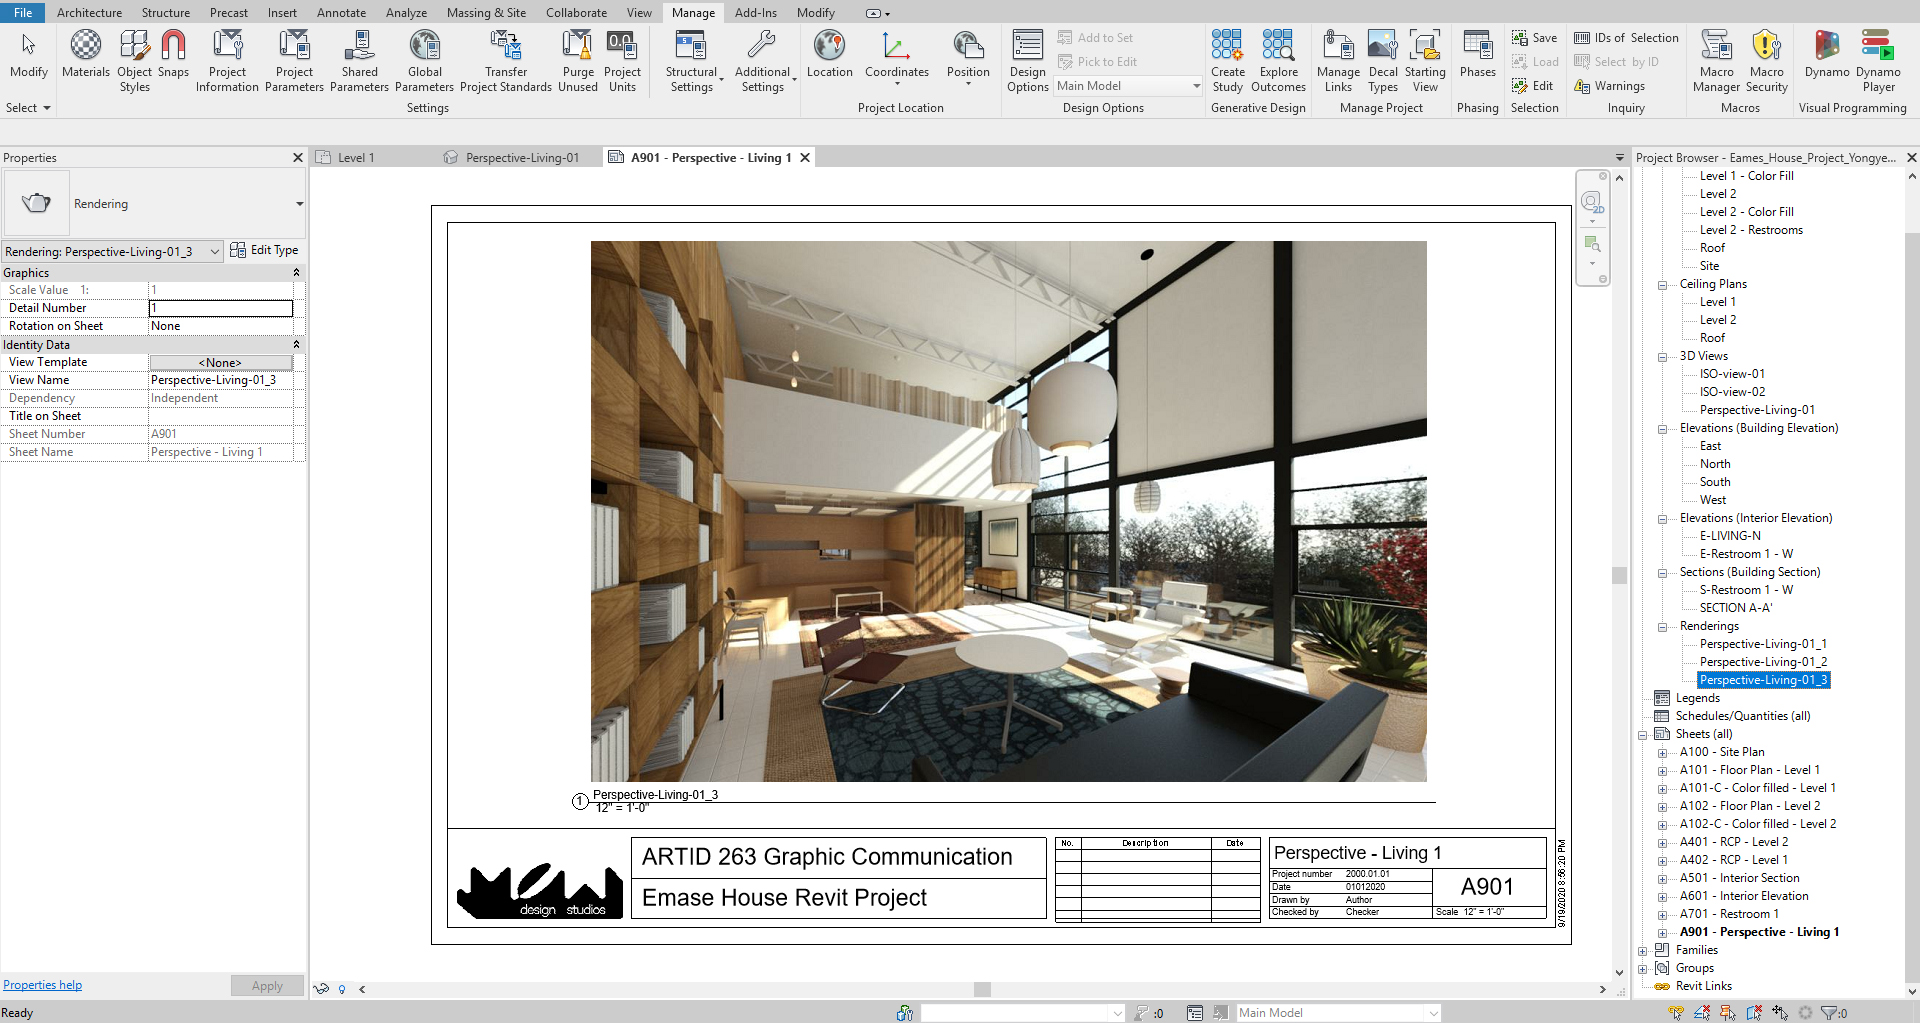
- [STEP 2] You can save the rendering with different formats by clicking [Export] under the image on [Render settings]. Typically, save JPG for photoshopping.
Render Background
- [STEP 1] You can add a background for your render [background]
- The default setting can be Revit Sky, which can correspond with a specific date and time.
- You are also able to add an image as a background.
- You can set as a Transparent image. The file type must be PNG or TIFF file to save a transparent image for the background.
(CO 3) Edit render qualities

A YouTube element has been excluded from this version of the text. You can view it online here: https://iastate.pressbooks.pub/visualgraphiccomm/?p=108
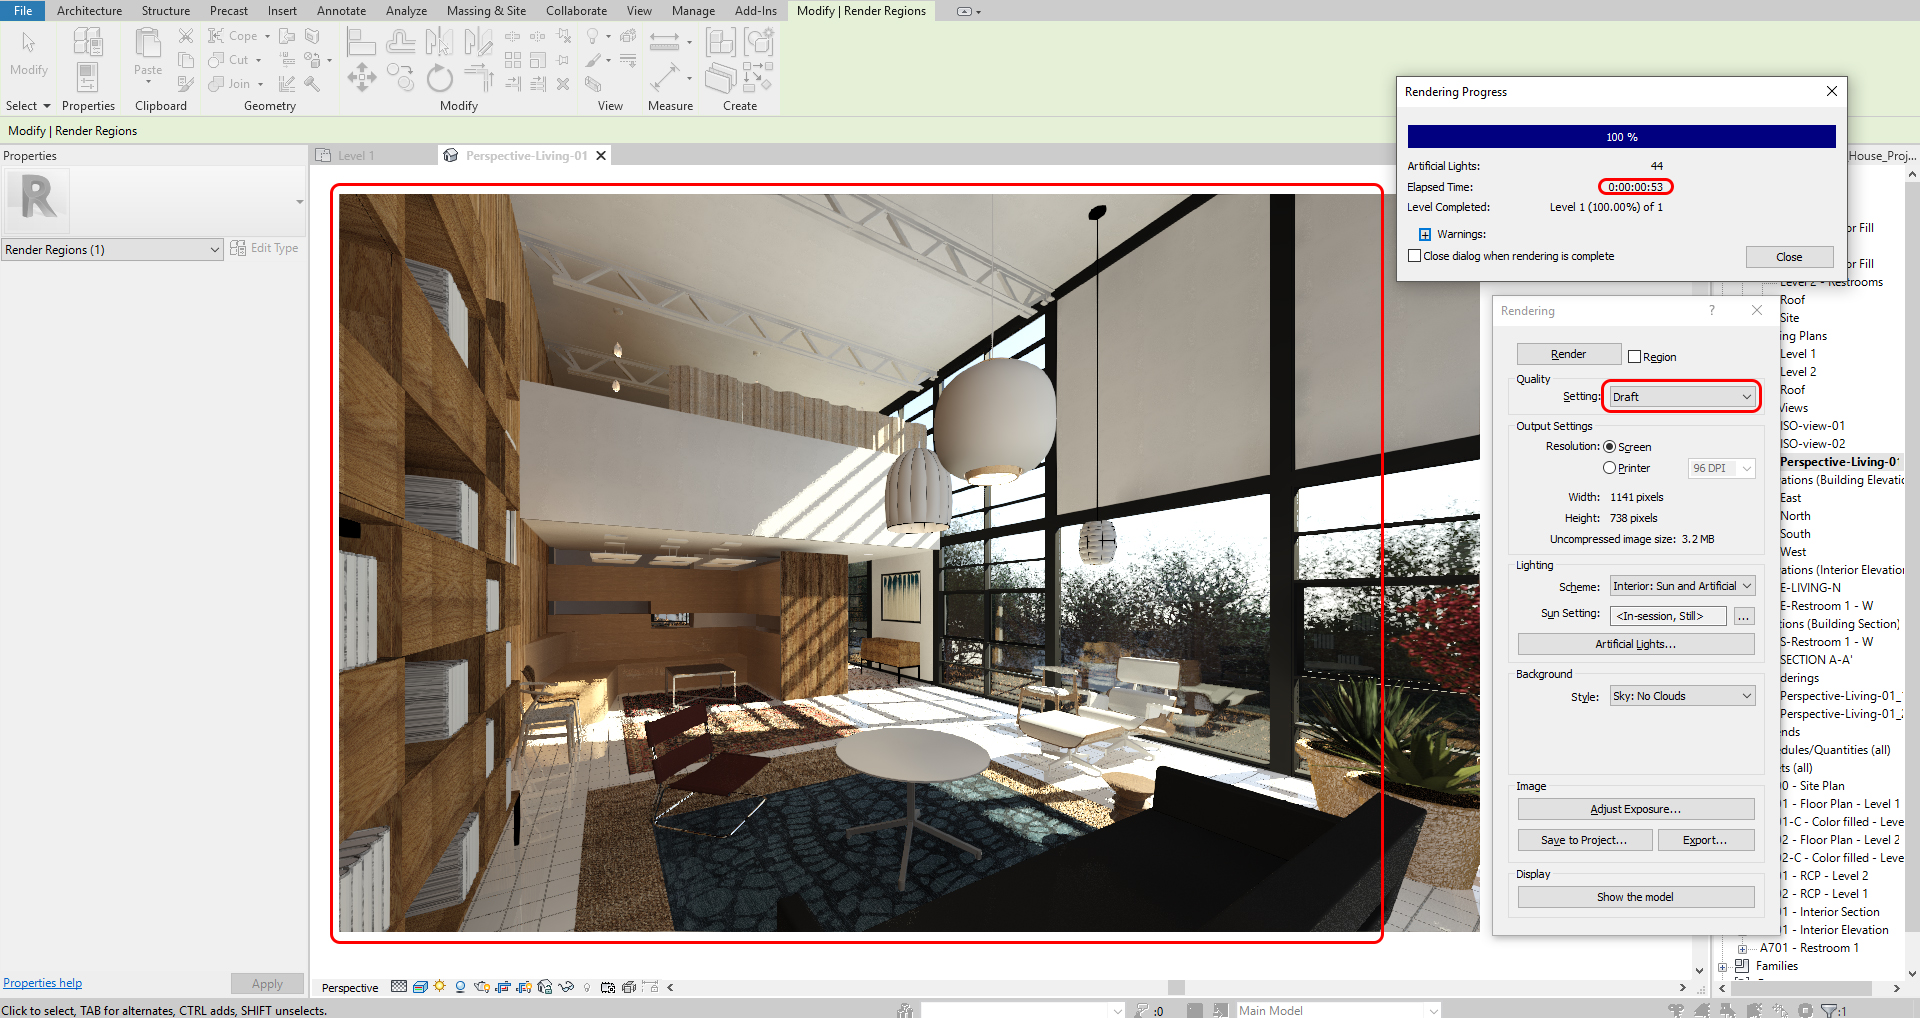
Change the render quality
- Draft – for a test render, but not recommended, because of lighting quality, reflection, bump, and refraction on finishesDraft-Render time 1min
- Med – is recommended for a test render. Not the best quality, but it is acceptable
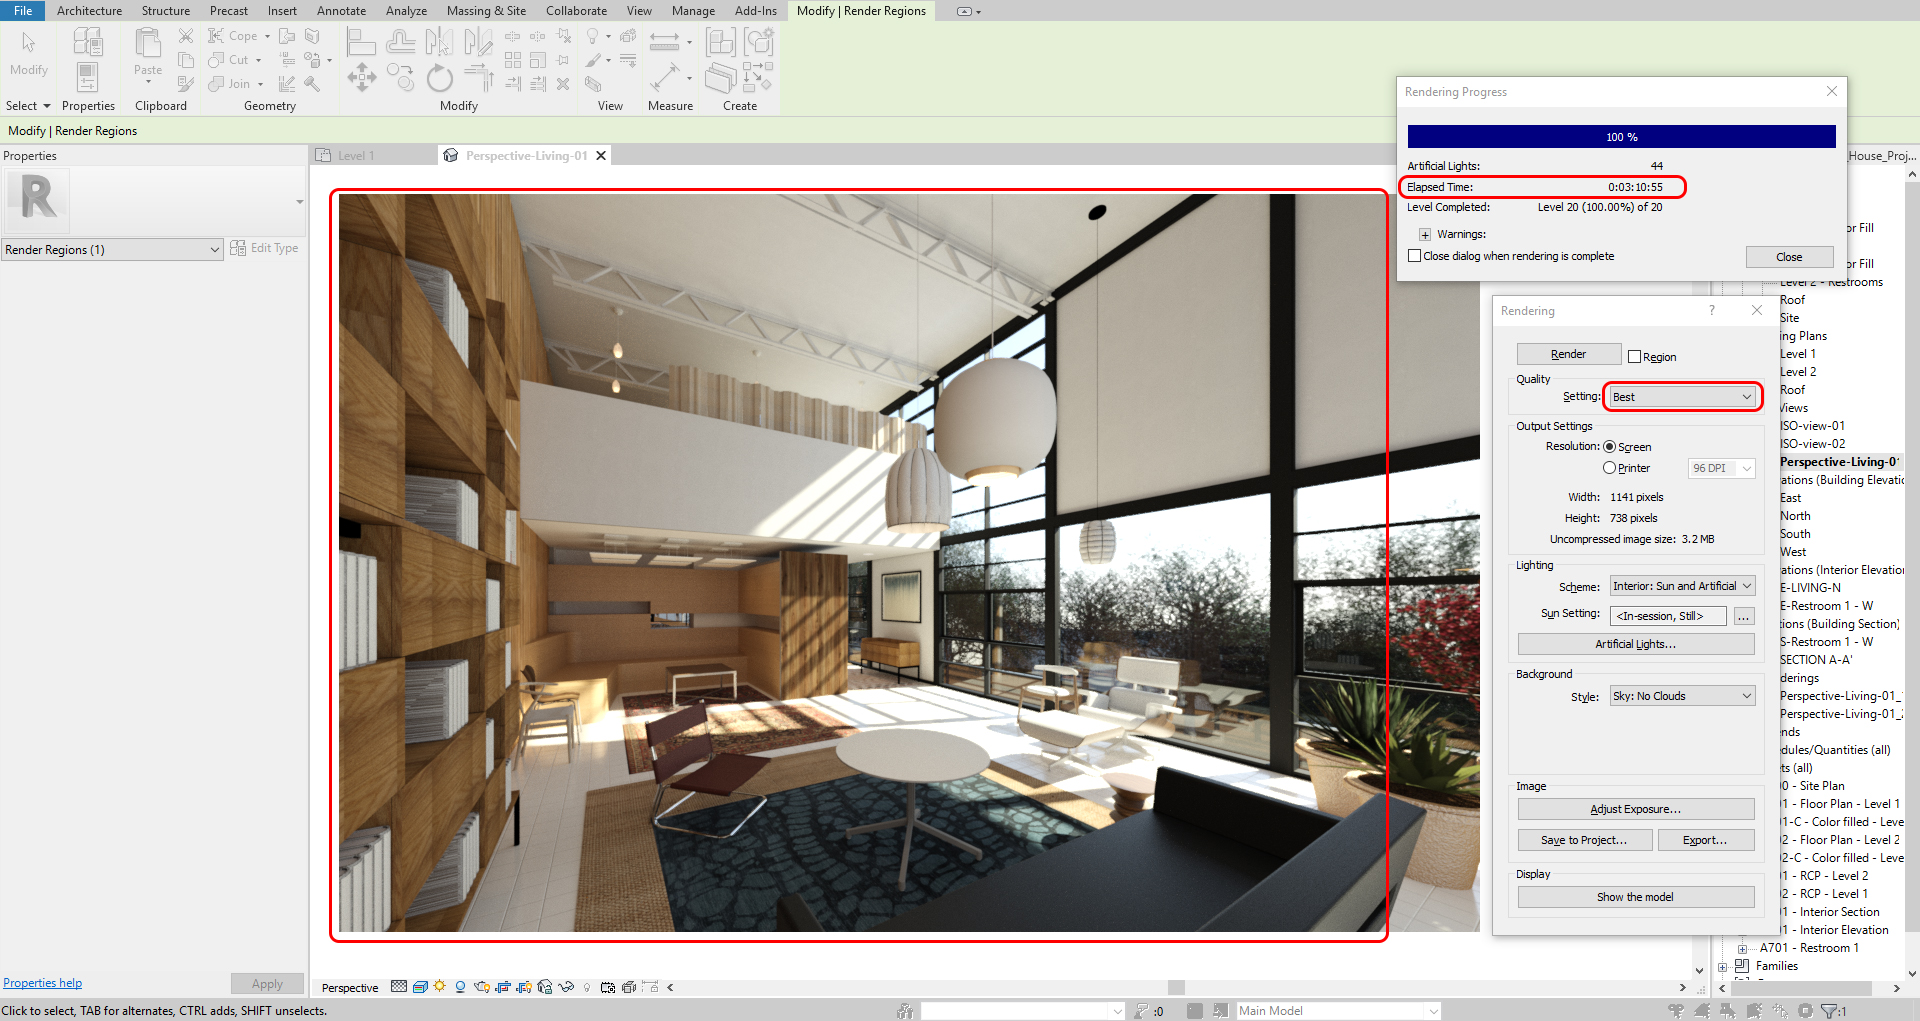
- High – is recommended for a final render because of time and quality
- Best – Although it produces the best quality, it is not recommended due to rendering time. Best-Render time 2hrs
(CO 4) Understand and make Cloud Renderings

A YouTube element has been excluded from this version of the text. You can view it online here: https://iastate.pressbooks.pub/visualgraphiccomm/?p=108
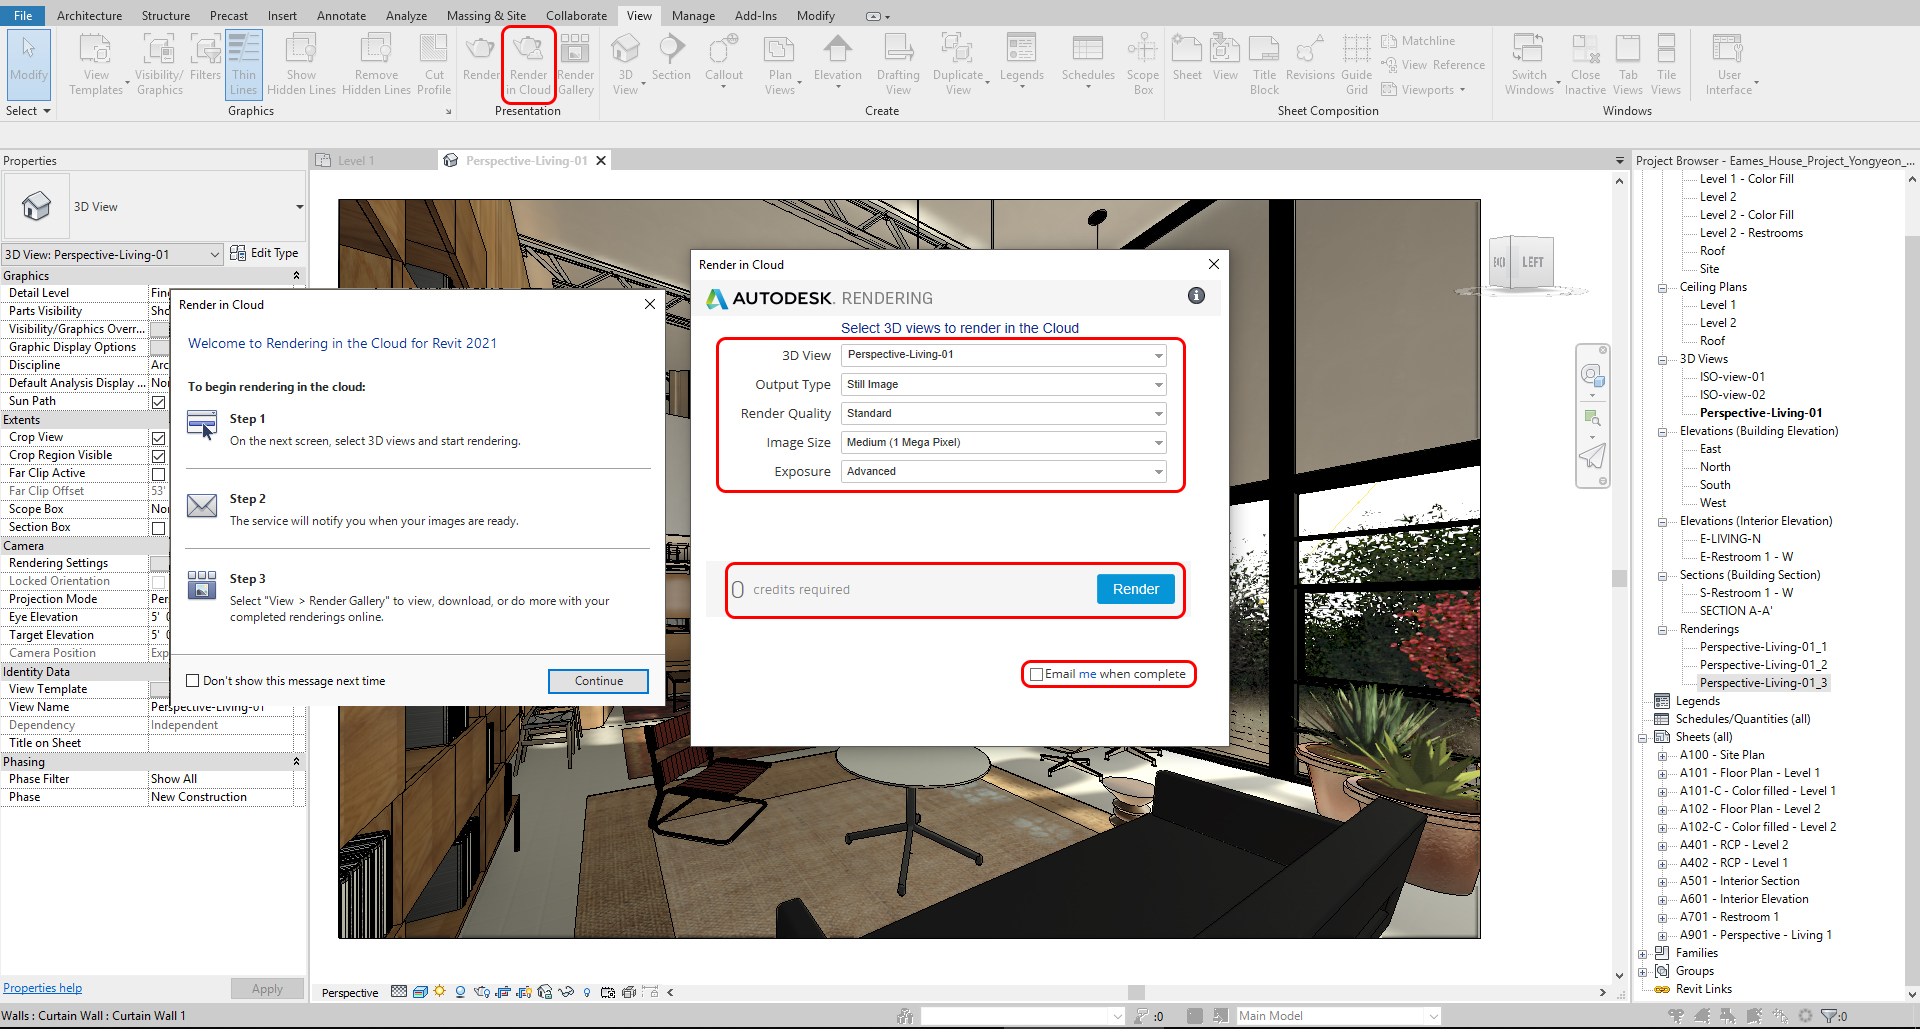
Cloud rendering
Autodesk provides users with Cloud rendering. Design firms have great hardware to quickly render but Autodesk also provides its servers for rendering. The render quality is a bit better and faster than Revit rendering. Cloud rendering is a paid service, however, for educational purposes, it is offered for free.
- [STEP 1] Once your render settings are what you want to produce, click [Render in Cloud] from [View] tab, under [Presentation] panel
- [STEP 2] If you are a first time user of Cloud Render, you must Sign-in to an Autodesk account (email, PW, text code required)
- [STEP 3] Double-check your view name, output type (Still image), Render Quality, Image Size, Exposure
- [STEP 4] Click email when complete
- [STEP 5] Click Render
(CO 5) Save Cloud Rendering outputs

A YouTube element has been excluded from this version of the text. You can view it online here: https://iastate.pressbooks.pub/visualgraphiccomm/?p=108
Get rendering outputs
- [STEP 1] Check the render results
- [STEP 2] Once you received the notification email, you can check the results in Render Gallery

- [STEP 3] The Render Gallery website will open, click View Project
- [STEP 4] Click the rendered thumbnail image > Click [Post-Processing] to change expose level and color balance
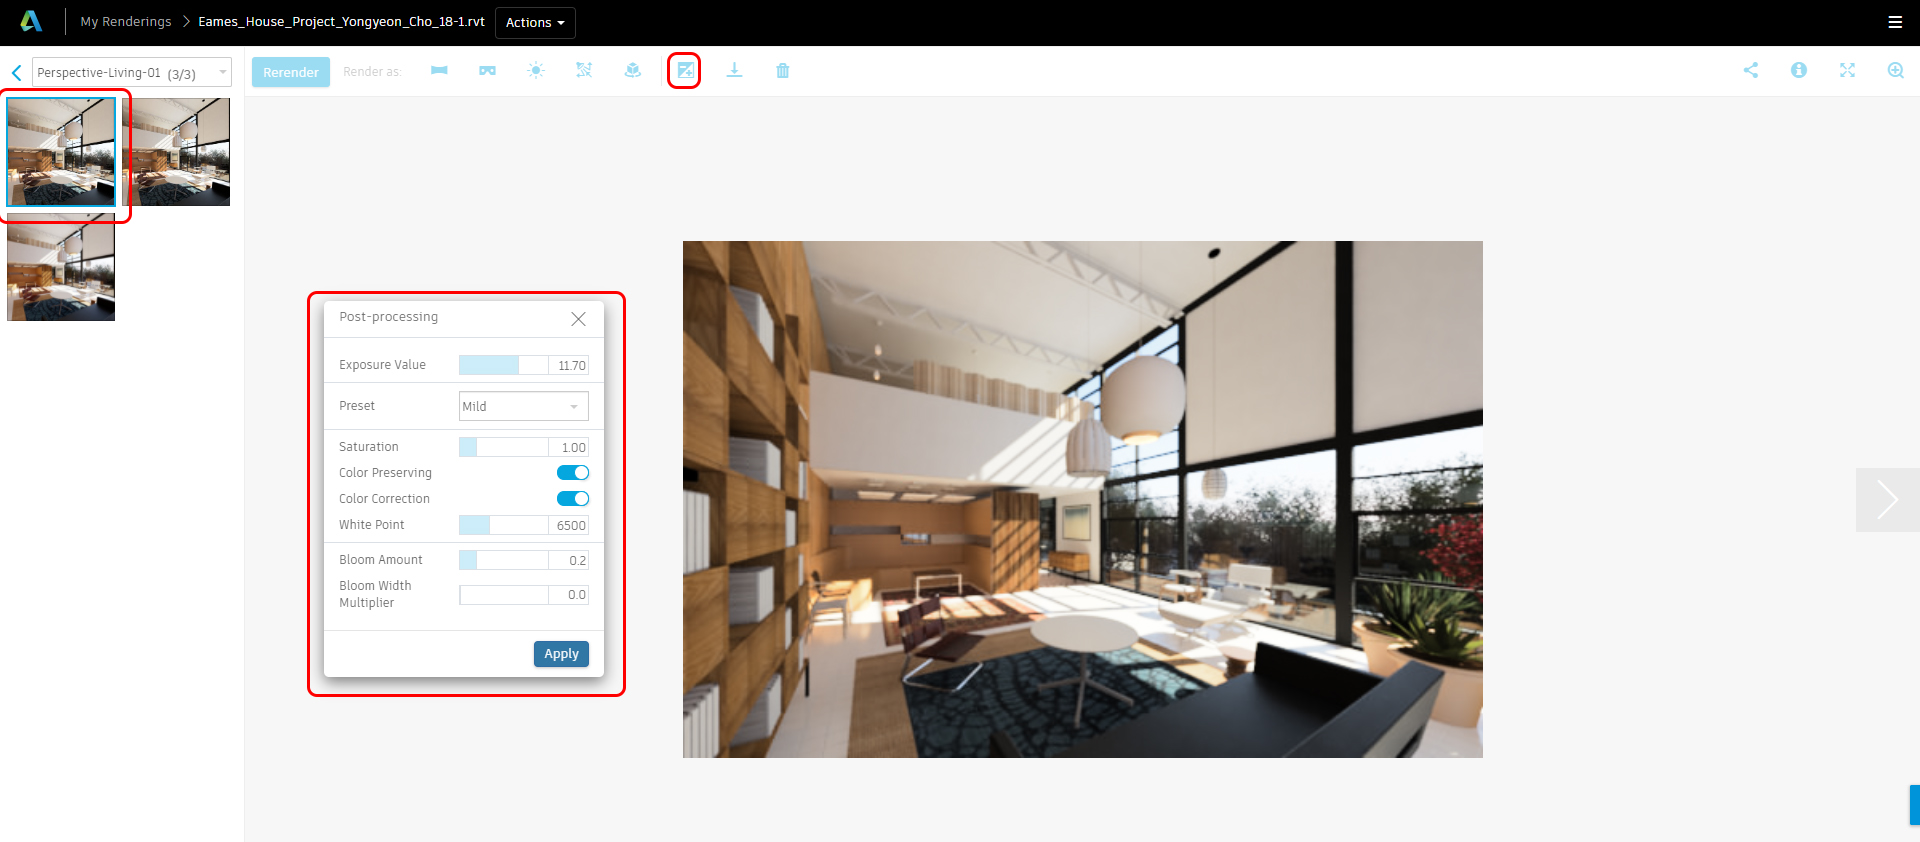
image credit: Autodesk cloud rendering
- [STEP 5] Click Download Icon > Click JPEG
- [STEP 6] If you need Transparent Background (for photoshop), click PNG
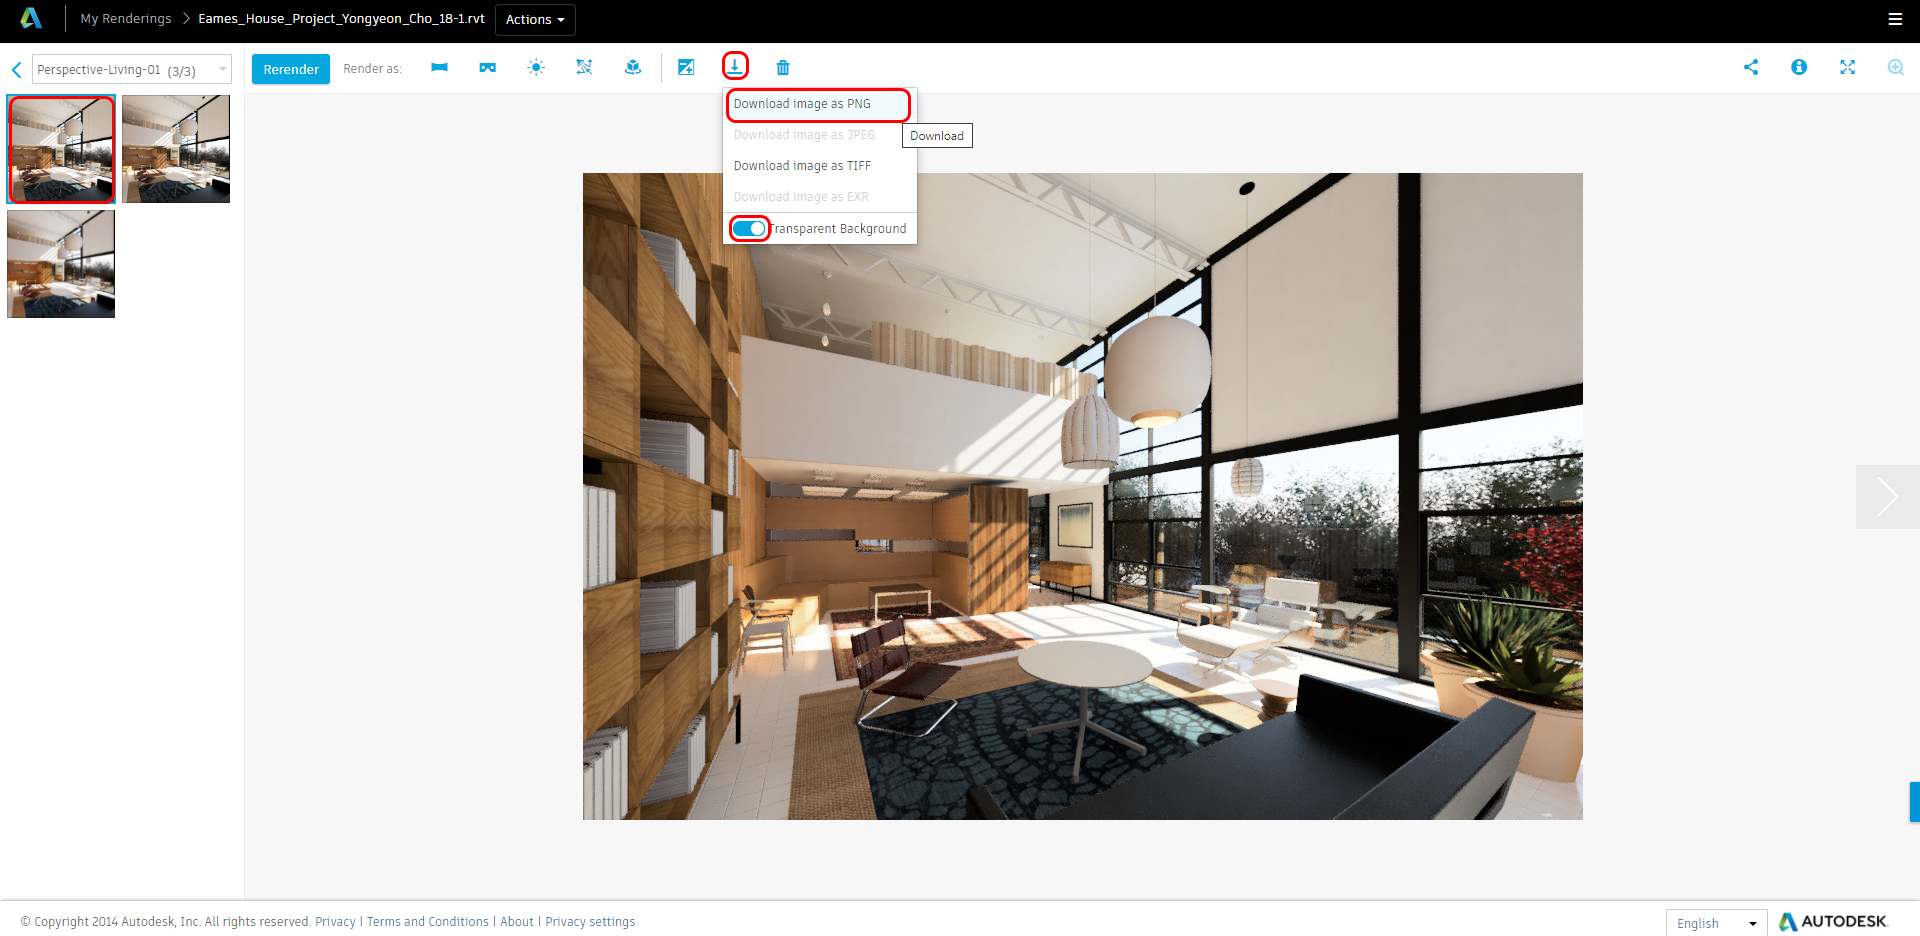
image credit: Autodesk cloud rendering
Revit rendering vs. Cloud rendering
| Revit Rendering | Revit Cloud Rendering | |
 | ||
| Render time | Longer | Vary (shorter) |
| Hardware use | Your hardware | No hardware required |
| Control – Image size | Fully controllable | Few options |
| Control – Lighting | Manual | Automatic |
SAVE the file before closing the application.
Save in a different location for the backup (e.g., a cloud folder)
 References
Balkan Architect. (2018, April 12). Importing SketchUp Files into Revit Tutorial. Retrieved October 23, 2020, from https://www.youtube.com/watch?v=4VFK-KEOMZc
M.T.H Revit Tutorials. (2018, May 4). Convert SketchUp Models Into Revit (with Materials). Retrieved October 23, 2020, from https://www.youtube.com/watch?v=k_1g3077jxI
Pedroeron. (2011, Oct 29). From 3ds Max to Revit without viewing Triangles edges. Retrieved October 23, 2020, from https://www.youtube.com/watch?v=ZghL7hRM-gM