1.5: File Management
- Page ID
- 14281
\( \newcommand{\vecs}[1]{\overset { \scriptstyle \rightharpoonup} {\mathbf{#1}} } \)
\( \newcommand{\vecd}[1]{\overset{-\!-\!\rightharpoonup}{\vphantom{a}\smash {#1}}} \)
\( \newcommand{\dsum}{\displaystyle\sum\limits} \)
\( \newcommand{\dint}{\displaystyle\int\limits} \)
\( \newcommand{\dlim}{\displaystyle\lim\limits} \)
\( \newcommand{\id}{\mathrm{id}}\) \( \newcommand{\Span}{\mathrm{span}}\)
( \newcommand{\kernel}{\mathrm{null}\,}\) \( \newcommand{\range}{\mathrm{range}\,}\)
\( \newcommand{\RealPart}{\mathrm{Re}}\) \( \newcommand{\ImaginaryPart}{\mathrm{Im}}\)
\( \newcommand{\Argument}{\mathrm{Arg}}\) \( \newcommand{\norm}[1]{\| #1 \|}\)
\( \newcommand{\inner}[2]{\langle #1, #2 \rangle}\)
\( \newcommand{\Span}{\mathrm{span}}\)
\( \newcommand{\id}{\mathrm{id}}\)
\( \newcommand{\Span}{\mathrm{span}}\)
\( \newcommand{\kernel}{\mathrm{null}\,}\)
\( \newcommand{\range}{\mathrm{range}\,}\)
\( \newcommand{\RealPart}{\mathrm{Re}}\)
\( \newcommand{\ImaginaryPart}{\mathrm{Im}}\)
\( \newcommand{\Argument}{\mathrm{Arg}}\)
\( \newcommand{\norm}[1]{\| #1 \|}\)
\( \newcommand{\inner}[2]{\langle #1, #2 \rangle}\)
\( \newcommand{\Span}{\mathrm{span}}\) \( \newcommand{\AA}{\unicode[.8,0]{x212B}}\)
\( \newcommand{\vectorA}[1]{\vec{#1}} % arrow\)
\( \newcommand{\vectorAt}[1]{\vec{\text{#1}}} % arrow\)
\( \newcommand{\vectorB}[1]{\overset { \scriptstyle \rightharpoonup} {\mathbf{#1}} } \)
\( \newcommand{\vectorC}[1]{\textbf{#1}} \)
\( \newcommand{\vectorD}[1]{\overrightarrow{#1}} \)
\( \newcommand{\vectorDt}[1]{\overrightarrow{\text{#1}}} \)
\( \newcommand{\vectE}[1]{\overset{-\!-\!\rightharpoonup}{\vphantom{a}\smash{\mathbf {#1}}}} \)
\( \newcommand{\vecs}[1]{\overset { \scriptstyle \rightharpoonup} {\mathbf{#1}} } \)
\(\newcommand{\longvect}{\overrightarrow}\)
\( \newcommand{\vecd}[1]{\overset{-\!-\!\rightharpoonup}{\vphantom{a}\smash {#1}}} \)
\(\newcommand{\avec}{\mathbf a}\) \(\newcommand{\bvec}{\mathbf b}\) \(\newcommand{\cvec}{\mathbf c}\) \(\newcommand{\dvec}{\mathbf d}\) \(\newcommand{\dtil}{\widetilde{\mathbf d}}\) \(\newcommand{\evec}{\mathbf e}\) \(\newcommand{\fvec}{\mathbf f}\) \(\newcommand{\nvec}{\mathbf n}\) \(\newcommand{\pvec}{\mathbf p}\) \(\newcommand{\qvec}{\mathbf q}\) \(\newcommand{\svec}{\mathbf s}\) \(\newcommand{\tvec}{\mathbf t}\) \(\newcommand{\uvec}{\mathbf u}\) \(\newcommand{\vvec}{\mathbf v}\) \(\newcommand{\wvec}{\mathbf w}\) \(\newcommand{\xvec}{\mathbf x}\) \(\newcommand{\yvec}{\mathbf y}\) \(\newcommand{\zvec}{\mathbf z}\) \(\newcommand{\rvec}{\mathbf r}\) \(\newcommand{\mvec}{\mathbf m}\) \(\newcommand{\zerovec}{\mathbf 0}\) \(\newcommand{\onevec}{\mathbf 1}\) \(\newcommand{\real}{\mathbb R}\) \(\newcommand{\twovec}[2]{\left[\begin{array}{r}#1 \\ #2 \end{array}\right]}\) \(\newcommand{\ctwovec}[2]{\left[\begin{array}{c}#1 \\ #2 \end{array}\right]}\) \(\newcommand{\threevec}[3]{\left[\begin{array}{r}#1 \\ #2 \\ #3 \end{array}\right]}\) \(\newcommand{\cthreevec}[3]{\left[\begin{array}{c}#1 \\ #2 \\ #3 \end{array}\right]}\) \(\newcommand{\fourvec}[4]{\left[\begin{array}{r}#1 \\ #2 \\ #3 \\ #4 \end{array}\right]}\) \(\newcommand{\cfourvec}[4]{\left[\begin{array}{c}#1 \\ #2 \\ #3 \\ #4 \end{array}\right]}\) \(\newcommand{\fivevec}[5]{\left[\begin{array}{r}#1 \\ #2 \\ #3 \\ #4 \\ #5 \\ \end{array}\right]}\) \(\newcommand{\cfivevec}[5]{\left[\begin{array}{c}#1 \\ #2 \\ #3 \\ #4 \\ #5 \\ \end{array}\right]}\) \(\newcommand{\mattwo}[4]{\left[\begin{array}{rr}#1 \amp #2 \\ #3 \amp #4 \\ \end{array}\right]}\) \(\newcommand{\laspan}[1]{\text{Span}\{#1\}}\) \(\newcommand{\bcal}{\cal B}\) \(\newcommand{\ccal}{\cal C}\) \(\newcommand{\scal}{\cal S}\) \(\newcommand{\wcal}{\cal W}\) \(\newcommand{\ecal}{\cal E}\) \(\newcommand{\coords}[2]{\left\{#1\right\}_{#2}}\) \(\newcommand{\gray}[1]{\color{gray}{#1}}\) \(\newcommand{\lgray}[1]{\color{lightgray}{#1}}\) \(\newcommand{\rank}{\operatorname{rank}}\) \(\newcommand{\row}{\text{Row}}\) \(\newcommand{\col}{\text{Col}}\) \(\renewcommand{\row}{\text{Row}}\) \(\newcommand{\nul}{\text{Nul}}\) \(\newcommand{\var}{\text{Var}}\) \(\newcommand{\corr}{\text{corr}}\) \(\newcommand{\len}[1]{\left|#1\right|}\) \(\newcommand{\bbar}{\overline{\bvec}}\) \(\newcommand{\bhat}{\widehat{\bvec}}\) \(\newcommand{\bperp}{\bvec^\perp}\) \(\newcommand{\xhat}{\widehat{\xvec}}\) \(\newcommand{\vhat}{\widehat{\vvec}}\) \(\newcommand{\uhat}{\widehat{\uvec}}\) \(\newcommand{\what}{\widehat{\wvec}}\) \(\newcommand{\Sighat}{\widehat{\Sigma}}\) \(\newcommand{\lt}{<}\) \(\newcommand{\gt}{>}\) \(\newcommand{\amp}{&}\) \(\definecolor{fillinmathshade}{gray}{0.9}\)One of the many attributes of being a successful college student is evidence of time management, communication, and organization skills. Managing the files on a computer is essential to excel at all of these skills. Almost all courses require a computer to access and communicate information. The inability to locate a file on a computer or course management system (like Brightspace D2L or Blackboard) could result in a late or missing assignment, missed conversations with an instructor or classmate, and/or tremendous stress. The primary solution to enhanced computer organization skills is through increased knowledge of Windows’ File Explorer tool (formerly known as Windows Explorer).
File Explorer displays the hierarchical structure of files, folders, and drives on your computer. All data, including applications, program files, etc. is stored on the computer’s disk (also known as disk drive). The primary internal hard drive is known as the C: drive. The contents of a disk are organized into individual files within individual folders. The Document folder is a general storage location for files created in programs like Microsoft Office, whereas photos downloaded from the Internet or a camera are typically stored in the Pictures folder. The Quick Access section displays frequently used folders and files, whereas the This PC view displays information regarding the computer’s storage capacity, and attached storage devices, including optical media.
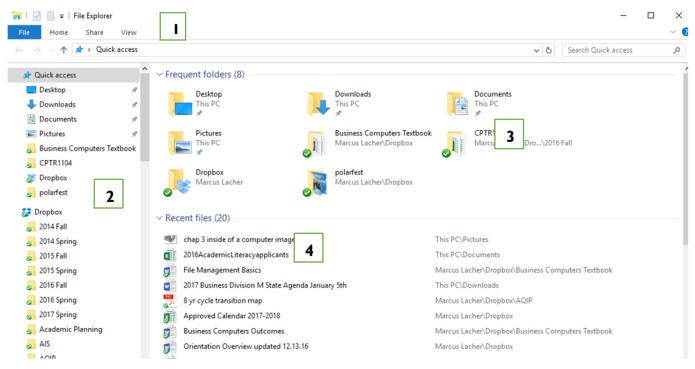
To access the computer’s files, click Start > File Explorer or select the File Explorer icon located in the taskbar. Upon launching File Explorer in Windows 10, the Quick access window will open. Previously known as “Favorites” in previous versions of Windows; this is where users will see their most frequently accessed folders and files that have been created.

The File Explorer window can be broken into the following sections:
- File Explorer ribbon. This is similar to the ribbon you will find in most Microsoft Office applications. The ribbon contains buttons for common tasks to perform on your files and folders, such as copying, pasting, moving and renaming files and folders. A recommended feature is the View menu which allows you to view your files via icons, tiles, a list or the underappreciated Details view.
- Navigation Pane. Vertically scroll through this pane to access commonly used drives and folders. You can also access your Downloaded files, Documents, and external storage devices, as well as other libraries, such as pictures and music.
- Frequent folders. This displays the folders you’ve worked with recently to allow for quick access.
- Recent files section. Similar to the Frequent folders section, this area displays the files and documents that you’ve recently opened.
The Search box is an underappreciated tool to help find files that can’t be found in their presumed location. Use the asterisk (*) wildcard character to expand the search results. i.e. Plane* will find files with the words plane or planet, and more. The File Explorer contains an array of tools which can help manage files and stay organized!
Creating a custom hierarchical structure of folders for each semester and each course is considered a best practice for organizing college data. For example, create a folder with the name of the current semester, i.e. 2018 Fall. Within this folder, create subfolders for each course, i.e. MIS1100. Descriptive folders and file names also diminish confusion when trying to find files on a computer disk.

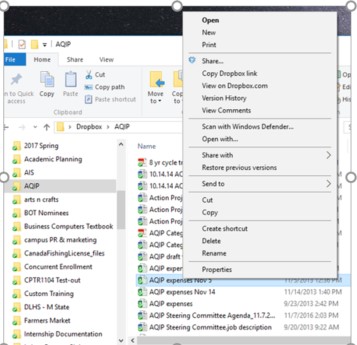
File Explorer is the primary tool for copying, moving, renaming and searching for files and folders. The View tab provides display and sorting options for files and folders. Viewing files using the Details layout allows for quick sorting by simply clicking a column header to toggle between ascending and descending order. The sort order in the above illustration is sorted by Name in ascending order. Clicking the File name extensions checkbox helps identify the source program for each file, particularly if the Type column is not displayed. Perhaps the most useful column is Size, which can be helpful to determine if a file is too large for distribution via e-mail or portable storage methods.

One of the most common operations for users is copying files, which creates a replica of an original file. To copy a file, select the file you want to copy and click Copy under the Home tab. Moving a file necessitates substituting the Copy button with the Cut button. Moving a file saves hard drive space by not creating a duplicate file. To add a new folder, right click and choose New > Folder from the Shortcut menu. Conversely, to delete a file or folder, right-click the object and choose Delete from the shortcut menu.


