3.5: Setting Tabs and Tab Stops
- Page ID
- 14238
\( \newcommand{\vecs}[1]{\overset { \scriptstyle \rightharpoonup} {\mathbf{#1}} } \)
\( \newcommand{\vecd}[1]{\overset{-\!-\!\rightharpoonup}{\vphantom{a}\smash {#1}}} \)
\( \newcommand{\dsum}{\displaystyle\sum\limits} \)
\( \newcommand{\dint}{\displaystyle\int\limits} \)
\( \newcommand{\dlim}{\displaystyle\lim\limits} \)
\( \newcommand{\id}{\mathrm{id}}\) \( \newcommand{\Span}{\mathrm{span}}\)
( \newcommand{\kernel}{\mathrm{null}\,}\) \( \newcommand{\range}{\mathrm{range}\,}\)
\( \newcommand{\RealPart}{\mathrm{Re}}\) \( \newcommand{\ImaginaryPart}{\mathrm{Im}}\)
\( \newcommand{\Argument}{\mathrm{Arg}}\) \( \newcommand{\norm}[1]{\| #1 \|}\)
\( \newcommand{\inner}[2]{\langle #1, #2 \rangle}\)
\( \newcommand{\Span}{\mathrm{span}}\)
\( \newcommand{\id}{\mathrm{id}}\)
\( \newcommand{\Span}{\mathrm{span}}\)
\( \newcommand{\kernel}{\mathrm{null}\,}\)
\( \newcommand{\range}{\mathrm{range}\,}\)
\( \newcommand{\RealPart}{\mathrm{Re}}\)
\( \newcommand{\ImaginaryPart}{\mathrm{Im}}\)
\( \newcommand{\Argument}{\mathrm{Arg}}\)
\( \newcommand{\norm}[1]{\| #1 \|}\)
\( \newcommand{\inner}[2]{\langle #1, #2 \rangle}\)
\( \newcommand{\Span}{\mathrm{span}}\) \( \newcommand{\AA}{\unicode[.8,0]{x212B}}\)
\( \newcommand{\vectorA}[1]{\vec{#1}} % arrow\)
\( \newcommand{\vectorAt}[1]{\vec{\text{#1}}} % arrow\)
\( \newcommand{\vectorB}[1]{\overset { \scriptstyle \rightharpoonup} {\mathbf{#1}} } \)
\( \newcommand{\vectorC}[1]{\textbf{#1}} \)
\( \newcommand{\vectorD}[1]{\overrightarrow{#1}} \)
\( \newcommand{\vectorDt}[1]{\overrightarrow{\text{#1}}} \)
\( \newcommand{\vectE}[1]{\overset{-\!-\!\rightharpoonup}{\vphantom{a}\smash{\mathbf {#1}}}} \)
\( \newcommand{\vecs}[1]{\overset { \scriptstyle \rightharpoonup} {\mathbf{#1}} } \)
\( \newcommand{\vecd}[1]{\overset{-\!-\!\rightharpoonup}{\vphantom{a}\smash {#1}}} \)
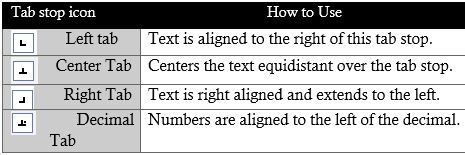
\(\newcommand{\avec}{\mathbf a}\) \(\newcommand{\bvec}{\mathbf b}\) \(\newcommand{\cvec}{\mathbf c}\) \(\newcommand{\dvec}{\mathbf d}\) \(\newcommand{\dtil}{\widetilde{\mathbf d}}\) \(\newcommand{\evec}{\mathbf e}\) \(\newcommand{\fvec}{\mathbf f}\) \(\newcommand{\nvec}{\mathbf n}\) \(\newcommand{\pvec}{\mathbf p}\) \(\newcommand{\qvec}{\mathbf q}\) \(\newcommand{\svec}{\mathbf s}\) \(\newcommand{\tvec}{\mathbf t}\) \(\newcommand{\uvec}{\mathbf u}\) \(\newcommand{\vvec}{\mathbf v}\) \(\newcommand{\wvec}{\mathbf w}\) \(\newcommand{\xvec}{\mathbf x}\) \(\newcommand{\yvec}{\mathbf y}\) \(\newcommand{\zvec}{\mathbf z}\) \(\newcommand{\rvec}{\mathbf r}\) \(\newcommand{\mvec}{\mathbf m}\) \(\newcommand{\zerovec}{\mathbf 0}\) \(\newcommand{\onevec}{\mathbf 1}\) \(\newcommand{\real}{\mathbb R}\) \(\newcommand{\twovec}[2]{\left[\begin{array}{r}#1 \\ #2 \end{array}\right]}\) \(\newcommand{\ctwovec}[2]{\left[\begin{array}{c}#1 \\ #2 \end{array}\right]}\) \(\newcommand{\threevec}[3]{\left[\begin{array}{r}#1 \\ #2 \\ #3 \end{array}\right]}\) \(\newcommand{\cthreevec}[3]{\left[\begin{array}{c}#1 \\ #2 \\ #3 \end{array}\right]}\) \(\newcommand{\fourvec}[4]{\left[\begin{array}{r}#1 \\ #2 \\ #3 \\ #4 \end{array}\right]}\) \(\newcommand{\cfourvec}[4]{\left[\begin{array}{c}#1 \\ #2 \\ #3 \\ #4 \end{array}\right]}\) \(\newcommand{\fivevec}[5]{\left[\begin{array}{r}#1 \\ #2 \\ #3 \\ #4 \\ #5 \\ \end{array}\right]}\) \(\newcommand{\cfivevec}[5]{\left[\begin{array}{c}#1 \\ #2 \\ #3 \\ #4 \\ #5 \\ \end{array}\right]}\) \(\newcommand{\mattwo}[4]{\left[\begin{array}{rr}#1 \amp #2 \\ #3 \amp #4 \\ \end{array}\right]}\) \(\newcommand{\laspan}[1]{\text{Span}\{#1\}}\) \(\newcommand{\bcal}{\cal B}\) \(\newcommand{\ccal}{\cal C}\) \(\newcommand{\scal}{\cal S}\) \(\newcommand{\wcal}{\cal W}\) \(\newcommand{\ecal}{\cal E}\) \(\newcommand{\coords}[2]{\left\{#1\right\}_{#2}}\) \(\newcommand{\gray}[1]{\color{gray}{#1}}\) \(\newcommand{\lgray}[1]{\color{lightgray}{#1}}\) \(\newcommand{\rank}{\operatorname{rank}}\) \(\newcommand{\row}{\text{Row}}\) \(\newcommand{\col}{\text{Col}}\) \(\renewcommand{\row}{\text{Row}}\) \(\newcommand{\nul}{\text{Nul}}\) \(\newcommand{\var}{\text{Var}}\) \(\newcommand{\corr}{\text{corr}}\) \(\newcommand{\len}[1]{\left|#1\right|}\) \(\newcommand{\bbar}{\overline{\bvec}}\) \(\newcommand{\bhat}{\widehat{\bvec}}\) \(\newcommand{\bperp}{\bvec^\perp}\) \(\newcommand{\xhat}{\widehat{\xvec}}\) \(\newcommand{\vhat}{\widehat{\vvec}}\) \(\newcommand{\uhat}{\widehat{\uvec}}\) \(\newcommand{\what}{\widehat{\wvec}}\) \(\newcommand{\Sighat}{\widehat{\Sigma}}\) \(\newcommand{\lt}{<}\) \(\newcommand{\gt}{>}\) \(\newcommand{\amp}{&}\) \(\definecolor{fillinmathshade}{gray}{0.9}\)Tabs allow users to align text vertically at a specific location in a document. A tab stop is a point on the horizontal ruler that indicates the location at which to align text. A tab stop is a location where the insertion point will stop when the user presses the  key. Tab stops can be used to help align text to create columns of data. Custom defined tab stops are displayed on the ruler above the document. A set of default tab stops are located every half inch, but they do not appear on the ruler. When a new tab stop is defined, Word automatically removes the default tab stops to the left. Using tabs, users can align text to the left, right, or center of a tab stop, or text can be aligned at a decimal point. Word stores paragraph formatting, such as tab stops, in the paragraph marks at the end of a paragraph. Therefore, when the user pressing the ENTER key, tab stops are copied to the next paragraph. The same tab stops can then be used in sequential paragraphs to create columns of text. Tabs can be set by clicking on the horizontal ruler, or by using the Tabs dialog window. The following icons represent different tab stops on the horizontal ruler:

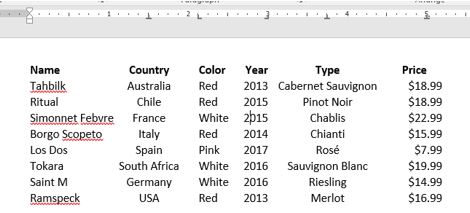
Each type of tab stop is used in the example shown below. Note the markers on the ruler:

The default tab stop is Left, but tab stops can easily be switched by multi-clicking the tab selector  on the horizontal ruler. Existing tab stops on the ruler can be dragged to a new position if needed. To remove a tab stop, drag the tab stop off the ruler and release the mouse. The text will realign itself to the existing tab stops. Once the tab stops are in set, newly inserted text will align to the stops when the tab key is pressed. Alternatively, some users prefer to enter text with tabs, but without tab stops, and then apply the tab stops to the existing text.
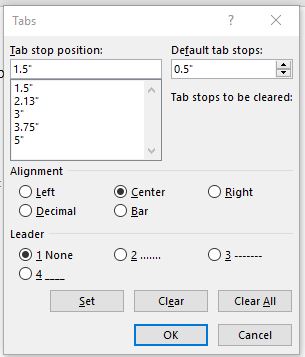
The Tabs dialog window is useful for adding new, and editing existing tab stops.

The window can be opened by double-clicking an existing tab stop or by clicking the Tabs… button in the Paragraph Dialog window, which is opened from the Paragraph Launcher button. The Tabs window is useful for precise position definitions, and it is the only option for adding Leaders to tab stops. A tab leader is a character that is repeated to fill the space spanned by a tab. The dotted leader is very commonly used on menus to make it easier to associate the menu description with its correlating price. The Tabs window is also a convenient way to clear one or all tab stops in a document.
Practice 3: Wine Prices – Part 1
- Open the data file Wines unformatted.docx from your data files.
- Insert two blank paragraphs at the beginning of the document.
- Select the text Name in the first paragraph. Apply the Arial font, size 12, bold and red text color.
- Use the Format Painter tool to apply the same formatting from Name to Country, Color, Year, Type and Price. Hint: Double-click the Format Painter after placing the cursor in Name, and then click each the headings. Click the Format Painter tool again to turn it off.
- Select the text starting with Name through $16.99. Click the Paragraph Launcher button and then click the Tabs… button to open the Tabs dialog window.
- Set the following five tab stops:
- Center tab stop at the 1.5” position. (Type 1.5 in the Tab stop position field, then click Center, then click Set.)
- Left tab stop at the 2.15” position.
- Right tab stop at the 3” position.
- Center tab stop at the 3.75” position.
- Decimal tab stop at the 6” position. Add a dotted leader before clicking Set. Then click OK.
- A slight error may be noticeable. If you enable the Show/Hide
 , you should notice that there are two tabs between Country and Color. Remove one of the tabs. This should align the data into neat columns.
 - Select the same block of text as step 5. Remove the 8 pt of paragraph spacing After each paragraph via the Layout tab.
- At the top of the document enter the text: Wine Prices. Center-align the paragraph, and make the font 36pt and bold.
- Save the file with a new name: Tab formatted Wine Prices.docx.
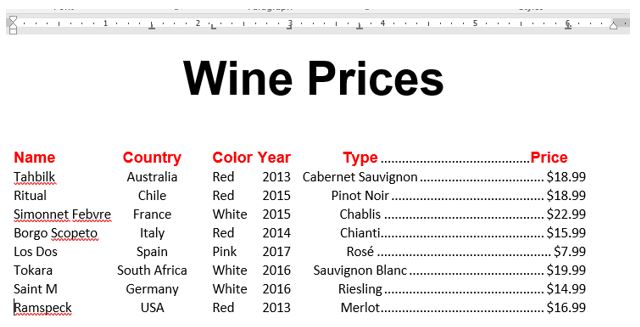
Your file should look like this:


