
3.10: Printing and Saving Files in Alternative File Formats
- Page ID
- 14305

\( \newcommand{\vecs}[1]{\overset { \scriptstyle \rightharpoonup} {\mathbf{#1}} } \)
\( \newcommand{\vecd}[1]{\overset{-\!-\!\rightharpoonup}{\vphantom{a}\smash {#1}}} \)
\( \newcommand{\id}{\mathrm{id}}\) \( \newcommand{\Span}{\mathrm{span}}\)
( \newcommand{\kernel}{\mathrm{null}\,}\) \( \newcommand{\range}{\mathrm{range}\,}\)
\( \newcommand{\RealPart}{\mathrm{Re}}\) \( \newcommand{\ImaginaryPart}{\mathrm{Im}}\)
\( \newcommand{\Argument}{\mathrm{Arg}}\) \( \newcommand{\norm}[1]{\| #1 \|}\)
\( \newcommand{\inner}[2]{\langle #1, #2 \rangle}\)
\( \newcommand{\Span}{\mathrm{span}}\)
\( \newcommand{\id}{\mathrm{id}}\)
\( \newcommand{\Span}{\mathrm{span}}\)
\( \newcommand{\kernel}{\mathrm{null}\,}\)
\( \newcommand{\range}{\mathrm{range}\,}\)
\( \newcommand{\RealPart}{\mathrm{Re}}\)
\( \newcommand{\ImaginaryPart}{\mathrm{Im}}\)
\( \newcommand{\Argument}{\mathrm{Arg}}\)
\( \newcommand{\norm}[1]{\| #1 \|}\)
\( \newcommand{\inner}[2]{\langle #1, #2 \rangle}\)
\( \newcommand{\Span}{\mathrm{span}}\) \( \newcommand{\AA}{\unicode[.8,0]{x212B}}\)
\( \newcommand{\vectorA}[1]{\vec{#1}} % arrow\)
\( \newcommand{\vectorAt}[1]{\vec{\text{#1}}} % arrow\)
\( \newcommand{\vectorB}[1]{\overset { \scriptstyle \rightharpoonup} {\mathbf{#1}} } \)
\( \newcommand{\vectorC}[1]{\textbf{#1}} \)
\( \newcommand{\vectorD}[1]{\overrightarrow{#1}} \)
\( \newcommand{\vectorDt}[1]{\overrightarrow{\text{#1}}} \)
\( \newcommand{\vectE}[1]{\overset{-\!-\!\rightharpoonup}{\vphantom{a}\smash{\mathbf {#1}}}} \)
\( \newcommand{\vecs}[1]{\overset { \scriptstyle \rightharpoonup} {\mathbf{#1}} } \)
\( \newcommand{\vecd}[1]{\overset{-\!-\!\rightharpoonup}{\vphantom{a}\smash {#1}}} \)
\(\newcommand{\avec}{\mathbf a}\) \(\newcommand{\bvec}{\mathbf b}\) \(\newcommand{\cvec}{\mathbf c}\) \(\newcommand{\dvec}{\mathbf d}\) \(\newcommand{\dtil}{\widetilde{\mathbf d}}\) \(\newcommand{\evec}{\mathbf e}\) \(\newcommand{\fvec}{\mathbf f}\) \(\newcommand{\nvec}{\mathbf n}\) \(\newcommand{\pvec}{\mathbf p}\) \(\newcommand{\qvec}{\mathbf q}\) \(\newcommand{\svec}{\mathbf s}\) \(\newcommand{\tvec}{\mathbf t}\) \(\newcommand{\uvec}{\mathbf u}\) \(\newcommand{\vvec}{\mathbf v}\) \(\newcommand{\wvec}{\mathbf w}\) \(\newcommand{\xvec}{\mathbf x}\) \(\newcommand{\yvec}{\mathbf y}\) \(\newcommand{\zvec}{\mathbf z}\) \(\newcommand{\rvec}{\mathbf r}\) \(\newcommand{\mvec}{\mathbf m}\) \(\newcommand{\zerovec}{\mathbf 0}\) \(\newcommand{\onevec}{\mathbf 1}\) \(\newcommand{\real}{\mathbb R}\) \(\newcommand{\twovec}[2]{\left[\begin{array}{r}#1 \\ #2 \end{array}\right]}\) \(\newcommand{\ctwovec}[2]{\left[\begin{array}{c}#1 \\ #2 \end{array}\right]}\) \(\newcommand{\threevec}[3]{\left[\begin{array}{r}#1 \\ #2 \\ #3 \end{array}\right]}\) \(\newcommand{\cthreevec}[3]{\left[\begin{array}{c}#1 \\ #2 \\ #3 \end{array}\right]}\) \(\newcommand{\fourvec}[4]{\left[\begin{array}{r}#1 \\ #2 \\ #3 \\ #4 \end{array}\right]}\) \(\newcommand{\cfourvec}[4]{\left[\begin{array}{c}#1 \\ #2 \\ #3 \\ #4 \end{array}\right]}\) \(\newcommand{\fivevec}[5]{\left[\begin{array}{r}#1 \\ #2 \\ #3 \\ #4 \\ #5 \\ \end{array}\right]}\) \(\newcommand{\cfivevec}[5]{\left[\begin{array}{c}#1 \\ #2 \\ #3 \\ #4 \\ #5 \\ \end{array}\right]}\) \(\newcommand{\mattwo}[4]{\left[\begin{array}{rr}#1 \amp #2 \\ #3 \amp #4 \\ \end{array}\right]}\) \(\newcommand{\laspan}[1]{\text{Span}\{#1\}}\) \(\newcommand{\bcal}{\cal B}\) \(\newcommand{\ccal}{\cal C}\) \(\newcommand{\scal}{\cal S}\) \(\newcommand{\wcal}{\cal W}\) \(\newcommand{\ecal}{\cal E}\) \(\newcommand{\coords}[2]{\left\{#1\right\}_{#2}}\) \(\newcommand{\gray}[1]{\color{gray}{#1}}\) \(\newcommand{\lgray}[1]{\color{lightgray}{#1}}\) \(\newcommand{\rank}{\operatorname{rank}}\) \(\newcommand{\row}{\text{Row}}\) \(\newcommand{\col}{\text{Col}}\) \(\renewcommand{\row}{\text{Row}}\) \(\newcommand{\nul}{\text{Nul}}\) \(\newcommand{\var}{\text{Var}}\) \(\newcommand{\corr}{\text{corr}}\) \(\newcommand{\len}[1]{\left|#1\right|}\) \(\newcommand{\bbar}{\overline{\bvec}}\) \(\newcommand{\bhat}{\widehat{\bvec}}\) \(\newcommand{\bperp}{\bvec^\perp}\) \(\newcommand{\xhat}{\widehat{\xvec}}\) \(\newcommand{\vhat}{\widehat{\vvec}}\) \(\newcommand{\uhat}{\widehat{\uvec}}\) \(\newcommand{\what}{\widehat{\wvec}}\) \(\newcommand{\Sighat}{\widehat{\Sigma}}\) \(\newcommand{\lt}{<}\) \(\newcommand{\gt}{>}\) \(\newcommand{\amp}{&}\) \(\definecolor{fillinmathshade}{gray}{0.9}\)Before printing a document, it is a good idea to preview the document and specify which pages should print. The preview might help the user discover some layout issues that can be addressed before wasting ink/toner and paper. The Print Preview window can be accessed in Backstage view by clicking File > Print. It is also a popular idea to add the Print Preview command to the Quick Access toolbar if it doesn’t already exist.
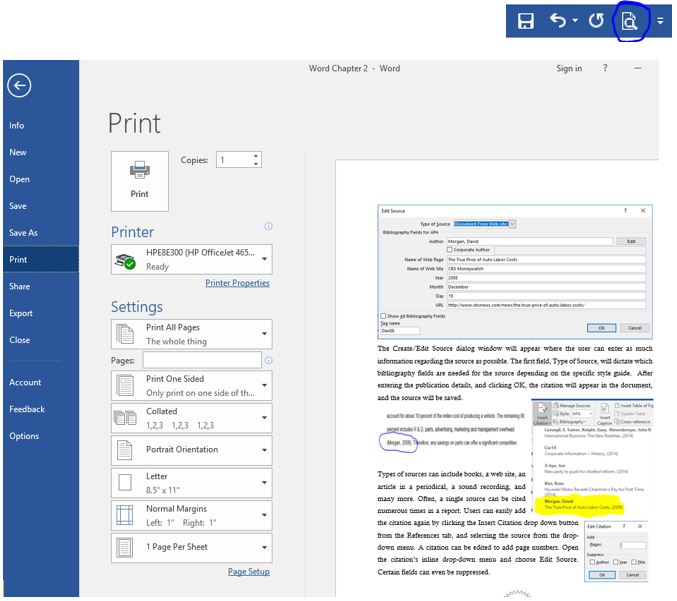
Numerous options can be defined in Backstage view, such as which printer, how many copies, which pages, etc. Once these decisions are made, pressing the big Print button in the top left of the window, will send the data to the selected printer. The back button  will exit Print Preview.
If printing a hard copy is not desired, saving the file is the obvious alternative. The way that the user saves a document and the format that they save it in depends on how they plan to use the document. While choosing Save from the File menu will resave the file in its existing format, choosing the Save As command (F12) provides numerous alternatives.
The first option available by using the Save As dialog window, is the ability to choose an alternative storage destination versus the existing location. Alternate storage destinations include a different file folder on the user’s hard drive, a portable file storage location, such a USB drive device, or a cloud-based storage location. OneDrive is Microsoft’s cloud-based storage option, but other cloud-based solutions, such as Dropbox, exist as well. Cloud computing requires Internet-connectivity to access the current versions of the files. An alternative file format is another option to consider from the Save As window. Choosing the drop-down list to the left of the Save button displays a list of alternative file formats.
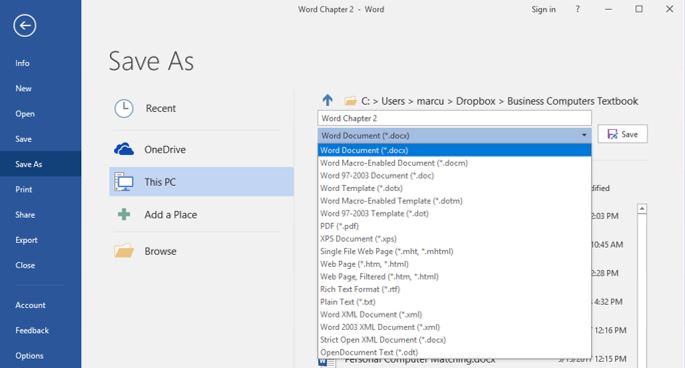
One of the most common alternative file formats is a PDF (Portable Document Format) file. PDFs are popular formats to share with non-Microsoft Office users, commercial printers, and users for whom the document is not to be edited. The PDF format looks the same on most computers, has a smaller file size, and preserves most formatting characteristics of the source document. The only software that is required to read or print a PDF file is Adobe Reader, which is available as a free download from Adobe’s web site. While prevention of editing was a key feature of PDF files, the current version of Word can actually edit PDF files, however, the edits are traceable.
The other common file format is saving a file to be viewed on a web site or simply in a web browser. Saving a file as a Single File Web Page is the optimal approach to allow users to open the document using a web browser. The file extension of a single file web page is .MHT. Other occasionally used file formats include: .XPS, .ODT, and RTF.
Practice 4: The Solar System – Part 3
- Open the recently edited data file The Solar System2.docx from your data files.
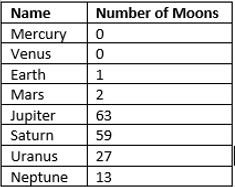
- Create a 2 x 9 table at the end of page 2.
- Add and format data to table as shown to the right.
- Add a new column to the table to the left of the Name column. The header should be Proximity to the Sun. The data should be 1, 2, 3 …. 8.
- Sort the table in descending order by Number of Moons.
- Apply the Grid Table 4 – Accent 4 table style to the table.
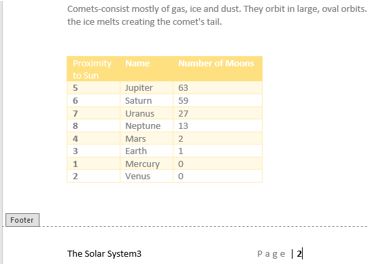
- Add the file name field to the left side of the footer, and the Accent Bar 2 page number to the center section of the footer. Refer to the illustration at right for steps 4-8.
- Change the paper size to Legal.
- Insert a page break before the paragraph beginning with The Dwarf Planets.
- Change the margins to the Office 2003 defaults.
- Add a new citation source
 following the period at the end of the paragraph regarding the Sun on page 1. The source details should be a web page (The Sun) on a web site (Nine Planets). Use today’s date for the Year, Month, Day, and the URL: nineplanets.org/sol.html. Mark the Corporate Author checkbox.
 - Add a Works Cited at the bottom of page 2.

- Save the file with a new name. i.e. The Solar System3. Save another version of the file in PDF format.