15.7: Editing Group
- Page ID
- 13682
\( \newcommand{\vecs}[1]{\overset { \scriptstyle \rightharpoonup} {\mathbf{#1}} } \)
\( \newcommand{\vecd}[1]{\overset{-\!-\!\rightharpoonup}{\vphantom{a}\smash {#1}}} \)
\( \newcommand{\dsum}{\displaystyle\sum\limits} \)
\( \newcommand{\dint}{\displaystyle\int\limits} \)
\( \newcommand{\dlim}{\displaystyle\lim\limits} \)
\( \newcommand{\id}{\mathrm{id}}\) \( \newcommand{\Span}{\mathrm{span}}\)
( \newcommand{\kernel}{\mathrm{null}\,}\) \( \newcommand{\range}{\mathrm{range}\,}\)
\( \newcommand{\RealPart}{\mathrm{Re}}\) \( \newcommand{\ImaginaryPart}{\mathrm{Im}}\)
\( \newcommand{\Argument}{\mathrm{Arg}}\) \( \newcommand{\norm}[1]{\| #1 \|}\)
\( \newcommand{\inner}[2]{\langle #1, #2 \rangle}\)
\( \newcommand{\Span}{\mathrm{span}}\)
\( \newcommand{\id}{\mathrm{id}}\)
\( \newcommand{\Span}{\mathrm{span}}\)
\( \newcommand{\kernel}{\mathrm{null}\,}\)
\( \newcommand{\range}{\mathrm{range}\,}\)
\( \newcommand{\RealPart}{\mathrm{Re}}\)
\( \newcommand{\ImaginaryPart}{\mathrm{Im}}\)
\( \newcommand{\Argument}{\mathrm{Arg}}\)
\( \newcommand{\norm}[1]{\| #1 \|}\)
\( \newcommand{\inner}[2]{\langle #1, #2 \rangle}\)
\( \newcommand{\Span}{\mathrm{span}}\) \( \newcommand{\AA}{\unicode[.8,0]{x212B}}\)
\( \newcommand{\vectorA}[1]{\vec{#1}} % arrow\)
\( \newcommand{\vectorAt}[1]{\vec{\text{#1}}} % arrow\)
\( \newcommand{\vectorB}[1]{\overset { \scriptstyle \rightharpoonup} {\mathbf{#1}} } \)
\( \newcommand{\vectorC}[1]{\textbf{#1}} \)
\( \newcommand{\vectorD}[1]{\overrightarrow{#1}} \)
\( \newcommand{\vectorDt}[1]{\overrightarrow{\text{#1}}} \)
\( \newcommand{\vectE}[1]{\overset{-\!-\!\rightharpoonup}{\vphantom{a}\smash{\mathbf {#1}}}} \)
\( \newcommand{\vecs}[1]{\overset { \scriptstyle \rightharpoonup} {\mathbf{#1}} } \)
\(\newcommand{\longvect}{\overrightarrow}\)
\( \newcommand{\vecd}[1]{\overset{-\!-\!\rightharpoonup}{\vphantom{a}\smash {#1}}} \)
\(\newcommand{\avec}{\mathbf a}\) \(\newcommand{\bvec}{\mathbf b}\) \(\newcommand{\cvec}{\mathbf c}\) \(\newcommand{\dvec}{\mathbf d}\) \(\newcommand{\dtil}{\widetilde{\mathbf d}}\) \(\newcommand{\evec}{\mathbf e}\) \(\newcommand{\fvec}{\mathbf f}\) \(\newcommand{\nvec}{\mathbf n}\) \(\newcommand{\pvec}{\mathbf p}\) \(\newcommand{\qvec}{\mathbf q}\) \(\newcommand{\svec}{\mathbf s}\) \(\newcommand{\tvec}{\mathbf t}\) \(\newcommand{\uvec}{\mathbf u}\) \(\newcommand{\vvec}{\mathbf v}\) \(\newcommand{\wvec}{\mathbf w}\) \(\newcommand{\xvec}{\mathbf x}\) \(\newcommand{\yvec}{\mathbf y}\) \(\newcommand{\zvec}{\mathbf z}\) \(\newcommand{\rvec}{\mathbf r}\) \(\newcommand{\mvec}{\mathbf m}\) \(\newcommand{\zerovec}{\mathbf 0}\) \(\newcommand{\onevec}{\mathbf 1}\) \(\newcommand{\real}{\mathbb R}\) \(\newcommand{\twovec}[2]{\left[\begin{array}{r}#1 \\ #2 \end{array}\right]}\) \(\newcommand{\ctwovec}[2]{\left[\begin{array}{c}#1 \\ #2 \end{array}\right]}\) \(\newcommand{\threevec}[3]{\left[\begin{array}{r}#1 \\ #2 \\ #3 \end{array}\right]}\) \(\newcommand{\cthreevec}[3]{\left[\begin{array}{c}#1 \\ #2 \\ #3 \end{array}\right]}\) \(\newcommand{\fourvec}[4]{\left[\begin{array}{r}#1 \\ #2 \\ #3 \\ #4 \end{array}\right]}\) \(\newcommand{\cfourvec}[4]{\left[\begin{array}{c}#1 \\ #2 \\ #3 \\ #4 \end{array}\right]}\) \(\newcommand{\fivevec}[5]{\left[\begin{array}{r}#1 \\ #2 \\ #3 \\ #4 \\ #5 \\ \end{array}\right]}\) \(\newcommand{\cfivevec}[5]{\left[\begin{array}{c}#1 \\ #2 \\ #3 \\ #4 \\ #5 \\ \end{array}\right]}\) \(\newcommand{\mattwo}[4]{\left[\begin{array}{rr}#1 \amp #2 \\ #3 \amp #4 \\ \end{array}\right]}\) \(\newcommand{\laspan}[1]{\text{Span}\{#1\}}\) \(\newcommand{\bcal}{\cal B}\) \(\newcommand{\ccal}{\cal C}\) \(\newcommand{\scal}{\cal S}\) \(\newcommand{\wcal}{\cal W}\) \(\newcommand{\ecal}{\cal E}\) \(\newcommand{\coords}[2]{\left\{#1\right\}_{#2}}\) \(\newcommand{\gray}[1]{\color{gray}{#1}}\) \(\newcommand{\lgray}[1]{\color{lightgray}{#1}}\) \(\newcommand{\rank}{\operatorname{rank}}\) \(\newcommand{\row}{\text{Row}}\) \(\newcommand{\col}{\text{Col}}\) \(\renewcommand{\row}{\text{Row}}\) \(\newcommand{\nul}{\text{Nul}}\) \(\newcommand{\var}{\text{Var}}\) \(\newcommand{\corr}{\text{corr}}\) \(\newcommand{\len}[1]{\left|#1\right|}\) \(\newcommand{\bbar}{\overline{\bvec}}\) \(\newcommand{\bhat}{\widehat{\bvec}}\) \(\newcommand{\bperp}{\bvec^\perp}\) \(\newcommand{\xhat}{\widehat{\xvec}}\) \(\newcommand{\vhat}{\widehat{\vvec}}\) \(\newcommand{\uhat}{\widehat{\uvec}}\) \(\newcommand{\what}{\widehat{\wvec}}\) \(\newcommand{\Sighat}{\widehat{\Sigma}}\) \(\newcommand{\lt}{<}\) \(\newcommand{\gt}{>}\) \(\newcommand{\amp}{&}\) \(\definecolor{fillinmathshade}{gray}{0.9}\)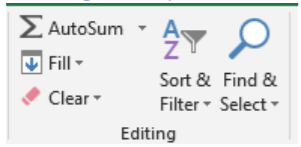
The Editing Group allows the user to manipulate data inside each cell using the AutoSum, Fill, and Clear Commands as will as sort & filter and Find & Select. We will first review AutoSum.
Autosum
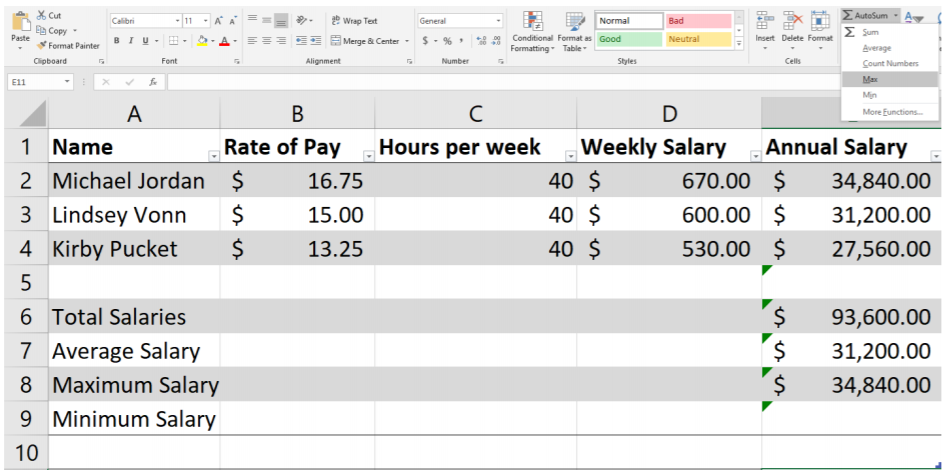
Let's go back to an example in a previous chapter. You are the owner of a construction company hiring three individuals to perform work for you. You have already used excel to calculate their weekly salary, but now you need more information; you need to know the total salary you expect to spend, the average salary, and the maximum and minimum salaries.
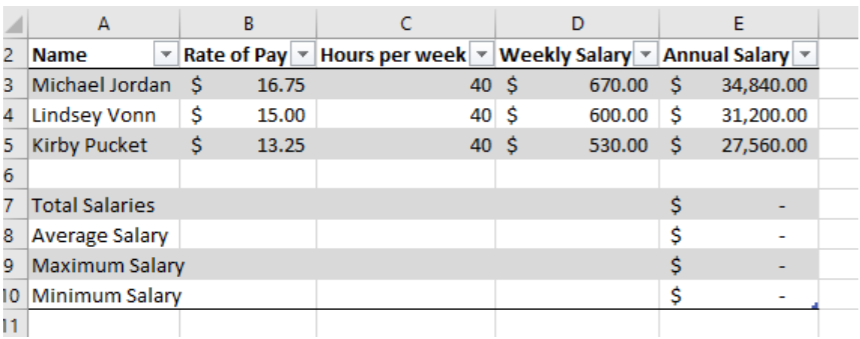
Now, using the AutoSum Icon and corresponding drop-down commands options, the user can allow excel to automatically calculate this information
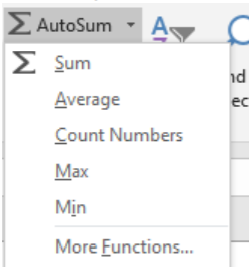
Sum calculates the total numbers added together in a specified range. Average calculates the value of the cells added together in a specified range divided by the number of cells in the range. Count Numbers provides the number of cells selected in a range. Maximum provides the highest number in a selected range, and Minimum provides the lowest number in a range. While these numbers automatically include the cells above them, the user can specify in the Excel Formula Bar the correct ranges if needed.
Fill Command
In addition to using AutoSum, the Fill Command allows the user to continue a pattern of cell number, or copy the contents of one cell to the next cell in any direction. This could help when the user is creating a numbered list or needs to enter the same data points in many cells.
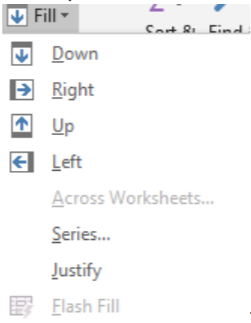
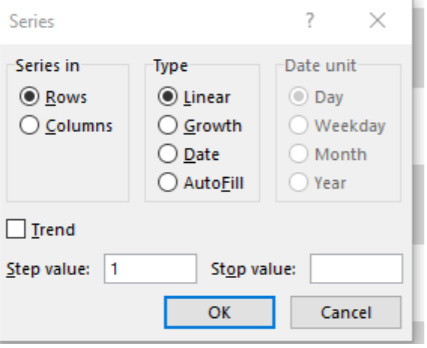
The Down, Right, Up, and Left Fill commands copy data from one cell to the next cell. Selecting the Series menu allows the user to select multiple methods for a cell to increase in value. Users can specify how much the cell increases and by what value, and whether the information increases in rows or columns. When the user is ready to fill cells, they should highlight the first cell (which has the starting number) and select the “Fill” icon on the menu, and select “Series”, and place the step value and the stop value (when the series should end) and click “Ok”. Their highlighted cells will then display the series in the cell.
This feature is especially helpful when creating numbered lists.
Clear Command
The Clear Command removes formatting and cell contents from selected cells. Once the Clear command is selected, a drop-down menu of options emerges with Clear All, Clear Formats, Clear Contents, Clear Comments, Clear Hyperlinks, and Remove Hyperlinks (if Hyperlinks are present).
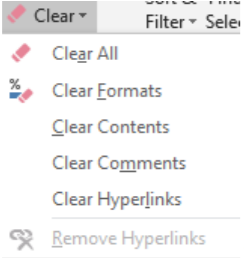
The Clear All will remove all of the contents and formatting of the selected cells. This allows the user an easy way to delete information without accidentally moving other data into other columns or rows. Clear Formats removes any formatting (like Bold or Italics) applied to any of the select cells. Clear contents only clear the information inside the cell, not the formatting or cell settings. Clear Comments removes Comments from other users but not the Cell Contents, Clear Hyperlinks remove the hyperlinks from the Cell, but keeps the text, and Remove Hyperlinks removes all text and link from the applicable Cell.
Sort & Filter
One of the powerful features of Excel is to be able to analyze data. One way to analyze data is to sort it by specific fields. The Sort & Filter/feature in Excel allows the user to perform this action. To use the Sort & Filter process, select a cell, and then click on the Sort & Filter menu. A drop-down menu of options will emerge, allowing the user to Sort from Smallest to Largest, Largest to Smallest, Custom Sort, Filter, Clear a previous Sort & Filter, and Reapply a Cleared filter.
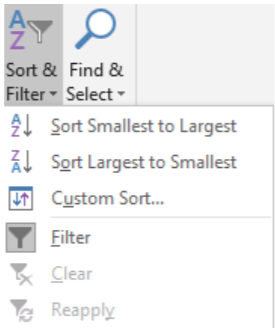
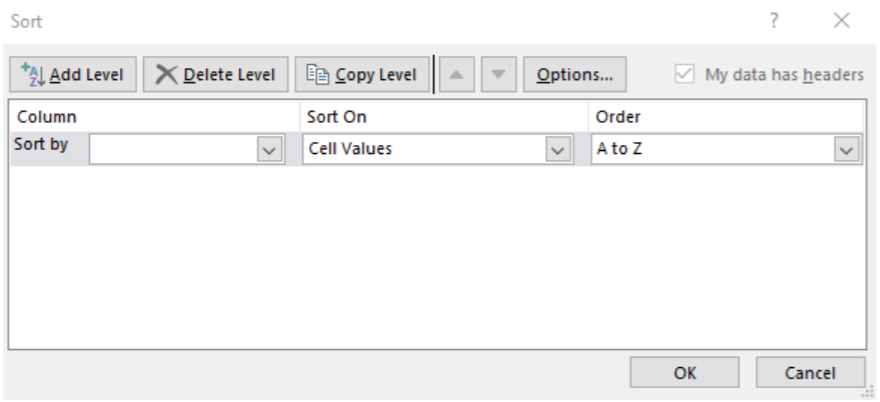
Smallest to largest moves all other columns in Excel to be in order with the smallest number in the selected column to be displayed first. Sort Largest to Smallest is the opposite, Custom Sort allows the user to apply multiple sort levels to the document.
Find & Select
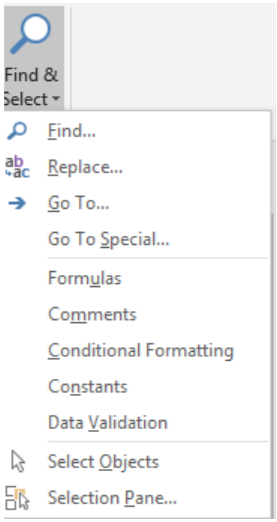
Finally, the Find & Select Menu of Excel allows the user to find or replace text, numbers, formulas, comments, or other data in any cell. Selecting the Find & Select Icon  will launch a drop-down menu which allows the user to find items, or replace one word or number with another in the entire worksheet. In addition, special search parameters (formulas, comments, conditional formatting, constants, and data validation are also parameters that can be used.
