1.9: Spot, Seam, Stud Welding Symbols
- Page ID
- 5155
\( \newcommand{\vecs}[1]{\overset { \scriptstyle \rightharpoonup} {\mathbf{#1}} } \)
\( \newcommand{\vecd}[1]{\overset{-\!-\!\rightharpoonup}{\vphantom{a}\smash {#1}}} \)
\( \newcommand{\id}{\mathrm{id}}\) \( \newcommand{\Span}{\mathrm{span}}\)
( \newcommand{\kernel}{\mathrm{null}\,}\) \( \newcommand{\range}{\mathrm{range}\,}\)
\( \newcommand{\RealPart}{\mathrm{Re}}\) \( \newcommand{\ImaginaryPart}{\mathrm{Im}}\)
\( \newcommand{\Argument}{\mathrm{Arg}}\) \( \newcommand{\norm}[1]{\| #1 \|}\)
\( \newcommand{\inner}[2]{\langle #1, #2 \rangle}\)
\( \newcommand{\Span}{\mathrm{span}}\)
\( \newcommand{\id}{\mathrm{id}}\)
\( \newcommand{\Span}{\mathrm{span}}\)
\( \newcommand{\kernel}{\mathrm{null}\,}\)
\( \newcommand{\range}{\mathrm{range}\,}\)
\( \newcommand{\RealPart}{\mathrm{Re}}\)
\( \newcommand{\ImaginaryPart}{\mathrm{Im}}\)
\( \newcommand{\Argument}{\mathrm{Arg}}\)
\( \newcommand{\norm}[1]{\| #1 \|}\)
\( \newcommand{\inner}[2]{\langle #1, #2 \rangle}\)
\( \newcommand{\Span}{\mathrm{span}}\) \( \newcommand{\AA}{\unicode[.8,0]{x212B}}\)
\( \newcommand{\vectorA}[1]{\vec{#1}} % arrow\)
\( \newcommand{\vectorAt}[1]{\vec{\text{#1}}} % arrow\)
\( \newcommand{\vectorB}[1]{\overset { \scriptstyle \rightharpoonup} {\mathbf{#1}} } \)
\( \newcommand{\vectorC}[1]{\textbf{#1}} \)
\( \newcommand{\vectorD}[1]{\overrightarrow{#1}} \)
\( \newcommand{\vectorDt}[1]{\overrightarrow{\text{#1}}} \)
\( \newcommand{\vectE}[1]{\overset{-\!-\!\rightharpoonup}{\vphantom{a}\smash{\mathbf {#1}}}} \)
\( \newcommand{\vecs}[1]{\overset { \scriptstyle \rightharpoonup} {\mathbf{#1}} } \)
\( \newcommand{\vecd}[1]{\overset{-\!-\!\rightharpoonup}{\vphantom{a}\smash {#1}}} \)
\(\newcommand{\avec}{\mathbf a}\) \(\newcommand{\bvec}{\mathbf b}\) \(\newcommand{\cvec}{\mathbf c}\) \(\newcommand{\dvec}{\mathbf d}\) \(\newcommand{\dtil}{\widetilde{\mathbf d}}\) \(\newcommand{\evec}{\mathbf e}\) \(\newcommand{\fvec}{\mathbf f}\) \(\newcommand{\nvec}{\mathbf n}\) \(\newcommand{\pvec}{\mathbf p}\) \(\newcommand{\qvec}{\mathbf q}\) \(\newcommand{\svec}{\mathbf s}\) \(\newcommand{\tvec}{\mathbf t}\) \(\newcommand{\uvec}{\mathbf u}\) \(\newcommand{\vvec}{\mathbf v}\) \(\newcommand{\wvec}{\mathbf w}\) \(\newcommand{\xvec}{\mathbf x}\) \(\newcommand{\yvec}{\mathbf y}\) \(\newcommand{\zvec}{\mathbf z}\) \(\newcommand{\rvec}{\mathbf r}\) \(\newcommand{\mvec}{\mathbf m}\) \(\newcommand{\zerovec}{\mathbf 0}\) \(\newcommand{\onevec}{\mathbf 1}\) \(\newcommand{\real}{\mathbb R}\) \(\newcommand{\twovec}[2]{\left[\begin{array}{r}#1 \\ #2 \end{array}\right]}\) \(\newcommand{\ctwovec}[2]{\left[\begin{array}{c}#1 \\ #2 \end{array}\right]}\) \(\newcommand{\threevec}[3]{\left[\begin{array}{r}#1 \\ #2 \\ #3 \end{array}\right]}\) \(\newcommand{\cthreevec}[3]{\left[\begin{array}{c}#1 \\ #2 \\ #3 \end{array}\right]}\) \(\newcommand{\fourvec}[4]{\left[\begin{array}{r}#1 \\ #2 \\ #3 \\ #4 \end{array}\right]}\) \(\newcommand{\cfourvec}[4]{\left[\begin{array}{c}#1 \\ #2 \\ #3 \\ #4 \end{array}\right]}\) \(\newcommand{\fivevec}[5]{\left[\begin{array}{r}#1 \\ #2 \\ #3 \\ #4 \\ #5 \\ \end{array}\right]}\) \(\newcommand{\cfivevec}[5]{\left[\begin{array}{c}#1 \\ #2 \\ #3 \\ #4 \\ #5 \\ \end{array}\right]}\) \(\newcommand{\mattwo}[4]{\left[\begin{array}{rr}#1 \amp #2 \\ #3 \amp #4 \\ \end{array}\right]}\) \(\newcommand{\laspan}[1]{\text{Span}\{#1\}}\) \(\newcommand{\bcal}{\cal B}\) \(\newcommand{\ccal}{\cal C}\) \(\newcommand{\scal}{\cal S}\) \(\newcommand{\wcal}{\cal W}\) \(\newcommand{\ecal}{\cal E}\) \(\newcommand{\coords}[2]{\left\{#1\right\}_{#2}}\) \(\newcommand{\gray}[1]{\color{gray}{#1}}\) \(\newcommand{\lgray}[1]{\color{lightgray}{#1}}\) \(\newcommand{\rank}{\operatorname{rank}}\) \(\newcommand{\row}{\text{Row}}\) \(\newcommand{\col}{\text{Col}}\) \(\renewcommand{\row}{\text{Row}}\) \(\newcommand{\nul}{\text{Nul}}\) \(\newcommand{\var}{\text{Var}}\) \(\newcommand{\corr}{\text{corr}}\) \(\newcommand{\len}[1]{\left|#1\right|}\) \(\newcommand{\bbar}{\overline{\bvec}}\) \(\newcommand{\bhat}{\widehat{\bvec}}\) \(\newcommand{\bperp}{\bvec^\perp}\) \(\newcommand{\xhat}{\widehat{\xvec}}\) \(\newcommand{\vhat}{\widehat{\vvec}}\) \(\newcommand{\uhat}{\widehat{\uvec}}\) \(\newcommand{\what}{\widehat{\wvec}}\) \(\newcommand{\Sighat}{\widehat{\Sigma}}\) \(\newcommand{\lt}{<}\) \(\newcommand{\gt}{>}\) \(\newcommand{\amp}{&}\) \(\definecolor{fillinmathshade}{gray}{0.9}\)Spot Weld
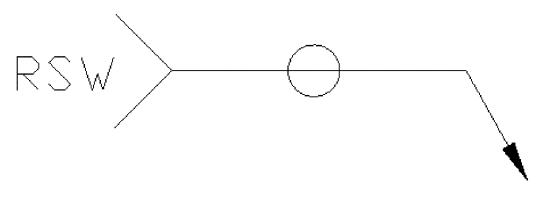
The spot weld symbol is simply a circle that may be placed above, below, or centered on the reference line. When the symbol is centered on the reference line this indicates that there is no side significance. When there is no side significance this can commonly be applied using a resistance spot welder which is used widely in sheet metal work.
A spot weld is simple a weld applied to the surface of one member that has enough heat input to melt into the material that is creating the faying surface. This is done with no prior preparation to the parts.

An example of arrow side spot weld and a no side significance resistance spot weld below.

The size of a spot weld is going to be placed to the left side of the welding symbol. This number indicates the diameter of said spot weld at the faying surface. The faying surface is where two parts are placed on top of each other at close proximity.
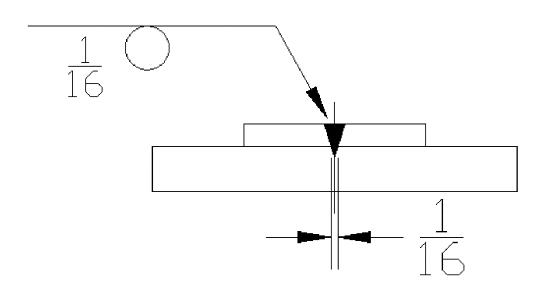
The number of spot welds required will be added in parenthesis above or below the symbol depending on location of the symbol. If it is centered on the reference line the placement of required welds could be placed above or below the symbol.

Pitch can be added to the spot weld symbol as well. This will be presented to the right of the symbol.
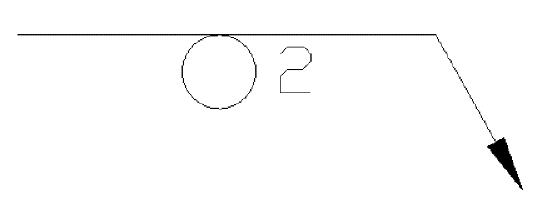
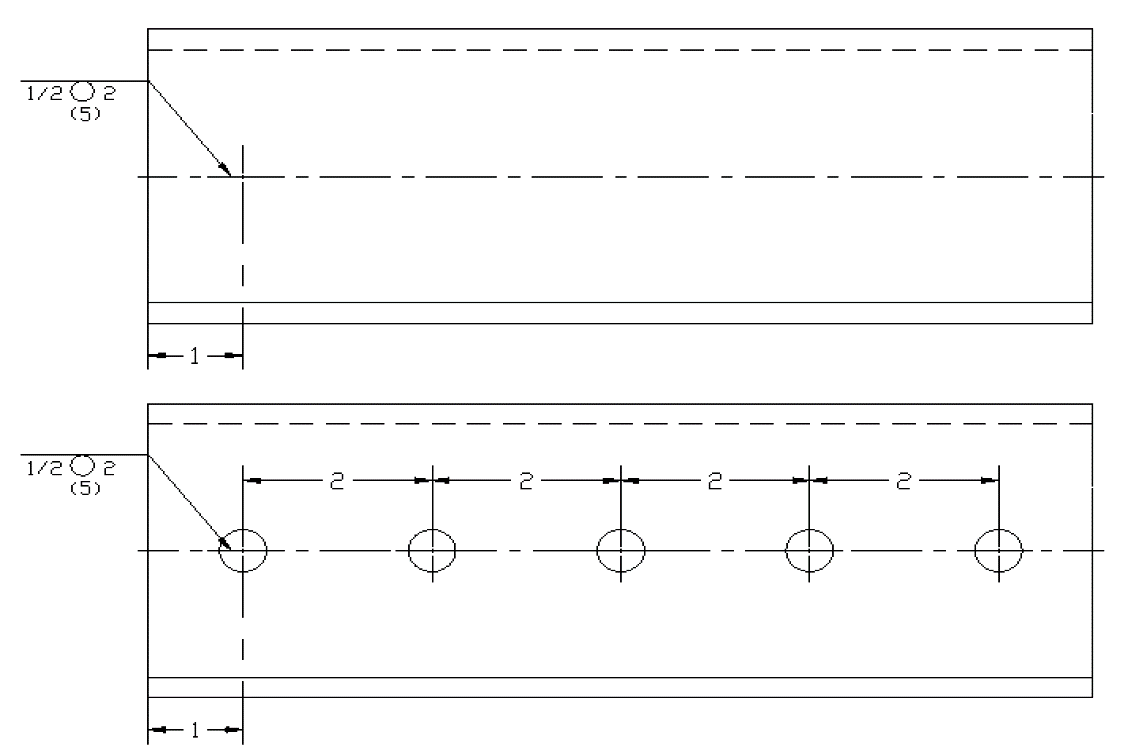
When a pitch is used this is stating that this will be continued across the full length of the part. For example if the part is 20 inches long you would be applying welds every 2 inches using the above symbol for the length of that 20 inch part. If the spot welding will not be covering the full length of the part this will need to be shown with dimension lines on the print in order to communicate this information properly.
Full length call out:
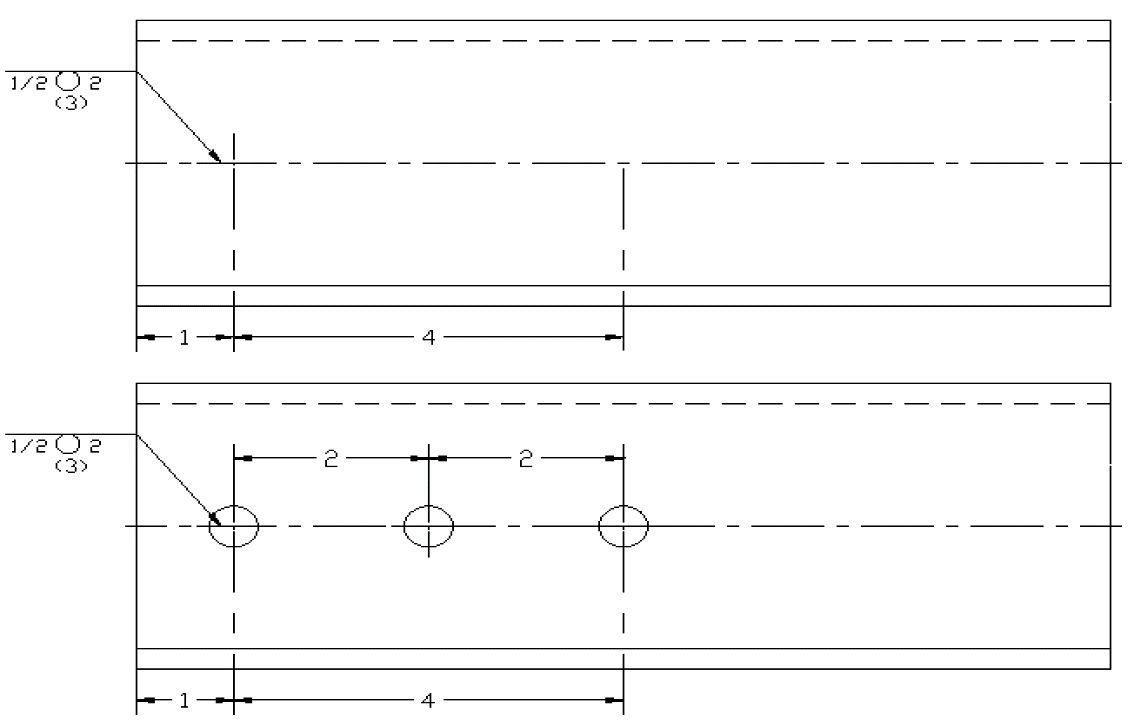
There are times when instead of using a diameter dimension the call out will be for shear strength. This is how resistant something is to shearing. This can be called out in pound-force (lbf) or if the blueprint is in metric it would call for Newton’s (N).
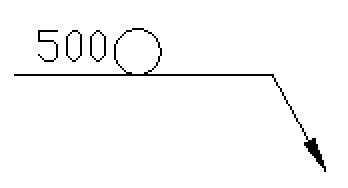 This calls for a spot weld with 500 pound-force shear strength.
(500 lbf specifies that the part will be able to resist shearing to a minimum of 500 lbf.
It may be specified what process will be used to achieve the weld and this will be put into the tail. Common processes for this would be resistance spot welding, and gas tungsten arc welding. The reasoning behind these are there could be no added filler used with the weld so there will be less of a chance for lack of fusion. Many other processes may be used as long as the effects of the weld are known and still acceptable for the outcome of the weld.
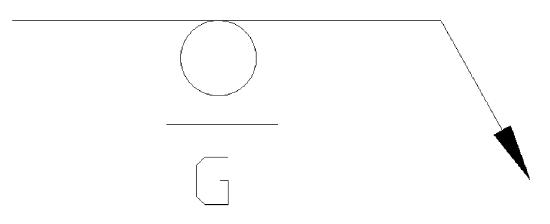
A contour may be added to the spot symbol in order to ensure that the surface is flush as if no weld has taken place. This will go into further detail in supplementary welding symbols.
For an example below is an arrow side weld with a flush contour by grinding.
Seam Weld
The seam weld uses a similar process as a spot weld but in an elongated fashion. There is no preparation like a plug or slot weld, rather the weld projects through the top surface and melts into the other member by means of heat input. The symbol is similar but it carries two parallel lines through it.

An example of a seam weld:
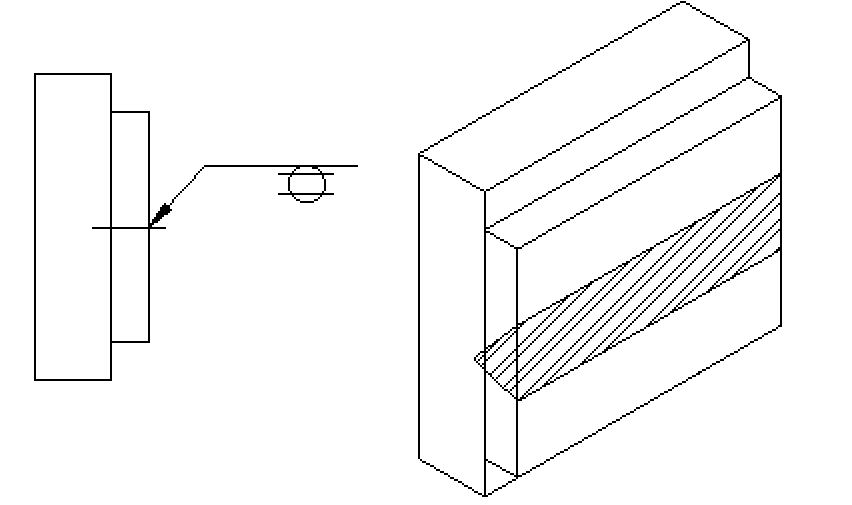
Seam welds will have a size or shear strength associated with the welding symbol commonly. This number will go to the left of the welding symbol. A size is an indication of width of the bead. Shear strength is the same as a spot weld and is the amount of pound-force the weld can take minimum per 1 inch of weld.

Length can be added to the right side of the symbol to indicate how long the weld to be made is.
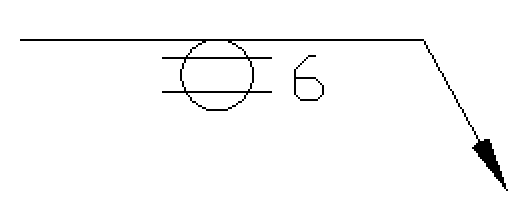
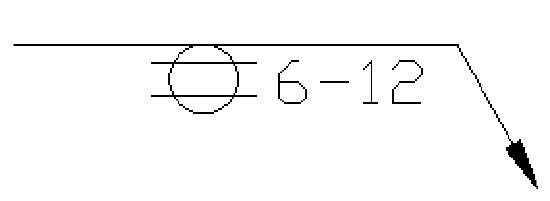
An additional element can be a pitch if it is needed for applying several welds. This will be added to the right side of the weld symbol after the length with a hyphen.
Seam welds can also have elements as spot welds do such as a process associated in the tail as well as a contour. The contour is shown above or below the symbol depending on the way the symbol is on the reference line.
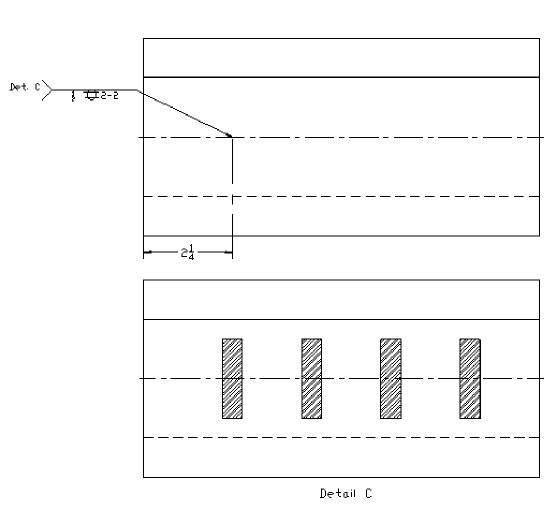
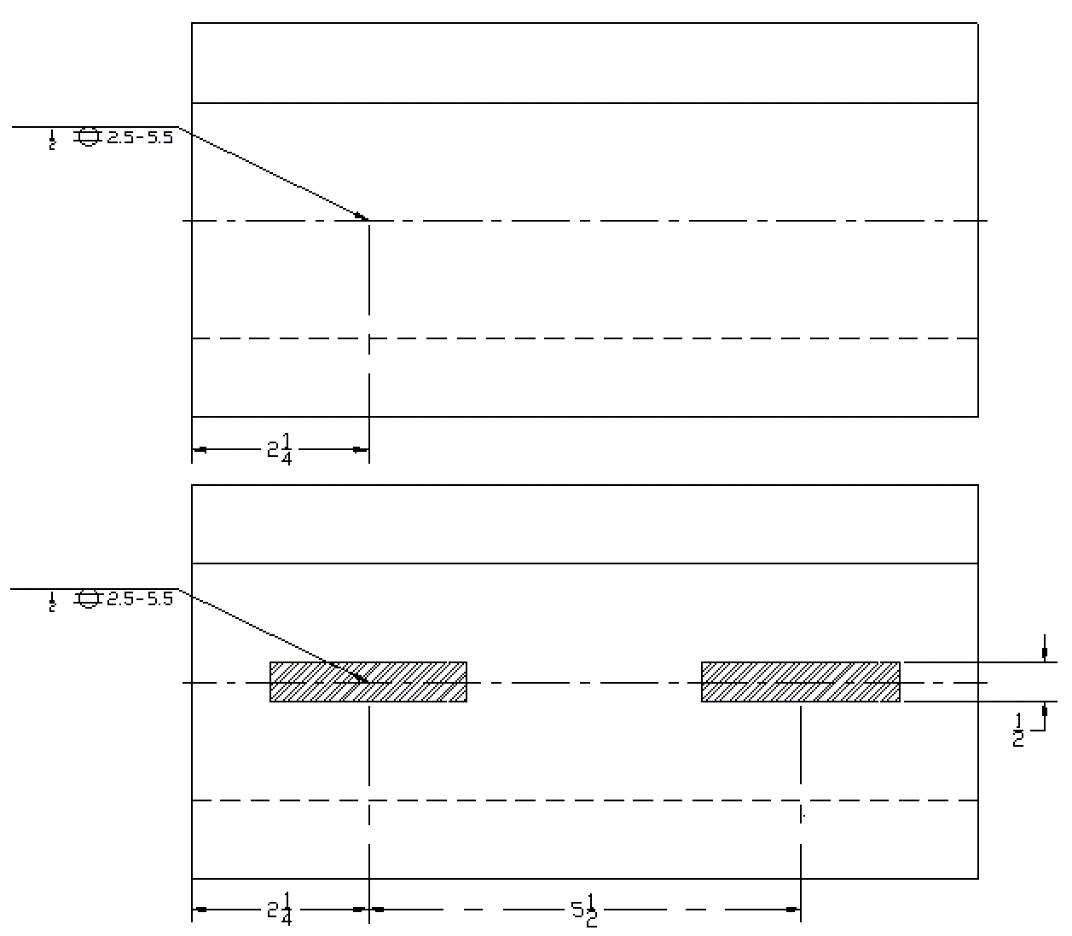
The next image shows a weld call out for a Seam weld on the arrow side. ½ inch in width with 2.5” segments and a 5.5” pitch. All intermittent welds (pitch) are made in a lengthwise pattern unless there is a detail on the print that says otherwise.
Stud Welds
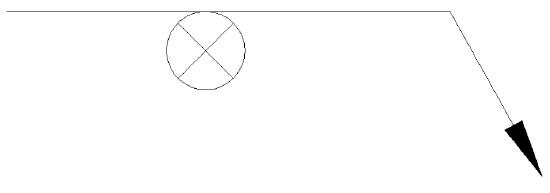
Stud welds are a common practice in many shops. This process often uses a stud welder which is sometimes a standalone or handheld unit. These welds require the symbol to be on the arrow side only of a joint. The elements of size, pitch, and amount of stud welds are placed in the same locations as spot and seam welds.
Symbol
Added elements
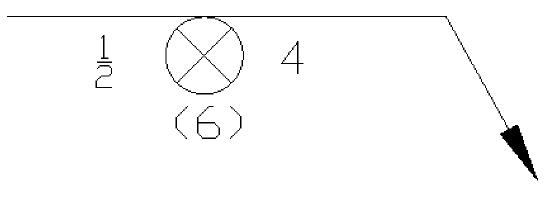
The above weld is calling for six ½” diameter stud welds placed at a 4” center to center spacing.
Studs come in all sorts of sizes, shapes, and varieties. For example there are studs for concrete anchors, threaded bolt patterns, tapped studs to use as a bolt, insulation hangers, and even hard faced studs to replace hard facing a part.
Spot, Stud, Seam Quiz
In the space below draw a symbol for the following:
3/16” spot weld on the arrow side, ground flush, a pitch of 2”, and 8 total welds.
1” Stud welds on the arrow side, 2” pitch, 20 total studs.
Resistance seam weld with no side significance, 8” pitch, 16” length.
1/4” stud welds on the arrow side with a pitch of 2”. If the part is 20” long and the first stud is placed 1” from the edge how many studs are required?

