
1.1: Module 1 Projects
- Page ID
- 19865

\( \newcommand{\vecs}[1]{\overset { \scriptstyle \rightharpoonup} {\mathbf{#1}} } \)
\( \newcommand{\vecd}[1]{\overset{-\!-\!\rightharpoonup}{\vphantom{a}\smash {#1}}} \)
\( \newcommand{\dsum}{\displaystyle\sum\limits} \)
\( \newcommand{\dint}{\displaystyle\int\limits} \)
\( \newcommand{\dlim}{\displaystyle\lim\limits} \)
\( \newcommand{\id}{\mathrm{id}}\) \( \newcommand{\Span}{\mathrm{span}}\)
( \newcommand{\kernel}{\mathrm{null}\,}\) \( \newcommand{\range}{\mathrm{range}\,}\)
\( \newcommand{\RealPart}{\mathrm{Re}}\) \( \newcommand{\ImaginaryPart}{\mathrm{Im}}\)
\( \newcommand{\Argument}{\mathrm{Arg}}\) \( \newcommand{\norm}[1]{\| #1 \|}\)
\( \newcommand{\inner}[2]{\langle #1, #2 \rangle}\)
\( \newcommand{\Span}{\mathrm{span}}\)
\( \newcommand{\id}{\mathrm{id}}\)
\( \newcommand{\Span}{\mathrm{span}}\)
\( \newcommand{\kernel}{\mathrm{null}\,}\)
\( \newcommand{\range}{\mathrm{range}\,}\)
\( \newcommand{\RealPart}{\mathrm{Re}}\)
\( \newcommand{\ImaginaryPart}{\mathrm{Im}}\)
\( \newcommand{\Argument}{\mathrm{Arg}}\)
\( \newcommand{\norm}[1]{\| #1 \|}\)
\( \newcommand{\inner}[2]{\langle #1, #2 \rangle}\)
\( \newcommand{\Span}{\mathrm{span}}\) \( \newcommand{\AA}{\unicode[.8,0]{x212B}}\)
\( \newcommand{\vectorA}[1]{\vec{#1}} % arrow\)
\( \newcommand{\vectorAt}[1]{\vec{\text{#1}}} % arrow\)
\( \newcommand{\vectorB}[1]{\overset { \scriptstyle \rightharpoonup} {\mathbf{#1}} } \)
\( \newcommand{\vectorC}[1]{\textbf{#1}} \)
\( \newcommand{\vectorD}[1]{\overrightarrow{#1}} \)
\( \newcommand{\vectorDt}[1]{\overrightarrow{\text{#1}}} \)
\( \newcommand{\vectE}[1]{\overset{-\!-\!\rightharpoonup}{\vphantom{a}\smash{\mathbf {#1}}}} \)
\( \newcommand{\vecs}[1]{\overset { \scriptstyle \rightharpoonup} {\mathbf{#1}} } \)
\(\newcommand{\longvect}{\overrightarrow}\)
\( \newcommand{\vecd}[1]{\overset{-\!-\!\rightharpoonup}{\vphantom{a}\smash {#1}}} \)
\(\newcommand{\avec}{\mathbf a}\) \(\newcommand{\bvec}{\mathbf b}\) \(\newcommand{\cvec}{\mathbf c}\) \(\newcommand{\dvec}{\mathbf d}\) \(\newcommand{\dtil}{\widetilde{\mathbf d}}\) \(\newcommand{\evec}{\mathbf e}\) \(\newcommand{\fvec}{\mathbf f}\) \(\newcommand{\nvec}{\mathbf n}\) \(\newcommand{\pvec}{\mathbf p}\) \(\newcommand{\qvec}{\mathbf q}\) \(\newcommand{\svec}{\mathbf s}\) \(\newcommand{\tvec}{\mathbf t}\) \(\newcommand{\uvec}{\mathbf u}\) \(\newcommand{\vvec}{\mathbf v}\) \(\newcommand{\wvec}{\mathbf w}\) \(\newcommand{\xvec}{\mathbf x}\) \(\newcommand{\yvec}{\mathbf y}\) \(\newcommand{\zvec}{\mathbf z}\) \(\newcommand{\rvec}{\mathbf r}\) \(\newcommand{\mvec}{\mathbf m}\) \(\newcommand{\zerovec}{\mathbf 0}\) \(\newcommand{\onevec}{\mathbf 1}\) \(\newcommand{\real}{\mathbb R}\) \(\newcommand{\twovec}[2]{\left[\begin{array}{r}#1 \\ #2 \end{array}\right]}\) \(\newcommand{\ctwovec}[2]{\left[\begin{array}{c}#1 \\ #2 \end{array}\right]}\) \(\newcommand{\threevec}[3]{\left[\begin{array}{r}#1 \\ #2 \\ #3 \end{array}\right]}\) \(\newcommand{\cthreevec}[3]{\left[\begin{array}{c}#1 \\ #2 \\ #3 \end{array}\right]}\) \(\newcommand{\fourvec}[4]{\left[\begin{array}{r}#1 \\ #2 \\ #3 \\ #4 \end{array}\right]}\) \(\newcommand{\cfourvec}[4]{\left[\begin{array}{c}#1 \\ #2 \\ #3 \\ #4 \end{array}\right]}\) \(\newcommand{\fivevec}[5]{\left[\begin{array}{r}#1 \\ #2 \\ #3 \\ #4 \\ #5 \\ \end{array}\right]}\) \(\newcommand{\cfivevec}[5]{\left[\begin{array}{c}#1 \\ #2 \\ #3 \\ #4 \\ #5 \\ \end{array}\right]}\) \(\newcommand{\mattwo}[4]{\left[\begin{array}{rr}#1 \amp #2 \\ #3 \amp #4 \\ \end{array}\right]}\) \(\newcommand{\laspan}[1]{\text{Span}\{#1\}}\) \(\newcommand{\bcal}{\cal B}\) \(\newcommand{\ccal}{\cal C}\) \(\newcommand{\scal}{\cal S}\) \(\newcommand{\wcal}{\cal W}\) \(\newcommand{\ecal}{\cal E}\) \(\newcommand{\coords}[2]{\left\{#1\right\}_{#2}}\) \(\newcommand{\gray}[1]{\color{gray}{#1}}\) \(\newcommand{\lgray}[1]{\color{lightgray}{#1}}\) \(\newcommand{\rank}{\operatorname{rank}}\) \(\newcommand{\row}{\text{Row}}\) \(\newcommand{\col}{\text{Col}}\) \(\renewcommand{\row}{\text{Row}}\) \(\newcommand{\nul}{\text{Nul}}\) \(\newcommand{\var}{\text{Var}}\) \(\newcommand{\corr}{\text{corr}}\) \(\newcommand{\len}[1]{\left|#1\right|}\) \(\newcommand{\bbar}{\overline{\bvec}}\) \(\newcommand{\bhat}{\widehat{\bvec}}\) \(\newcommand{\bperp}{\bvec^\perp}\) \(\newcommand{\xhat}{\widehat{\xvec}}\) \(\newcommand{\vhat}{\widehat{\vvec}}\) \(\newcommand{\uhat}{\widehat{\uvec}}\) \(\newcommand{\what}{\widehat{\wvec}}\) \(\newcommand{\Sighat}{\widehat{\Sigma}}\) \(\newcommand{\lt}{<}\) \(\newcommand{\gt}{>}\) \(\newcommand{\amp}{&}\) \(\definecolor{fillinmathshade}{gray}{0.9}\)1
Module 1 Projects
Wally Baumback
Learning Outcomes
When you have completed this module, you will be able to:
- Describe an Inventor project.
- Create the Inventor project that you will be using to organize and manage the files that you create while completing the Inventor book.
An Inventor Project
An Inventor project is a user named process to logically organize, store, and manage the valid links to the files created for an undertaking. For each project a user created name and a home folder is assigned. Inventor creates a project file that contains the project’s parameters and the paths to the locations of the files in that project. There is no limit to the number of projects that can be created. Inventor assigns a shortcut for each project so that you can easily select the appropriate project when required.
A project should be created so that it has a logical connection between the files in it. For example, if you were designing and drawing an office chair, all the individual parts of that chair, the assembly drawings, the design data, and the 2D working drawings would be stored in a project that you might name ‘ Office Chair ‘.
When a project is created, Inventor automatically creates a project file and saves it in the home folder of the project. A project file is automatically given the extension .ipj and contains the project parameters data as shown in Figure 1-1. This file also specifies the paths to the templates and files in the project. The information, parameters and data contained in the project file can be edited as required.
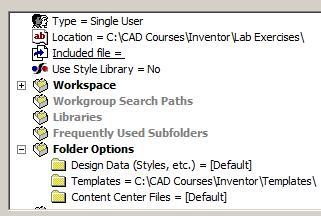
Typical Project Parameter Data List
MUST KNOW: When a project is created, Inventor automatically creates a project file and saves it in the home folder of the project. A project file is automatically given the extension.ipj and contains the data list of the project’s parameters. The extension .ipj is an acronym for Inventor Project.
Inventor Command: PROJECTS
The PROJECTS command is used to create or manage Inventor projects.
Shortcut: None
WORK ALONG: Creating the Project for the Inventor book
Step 1
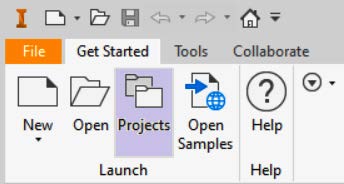
Start Inventor and enable the Get Started tab. In the ribbon menu, click Projects. This will display the Projects window. (Figure Step 1)
Step 2
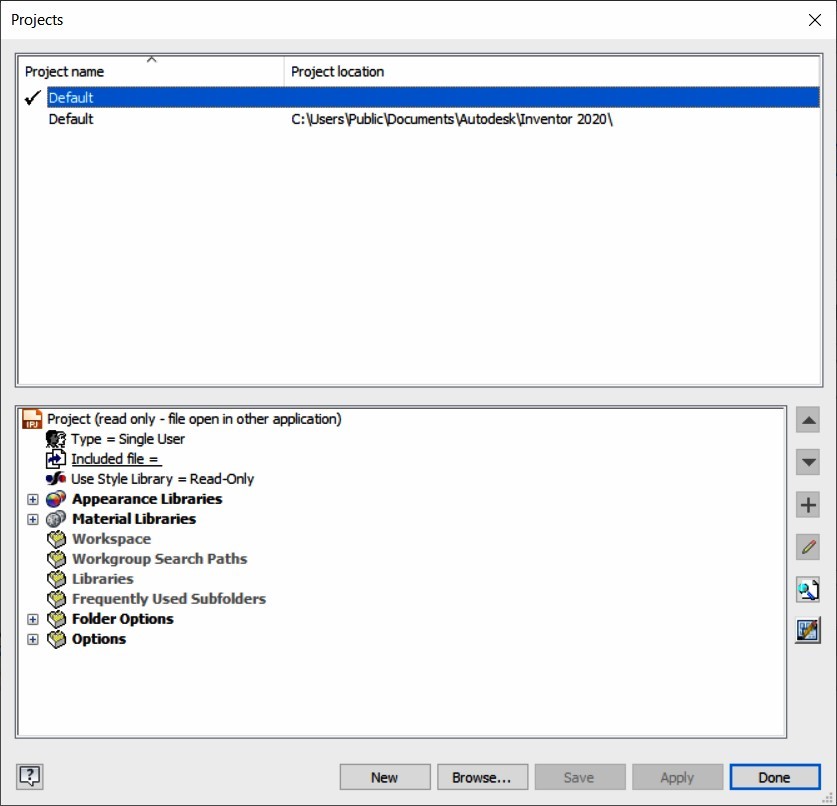
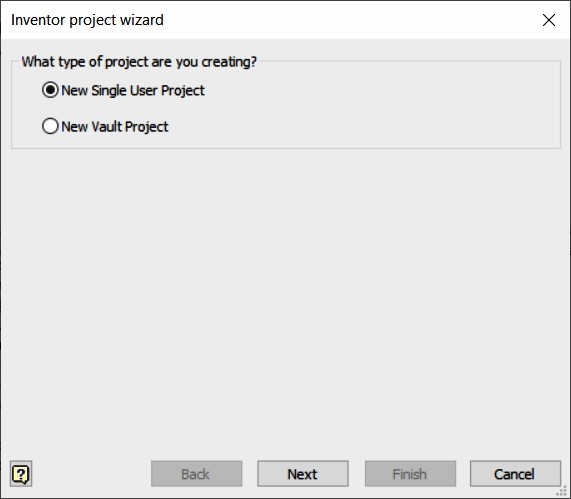
Click the New button along the bottom of the dialogue box. The Inventor project wizard window will open. Enable the New Single User Project button and then click Next. (Figure Step 2A and 2B)
Step 3
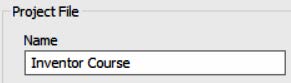
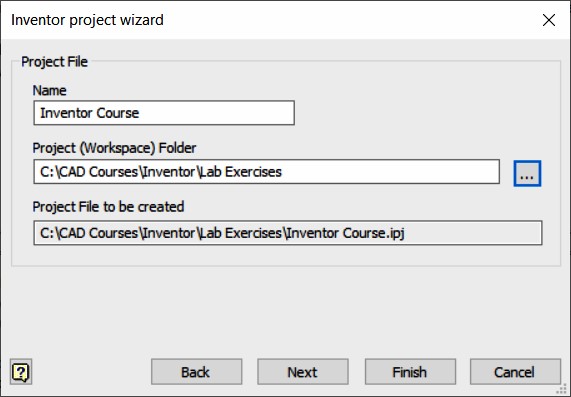
Name the project: Inventor Course. (Figure Step 3)
Step 4
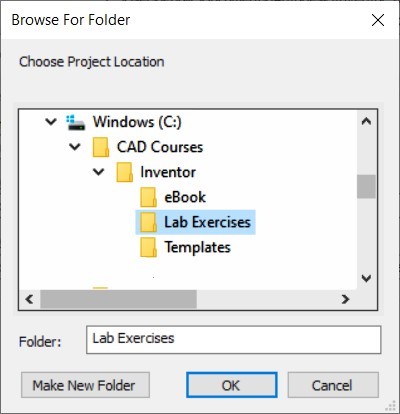
Set the location for the Project (Workspace) Folder. To do that, click the Browse button (the one with the 3 dots at the right-hand of the Project (Workspace) Folder) window. In the Browse for Folder dialogue box, locate the folder: C:\CAD Courses\Inventor\Lab Exercises. Highlight it by selecting it and click OK. (Figure Step 4A and 4B)

Step 5
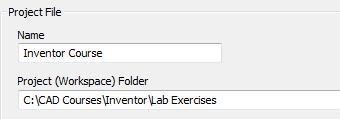
You should now see the Project (Workspace) Folder location as follows: C:\CAD Courses\Inventor\Lab Exercises (Figure Step 5)
Step 6
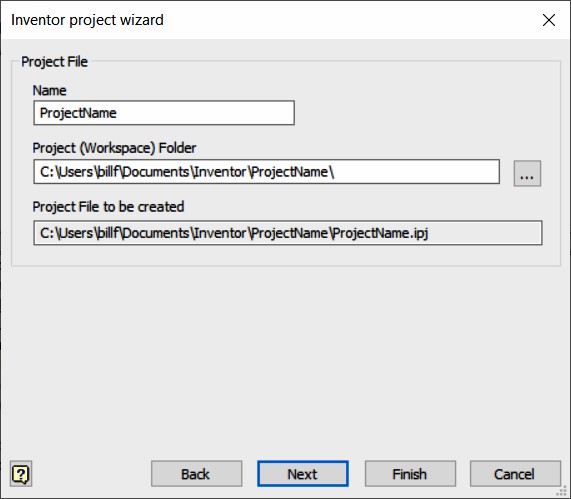
The Project File to be created will automatically be created by Inventor. (Figure Step 6)

Step 7
Check the completed page and ensure it matches the figure. Click the Finish button to complete the project setup. (Figure Step 7)
Step 8
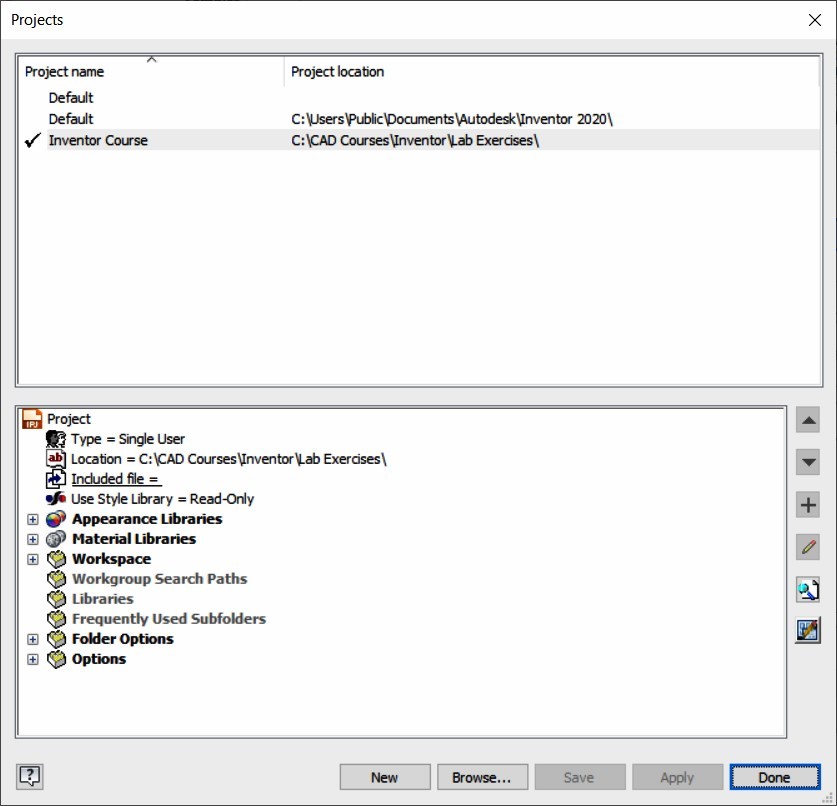
The Project window will show the new project that you just created. Double click Inventor Course in the Projects name column and note how the check mark icon beside the Inventor Course project indicates it is the current project. (Figure Step 8)
Step 9
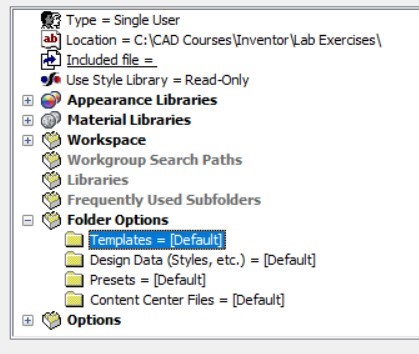
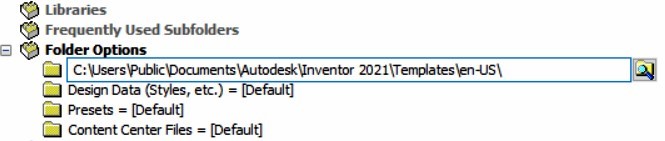
Down near the bottom, expand Folder Options and click the Templates folder to select it. (Figure Step 9)
Step 10
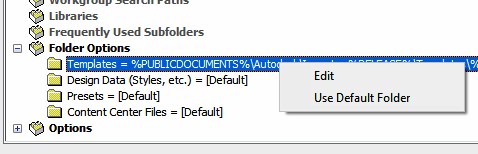
While the Templates folder is selected, right-click the mouse. In the right-click menu, click Edit. (Figure Step 10)
Step 11
Click the Browse icon. (Figure Step 11)
Step 12
In the Browse For Folder dialogue box, locate and select the Templates folder: C:\CAD Courses\Inventor\Templates (Figure Step 12)
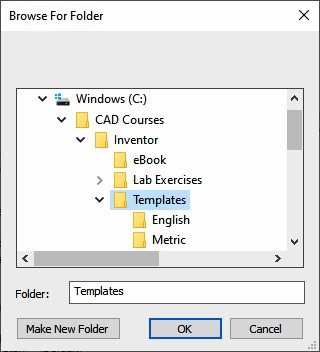
MUST KNOW: The folder location for the templates in the Inventor book should be set to C:\CAD Courses\Inventor\Templates\ in the Inventor Course project.
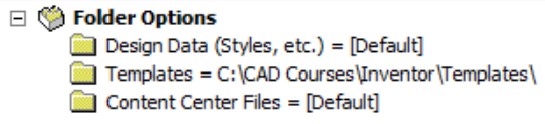
Step 13
Click OK and the dialogue box will appear similar to the figure. (Figure Step 13)

Step 14
Click Apply and Done to complete the new project.
Step 15
Exit Inventor.
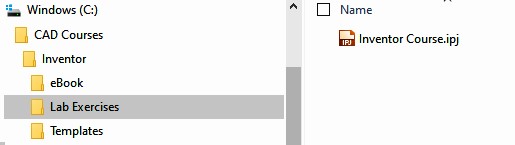
Step 16
Open Windows Explorer and locate the folder Lab Exercises in the folder list. The file Inventor Course.ipj, that was automatically created by Inventor in this workalong, should appear in the file list. (Figure Step 16)
MUST KNOW: In the Projects window dialogue box, Inventor Course should always be the current project when you are working on all exercises in the Inventor book.

Key Principles
Key Principles in Module 1
- An Inventor project is designed to logically organize, store, and manage the valid links to the files created for each undertaking. For each project, a name and a home folder must be assigned.
- A project file is automatically given the extension .ipj and contains the project’s specifications.
- check mark beside the Inventor Course project means it is the current project. Ensure that this project is always the current project when working on all exercises in the Inventor book.