
1.11: Sausage Making
- Page ID
- 23634

\( \newcommand{\vecs}[1]{\overset { \scriptstyle \rightharpoonup} {\mathbf{#1}} } \)
\( \newcommand{\vecd}[1]{\overset{-\!-\!\rightharpoonup}{\vphantom{a}\smash {#1}}} \)
\( \newcommand{\dsum}{\displaystyle\sum\limits} \)
\( \newcommand{\dint}{\displaystyle\int\limits} \)
\( \newcommand{\dlim}{\displaystyle\lim\limits} \)
\( \newcommand{\id}{\mathrm{id}}\) \( \newcommand{\Span}{\mathrm{span}}\)
( \newcommand{\kernel}{\mathrm{null}\,}\) \( \newcommand{\range}{\mathrm{range}\,}\)
\( \newcommand{\RealPart}{\mathrm{Re}}\) \( \newcommand{\ImaginaryPart}{\mathrm{Im}}\)
\( \newcommand{\Argument}{\mathrm{Arg}}\) \( \newcommand{\norm}[1]{\| #1 \|}\)
\( \newcommand{\inner}[2]{\langle #1, #2 \rangle}\)
\( \newcommand{\Span}{\mathrm{span}}\)
\( \newcommand{\id}{\mathrm{id}}\)
\( \newcommand{\Span}{\mathrm{span}}\)
\( \newcommand{\kernel}{\mathrm{null}\,}\)
\( \newcommand{\range}{\mathrm{range}\,}\)
\( \newcommand{\RealPart}{\mathrm{Re}}\)
\( \newcommand{\ImaginaryPart}{\mathrm{Im}}\)
\( \newcommand{\Argument}{\mathrm{Arg}}\)
\( \newcommand{\norm}[1]{\| #1 \|}\)
\( \newcommand{\inner}[2]{\langle #1, #2 \rangle}\)
\( \newcommand{\Span}{\mathrm{span}}\) \( \newcommand{\AA}{\unicode[.8,0]{x212B}}\)
\( \newcommand{\vectorA}[1]{\vec{#1}} % arrow\)
\( \newcommand{\vectorAt}[1]{\vec{\text{#1}}} % arrow\)
\( \newcommand{\vectorB}[1]{\overset { \scriptstyle \rightharpoonup} {\mathbf{#1}} } \)
\( \newcommand{\vectorC}[1]{\textbf{#1}} \)
\( \newcommand{\vectorD}[1]{\overrightarrow{#1}} \)
\( \newcommand{\vectorDt}[1]{\overrightarrow{\text{#1}}} \)
\( \newcommand{\vectE}[1]{\overset{-\!-\!\rightharpoonup}{\vphantom{a}\smash{\mathbf {#1}}}} \)
\( \newcommand{\vecs}[1]{\overset { \scriptstyle \rightharpoonup} {\mathbf{#1}} } \)
\(\newcommand{\longvect}{\overrightarrow}\)
\( \newcommand{\vecd}[1]{\overset{-\!-\!\rightharpoonup}{\vphantom{a}\smash {#1}}} \)
\(\newcommand{\avec}{\mathbf a}\) \(\newcommand{\bvec}{\mathbf b}\) \(\newcommand{\cvec}{\mathbf c}\) \(\newcommand{\dvec}{\mathbf d}\) \(\newcommand{\dtil}{\widetilde{\mathbf d}}\) \(\newcommand{\evec}{\mathbf e}\) \(\newcommand{\fvec}{\mathbf f}\) \(\newcommand{\nvec}{\mathbf n}\) \(\newcommand{\pvec}{\mathbf p}\) \(\newcommand{\qvec}{\mathbf q}\) \(\newcommand{\svec}{\mathbf s}\) \(\newcommand{\tvec}{\mathbf t}\) \(\newcommand{\uvec}{\mathbf u}\) \(\newcommand{\vvec}{\mathbf v}\) \(\newcommand{\wvec}{\mathbf w}\) \(\newcommand{\xvec}{\mathbf x}\) \(\newcommand{\yvec}{\mathbf y}\) \(\newcommand{\zvec}{\mathbf z}\) \(\newcommand{\rvec}{\mathbf r}\) \(\newcommand{\mvec}{\mathbf m}\) \(\newcommand{\zerovec}{\mathbf 0}\) \(\newcommand{\onevec}{\mathbf 1}\) \(\newcommand{\real}{\mathbb R}\) \(\newcommand{\twovec}[2]{\left[\begin{array}{r}#1 \\ #2 \end{array}\right]}\) \(\newcommand{\ctwovec}[2]{\left[\begin{array}{c}#1 \\ #2 \end{array}\right]}\) \(\newcommand{\threevec}[3]{\left[\begin{array}{r}#1 \\ #2 \\ #3 \end{array}\right]}\) \(\newcommand{\cthreevec}[3]{\left[\begin{array}{c}#1 \\ #2 \\ #3 \end{array}\right]}\) \(\newcommand{\fourvec}[4]{\left[\begin{array}{r}#1 \\ #2 \\ #3 \\ #4 \end{array}\right]}\) \(\newcommand{\cfourvec}[4]{\left[\begin{array}{c}#1 \\ #2 \\ #3 \\ #4 \end{array}\right]}\) \(\newcommand{\fivevec}[5]{\left[\begin{array}{r}#1 \\ #2 \\ #3 \\ #4 \\ #5 \\ \end{array}\right]}\) \(\newcommand{\cfivevec}[5]{\left[\begin{array}{c}#1 \\ #2 \\ #3 \\ #4 \\ #5 \\ \end{array}\right]}\) \(\newcommand{\mattwo}[4]{\left[\begin{array}{rr}#1 \amp #2 \\ #3 \amp #4 \\ \end{array}\right]}\) \(\newcommand{\laspan}[1]{\text{Span}\{#1\}}\) \(\newcommand{\bcal}{\cal B}\) \(\newcommand{\ccal}{\cal C}\) \(\newcommand{\scal}{\cal S}\) \(\newcommand{\wcal}{\cal W}\) \(\newcommand{\ecal}{\cal E}\) \(\newcommand{\coords}[2]{\left\{#1\right\}_{#2}}\) \(\newcommand{\gray}[1]{\color{gray}{#1}}\) \(\newcommand{\lgray}[1]{\color{lightgray}{#1}}\) \(\newcommand{\rank}{\operatorname{rank}}\) \(\newcommand{\row}{\text{Row}}\) \(\newcommand{\col}{\text{Col}}\) \(\renewcommand{\row}{\text{Row}}\) \(\newcommand{\nul}{\text{Nul}}\) \(\newcommand{\var}{\text{Var}}\) \(\newcommand{\corr}{\text{corr}}\) \(\newcommand{\len}[1]{\left|#1\right|}\) \(\newcommand{\bbar}{\overline{\bvec}}\) \(\newcommand{\bhat}{\widehat{\bvec}}\) \(\newcommand{\bperp}{\bvec^\perp}\) \(\newcommand{\xhat}{\widehat{\xvec}}\) \(\newcommand{\vhat}{\widehat{\vvec}}\) \(\newcommand{\uhat}{\widehat{\uvec}}\) \(\newcommand{\what}{\widehat{\wvec}}\) \(\newcommand{\Sighat}{\widehat{\Sigma}}\) \(\newcommand{\lt}{<}\) \(\newcommand{\gt}{>}\) \(\newcommand{\amp}{&}\) \(\definecolor{fillinmathshade}{gray}{0.9}\)The origins of meat preservation are lost to the ages but probably began when humans began to realize the preservative value of salt. Sausage making originally developed as a means to preserve and transport meat. Primitive societies learned that dried berries and spices could be added to dried meat. The procedure of stuffing meat into casings essentially remains the same today, but sausage recipes have been greatly refined and sausage making has become a highly respected culinary art.
Sausages come in two main types: fresh and cured. Cured sausages may be either cooked or dried. Most cured sausages are smoked, but this is not mandatory. The curing process itself changes the meat and imparts its own flavors. An example is the difference in taste between a pork roast and a ham.
All smoked sausages are cured. The reason is the threat of botulism. The bacterium responsible, Clostridium botulinum, is ubiquitous in the environment, grows in the anaerobic conditions created in the interior of the sausage, and thrives in the 4 °C (39 °F) to 60 °C (140 °F) temperature range common in the smoke house and subsequent ambient storage. Thus, for safety reasons, sausages are cured before smoking.
Sausage Classifications
| Classification | Examples | Storage and Handling |
|---|---|---|
| Fresh sausage | Fresh pork sausage | Keep refrigerated. Cook bratwurst, bockwurst thoroughly before eating. Consume within 3 days or freeze |
| Uncooked smoked sausage | Smoked, country style, mettwurst, kielbasa. | Keep refrigerated. Cook thoroughly before eating. Consume within 7 days or freeze. |
| Cooked smoked sausage | Frankfurter, bologna, cotto salami | Keep refrigerated. Consume within 7 days of opening vacuum package |
| Dry sausage | Genoa salami, pepperoni | Does not require refrigeration. |
| Semi-dry sausage | Lebanon bologna, cervelot, summer sausage, Thüringen | For best quality, keep refrigerated. |
| Cooked meat specialties | Loaves, head cheese, scrapple | Keep refrigerated. Consume within 3 days after opening vacuum package |
Some of the information discussed here will be familiar as it was touched on in Chapter Four - Charcuterie Production and Aging. It will do you well to have the opportunity to review and delve deeper into the growing trend technique that is driving the modern chef. So before you go further re-read the brief section in Chapter Four dealing with sausage.
Equipment Mise En Place
- Safety first. Make certain the grinder is unplugged and that the proper parts are gathered and in good working order, cleaned, sanitized, and free of rust. This will prevent cross contamination from rust and other protein sources.
- Chill the assembly parts. The grinder housing, the auger or worm, blade, the die plates, the cutter, and collar should all be chilled in an ice bath. This helps to keep the fat from melting which aids in a good emulsion for the sausage. If this step is skipped, the end product will become mealy and crumbly leading to dry sausage that bursts when grilled.
- Take care in grinding. Assemble the machine properly or the product will show poorly immediately. Do not cut the meat too big to fit down the grinder housing. Do not force it down too fast. Take your time to do it right, but get along with it to be efficient.

Manual meat grinder- commons.wikimedia.org
Once the housing is mounted and the order of assembly begins with the insertion of the worm. The blade fits over the end of the worm with the flat side outward toward you. The die (with the holes) goes on next and usually has a notch to be lined up on the housing. After this screw on the collar snuggly and plug in the machine.
Some sausages benefit from mixing the seasonings and cures with the diced meats and fats then resting before grinding. Others are ground first with meat and fat ground separately then seasoned and mixed. As always follow your recipe and thoroughly know your game plan before starting. The following describes a basic technique in sausage grinding.
Basic Grinding Technique
- Chill the meat and fat to a temperature as close to freezing as possible, 30-32°F. Cut the meat into 1 or two inch pieces so that they easily fit the tube in the grinder housing. If the meat is cut into the proper size, it will go along smoothly when pulled in by the worm. If it is too big, the machine will strain to cut it. If the meat does not come out looking like ground beef leaving the die, if torn or has a fat pasty smooth texture, the assembly may be off. This is an indication that the blade may be on backwards. If you have a problem, stop the machine immediately; unplug it and disassemble the parts to see where the problem is. Your chef instructor will gladly help you back on track.
- Mix the ground sausage product in an electric mixer on medium speed for a minute or so. This will help to evenly distribute the seasonings and fat throughout the mixture. Be sure the parts are chilled and that you do not over load the bowl when mixing.
- Test the sausage for tasting before filling into casings. Try to cook the sausage in a manner that will be closest to the final product so that you get a true flavor. Poach a small portion if it is a poached sausage, Grill if grilled and so on.
Fermented Sausages
These dry and semi dry sausages, though ancient, are in great demand today with the resurgence in modernist movement. The lactic acid produced during the long curing time adds a tanginess that offers a palate for the chef to show other preservation skills through condiment and cheese pairings. The charcuterie board today is almost necessary for the menu today. Some examples or semi dry offerings are summer sausage or Lebanon Bologna (my father ordered Weavers brand when I was a child). A dry type would be our Saucisson Sec- a garlic and pork dry sausage cured in pork middles.
Important Tips for Fermented Sausages
- Use salts and curing agents like nitrates, nitrites, and sugars like sucrose and dextrose with a ratio of roughly 65% meat to fat. The salts ward off bad bacteria and the sugars help in curing along with feeding the good bacteria. Some recipes call for an additive to help feed the good bacteria.
- Mix the meat well to distribute the salts and sugars for a few days at very cold temperatures before adding the remaining seasonings and subsequent grinding. The temperature should be as close to freezing as possible.
- Stuff the sausage with careful attention to avoid air pockets where bacteria can grow. Also, take care to keep the humidity around 60% in the storing chamber to allow the moisture inside to dry and prevent green mold growth on the surface of the casings. Semi dry sausages will lose around 15% of their weight through the process while dry sausages will lose up to 30%. If a white mold develops this is good. It is called Mycelium and is not harmful. A trip to the grocer will show many such dried sausages covered in this harmless mold.
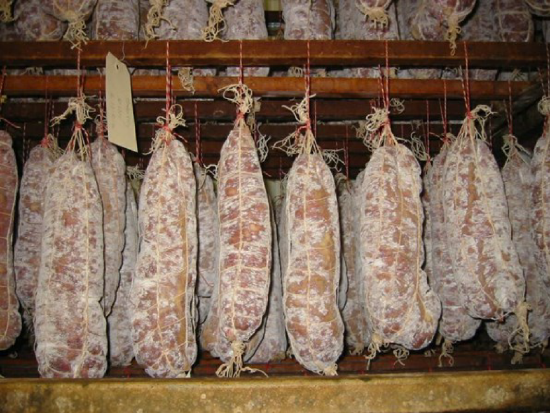
Saucisson Sec- commons.wikimedia.org
Emulsion Sausages
These sausages include frankfurters, bologna, and mortadella among others. The process utilizes a ratio of 5-4-3 forcemeat meaning that five parts of the recipe is made of trimmed raw meat. Four parts are pork fat from the belly, jowl, or plate. Three parts are water and usually comes from ice that is ground into the sausage using a buffalo chopper. This ensures a very cold emulsion and a final paste texture to the protein for stuffing.
- Trim, cure, and grind the meat. Progressive grinding is good; just make certain that the final grind is very fine. Keep the meat cold through this process.
- Grind the chilled fat and keep this cold.
- Place the chilled ground meat into the buffalo chopper and process with the ice in stages allowing the ice to form an emulsion as you go. The goal temperature is 30°F.
- Allow the temperature to rise to 40°F and add the ground fat to the mixture and process further until a rich smooth fluffy texture is reached.
- At this point, add any remaining seasonings, powdered milk if necessary, and process again until the product temperature rises to 58°F. You are now in the temperature danger zone so quickly test the product and adjust seasonings before final casing, packaging, and refrigeration.
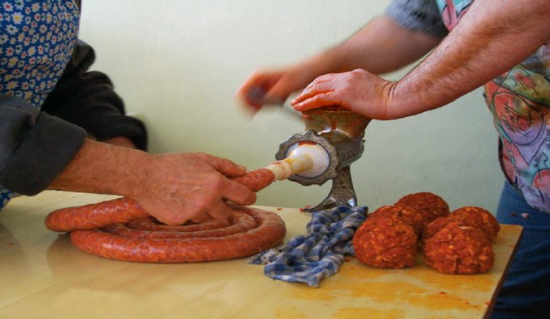
Stuffing with casings
- Gather sausage stuffer mise en place. Clean the casing by running water through the casings and soak them in acidulated water prior to putting them on the stuffer. With the water running slowly open the end of the casing and thread it over the spigot. Wet the spigot and continue to feed the casing over it. When finished slide the casing back over the end of the tube, keeping the tube moist until full of casing. Attach the tube to the stuffer.
- Fill the stuffer cylinder with sausage. Assemble the piston with “O-ring and place the stuffer cylinder on the base. Turn to press out any air from the machine and when sausage reaches the end of the tube pull the casing out and tie the end.
- Turn and fill the casing without too much pressure on the size casing or they may burst. Make one continual sausage and form into a large ring around itself. You may later twist into desired lengths.
- Go back over your product and pop out air bubbles with a needle of knife.
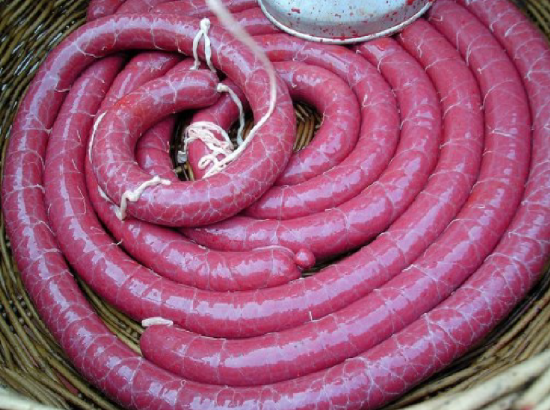
Stuffed casings, Fen.Wikipediam.org.
Filling casings, Fen.Wikipediam.org
Sausage Making
- T or F. Circle one. When making sausages, we should use the lesser and tougher cuts.
- What does the Latin word “Salsus” mean?
- What are the six basic components of sausage?
- What three things does fat provide for sausage?
- Salts and curing agents do three things for sausage; what are they?
- What is the name of the spice we associate with Italian sausage?
- Name the five aromatics used in sausage making.
- What are the three Equipment Mise En Place categories noted in Topic 11?
- After the housing is mounted on the grinder, what part goes on next?
- What part is assembled after the worm or auger?
- When mounting the blade, which side faces out?
- Describe the progressive grinding technique.
- What is produced inside fermented sausage to make the tangy flavor?
- What do the salts and sugars do during sausage fermentation?
- What is the white mold on fermented sausage called?