
5.6: Designing a Package Label
- Page ID
- 17834

\( \newcommand{\vecs}[1]{\overset { \scriptstyle \rightharpoonup} {\mathbf{#1}} } \)
\( \newcommand{\vecd}[1]{\overset{-\!-\!\rightharpoonup}{\vphantom{a}\smash {#1}}} \)
\( \newcommand{\id}{\mathrm{id}}\) \( \newcommand{\Span}{\mathrm{span}}\)
( \newcommand{\kernel}{\mathrm{null}\,}\) \( \newcommand{\range}{\mathrm{range}\,}\)
\( \newcommand{\RealPart}{\mathrm{Re}}\) \( \newcommand{\ImaginaryPart}{\mathrm{Im}}\)
\( \newcommand{\Argument}{\mathrm{Arg}}\) \( \newcommand{\norm}[1]{\| #1 \|}\)
\( \newcommand{\inner}[2]{\langle #1, #2 \rangle}\)
\( \newcommand{\Span}{\mathrm{span}}\)
\( \newcommand{\id}{\mathrm{id}}\)
\( \newcommand{\Span}{\mathrm{span}}\)
\( \newcommand{\kernel}{\mathrm{null}\,}\)
\( \newcommand{\range}{\mathrm{range}\,}\)
\( \newcommand{\RealPart}{\mathrm{Re}}\)
\( \newcommand{\ImaginaryPart}{\mathrm{Im}}\)
\( \newcommand{\Argument}{\mathrm{Arg}}\)
\( \newcommand{\norm}[1]{\| #1 \|}\)
\( \newcommand{\inner}[2]{\langle #1, #2 \rangle}\)
\( \newcommand{\Span}{\mathrm{span}}\) \( \newcommand{\AA}{\unicode[.8,0]{x212B}}\)
\( \newcommand{\vectorA}[1]{\vec{#1}} % arrow\)
\( \newcommand{\vectorAt}[1]{\vec{\text{#1}}} % arrow\)
\( \newcommand{\vectorB}[1]{\overset { \scriptstyle \rightharpoonup} {\mathbf{#1}} } \)
\( \newcommand{\vectorC}[1]{\textbf{#1}} \)
\( \newcommand{\vectorD}[1]{\overrightarrow{#1}} \)
\( \newcommand{\vectorDt}[1]{\overrightarrow{\text{#1}}} \)
\( \newcommand{\vectE}[1]{\overset{-\!-\!\rightharpoonup}{\vphantom{a}\smash{\mathbf {#1}}}} \)
\( \newcommand{\vecs}[1]{\overset { \scriptstyle \rightharpoonup} {\mathbf{#1}} } \)
\( \newcommand{\vecd}[1]{\overset{-\!-\!\rightharpoonup}{\vphantom{a}\smash {#1}}} \)
\(\newcommand{\avec}{\mathbf a}\) \(\newcommand{\bvec}{\mathbf b}\) \(\newcommand{\cvec}{\mathbf c}\) \(\newcommand{\dvec}{\mathbf d}\) \(\newcommand{\dtil}{\widetilde{\mathbf d}}\) \(\newcommand{\evec}{\mathbf e}\) \(\newcommand{\fvec}{\mathbf f}\) \(\newcommand{\nvec}{\mathbf n}\) \(\newcommand{\pvec}{\mathbf p}\) \(\newcommand{\qvec}{\mathbf q}\) \(\newcommand{\svec}{\mathbf s}\) \(\newcommand{\tvec}{\mathbf t}\) \(\newcommand{\uvec}{\mathbf u}\) \(\newcommand{\vvec}{\mathbf v}\) \(\newcommand{\wvec}{\mathbf w}\) \(\newcommand{\xvec}{\mathbf x}\) \(\newcommand{\yvec}{\mathbf y}\) \(\newcommand{\zvec}{\mathbf z}\) \(\newcommand{\rvec}{\mathbf r}\) \(\newcommand{\mvec}{\mathbf m}\) \(\newcommand{\zerovec}{\mathbf 0}\) \(\newcommand{\onevec}{\mathbf 1}\) \(\newcommand{\real}{\mathbb R}\) \(\newcommand{\twovec}[2]{\left[\begin{array}{r}#1 \\ #2 \end{array}\right]}\) \(\newcommand{\ctwovec}[2]{\left[\begin{array}{c}#1 \\ #2 \end{array}\right]}\) \(\newcommand{\threevec}[3]{\left[\begin{array}{r}#1 \\ #2 \\ #3 \end{array}\right]}\) \(\newcommand{\cthreevec}[3]{\left[\begin{array}{c}#1 \\ #2 \\ #3 \end{array}\right]}\) \(\newcommand{\fourvec}[4]{\left[\begin{array}{r}#1 \\ #2 \\ #3 \\ #4 \end{array}\right]}\) \(\newcommand{\cfourvec}[4]{\left[\begin{array}{c}#1 \\ #2 \\ #3 \\ #4 \end{array}\right]}\) \(\newcommand{\fivevec}[5]{\left[\begin{array}{r}#1 \\ #2 \\ #3 \\ #4 \\ #5 \\ \end{array}\right]}\) \(\newcommand{\cfivevec}[5]{\left[\begin{array}{c}#1 \\ #2 \\ #3 \\ #4 \\ #5 \\ \end{array}\right]}\) \(\newcommand{\mattwo}[4]{\left[\begin{array}{rr}#1 \amp #2 \\ #3 \amp #4 \\ \end{array}\right]}\) \(\newcommand{\laspan}[1]{\text{Span}\{#1\}}\) \(\newcommand{\bcal}{\cal B}\) \(\newcommand{\ccal}{\cal C}\) \(\newcommand{\scal}{\cal S}\) \(\newcommand{\wcal}{\cal W}\) \(\newcommand{\ecal}{\cal E}\) \(\newcommand{\coords}[2]{\left\{#1\right\}_{#2}}\) \(\newcommand{\gray}[1]{\color{gray}{#1}}\) \(\newcommand{\lgray}[1]{\color{lightgray}{#1}}\) \(\newcommand{\rank}{\operatorname{rank}}\) \(\newcommand{\row}{\text{Row}}\) \(\newcommand{\col}{\text{Col}}\) \(\renewcommand{\row}{\text{Row}}\) \(\newcommand{\nul}{\text{Nul}}\) \(\newcommand{\var}{\text{Var}}\) \(\newcommand{\corr}{\text{corr}}\) \(\newcommand{\len}[1]{\left|#1\right|}\) \(\newcommand{\bbar}{\overline{\bvec}}\) \(\newcommand{\bhat}{\widehat{\bvec}}\) \(\newcommand{\bperp}{\bvec^\perp}\) \(\newcommand{\xhat}{\widehat{\xvec}}\) \(\newcommand{\vhat}{\widehat{\vvec}}\) \(\newcommand{\uhat}{\widehat{\uvec}}\) \(\newcommand{\what}{\widehat{\wvec}}\) \(\newcommand{\Sighat}{\widehat{\Sigma}}\) \(\newcommand{\lt}{<}\) \(\newcommand{\gt}{>}\) \(\newcommand{\amp}{&}\) \(\definecolor{fillinmathshade}{gray}{0.9}\)Designing a label is a blend of detail and creativity. Think about all of the components needed on the label before you start designing the label. Also, consider packaging layout and size. This will be important for determining what goes where and how much space you have for the design. Then get creative on how you want to make your package stand out on the grocery store shelves.
Requirements for a Food Label
- Statement of Identity or standard product name (in addition to the brand name)
- Net Quantity of Contents statement
- How much is in the package?
- Component/Ingredient Statement
- Listed greatest to least by weight
- Include all of the ingredients within ingredients – look at food packages for examples – enriched flour, chocolate and syrups are just some of the ingredients that are made up of additional ingredients
- Nutrition Facts Panel – make sure to check ingredients, processing adjustments, and serving size in Genesis. Get your Nutrition Facts Panel approved before exporting it for your label
- Allergen Statement – see FSIS Compliance Guidelines on Allergens (pdf) for more information.
- Signature line or name and place of business of the U.S. manufacturer, packer, or distributor
Additional Label Material
- Bar Code – can be generated on Genesis or “borrowed” from the internet…
- “Best by” Date – set your date based on shelf-life testing and research
- Lot Code – used for tracking purposes
- Preparation &/or Storage Instructions (keep refrigerated, heat thoroughly, etc.)
- Label Claims
- Nutrient Content Claims
- Health Claims
- Other truthful statements (vegan, kosher, third party verification, etc.)
- Marketing extras
- Slogan
- Promotional materials
- Choking Hazard Statement may be needed for some foods
- Not required by FDA, but encouraged
- For more information, check out Small Parts for Toys and Children’s Products Business Guidance.
- Meat & Poultry products need an Inspection Label – Check out the FSIS Label Reference (pdf) for more information.
Layout & Font Size
- Study FDA’s A Food Labeling Guide (pdf) – it is incredibly helpful for all components of the label and especially helpful for the layout requirements.
- Necessary to determine which part of your package is the Principal Display Panel (PDP) & Information Panel
- Then determine the area of the PDP for minimum type size permitted (especially for the net quantity statement)
What name should be used as the Statement of Identity?
- The name established by law or regulation, or in the absence thereof, the common or usual name of the food, if the food has one, should be used as the statement of identity.
- If there is none, then an appropriately descriptive name, that is not misleading, should be used.
- Brand names are not considered to be statements of identity and should not be unduly prominent compared to the statement of identity.
- Check out 21 CFR 101.3(b) & (d) for more information.
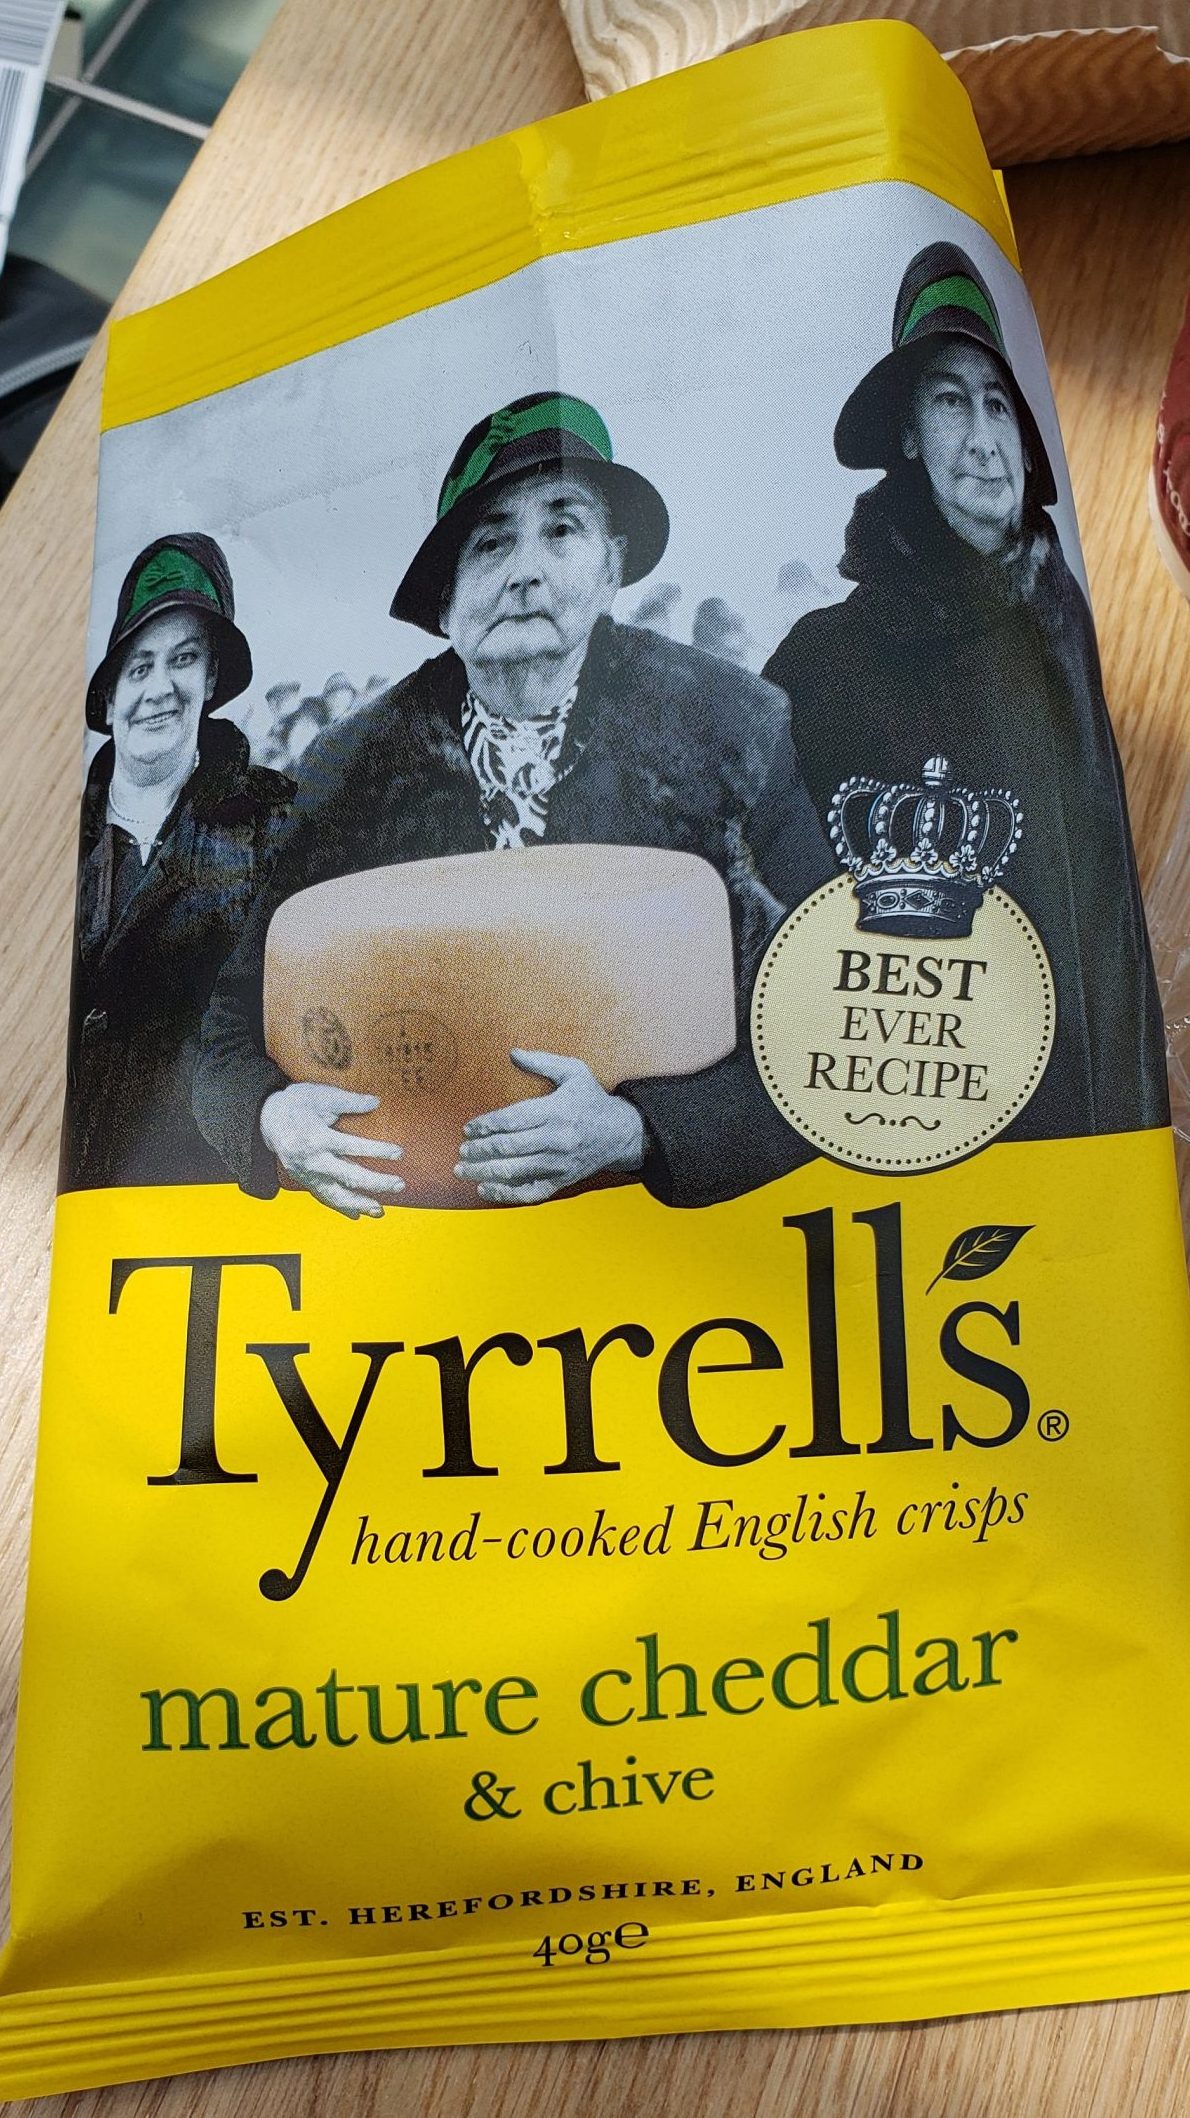
Be Creative – make your packaging stand out!
Here is a label (from England) that stands out on a crowded snack shelf.
End Goal
- Your team needs one finished label and package to submit.
- The approval process generally takes a few times to get it right.
How to Get Started
- Organize/create all of the material that is required for the label.
- Organize/create additional material (graphics, claims, etc.) that you would like to put on the label.
- Determine package material(s) & size/dimensions.
- Identify the principal display panel and then organize the layout accordingly.
- Canva is recommended for designing the label.
- Check out Packola.com for boxes (help with the layout).
Package Example – Bag Design
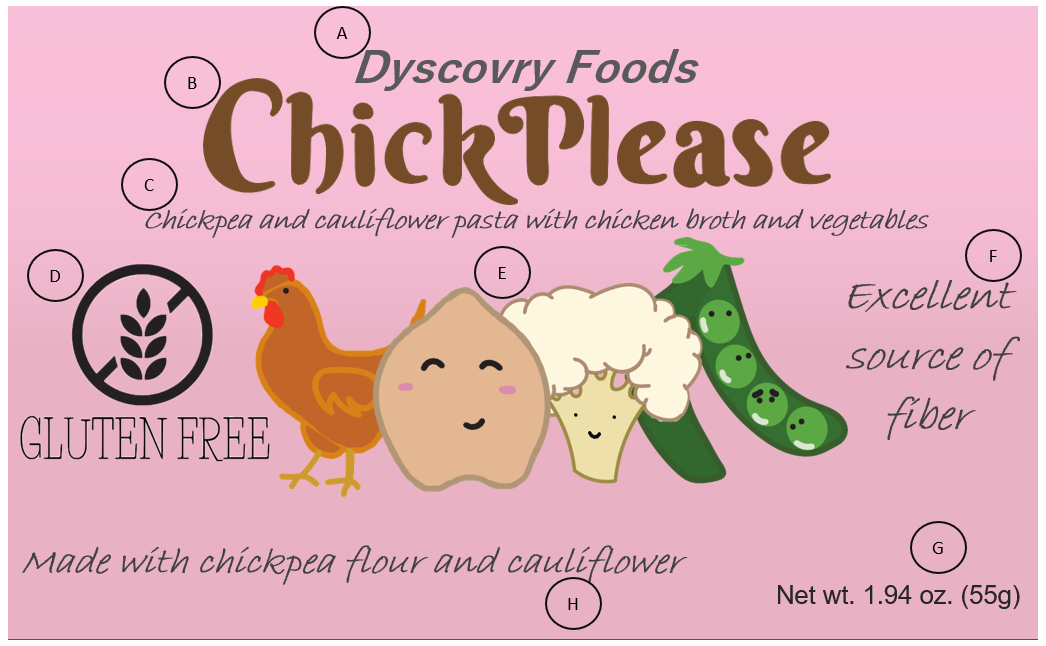
Legend:
- Company name
- Brand name
- Statement of Identity/standard product name
- Truthful statement
- Image for branding and consumer attraction purposes
- Nutrient Content Claim
- Net Weight Statement
- Ingredient callout for marketing & consumer attraction purposes
- Nutrition Facts Panel
- Preparation steps for product
- Ingredient Statement
- Manufacturer Address and Phone Number, Bar Code, and Lot Code/Tracking Code