2.10: Inserting and Modifying Graphics
- Page ID
- 14292

\( \newcommand{\vecs}[1]{\overset { \scriptstyle \rightharpoonup} {\mathbf{#1}} } \)
\( \newcommand{\vecd}[1]{\overset{-\!-\!\rightharpoonup}{\vphantom{a}\smash {#1}}} \)
\( \newcommand{\id}{\mathrm{id}}\) \( \newcommand{\Span}{\mathrm{span}}\)
( \newcommand{\kernel}{\mathrm{null}\,}\) \( \newcommand{\range}{\mathrm{range}\,}\)
\( \newcommand{\RealPart}{\mathrm{Re}}\) \( \newcommand{\ImaginaryPart}{\mathrm{Im}}\)
\( \newcommand{\Argument}{\mathrm{Arg}}\) \( \newcommand{\norm}[1]{\| #1 \|}\)
\( \newcommand{\inner}[2]{\langle #1, #2 \rangle}\)
\( \newcommand{\Span}{\mathrm{span}}\)
\( \newcommand{\id}{\mathrm{id}}\)
\( \newcommand{\Span}{\mathrm{span}}\)
\( \newcommand{\kernel}{\mathrm{null}\,}\)
\( \newcommand{\range}{\mathrm{range}\,}\)
\( \newcommand{\RealPart}{\mathrm{Re}}\)
\( \newcommand{\ImaginaryPart}{\mathrm{Im}}\)
\( \newcommand{\Argument}{\mathrm{Arg}}\)
\( \newcommand{\norm}[1]{\| #1 \|}\)
\( \newcommand{\inner}[2]{\langle #1, #2 \rangle}\)
\( \newcommand{\Span}{\mathrm{span}}\) \( \newcommand{\AA}{\unicode[.8,0]{x212B}}\)
\( \newcommand{\vectorA}[1]{\vec{#1}} % arrow\)
\( \newcommand{\vectorAt}[1]{\vec{\text{#1}}} % arrow\)
\( \newcommand{\vectorB}[1]{\overset { \scriptstyle \rightharpoonup} {\mathbf{#1}} } \)
\( \newcommand{\vectorC}[1]{\textbf{#1}} \)
\( \newcommand{\vectorD}[1]{\overrightarrow{#1}} \)
\( \newcommand{\vectorDt}[1]{\overrightarrow{\text{#1}}} \)
\( \newcommand{\vectE}[1]{\overset{-\!-\!\rightharpoonup}{\vphantom{a}\smash{\mathbf {#1}}}} \)
\( \newcommand{\vecs}[1]{\overset { \scriptstyle \rightharpoonup} {\mathbf{#1}} } \)
\( \newcommand{\vecd}[1]{\overset{-\!-\!\rightharpoonup}{\vphantom{a}\smash {#1}}} \)
\(\newcommand{\avec}{\mathbf a}\) \(\newcommand{\bvec}{\mathbf b}\) \(\newcommand{\cvec}{\mathbf c}\) \(\newcommand{\dvec}{\mathbf d}\) \(\newcommand{\dtil}{\widetilde{\mathbf d}}\) \(\newcommand{\evec}{\mathbf e}\) \(\newcommand{\fvec}{\mathbf f}\) \(\newcommand{\nvec}{\mathbf n}\) \(\newcommand{\pvec}{\mathbf p}\) \(\newcommand{\qvec}{\mathbf q}\) \(\newcommand{\svec}{\mathbf s}\) \(\newcommand{\tvec}{\mathbf t}\) \(\newcommand{\uvec}{\mathbf u}\) \(\newcommand{\vvec}{\mathbf v}\) \(\newcommand{\wvec}{\mathbf w}\) \(\newcommand{\xvec}{\mathbf x}\) \(\newcommand{\yvec}{\mathbf y}\) \(\newcommand{\zvec}{\mathbf z}\) \(\newcommand{\rvec}{\mathbf r}\) \(\newcommand{\mvec}{\mathbf m}\) \(\newcommand{\zerovec}{\mathbf 0}\) \(\newcommand{\onevec}{\mathbf 1}\) \(\newcommand{\real}{\mathbb R}\) \(\newcommand{\twovec}[2]{\left[\begin{array}{r}#1 \\ #2 \end{array}\right]}\) \(\newcommand{\ctwovec}[2]{\left[\begin{array}{c}#1 \\ #2 \end{array}\right]}\) \(\newcommand{\threevec}[3]{\left[\begin{array}{r}#1 \\ #2 \\ #3 \end{array}\right]}\) \(\newcommand{\cthreevec}[3]{\left[\begin{array}{c}#1 \\ #2 \\ #3 \end{array}\right]}\) \(\newcommand{\fourvec}[4]{\left[\begin{array}{r}#1 \\ #2 \\ #3 \\ #4 \end{array}\right]}\) \(\newcommand{\cfourvec}[4]{\left[\begin{array}{c}#1 \\ #2 \\ #3 \\ #4 \end{array}\right]}\) \(\newcommand{\fivevec}[5]{\left[\begin{array}{r}#1 \\ #2 \\ #3 \\ #4 \\ #5 \\ \end{array}\right]}\) \(\newcommand{\cfivevec}[5]{\left[\begin{array}{c}#1 \\ #2 \\ #3 \\ #4 \\ #5 \\ \end{array}\right]}\) \(\newcommand{\mattwo}[4]{\left[\begin{array}{rr}#1 \amp #2 \\ #3 \amp #4 \\ \end{array}\right]}\) \(\newcommand{\laspan}[1]{\text{Span}\{#1\}}\) \(\newcommand{\bcal}{\cal B}\) \(\newcommand{\ccal}{\cal C}\) \(\newcommand{\scal}{\cal S}\) \(\newcommand{\wcal}{\cal W}\) \(\newcommand{\ecal}{\cal E}\) \(\newcommand{\coords}[2]{\left\{#1\right\}_{#2}}\) \(\newcommand{\gray}[1]{\color{gray}{#1}}\) \(\newcommand{\lgray}[1]{\color{lightgray}{#1}}\) \(\newcommand{\rank}{\operatorname{rank}}\) \(\newcommand{\row}{\text{Row}}\) \(\newcommand{\col}{\text{Col}}\) \(\renewcommand{\row}{\text{Row}}\) \(\newcommand{\nul}{\text{Nul}}\) \(\newcommand{\var}{\text{Var}}\) \(\newcommand{\corr}{\text{corr}}\) \(\newcommand{\len}[1]{\left|#1\right|}\) \(\newcommand{\bbar}{\overline{\bvec}}\) \(\newcommand{\bhat}{\widehat{\bvec}}\) \(\newcommand{\bperp}{\bvec^\perp}\) \(\newcommand{\xhat}{\widehat{\xvec}}\) \(\newcommand{\vhat}{\widehat{\vvec}}\) \(\newcommand{\uhat}{\widehat{\uvec}}\) \(\newcommand{\what}{\widehat{\wvec}}\) \(\newcommand{\Sighat}{\widehat{\Sigma}}\) \(\newcommand{\lt}{<}\) \(\newcommand{\gt}{>}\) \(\newcommand{\amp}{&}\) \(\definecolor{fillinmathshade}{gray}{0.9}\)It is said that a picture is worth a thousand words. This could be because graphic images make a document more interesting. You can insert photos from your computer or the web, edit them, compress them, resize and re-position them. Word offers a variety of graphics (from the Illustrations group of the Insert ribbon) that can be inserted into documents to add pizzazz to an otherwise dry document.
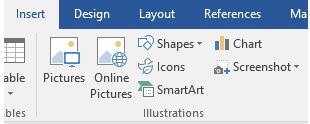
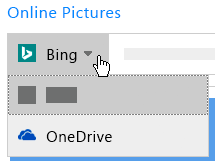
A word-processing application differs from a text editor in part due to its ability to perform basic graphic design functionality. As shown in this textbook, the author has inserted graphic screenshots via the Pictures button on the Insert tab. Pictures and Online Pictures only differ by where the source files reside. The Pictures option will allow you to insert local pictures that reside on your local device. Conversely, Online Pictures allows the user to insert images from the Internet using Microsoft’s Bing search engine or OneDrive, provided you have a OneDrive account set up.
When inserting graphics obtained from the Internet, keep in mind that using someone else’s work without their permission is not only wrong but also may be illegal. US Copyright laws control how a copyrighted work can be used. Consider either using public domain images, which are free to use, or images distributed under a Creative Common license, which generally are free, as long as you provide attribution to the owner.
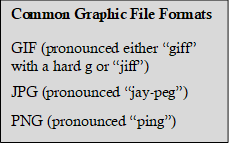
Most of the images inserted via the Pictures and Online Pictures features are likely to be photos. Nonetheless, other common graphics include clip art, scanned artwork, and shapes. Clip art differs from photos when the images consist of simple illustrations. This results in flexible file formats and small file sizes, which explained the appeal to early desktop publishers. However, increased computing resources have marginalized the benefits of clip art, and the rich quality of photos have diminished their demand.

The once popular clip art option is hidden behind the Online Pictures feature. The keyword that is entered into the search box will, by default, retrieve photos, clip art, and other images. However, the filter ![]() option, which appears once the original results appear, can further restrict the results to only clip art images, or other image types, specific sizes. layouts or colors.
option, which appears once the original results appear, can further restrict the results to only clip art images, or other image types, specific sizes. layouts or colors.
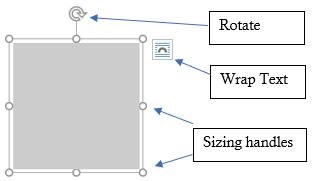
A complete array of built-in shapes can be inserted to complement existing graphics. Popular shapes include lines, rectangles and flow chart symbols. Once a shape is selected, the user needs to draw it on a blank area of the document. Once inserted, the shape, like any other graphic object, can be resized and re-positioned. To move the image, hover the mouse over the image until the pointer is the four arrows, then click and drag to your desired position. To resize a graphic, select the image and drag a corner sizing handle to resize it proportionately. The top/bottom or side handles allow the user to resize the graphic disproportionately. The rotate icon allows the user to rotate the object up to ± 360º.
Tip
A real useful picture to create is an image of your signature. Use a scanner or take a digital photo of your autograph and save your signature as an image file on your computer. Then insert the file below your typed name in professional correspondence.
Once the graphic is selected, a new contextual tab called the Picture Tools tab will appear on the ribbon. This tab will allow the user to make a plethora of corrections and adjustments to the graphic. Picture styles, effects, layouts, and the image size are common edits to the defaulting graphic. To resize an image disproportionately, click the launcher icon in the bottom right corner of the Size group to open the Layout dialog window. Now unmark the Lock Aspect Ratio checkbox.

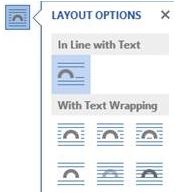
Perhaps the most common feature used in document layout considerations is the Wrap Text feature. By default, when pictures are inserted into a document, their layout is set to In Line with Text. This leaves a lot of unnecessary white space to the right of the image. To wrap text around a picture, select the picture, and then select a wrapping option (as shown in the image to the right of this paragraph). Popular options include Tight or Square.