
12.3: Tables Group
- Page ID
- 13647

\( \newcommand{\vecs}[1]{\overset { \scriptstyle \rightharpoonup} {\mathbf{#1}} } \)
\( \newcommand{\vecd}[1]{\overset{-\!-\!\rightharpoonup}{\vphantom{a}\smash {#1}}} \)
\( \newcommand{\id}{\mathrm{id}}\) \( \newcommand{\Span}{\mathrm{span}}\)
( \newcommand{\kernel}{\mathrm{null}\,}\) \( \newcommand{\range}{\mathrm{range}\,}\)
\( \newcommand{\RealPart}{\mathrm{Re}}\) \( \newcommand{\ImaginaryPart}{\mathrm{Im}}\)
\( \newcommand{\Argument}{\mathrm{Arg}}\) \( \newcommand{\norm}[1]{\| #1 \|}\)
\( \newcommand{\inner}[2]{\langle #1, #2 \rangle}\)
\( \newcommand{\Span}{\mathrm{span}}\)
\( \newcommand{\id}{\mathrm{id}}\)
\( \newcommand{\Span}{\mathrm{span}}\)
\( \newcommand{\kernel}{\mathrm{null}\,}\)
\( \newcommand{\range}{\mathrm{range}\,}\)
\( \newcommand{\RealPart}{\mathrm{Re}}\)
\( \newcommand{\ImaginaryPart}{\mathrm{Im}}\)
\( \newcommand{\Argument}{\mathrm{Arg}}\)
\( \newcommand{\norm}[1]{\| #1 \|}\)
\( \newcommand{\inner}[2]{\langle #1, #2 \rangle}\)
\( \newcommand{\Span}{\mathrm{span}}\) \( \newcommand{\AA}{\unicode[.8,0]{x212B}}\)
\( \newcommand{\vectorA}[1]{\vec{#1}} % arrow\)
\( \newcommand{\vectorAt}[1]{\vec{\text{#1}}} % arrow\)
\( \newcommand{\vectorB}[1]{\overset { \scriptstyle \rightharpoonup} {\mathbf{#1}} } \)
\( \newcommand{\vectorC}[1]{\textbf{#1}} \)
\( \newcommand{\vectorD}[1]{\overrightarrow{#1}} \)
\( \newcommand{\vectorDt}[1]{\overrightarrow{\text{#1}}} \)
\( \newcommand{\vectE}[1]{\overset{-\!-\!\rightharpoonup}{\vphantom{a}\smash{\mathbf {#1}}}} \)
\( \newcommand{\vecs}[1]{\overset { \scriptstyle \rightharpoonup} {\mathbf{#1}} } \)
\( \newcommand{\vecd}[1]{\overset{-\!-\!\rightharpoonup}{\vphantom{a}\smash {#1}}} \)
\(\newcommand{\avec}{\mathbf a}\) \(\newcommand{\bvec}{\mathbf b}\) \(\newcommand{\cvec}{\mathbf c}\) \(\newcommand{\dvec}{\mathbf d}\) \(\newcommand{\dtil}{\widetilde{\mathbf d}}\) \(\newcommand{\evec}{\mathbf e}\) \(\newcommand{\fvec}{\mathbf f}\) \(\newcommand{\nvec}{\mathbf n}\) \(\newcommand{\pvec}{\mathbf p}\) \(\newcommand{\qvec}{\mathbf q}\) \(\newcommand{\svec}{\mathbf s}\) \(\newcommand{\tvec}{\mathbf t}\) \(\newcommand{\uvec}{\mathbf u}\) \(\newcommand{\vvec}{\mathbf v}\) \(\newcommand{\wvec}{\mathbf w}\) \(\newcommand{\xvec}{\mathbf x}\) \(\newcommand{\yvec}{\mathbf y}\) \(\newcommand{\zvec}{\mathbf z}\) \(\newcommand{\rvec}{\mathbf r}\) \(\newcommand{\mvec}{\mathbf m}\) \(\newcommand{\zerovec}{\mathbf 0}\) \(\newcommand{\onevec}{\mathbf 1}\) \(\newcommand{\real}{\mathbb R}\) \(\newcommand{\twovec}[2]{\left[\begin{array}{r}#1 \\ #2 \end{array}\right]}\) \(\newcommand{\ctwovec}[2]{\left[\begin{array}{c}#1 \\ #2 \end{array}\right]}\) \(\newcommand{\threevec}[3]{\left[\begin{array}{r}#1 \\ #2 \\ #3 \end{array}\right]}\) \(\newcommand{\cthreevec}[3]{\left[\begin{array}{c}#1 \\ #2 \\ #3 \end{array}\right]}\) \(\newcommand{\fourvec}[4]{\left[\begin{array}{r}#1 \\ #2 \\ #3 \\ #4 \end{array}\right]}\) \(\newcommand{\cfourvec}[4]{\left[\begin{array}{c}#1 \\ #2 \\ #3 \\ #4 \end{array}\right]}\) \(\newcommand{\fivevec}[5]{\left[\begin{array}{r}#1 \\ #2 \\ #3 \\ #4 \\ #5 \\ \end{array}\right]}\) \(\newcommand{\cfivevec}[5]{\left[\begin{array}{c}#1 \\ #2 \\ #3 \\ #4 \\ #5 \\ \end{array}\right]}\) \(\newcommand{\mattwo}[4]{\left[\begin{array}{rr}#1 \amp #2 \\ #3 \amp #4 \\ \end{array}\right]}\) \(\newcommand{\laspan}[1]{\text{Span}\{#1\}}\) \(\newcommand{\bcal}{\cal B}\) \(\newcommand{\ccal}{\cal C}\) \(\newcommand{\scal}{\cal S}\) \(\newcommand{\wcal}{\cal W}\) \(\newcommand{\ecal}{\cal E}\) \(\newcommand{\coords}[2]{\left\{#1\right\}_{#2}}\) \(\newcommand{\gray}[1]{\color{gray}{#1}}\) \(\newcommand{\lgray}[1]{\color{lightgray}{#1}}\) \(\newcommand{\rank}{\operatorname{rank}}\) \(\newcommand{\row}{\text{Row}}\) \(\newcommand{\col}{\text{Col}}\) \(\renewcommand{\row}{\text{Row}}\) \(\newcommand{\nul}{\text{Nul}}\) \(\newcommand{\var}{\text{Var}}\) \(\newcommand{\corr}{\text{corr}}\) \(\newcommand{\len}[1]{\left|#1\right|}\) \(\newcommand{\bbar}{\overline{\bvec}}\) \(\newcommand{\bhat}{\widehat{\bvec}}\) \(\newcommand{\bperp}{\bvec^\perp}\) \(\newcommand{\xhat}{\widehat{\xvec}}\) \(\newcommand{\vhat}{\widehat{\vvec}}\) \(\newcommand{\uhat}{\widehat{\uvec}}\) \(\newcommand{\what}{\widehat{\wvec}}\) \(\newcommand{\Sighat}{\widehat{\Sigma}}\) \(\newcommand{\lt}{<}\) \(\newcommand{\gt}{>}\) \(\newcommand{\amp}{&}\) \(\definecolor{fillinmathshade}{gray}{0.9}\)
The Tables Group has one icon with many features. Clicking on the Table icon will launch an additional commands dialog box below. Users will have the option to insert a table by selecting how many row and column cells the table contains as the first option. Cells are the individual “boxes” that make up a table. Rows are groupings of cells that move left to right. Columns are groupings of cells that move up to down. A table can allow information to be shared with the reader in an easy to understand way. As an example, see the table below for a detailed example of all the table command options available to the user.
| Table Command | Function |
|---|---|
| Insert Table Command | 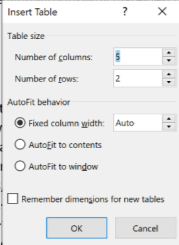 The Insert Table Command will allow the user to customize the number of columns and rows and determine whether they would like to size the table themselves with a fixed column with or allow Word to autofit the table to the specific text or window area. Word users may always resize the table by moving their cursor between the table cells until their insertion point cursor changes to a cursor with arrows pointing left and right. Clicking on the mouse at this point will allow the user to adjust the size of tables columns and/or rows. The Insert Table Command will allow the user to customize the number of columns and rows and determine whether they would like to size the table themselves with a fixed column with or allow Word to autofit the table to the specific text or window area. Word users may always resize the table by moving their cursor between the table cells until their insertion point cursor changes to a cursor with arrows pointing left and right. Clicking on the mouse at this point will allow the user to adjust the size of tables columns and/or rows. |
| Draw Table | Selecting the Draw Table command will change the cursor’s image from the insertion point to a pen. When the user selects a location with the pen and clicks the mouse, they can insert a table cell. |
| Convert Text to Table | Users can apply this command after selecting words they wish to place into a table. With the command entered, Word will attempt to place the text into the cells which it thinks is correct. It may still require the user to manipulate the table. |
| Excel Spreadsheet | Selecting an Excel Spreadsheet will allow the user to place a mini excel worksheet in their document at the insertion point. The excel document not only can appear as a table but can also be used to perform several calculations. |
| Quick Tables | Selecting Quick Tables will launch a variety of table templates from Microsoft Word, allowing the user to select from already created tables that have been formatted and choose the best one for their project. |
After the Table has been created it is easy to add additional rows/columns, resize the table, or add additional features and formatting. By using the primary mouse button (usually left-clicking) inside the table will add two additional modules to the Word Ribbon: Design & Layout.  . In addition, using the secondary mouse button (usually right-clicking) brings up other shortcuts for the table that are found in the Design and Layout Tab.
Design Tab

The Design Tab allows for manipulation of the appearance of the Table. In the Design, Tab is Table Style Options, Table Styles, and Borders Groups.
Table Style Options
Table Style Options allow the user to allow to Program Word to understand the type of table that was created. Selecting Header Row will change the formatting of the top row to differentiate the shading and the font of the header row. Total Row will change the formatting and shading of the bottom row. This is usually selected if the table is displaying a total (such as the total cost of supplies in a table about supply costs. Banded Rows are always selected by default. Banded Rows indicates that every that the shading in every row will be alternated to provide better visual clarity of the table. First Column indicates that the First Column on the left of being shaded differently to provide visual separation from the table information. This can also be selected for the last column. Finally, Banded Columns are the exact same as Banded Rows, except that they apply to columns. Depending on the table created and the information in the table, there are many options to make the information in the table stand out to the reader.
Table Styles
The Table Styles Group has two main options: to change the appearance and shading of the table and to manipulate the color options. Selecting the downward-facing arrow will launch a dialog box to provide the user with additional Table Styles with variations on color, spacing, and line thickness. Users can even create their own Table Style or edit a Table Style template. Finally, selecting the shading paint can button  will allow the user to change the color of the cell.
Table Borders
Table Borders allows the user to adjust the line thickness, color, and pattern of the table borders. Clicking on the downward arrows will provide even more options about Border styles, font size (default is ½ pt.) and Pen color. In addition, users can add or remove cell lines by selecting the Borders icon  Finally, the Border Painter icon
  will change the cursor to a paintbrush. Word users may add page borders by directing the cursor to the border of a table to add a line or increase the darkness of the line.