12.4: Layout Tab
- Page ID
- 13648
\( \newcommand{\vecs}[1]{\overset { \scriptstyle \rightharpoonup} {\mathbf{#1}} } \)
\( \newcommand{\vecd}[1]{\overset{-\!-\!\rightharpoonup}{\vphantom{a}\smash {#1}}} \)
\( \newcommand{\id}{\mathrm{id}}\) \( \newcommand{\Span}{\mathrm{span}}\)
( \newcommand{\kernel}{\mathrm{null}\,}\) \( \newcommand{\range}{\mathrm{range}\,}\)
\( \newcommand{\RealPart}{\mathrm{Re}}\) \( \newcommand{\ImaginaryPart}{\mathrm{Im}}\)
\( \newcommand{\Argument}{\mathrm{Arg}}\) \( \newcommand{\norm}[1]{\| #1 \|}\)
\( \newcommand{\inner}[2]{\langle #1, #2 \rangle}\)
\( \newcommand{\Span}{\mathrm{span}}\)
\( \newcommand{\id}{\mathrm{id}}\)
\( \newcommand{\Span}{\mathrm{span}}\)
\( \newcommand{\kernel}{\mathrm{null}\,}\)
\( \newcommand{\range}{\mathrm{range}\,}\)
\( \newcommand{\RealPart}{\mathrm{Re}}\)
\( \newcommand{\ImaginaryPart}{\mathrm{Im}}\)
\( \newcommand{\Argument}{\mathrm{Arg}}\)
\( \newcommand{\norm}[1]{\| #1 \|}\)
\( \newcommand{\inner}[2]{\langle #1, #2 \rangle}\)
\( \newcommand{\Span}{\mathrm{span}}\) \( \newcommand{\AA}{\unicode[.8,0]{x212B}}\)
\( \newcommand{\vectorA}[1]{\vec{#1}} % arrow\)
\( \newcommand{\vectorAt}[1]{\vec{\text{#1}}} % arrow\)
\( \newcommand{\vectorB}[1]{\overset { \scriptstyle \rightharpoonup} {\mathbf{#1}} } \)
\( \newcommand{\vectorC}[1]{\textbf{#1}} \)
\( \newcommand{\vectorD}[1]{\overrightarrow{#1}} \)
\( \newcommand{\vectorDt}[1]{\overrightarrow{\text{#1}}} \)
\( \newcommand{\vectE}[1]{\overset{-\!-\!\rightharpoonup}{\vphantom{a}\smash{\mathbf {#1}}}} \)
\( \newcommand{\vecs}[1]{\overset { \scriptstyle \rightharpoonup} {\mathbf{#1}} } \)
\( \newcommand{\vecd}[1]{\overset{-\!-\!\rightharpoonup}{\vphantom{a}\smash {#1}}} \)
\(\newcommand{\avec}{\mathbf a}\) \(\newcommand{\bvec}{\mathbf b}\) \(\newcommand{\cvec}{\mathbf c}\) \(\newcommand{\dvec}{\mathbf d}\) \(\newcommand{\dtil}{\widetilde{\mathbf d}}\) \(\newcommand{\evec}{\mathbf e}\) \(\newcommand{\fvec}{\mathbf f}\) \(\newcommand{\nvec}{\mathbf n}\) \(\newcommand{\pvec}{\mathbf p}\) \(\newcommand{\qvec}{\mathbf q}\) \(\newcommand{\svec}{\mathbf s}\) \(\newcommand{\tvec}{\mathbf t}\) \(\newcommand{\uvec}{\mathbf u}\) \(\newcommand{\vvec}{\mathbf v}\) \(\newcommand{\wvec}{\mathbf w}\) \(\newcommand{\xvec}{\mathbf x}\) \(\newcommand{\yvec}{\mathbf y}\) \(\newcommand{\zvec}{\mathbf z}\) \(\newcommand{\rvec}{\mathbf r}\) \(\newcommand{\mvec}{\mathbf m}\) \(\newcommand{\zerovec}{\mathbf 0}\) \(\newcommand{\onevec}{\mathbf 1}\) \(\newcommand{\real}{\mathbb R}\) \(\newcommand{\twovec}[2]{\left[\begin{array}{r}#1 \\ #2 \end{array}\right]}\) \(\newcommand{\ctwovec}[2]{\left[\begin{array}{c}#1 \\ #2 \end{array}\right]}\) \(\newcommand{\threevec}[3]{\left[\begin{array}{r}#1 \\ #2 \\ #3 \end{array}\right]}\) \(\newcommand{\cthreevec}[3]{\left[\begin{array}{c}#1 \\ #2 \\ #3 \end{array}\right]}\) \(\newcommand{\fourvec}[4]{\left[\begin{array}{r}#1 \\ #2 \\ #3 \\ #4 \end{array}\right]}\) \(\newcommand{\cfourvec}[4]{\left[\begin{array}{c}#1 \\ #2 \\ #3 \\ #4 \end{array}\right]}\) \(\newcommand{\fivevec}[5]{\left[\begin{array}{r}#1 \\ #2 \\ #3 \\ #4 \\ #5 \\ \end{array}\right]}\) \(\newcommand{\cfivevec}[5]{\left[\begin{array}{c}#1 \\ #2 \\ #3 \\ #4 \\ #5 \\ \end{array}\right]}\) \(\newcommand{\mattwo}[4]{\left[\begin{array}{rr}#1 \amp #2 \\ #3 \amp #4 \\ \end{array}\right]}\) \(\newcommand{\laspan}[1]{\text{Span}\{#1\}}\) \(\newcommand{\bcal}{\cal B}\) \(\newcommand{\ccal}{\cal C}\) \(\newcommand{\scal}{\cal S}\) \(\newcommand{\wcal}{\cal W}\) \(\newcommand{\ecal}{\cal E}\) \(\newcommand{\coords}[2]{\left\{#1\right\}_{#2}}\) \(\newcommand{\gray}[1]{\color{gray}{#1}}\) \(\newcommand{\lgray}[1]{\color{lightgray}{#1}}\) \(\newcommand{\rank}{\operatorname{rank}}\) \(\newcommand{\row}{\text{Row}}\) \(\newcommand{\col}{\text{Col}}\) \(\renewcommand{\row}{\text{Row}}\) \(\newcommand{\nul}{\text{Nul}}\) \(\newcommand{\var}{\text{Var}}\) \(\newcommand{\corr}{\text{corr}}\) \(\newcommand{\len}[1]{\left|#1\right|}\) \(\newcommand{\bbar}{\overline{\bvec}}\) \(\newcommand{\bhat}{\widehat{\bvec}}\) \(\newcommand{\bperp}{\bvec^\perp}\) \(\newcommand{\xhat}{\widehat{\xvec}}\) \(\newcommand{\vhat}{\widehat{\vvec}}\) \(\newcommand{\uhat}{\widehat{\uvec}}\) \(\newcommand{\what}{\widehat{\wvec}}\) \(\newcommand{\Sighat}{\widehat{\Sigma}}\) \(\newcommand{\lt}{<}\) \(\newcommand{\gt}{>}\) \(\newcommand{\amp}{&}\) \(\definecolor{fillinmathshade}{gray}{0.9}\)
In contrast to the design tab, the layout tab allows for manipulation of the table itself. The Layout Tab consists of the Table Group, the Draw Group, the Rows & Columns group, the Merge Group, Cell Size, Alignment, and Data Groups.
Table Group
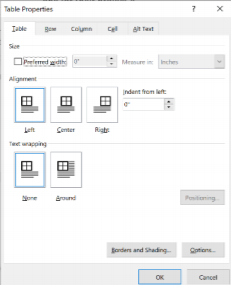
The Select button relates to the specific location of the insertion point in a specific cell in a table. Clicking on the Select icon will display Select Cell, Select Row, Select Column, and Select Table. Select Cells will highlight the specific cell. Select Row will highlight the entire row with the insertion point contained in it. Select Column will select the entire column. Finally, a select table will highlight the entire table. View Gridlines shows are hiding the gridlines of a table. By default, the gridlines are displayed in a table. Sometimes, the user wishes to not display these lines for cosmetic reasons. Finally, Table Properties allow for the manipulation of table formatting, row and column information, and allows the user to enter Alt Text, which allows users with screen readers to view information about the content in the table. Users can also adjust borders and shading and text wrapping in the table, along with preferred width of cells.

Draw Group
The Draw Table group has two options, Draw Table and Eraser. Draw Table allows the user to use the mouse to draw custom table boundaries, including diagonal lines. The Eraser icon allows the user to remove table boundaries and lines to merge cells in order to customize a table.
Rows & Columns Group
The Rows & Columns Group allows the user to insert cell rows or columns above, below, left, or right of the insertion point. Often when designing a table, new information requires a new row or column. Users can also do this by right-clicking on the table, but this can be a solution with more options.
Merge Group
The merge group consists of Merge Cells, Split Cells, and Split Table. If a user highlights information in two adjacent cells, it will merge the information together in one cell that takes up the same area of space. Split Cells does the opposite, it separates one cell into multiple cells. Finally, Split Table allows a new table to be created beginning at the row that is currently the insertion point.
Cell Size
Cell Size determines the length and width of each cell in a table. The first option is the Autofit command. Autofit allows the user to resize the entire table. It provides three options, Autofit Content, Autofit Window, and Fixed Column Width. Autofit Content allows Microsoft Word to automatically size the table to take up as little space on the page as possible. Autofit Window resizes the table based upon the size of the window. Finally, Fixed Column Width allows the user to manually resize the table with the measurements to the right. Distribute Rows & Columns allow for an equal distribution of rows/columns in the table.
Table Alignment

Table Alignment allows the user to orientate the text within each table cell top left centered, centered, top right centered, middle left alignment, middle center, middle right alignment, lower left alignment, lower-middle centered, and lower middle right alignment. The text direction allows the user to change the direction text is displayed. Text can be displayed by default as left to right, but it can also be up to down, right to left, and up to down.

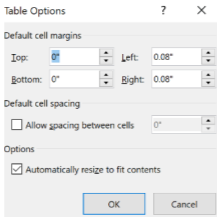
Finally, Cell Margins allows the user to set up margins between cells, and left, right, upper, or lower indentation for text.
Table Data

Table Data allows the user to use some features of Excel in a Microsoft Word table. Information can be sorted. If a table occupies more than one page, selecting Repeat Header Row will display the table header on the next page so the viewer can see the headings. Convert to Text removes all table formatting and automatically places each table row into paragraphs. Users may need to additionally adjust the table to ensure the data displays the way they would like it to after selecting this command. Finally, the formula allows for some features of excel to be used in their table to perform calculations.


