6.3: Database Integration
- Page ID
- 4449
\( \newcommand{\vecs}[1]{\overset { \scriptstyle \rightharpoonup} {\mathbf{#1}} } \)
\( \newcommand{\vecd}[1]{\overset{-\!-\!\rightharpoonup}{\vphantom{a}\smash {#1}}} \)
\( \newcommand{\id}{\mathrm{id}}\) \( \newcommand{\Span}{\mathrm{span}}\)
( \newcommand{\kernel}{\mathrm{null}\,}\) \( \newcommand{\range}{\mathrm{range}\,}\)
\( \newcommand{\RealPart}{\mathrm{Re}}\) \( \newcommand{\ImaginaryPart}{\mathrm{Im}}\)
\( \newcommand{\Argument}{\mathrm{Arg}}\) \( \newcommand{\norm}[1]{\| #1 \|}\)
\( \newcommand{\inner}[2]{\langle #1, #2 \rangle}\)
\( \newcommand{\Span}{\mathrm{span}}\)
\( \newcommand{\id}{\mathrm{id}}\)
\( \newcommand{\Span}{\mathrm{span}}\)
\( \newcommand{\kernel}{\mathrm{null}\,}\)
\( \newcommand{\range}{\mathrm{range}\,}\)
\( \newcommand{\RealPart}{\mathrm{Re}}\)
\( \newcommand{\ImaginaryPart}{\mathrm{Im}}\)
\( \newcommand{\Argument}{\mathrm{Arg}}\)
\( \newcommand{\norm}[1]{\| #1 \|}\)
\( \newcommand{\inner}[2]{\langle #1, #2 \rangle}\)
\( \newcommand{\Span}{\mathrm{span}}\) \( \newcommand{\AA}{\unicode[.8,0]{x212B}}\)
\( \newcommand{\vectorA}[1]{\vec{#1}} % arrow\)
\( \newcommand{\vectorAt}[1]{\vec{\text{#1}}} % arrow\)
\( \newcommand{\vectorB}[1]{\overset { \scriptstyle \rightharpoonup} {\mathbf{#1}} } \)
\( \newcommand{\vectorC}[1]{\textbf{#1}} \)
\( \newcommand{\vectorD}[1]{\overrightarrow{#1}} \)
\( \newcommand{\vectorDt}[1]{\overrightarrow{\text{#1}}} \)
\( \newcommand{\vectE}[1]{\overset{-\!-\!\rightharpoonup}{\vphantom{a}\smash{\mathbf {#1}}}} \)
\( \newcommand{\vecs}[1]{\overset { \scriptstyle \rightharpoonup} {\mathbf{#1}} } \)
\( \newcommand{\vecd}[1]{\overset{-\!-\!\rightharpoonup}{\vphantom{a}\smash {#1}}} \)
\(\newcommand{\avec}{\mathbf a}\) \(\newcommand{\bvec}{\mathbf b}\) \(\newcommand{\cvec}{\mathbf c}\) \(\newcommand{\dvec}{\mathbf d}\) \(\newcommand{\dtil}{\widetilde{\mathbf d}}\) \(\newcommand{\evec}{\mathbf e}\) \(\newcommand{\fvec}{\mathbf f}\) \(\newcommand{\nvec}{\mathbf n}\) \(\newcommand{\pvec}{\mathbf p}\) \(\newcommand{\qvec}{\mathbf q}\) \(\newcommand{\svec}{\mathbf s}\) \(\newcommand{\tvec}{\mathbf t}\) \(\newcommand{\uvec}{\mathbf u}\) \(\newcommand{\vvec}{\mathbf v}\) \(\newcommand{\wvec}{\mathbf w}\) \(\newcommand{\xvec}{\mathbf x}\) \(\newcommand{\yvec}{\mathbf y}\) \(\newcommand{\zvec}{\mathbf z}\) \(\newcommand{\rvec}{\mathbf r}\) \(\newcommand{\mvec}{\mathbf m}\) \(\newcommand{\zerovec}{\mathbf 0}\) \(\newcommand{\onevec}{\mathbf 1}\) \(\newcommand{\real}{\mathbb R}\) \(\newcommand{\twovec}[2]{\left[\begin{array}{r}#1 \\ #2 \end{array}\right]}\) \(\newcommand{\ctwovec}[2]{\left[\begin{array}{c}#1 \\ #2 \end{array}\right]}\) \(\newcommand{\threevec}[3]{\left[\begin{array}{r}#1 \\ #2 \\ #3 \end{array}\right]}\) \(\newcommand{\cthreevec}[3]{\left[\begin{array}{c}#1 \\ #2 \\ #3 \end{array}\right]}\) \(\newcommand{\fourvec}[4]{\left[\begin{array}{r}#1 \\ #2 \\ #3 \\ #4 \end{array}\right]}\) \(\newcommand{\cfourvec}[4]{\left[\begin{array}{c}#1 \\ #2 \\ #3 \\ #4 \end{array}\right]}\) \(\newcommand{\fivevec}[5]{\left[\begin{array}{r}#1 \\ #2 \\ #3 \\ #4 \\ #5 \\ \end{array}\right]}\) \(\newcommand{\cfivevec}[5]{\left[\begin{array}{c}#1 \\ #2 \\ #3 \\ #4 \\ #5 \\ \end{array}\right]}\) \(\newcommand{\mattwo}[4]{\left[\begin{array}{rr}#1 \amp #2 \\ #3 \amp #4 \\ \end{array}\right]}\) \(\newcommand{\laspan}[1]{\text{Span}\{#1\}}\) \(\newcommand{\bcal}{\cal B}\) \(\newcommand{\ccal}{\cal C}\) \(\newcommand{\scal}{\cal S}\) \(\newcommand{\wcal}{\cal W}\) \(\newcommand{\ecal}{\cal E}\) \(\newcommand{\coords}[2]{\left\{#1\right\}_{#2}}\) \(\newcommand{\gray}[1]{\color{gray}{#1}}\) \(\newcommand{\lgray}[1]{\color{lightgray}{#1}}\) \(\newcommand{\rank}{\operatorname{rank}}\) \(\newcommand{\row}{\text{Row}}\) \(\newcommand{\col}{\text{Col}}\) \(\renewcommand{\row}{\text{Row}}\) \(\newcommand{\nul}{\text{Nul}}\) \(\newcommand{\var}{\text{Var}}\) \(\newcommand{\corr}{\text{corr}}\) \(\newcommand{\len}[1]{\left|#1\right|}\) \(\newcommand{\bbar}{\overline{\bvec}}\) \(\newcommand{\bhat}{\widehat{\bvec}}\) \(\newcommand{\bperp}{\bvec^\perp}\) \(\newcommand{\xhat}{\widehat{\xvec}}\) \(\newcommand{\vhat}{\widehat{\vvec}}\) \(\newcommand{\uhat}{\widehat{\uvec}}\) \(\newcommand{\what}{\widehat{\wvec}}\) \(\newcommand{\Sighat}{\widehat{\Sigma}}\) \(\newcommand{\lt}{<}\) \(\newcommand{\gt}{>}\) \(\newcommand{\amp}{&}\) \(\definecolor{fillinmathshade}{gray}{0.9}\)Learning Objectives
- Explain why websites need to capture and display data
- Explain the role of a form in capturing data
- Create a form that captures data and saves it to a Google spreadsheet
Even our simple store must collect and display data from a database. We collect data about each app—what it is called, its description, and the link to the student page. We also collect data about each sale—who purchased what and when.
Every time you register on a website, your registration information is stored in a database. Similarly, when you make an online purchase the information is stored in a database. If you play online games, your scores are stored in a database. Websites constantly capture customer data in order to improve their services.
A database is a collection of one or more related tables of data stored in rows and columns. By this definition even a spreadsheet is a simple database. However, many business databases consist of multiple files that are interrelated. Databases may be searched, sorted, and summarized to display information. Most businesses would not function without databases of information. For example, imagine a bank trying to function without its database of customer and account information.
Information is usually entered into a database using a form. Each form normally corresponds to a single record or row in the database. Each field in the form normally corresponds to a single column or cell in that record. The form helps ensure that correct information is entered. Drop down menus in particular help ensure that users do not type in gibberish.
Just a short time ago, only professional programmers could save website information to a database. There are now tools that make this functionality easily accessible. The simplest example of database integration is to save information to a one table database. The simplest one table database is a spreadsheet.
Information is extracted from databases in the form of reports. The simplest report is a listing of all the records in the database. However, most reports summarize the information in a way that is helpful to business managers so that they can make data driven decisions. For example, a report might show total sales by product allowing managers to adjust inventory to meet demand.
One very interesting use of database information is to create custom web pages. For example, imagine you have purchased multiple items from Amazon.com. Amazon keeps track of your purchases and those of millions of other customers. By looking for patterns of buying behavior in its database, Amazon is able to suggest products you might like based on the buying behavior of customers who match your purchase profile.
Save Website Data to a File
While the site registration and sale forms are created by the professor, we would like you to have some experience with data integration. Therefore, you will make a form whereby users can register with your site to receive product update information even without making a purchase.
Because the form includes the customer’s email address, the information is a valuable resource for future mass mailings. If used judiciously, such mass mailings are appreciated by customers; if overused they are considered spam.
Google Docs lets you create a form to accept customer information and then stores the information in a spreadsheet. In other words, when you create a form, you get both a form and a spreadsheet automatically.
Start Google Docs
Create New > Form
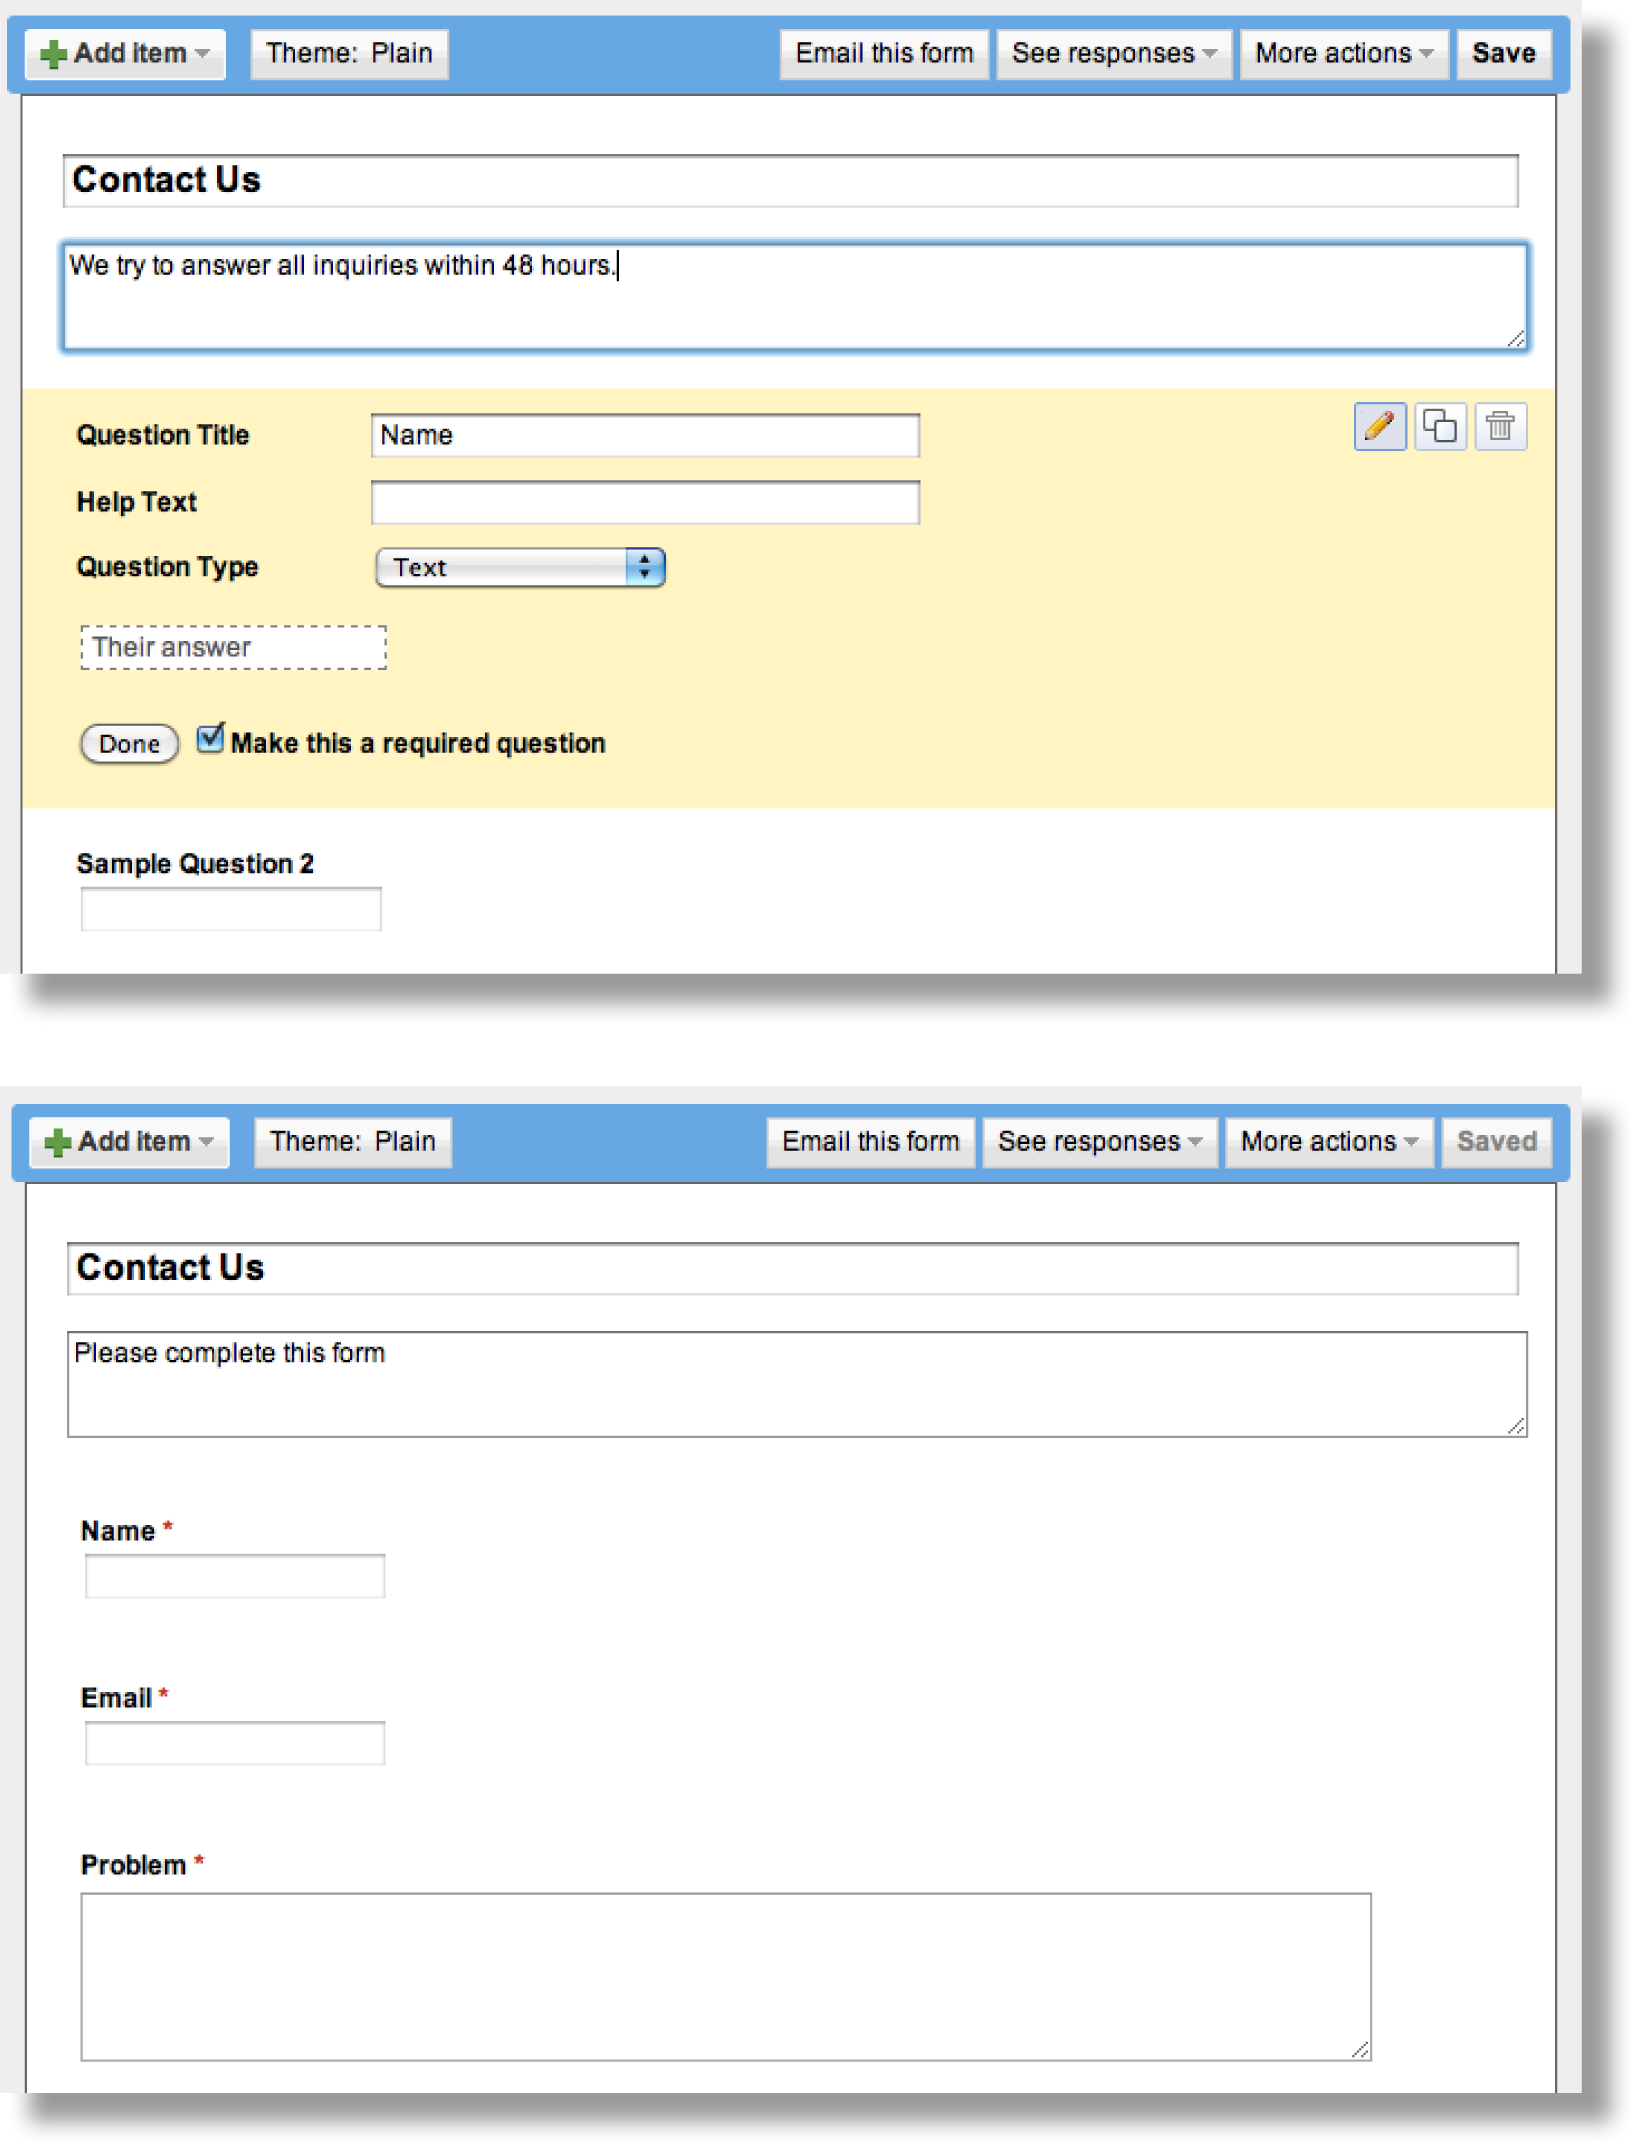
Complete the form so that it looks similar to the form below. After completing each field you need to click Done. The first two fields are already on the form. To get the third field, check Add item. Then save the form.
Add the form to your web page from the same menu that you use to insert gadgets, calendars, and so forth. Then exit edit mode and practice filling in the form.
Return to Google Docs. You will see a spreadsheet listed with the same name as your form. Open the spreadsheet to view the captured data.

Google Docs allows you to develop an input form, which you can then embed in a page of your website. Data entered into the form by users is automatically saved in a Google spreadsheet. Each user record becomes a new row in the spreadsheet.
Key Takeaways
- The ability to capture and store customer data using a Google Docs form and spreadsheet is the first step toward database integration. Full database integration allows you to customize pages for individual customers.
Questions and Exercises
- A spreadsheet is sometimes referred to as a one table database. Describe a business problem requiring more than one table?
- Why do websites make such heavy use of drop down menus for filling in forms?
Techniques
The following techniques, found in the Google section of the Cloud Computing software reference, may be useful in completing the assignments for this chapter: Overview Map of Interface • Share a Document • Create a Form • Background Color • Copyright in Sidebar • Page Layout • Content-Delete “Comments and Attachments” and the Default Page • Title • Page-Create New • Gadgets-Insert • Logo-Insert
L3 Assignment: Develop a Website
In this assignment you create a working website prototype to help market your app. Your site will become part of the class app store.
Setup
Sign on to your Gmail account. Select Sites from the More menu.
Content and Style
- Follow all graphic design and usability principles.
- Follow your design plan. You may make some changes as necessary. However, the bottom line is that you should meet the requirements that you laid out earlier.
- You will be creating three pages in the Class App store. Your logo should appear in the upper left corner of each page.
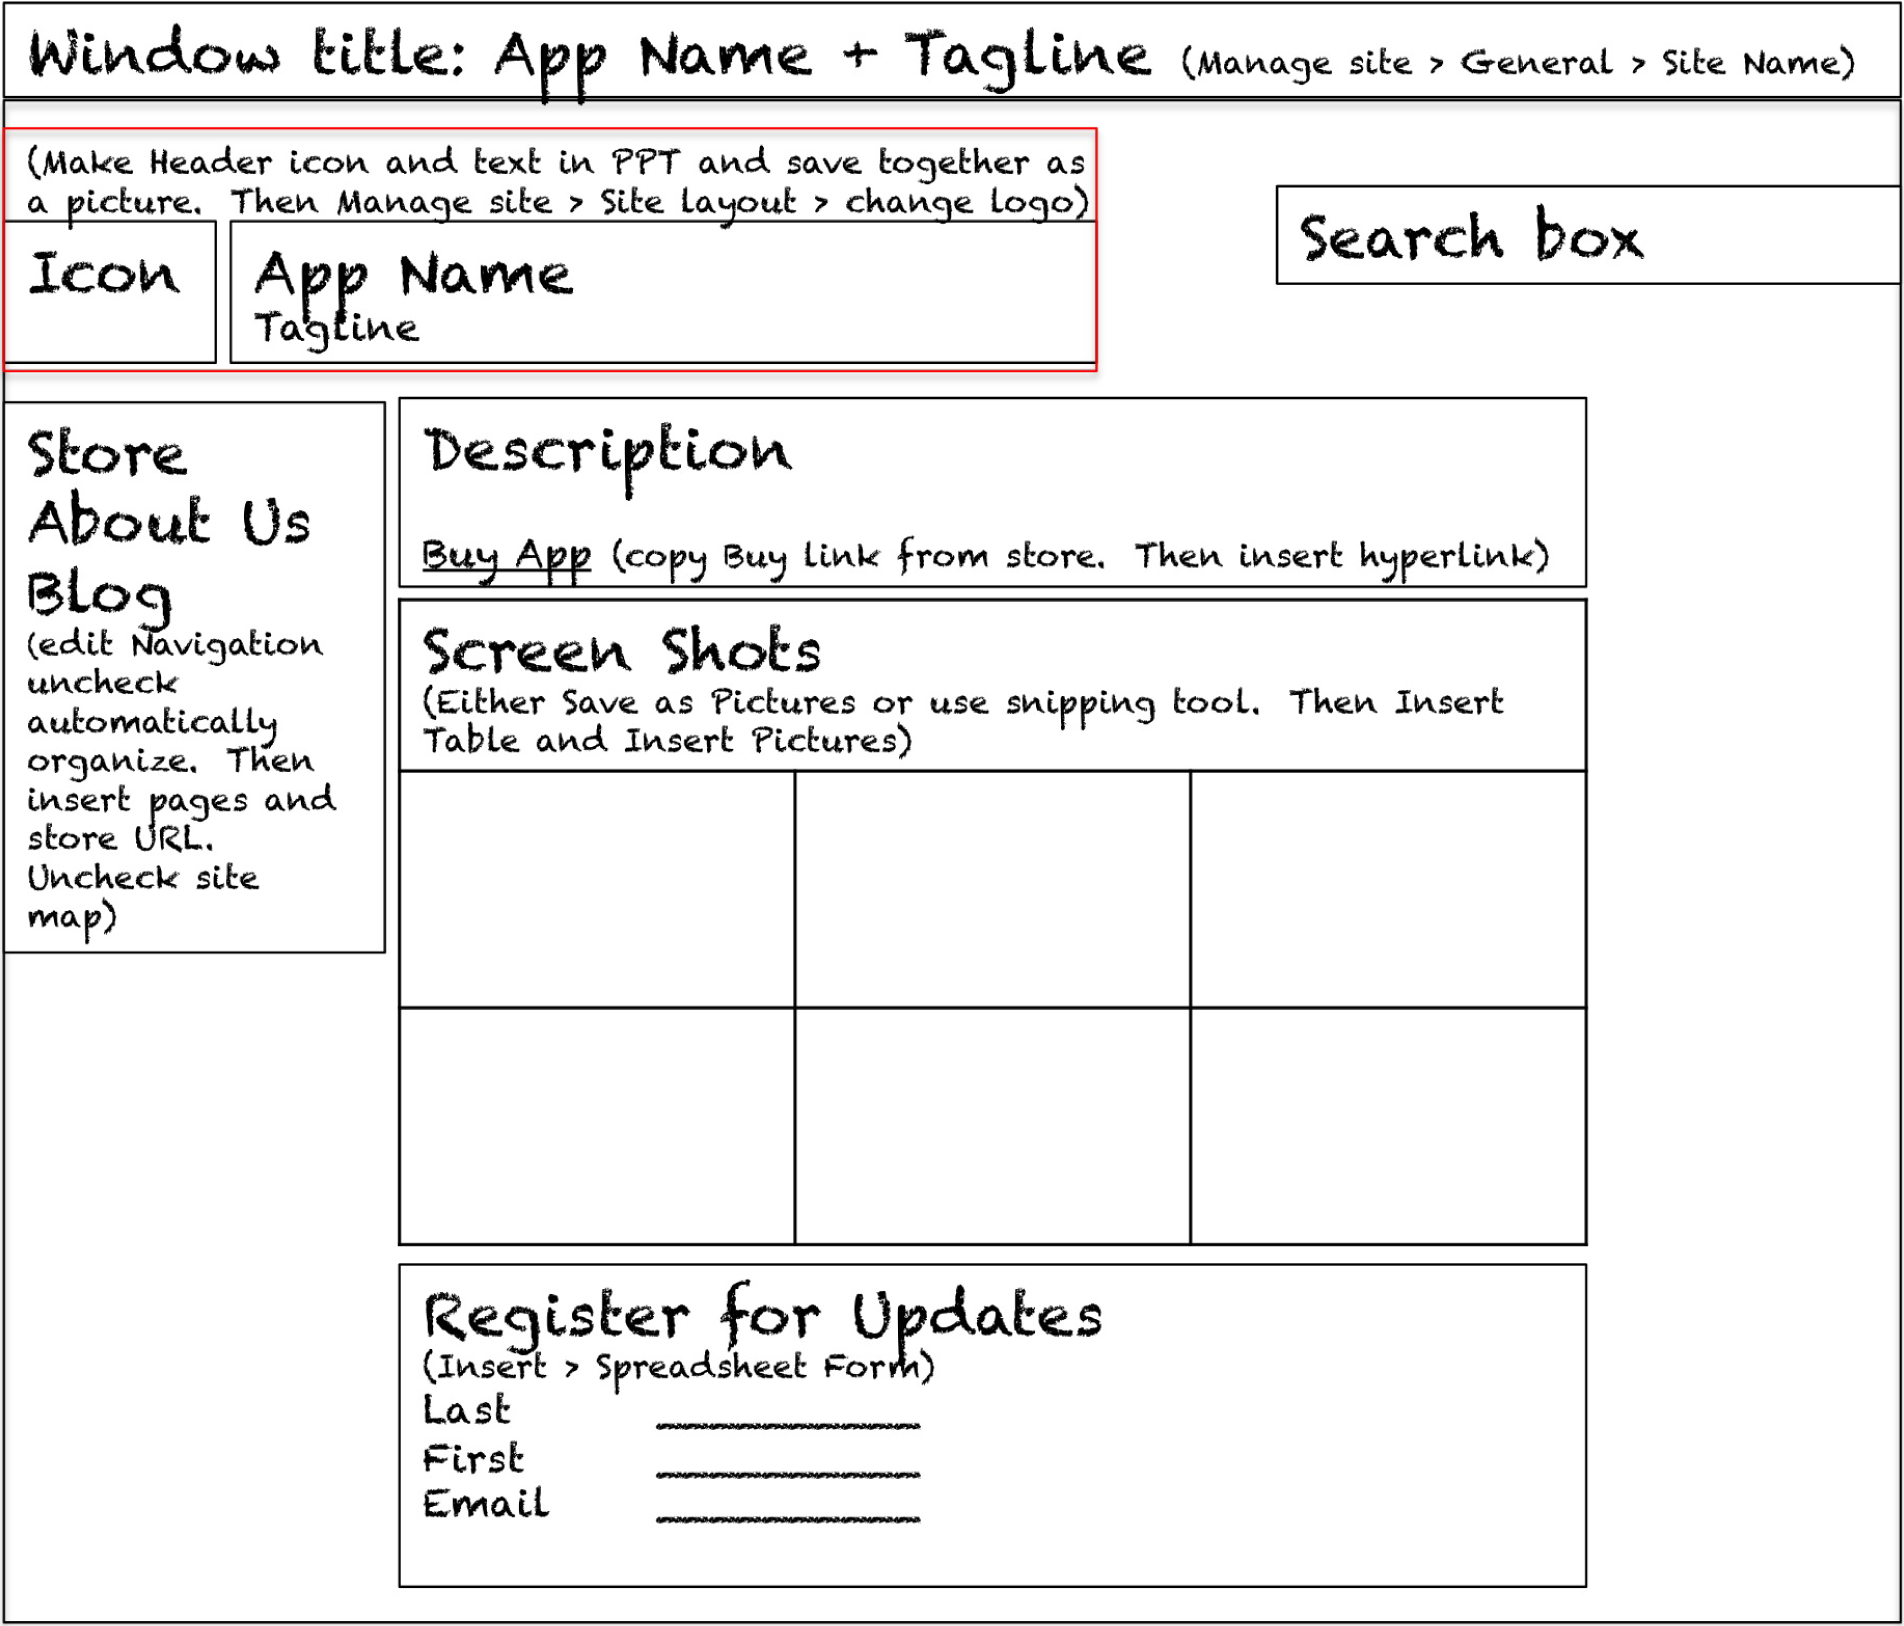
- Homepage
- Text describing your app and its features and benefits
- Show at least six screenshots of your app with a link to purchase the app. For ease of viewing without scrolling horizontally, the screenshots should be in a two row table.
- Provide a form where people can register for email updates about your product.
- Provide a link back to the Store in your navigation panel.
- About Us
- Describe your business soft skills.
- Include your name, picture, and email address.
- Blog
- Include at least two entries in the blog. For example, you might describe how you came up with the idea or who the target market is for your product or discuss future plans.
- Extra Credit (if you make it work)
- Show a real time counter on your home page of how many people have purchased your app. Your counter will use a query similar to that found on the main store site.
- Your pages MUST tie in thematically with the Class App store. You may have an original design, but it MUST be obvious to the user (the grader) that they are still in the same store. Using the same theme or a similar theme family is the most obvious way to do this.
- Register your site with the professor’s online store.
- Embed a working Buy link on your homepage.
- Buy your own app just once to make sure that your Buy link is working. Register for email updates to make sure that your form is working. Check this by viewing the report on your homepage.
- Turn on Google Analytics from the Manage Sites menu using ID number provided by your professor. Do this last after you have thoroughly tested your site.
Deliverables
Electronic submission: Post a WORKING link to your website. Paper submission: Create a printout of each screen of your site.
Shopping
After everyone’s site is posted the professor will open the store for shopping. At that point you need to buy 10 apps of your choice.


