9.6: Office 365 Web Versions
- Page ID
- 13627
\( \newcommand{\vecs}[1]{\overset { \scriptstyle \rightharpoonup} {\mathbf{#1}} } \)
\( \newcommand{\vecd}[1]{\overset{-\!-\!\rightharpoonup}{\vphantom{a}\smash {#1}}} \)
\( \newcommand{\id}{\mathrm{id}}\) \( \newcommand{\Span}{\mathrm{span}}\)
( \newcommand{\kernel}{\mathrm{null}\,}\) \( \newcommand{\range}{\mathrm{range}\,}\)
\( \newcommand{\RealPart}{\mathrm{Re}}\) \( \newcommand{\ImaginaryPart}{\mathrm{Im}}\)
\( \newcommand{\Argument}{\mathrm{Arg}}\) \( \newcommand{\norm}[1]{\| #1 \|}\)
\( \newcommand{\inner}[2]{\langle #1, #2 \rangle}\)
\( \newcommand{\Span}{\mathrm{span}}\)
\( \newcommand{\id}{\mathrm{id}}\)
\( \newcommand{\Span}{\mathrm{span}}\)
\( \newcommand{\kernel}{\mathrm{null}\,}\)
\( \newcommand{\range}{\mathrm{range}\,}\)
\( \newcommand{\RealPart}{\mathrm{Re}}\)
\( \newcommand{\ImaginaryPart}{\mathrm{Im}}\)
\( \newcommand{\Argument}{\mathrm{Arg}}\)
\( \newcommand{\norm}[1]{\| #1 \|}\)
\( \newcommand{\inner}[2]{\langle #1, #2 \rangle}\)
\( \newcommand{\Span}{\mathrm{span}}\) \( \newcommand{\AA}{\unicode[.8,0]{x212B}}\)
\( \newcommand{\vectorA}[1]{\vec{#1}} % arrow\)
\( \newcommand{\vectorAt}[1]{\vec{\text{#1}}} % arrow\)
\( \newcommand{\vectorB}[1]{\overset { \scriptstyle \rightharpoonup} {\mathbf{#1}} } \)
\( \newcommand{\vectorC}[1]{\textbf{#1}} \)
\( \newcommand{\vectorD}[1]{\overrightarrow{#1}} \)
\( \newcommand{\vectorDt}[1]{\overrightarrow{\text{#1}}} \)
\( \newcommand{\vectE}[1]{\overset{-\!-\!\rightharpoonup}{\vphantom{a}\smash{\mathbf {#1}}}} \)
\( \newcommand{\vecs}[1]{\overset { \scriptstyle \rightharpoonup} {\mathbf{#1}} } \)
\( \newcommand{\vecd}[1]{\overset{-\!-\!\rightharpoonup}{\vphantom{a}\smash {#1}}} \)
\(\newcommand{\avec}{\mathbf a}\) \(\newcommand{\bvec}{\mathbf b}\) \(\newcommand{\cvec}{\mathbf c}\) \(\newcommand{\dvec}{\mathbf d}\) \(\newcommand{\dtil}{\widetilde{\mathbf d}}\) \(\newcommand{\evec}{\mathbf e}\) \(\newcommand{\fvec}{\mathbf f}\) \(\newcommand{\nvec}{\mathbf n}\) \(\newcommand{\pvec}{\mathbf p}\) \(\newcommand{\qvec}{\mathbf q}\) \(\newcommand{\svec}{\mathbf s}\) \(\newcommand{\tvec}{\mathbf t}\) \(\newcommand{\uvec}{\mathbf u}\) \(\newcommand{\vvec}{\mathbf v}\) \(\newcommand{\wvec}{\mathbf w}\) \(\newcommand{\xvec}{\mathbf x}\) \(\newcommand{\yvec}{\mathbf y}\) \(\newcommand{\zvec}{\mathbf z}\) \(\newcommand{\rvec}{\mathbf r}\) \(\newcommand{\mvec}{\mathbf m}\) \(\newcommand{\zerovec}{\mathbf 0}\) \(\newcommand{\onevec}{\mathbf 1}\) \(\newcommand{\real}{\mathbb R}\) \(\newcommand{\twovec}[2]{\left[\begin{array}{r}#1 \\ #2 \end{array}\right]}\) \(\newcommand{\ctwovec}[2]{\left[\begin{array}{c}#1 \\ #2 \end{array}\right]}\) \(\newcommand{\threevec}[3]{\left[\begin{array}{r}#1 \\ #2 \\ #3 \end{array}\right]}\) \(\newcommand{\cthreevec}[3]{\left[\begin{array}{c}#1 \\ #2 \\ #3 \end{array}\right]}\) \(\newcommand{\fourvec}[4]{\left[\begin{array}{r}#1 \\ #2 \\ #3 \\ #4 \end{array}\right]}\) \(\newcommand{\cfourvec}[4]{\left[\begin{array}{c}#1 \\ #2 \\ #3 \\ #4 \end{array}\right]}\) \(\newcommand{\fivevec}[5]{\left[\begin{array}{r}#1 \\ #2 \\ #3 \\ #4 \\ #5 \\ \end{array}\right]}\) \(\newcommand{\cfivevec}[5]{\left[\begin{array}{c}#1 \\ #2 \\ #3 \\ #4 \\ #5 \\ \end{array}\right]}\) \(\newcommand{\mattwo}[4]{\left[\begin{array}{rr}#1 \amp #2 \\ #3 \amp #4 \\ \end{array}\right]}\) \(\newcommand{\laspan}[1]{\text{Span}\{#1\}}\) \(\newcommand{\bcal}{\cal B}\) \(\newcommand{\ccal}{\cal C}\) \(\newcommand{\scal}{\cal S}\) \(\newcommand{\wcal}{\cal W}\) \(\newcommand{\ecal}{\cal E}\) \(\newcommand{\coords}[2]{\left\{#1\right\}_{#2}}\) \(\newcommand{\gray}[1]{\color{gray}{#1}}\) \(\newcommand{\lgray}[1]{\color{lightgray}{#1}}\) \(\newcommand{\rank}{\operatorname{rank}}\) \(\newcommand{\row}{\text{Row}}\) \(\newcommand{\col}{\text{Col}}\) \(\renewcommand{\row}{\text{Row}}\) \(\newcommand{\nul}{\text{Nul}}\) \(\newcommand{\var}{\text{Var}}\) \(\newcommand{\corr}{\text{corr}}\) \(\newcommand{\len}[1]{\left|#1\right|}\) \(\newcommand{\bbar}{\overline{\bvec}}\) \(\newcommand{\bhat}{\widehat{\bvec}}\) \(\newcommand{\bperp}{\bvec^\perp}\) \(\newcommand{\xhat}{\widehat{\xvec}}\) \(\newcommand{\vhat}{\widehat{\vvec}}\) \(\newcommand{\uhat}{\widehat{\uvec}}\) \(\newcommand{\what}{\widehat{\wvec}}\) \(\newcommand{\Sighat}{\widehat{\Sigma}}\) \(\newcommand{\lt}{<}\) \(\newcommand{\gt}{>}\) \(\newcommand{\amp}{&}\) \(\definecolor{fillinmathshade}{gray}{0.9}\)An Office 365 subscription includes web-based versions of Outlook, Word, Excel, PowerPoint. In addition, online access to OneDrive provides online storage saves these files in the cloud so these files may be accessed anywhere. In addition, online outlook, word, excel, & PowerPoint by default only access files from the cloud unless a file is manually uploaded or attached to the web application.
Getting Started
To login to Office 365 web applications, visit www.office.com. Click the “Sign in”  button. You will be sent to the Office Login Screen. Log in with your username and credentials or create an account. Enter your password. Keep in mind the Office 365 passwords are case sensitive.
After successfully logging in, an Office start screen is displayed. This start screen provides shortcuts to all your Office applications that have web versions. In addition, files in One Drive which had been recently accessed are automatically displayed. This screen provides much functionality, so we will define all the screen elements below.
 Office 365 Application picker allows the user to specify which web application they would like to use.
 Search Bar: Allows the user to search for any file saved to OneDrive.
 Notification Center: Allows the user to view any notifications they may have received- for example, receiving a shared document, another colleague editing your document, etc.
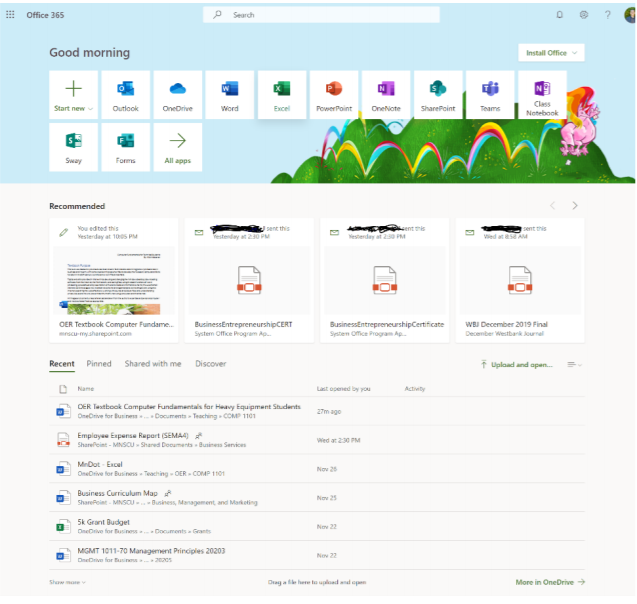
 Settings Menu: Allows you to change the visual appearance of Office, customize your notifications and change your passwords.
 Help Menu: Search the Office 365 Knowledge Base for Help. Install Office button allows individuals with an Office 365 subscription may click on this icon to download a free Windows 10 Office Application.
 Start new allows the user to create a new Office Document on the web.
 Outlook Email, Calendar, and Contacts Application. More information will be provided about this web application in the next section.
 OneDrive in the cloud allows a user to view and share all their uploaded files. More information about one drive will be provided later in the text.
 Microsoft Word online is a word processing tool. More information will be provided about Microsoft Word in later chapters.
 Microsoft Excel online is a spreadsheet and calculation tool. More information will be provided about Microsoft Excel in later chapters.
 Microsoft PowerPoint online is a presentation tool. More information will be provided about Microsoft PowerPoint in later chapters.
 Microsoft OneNote is a notetaking and list building application. This text does not provide instruction for Microsoft OneNote, but it does have a similar interface to Microsoft Word but has limited functionality.
 Microsoft SharePoint online is used in the organization as a hub to share information and files. It allows departments to privately collaborate on documents and communicate with each other. This text does not provide instruction for Microsoft SharePoint.
 Class Notebook is a shared note-taking web application that is available to educational institutions and students using Office365. This textbook does not provide instruction for the Class Notebook.
 Microsoft Teams online is a collaborative application that allows groups of individuals working on a project to chat, schedule meetings, share and work collaboratively on documents, and communicate in private groups. This textbook does not provide instruction for Microsoft Teams.
 Microsoft Sway is a new application from Microsoft Office that makes it easy to create and share interactive reports, personal stories, presentations, and more. This textbook does not provide instruction for Microsoft Sway.
 Microsoft Forms allows users to create secure web forms that can be used inside or outside an organization to obtain information from others. This textbook does not provide instruction for Microsoft Forms.
 Click here to access all other less frequently used Microsoft Online Applications that are available as part of the Office 365 subscription.
Microsoft Outlook Online
The Outlook online application is divided into a three-column view. The column on the left consists of different mailbox folders. You can use mailbox folders to better sort your messages, so they are easy to find. You can create a new folder at any time by clicking on the “New Folder”  link. Clicking on the
 icon hides the left column. Above the left column is the
  New message link which allows the user to create a new email message.
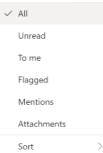
The center column is where you organize your messages that you receive. There are three default views above your messages that allow you to sort your messages: “Focused” or “Other”.  . The “checkbox” icon selects all your messages. The “Focused” icon only shows you messages that Outlook’s artificial intelligence filters as important to you. The “Other” icon usually displays items Outlook believes are junk mail or email that is not important. The “Filter” icon allows multiple ways to sort your messages as described in Figure 2.
The right column displays the content of a selected email. To select the email, you may click on the message you wish to view. The message will display with the name of the person and picture of them (if this information is entered your contacts, and some message options:  . Sends a response to the sender that you “liked” the message.
  Replies to the message.
  Replies to everyone who was sent the message if you were part of a group email.
  forward the message that was written to you to someone else.
  Contains less frequently used settings for the message like to mark it as unread, to delete it, to mark as junk, print, show message details, Flag, or block the sender. If you choose an action to reply or forward the message, you will enter the message authoring text box.
The message authoring text box will appear in a separate box above the email you are referencing. In addition to being able to type your message, it has a few options to change the text size, font, formatting, and text effects of the email through a toolbar at the bottom of the screen.
 Students are encouraged to experiment with the text functions. These functions are also available in Microsoft Word which will be discussed in a later chapter. At the top of the textbook authoring window are options to send the completed message, discard or delete the message, attach a file to the message, insert an image or an emoji.
  When writing an email, please use professional language and write in alignment with proper web etiquette- this means no writing in caps or using slang or acronyms like “lol”.
At the bottom left corner of the outlook window are additional features;  The mailbox is the email application that was previously described. Clicking on the other icons will allow the user to view their calendar, contacts list, and tasks list.
Outlook Calendar
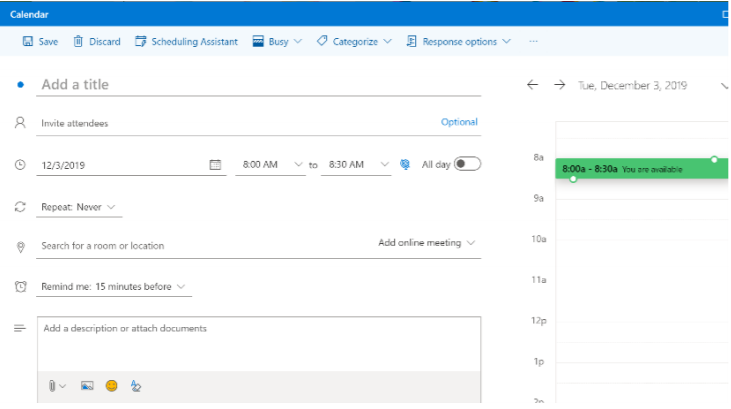
The Outlook Calendar retains the same three-column navigational design as the email application. The left column provides the user with multiple calendars of specific events and sub-calendars. The center column allows the user to select certain calendar views. The right column displays specific event details.
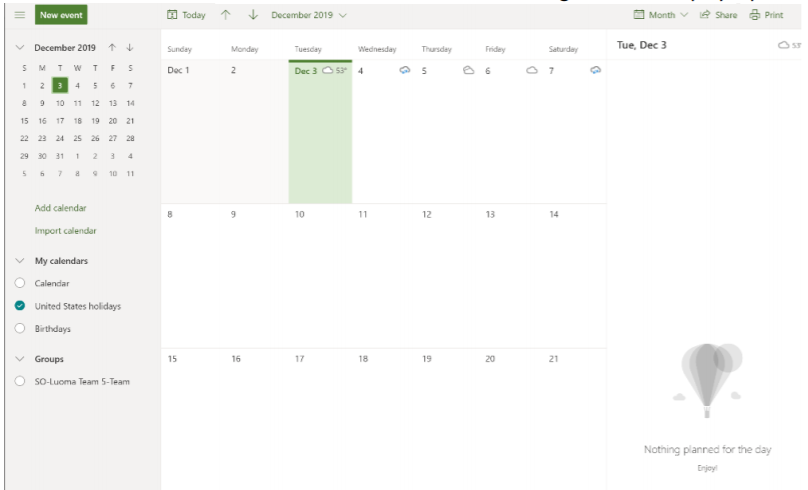
Clicking on “New Event”  Will allow you to create a new calendar event. When creating a new event, you are permitted to create a title for the event, invite other attendees (which will send a calendar invitation to their email address and display if they accept the invitation on their calendar), choose the time and date and location, as well as make it a one-time meeting or a repeating meeting, such as a weekly staff meeting. You can also view your calendar to find available times that do not conflict with other meetings, schedule a time to be reminded, and add a description of the meeting or attach documents, such as a meeting agenda to the appointment. Clicking on the menu at the top of the window allows other useful features:
  . “Save” allows for the invitation to be saved and sent to others if invited. “Discard deletes the calendar appointment. “Scheduling Assistant” allows you to search for an open day and time on every person whom you have invited if everyone is using Office 365 as their email client. Scheduling assistant will not show details of the other schedules but will show busy and free time. “Busy” settings allow you to customize the type of appointment, for example, you could create a calendar appointment to complete paperwork at the office desk at a certain time but still want to be open for meeting if needed, so you could create an appointment “Work at my desk” and mark it as “Free” instead of busy. “Categorize” allows you to classify meetings by color if you choose to do so. Finally, “Response options” allow you to specify what options recipients of a calendar invitation would have available to them.
Contacts
You may also want to review your contact list  in Outlook as well. Contacts are useful to maintain for individuals whom you may need to work with have to be able to reach. You may maintain any contact information you find helpful in Outlook Contacts including your contact’s name, email, company, title, phone number, address, birthday, picture, etc. The Contacts Application continues the three-column view with the left view being a place to sort your contacts into groups, the middle list containing all your contacts in a group, and the right column providing the details of a selected contact on the right. At the top of both columns in your menu bar.
  .
.
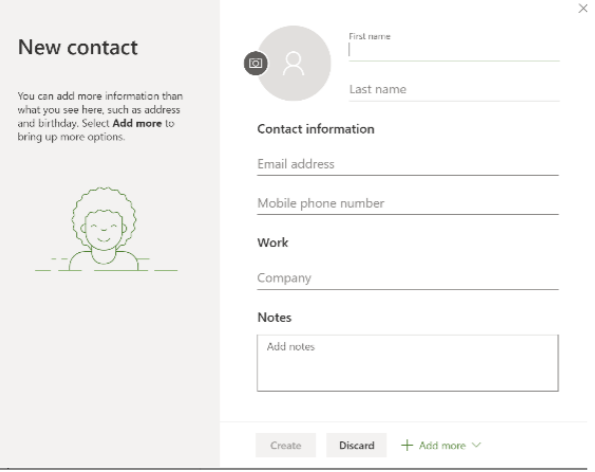
New Contact allows the data entry of a new contact. A variety of contact information is available. If you do not see the information you wish to enter click Add more at the bottom right of the screen.
Add to favorites allows you to select a contact to favorites. You would perform this action is you wished to reference this contact information frequently.
Edit allows you to edit a contact’s information.
Delete allows you to delete a contact form your list.
Add to list adds a selected contact to a specific folder of your choosing to better organize your contacts.
Microsoft OneDrive
Microsoft OneDrive contains all your applications stored in the OneDrive cloud. Files in OneDrive may be accessed anywhere you have an internet connection. The user interface of Microsoft OneDrive maintains a two-column setup. The left column is the navigation bar that helps the user navigate the directory of OneDrive to find the specific location of their files or folders. The Center column displays the actual files. Clicking on a file will display the file in the appropriate web application in a new browser window. Files can be uploaded to OneDrive by selecting Upload from the top menu  and selecting the proper file. You may also create a new file to save to OneDrive by selecting New.
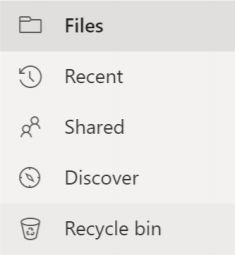 The left navigation pane displays different file views in OneDrive. Files view allows the user to search the folder directory that they have established, like using Windows Explorer in Windows 10. Recents allows the user to view files they have more recently accessed or edited. Shared displays files that were shared by or shared with the account user. Discover allows the user to view files that were recently edited by others that may relate to the user. OneDrive uses artificial intelligence to determine which files to view. Finally, the Recycle bin provides the user with files that were most recently deleted. Files are purged from the Recycle bin after 90 days. The user may also manually delete these files permanently by clicking on the Empty recycle bin icon
  .
.
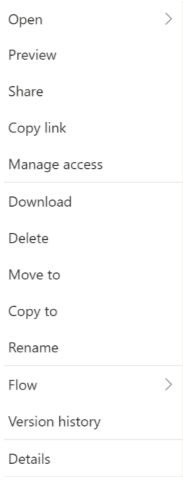 The right navigation pane displays your files. Hovering the mouse cursor over a specific file will highlight specific commands to the user-Share and More Options.
  Share allows a user to share online access to the file to another user to view or edit. This is helpful when working collaboratively. As previously discussed, sharing is also more secure and convenient, because the recipient will always be able to view the most recent changes made to the document, and the person who shared the document always has control over who can and cannot always view or edit the document. More options bring up a menu to perform a variety of functions on the document.
Summary
Office 365 Web Applications provide the user with the most frequently used controls in a similar user interface to the Office 365 Windows 10 Applications. The convenience of working on the web allows for any computer anywhere with an internet connection to access the power of Microsoft Office. Now that you have a familiarity with Microsoft Office, it is time to explore the features of the Windows 10 applications, beginning with Microsoft Word.


